- Made by AppCoda
- Contact us / Support
- Tweet this book
- Preface
- 1. The Development Tools, the Learning Approach, and the App Idea
- 2. Your First Taste of Swift with Playgrounds
- 3. Hello World! Build Your First App in Swift
- 4. Hello World App Explained
- 5. Introduction to Auto Layout
- 6. Designing UI Using Stack Views
- 7. Introduction to Prototyping
- 8. Creating a Simple Table-based App
- 9. Customize Table Views Using Prototype Cell, Diffable Data Source and Dark Mode
- 10. Displaying Alerts with UIAlertController and Handling Table View Selection
- 11. Object Oriented Programming, Project Organization and Code Documentation
- 12. Table Row Deletion, Custom Action Button and MVC
- 13. Introduction to Navigation Controller and Segue
- 14. Detail View Enhancement and Navigation Bar Customization
- 15. Navigation Bar Customization, Extensions and Dynamic Type
- 16. Working with Maps
- 17. Basic Animations, Visual Effects and Unwind Segues
- 18. Working with Static Table Views, Camera and NSLayoutConstraint
- 19. Working with Core Data
- 20. Search Bar and UISearchController
- 21. Building Walkthrough Screens with UIPageViewController and Container Views
- 22. Exploring Tab Bar Controller and Storyboard References
- 23. Getting Started with WKWebView and SFSafariViewController
- 24. Exploring CloudKit
- 25. Localizing Your App to Reach More Users
- 26. Deploying and Testing Your App on a Real iOS Device
- 27. Beta Testing with TestFlight and CloudKit Production Deployment
- 28. Submit Your App to App Store
- 29. Adopting 3D Touch, Haptic Touch and Context Menus
- 30. Developing User Notifications in iOS
- 31. Appendix - Swift Basics
- Published with GitBook
Chapter 10
Displaying Alerts with UIAlertController and Handling Table View Selection

There is no learning without trying lots of ideas and failing lots of times.
- Jonathan Ive
Are you able to complete the previous exercise and create the custom table view? No worries if you can't. I will go through the solution with you in this chapter and introduce some new layout techniques. Up till now, we only focus on displaying data in a table view. I guess you may wonder how we can interact with the table view and detect row selections. This is what we will also discuss in this chapter.
To begin, first download the complete project we built in the previous chapter (http://www.appcoda.com/resources/swift57/FoodPinCustomTable.zip). We will continue to enhance the app and make it even better. In brief, here are what we are going to implement:
- Add another prototype cell to the table view
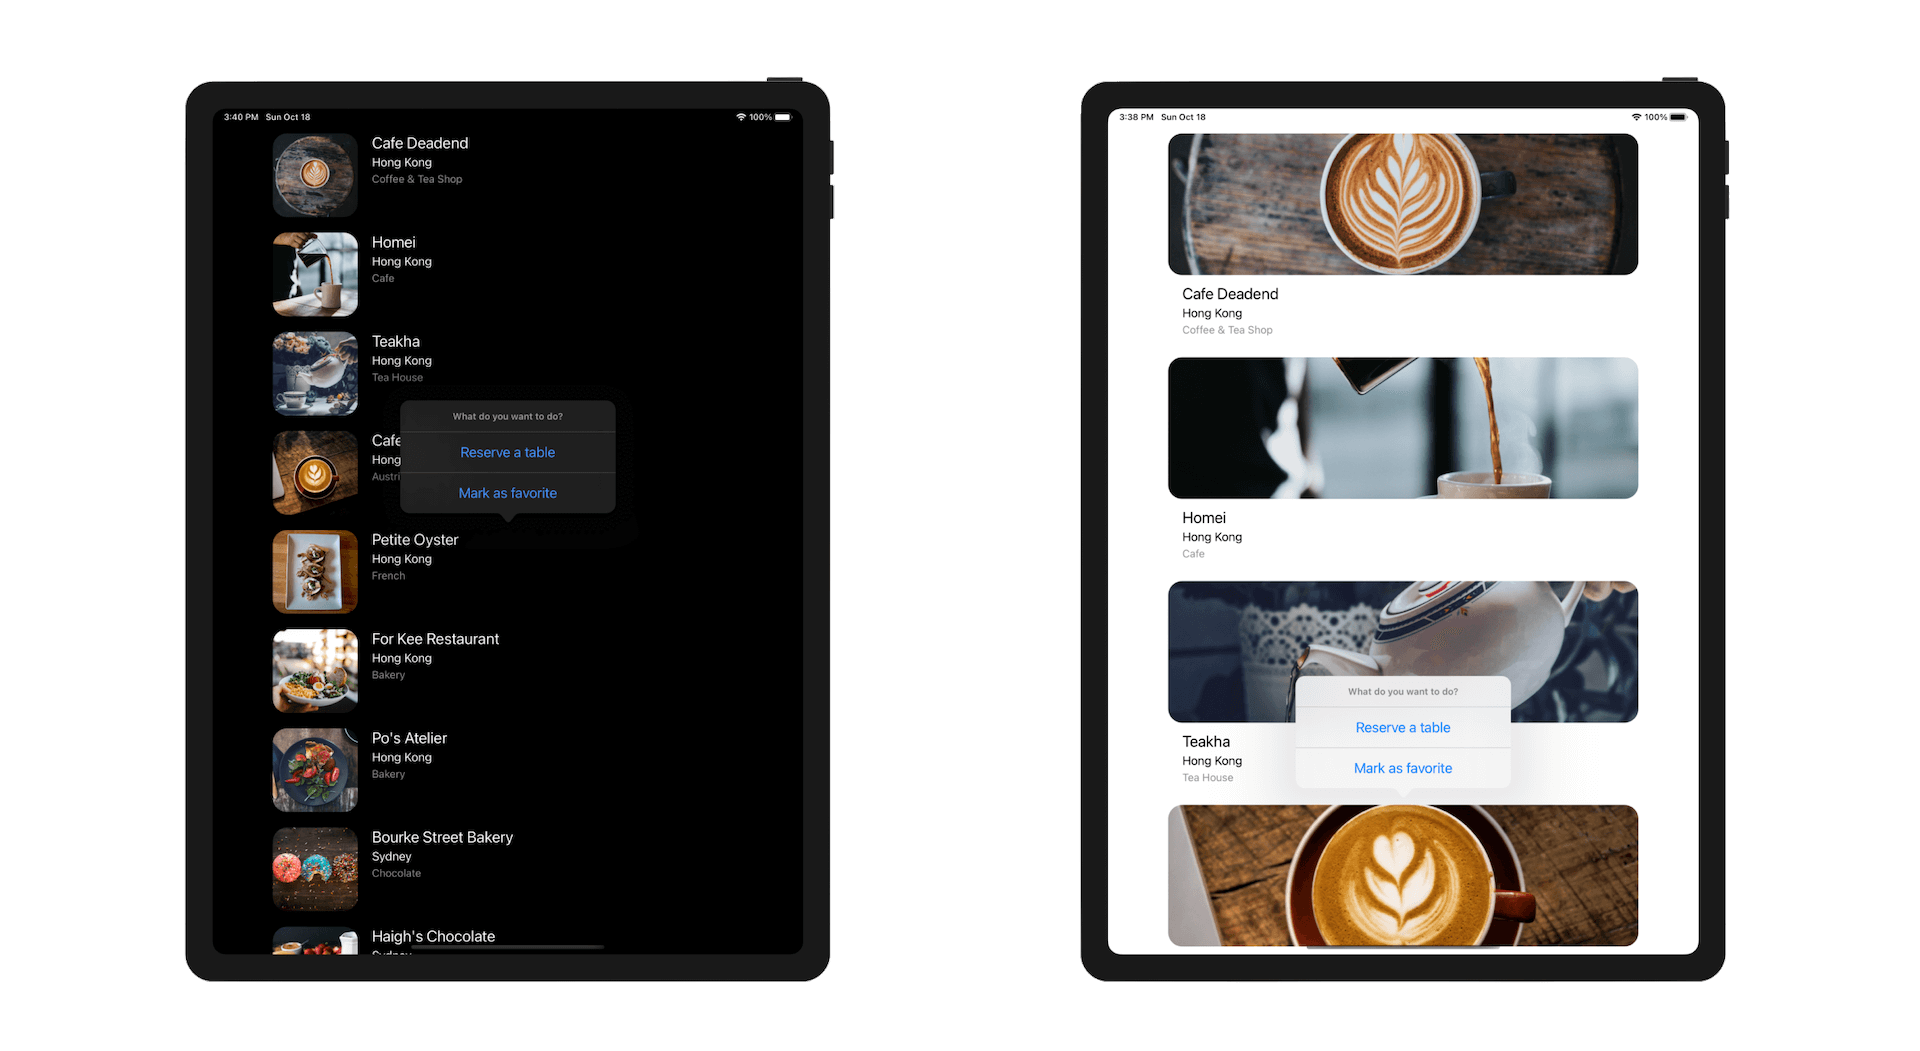
- Bring up a menu when a user taps a cell. The menu offers two options: Reserve a table and Mark as favorite.
- Display a heart icon when a user selects Mark as favorite.
Through implementing these new features, you will also learn how to use two prototype cells and use UIAlertController to display alerts in iOS.
Building a more Elegant Cell Layout
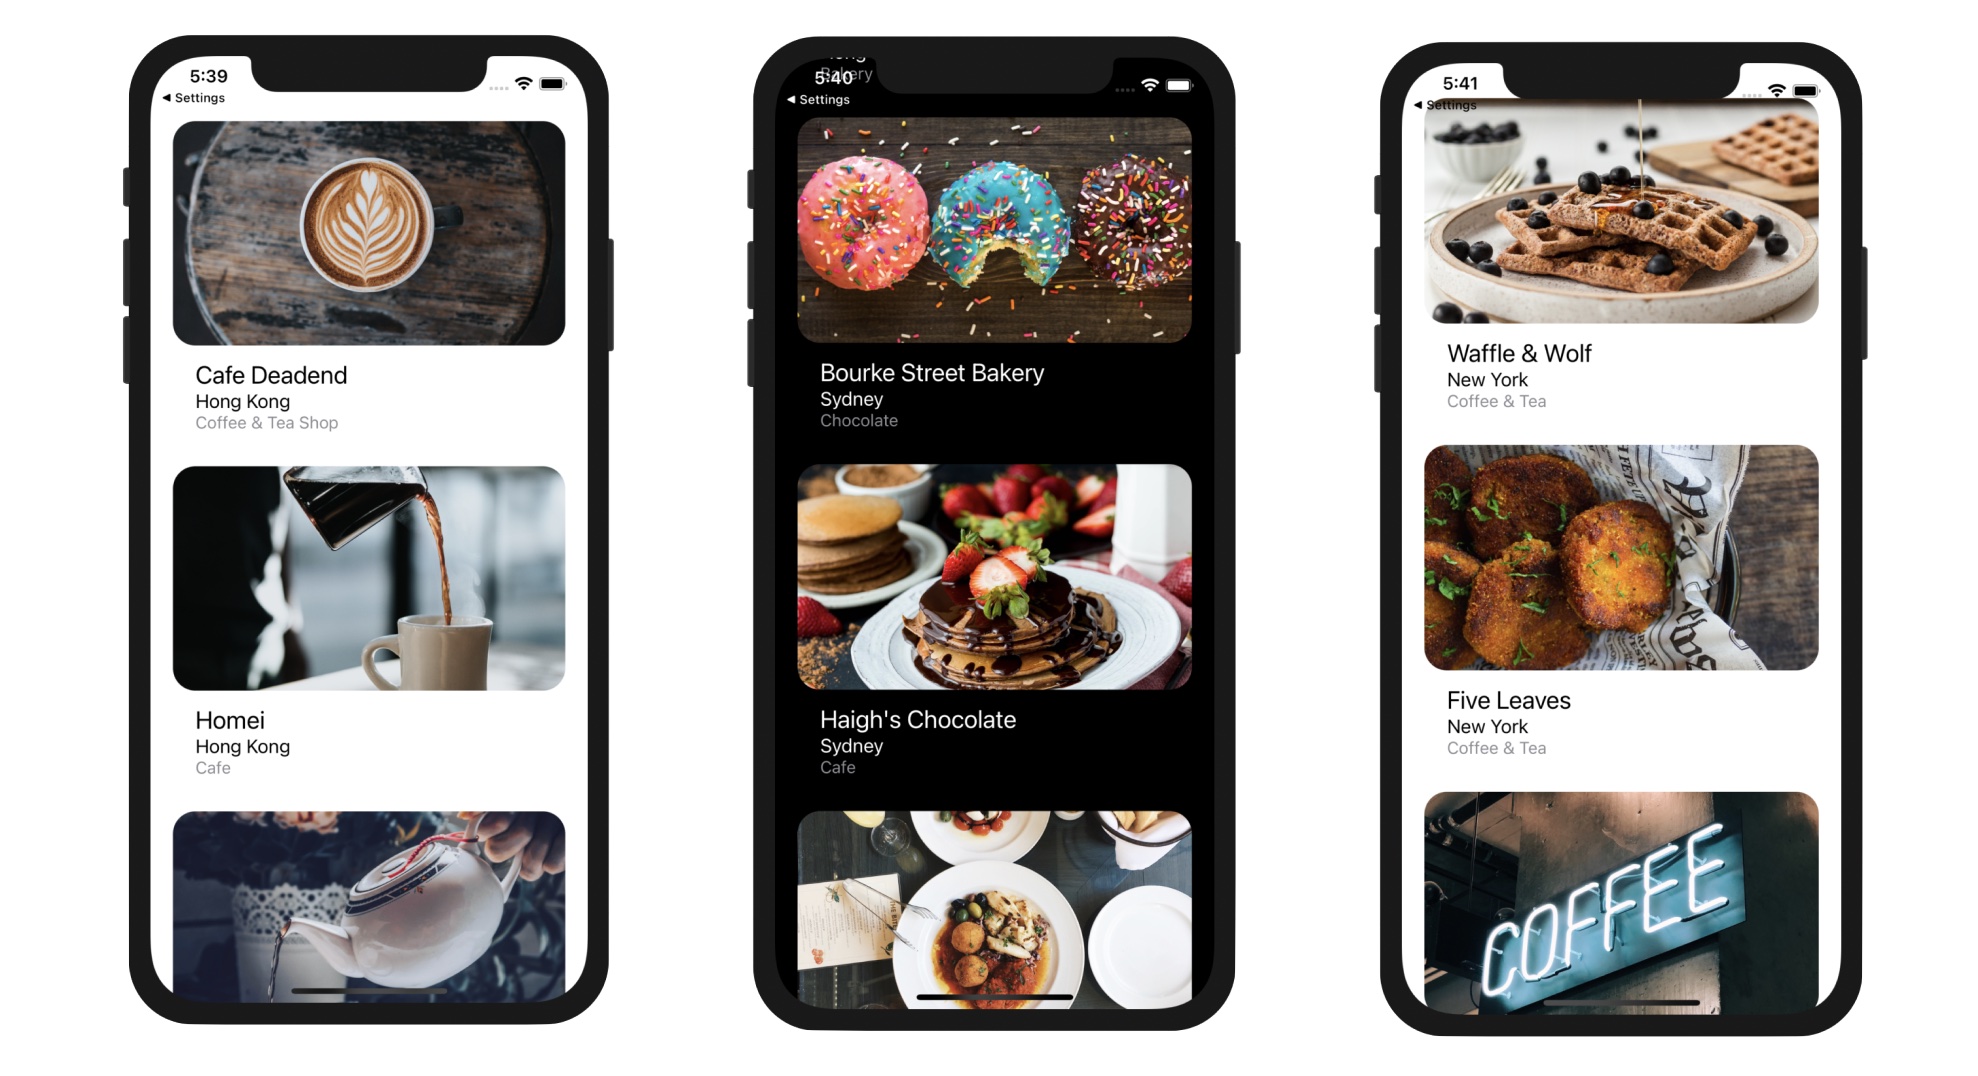
Previously, I had an exercise for you and asked you to redesign the prototype cell to make the cell layout look like that shown in figure 10-2. I hope you already tried to figure out the solution. Even if you couldn't find a way to design the cell, I appreciate your effort. It is not an easy exercise for beginners.
Now let's see how to design the cell layout. Assuming you have already downloaded the project and open it in Xcode, select Main and switch over to Interface Builder. Instead of deleting the existing cell layout, we will create another prototype cell for the new design. That's right! You can create multiple prototype cells in the same table view. The only requirement is that each of the prototype cell should have a distinct identifier.
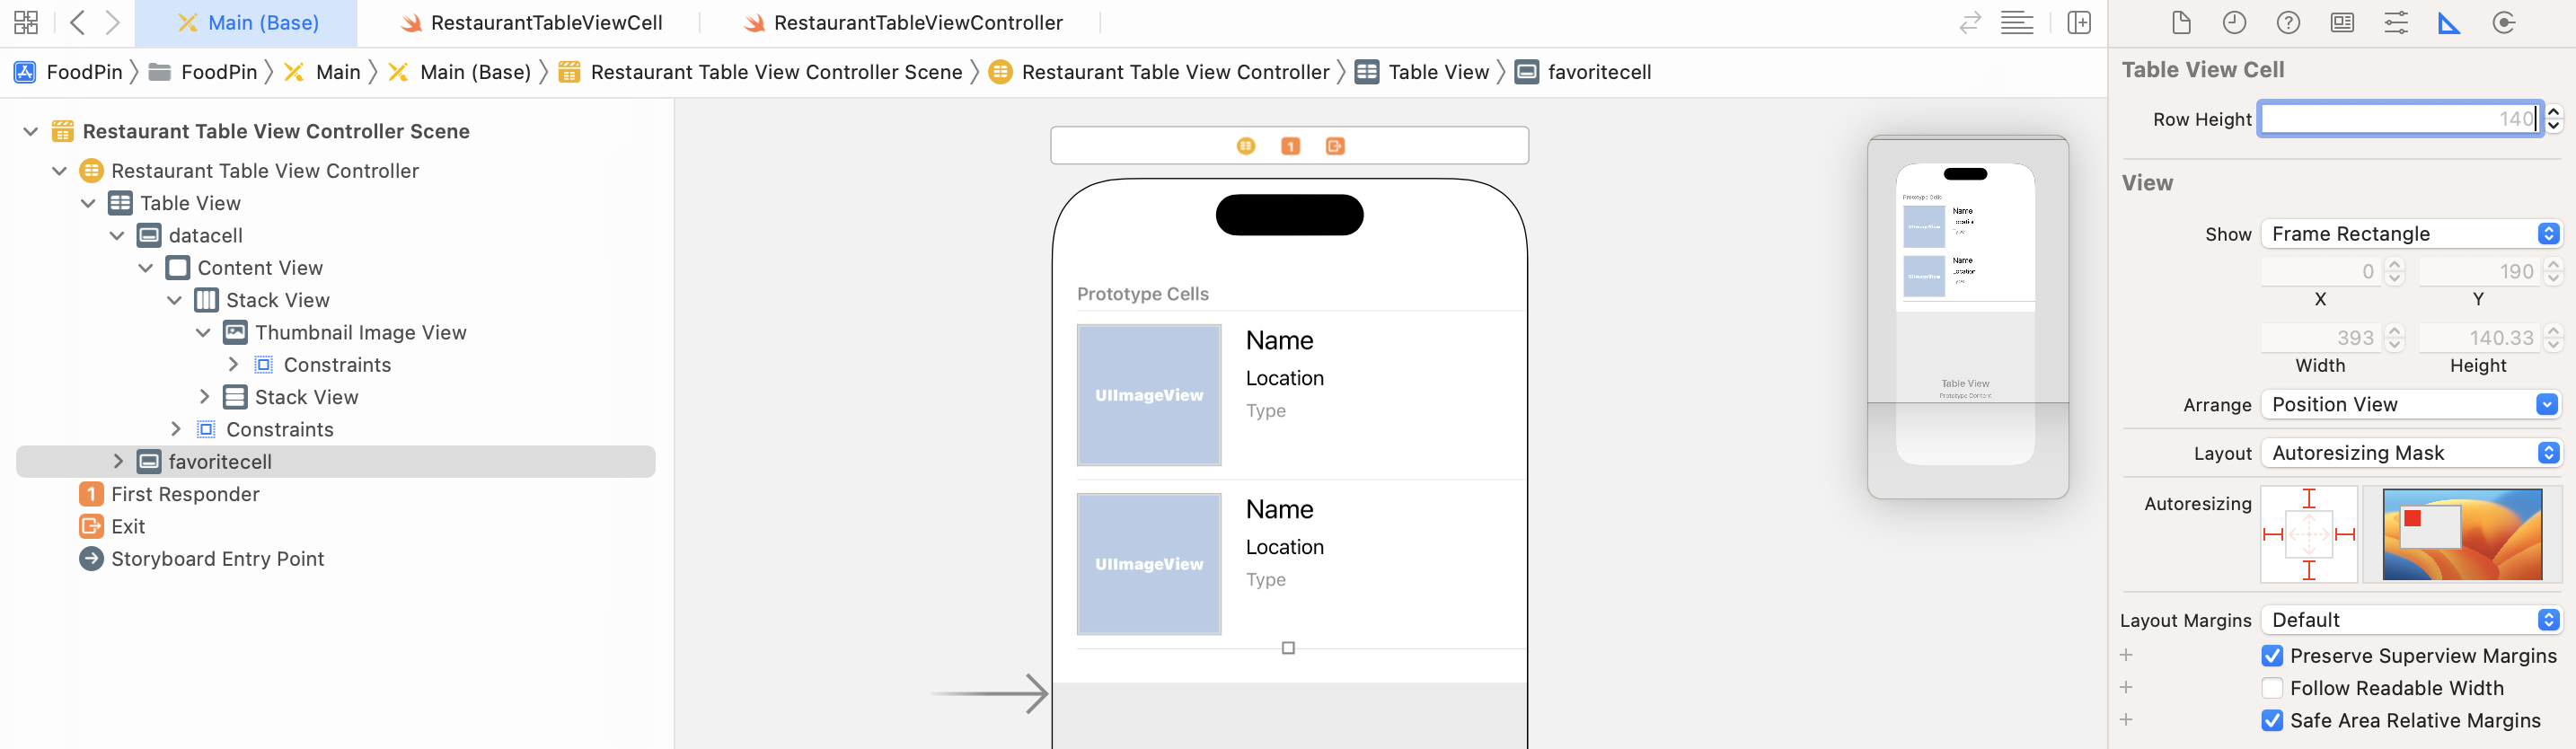
In the document outline, select Table View and then open the Attributes inspector. Here, change the value of the Prototype Cells option from 1 to 2. You will immediately see a new prototype cell added to the table view with the same cell layout.
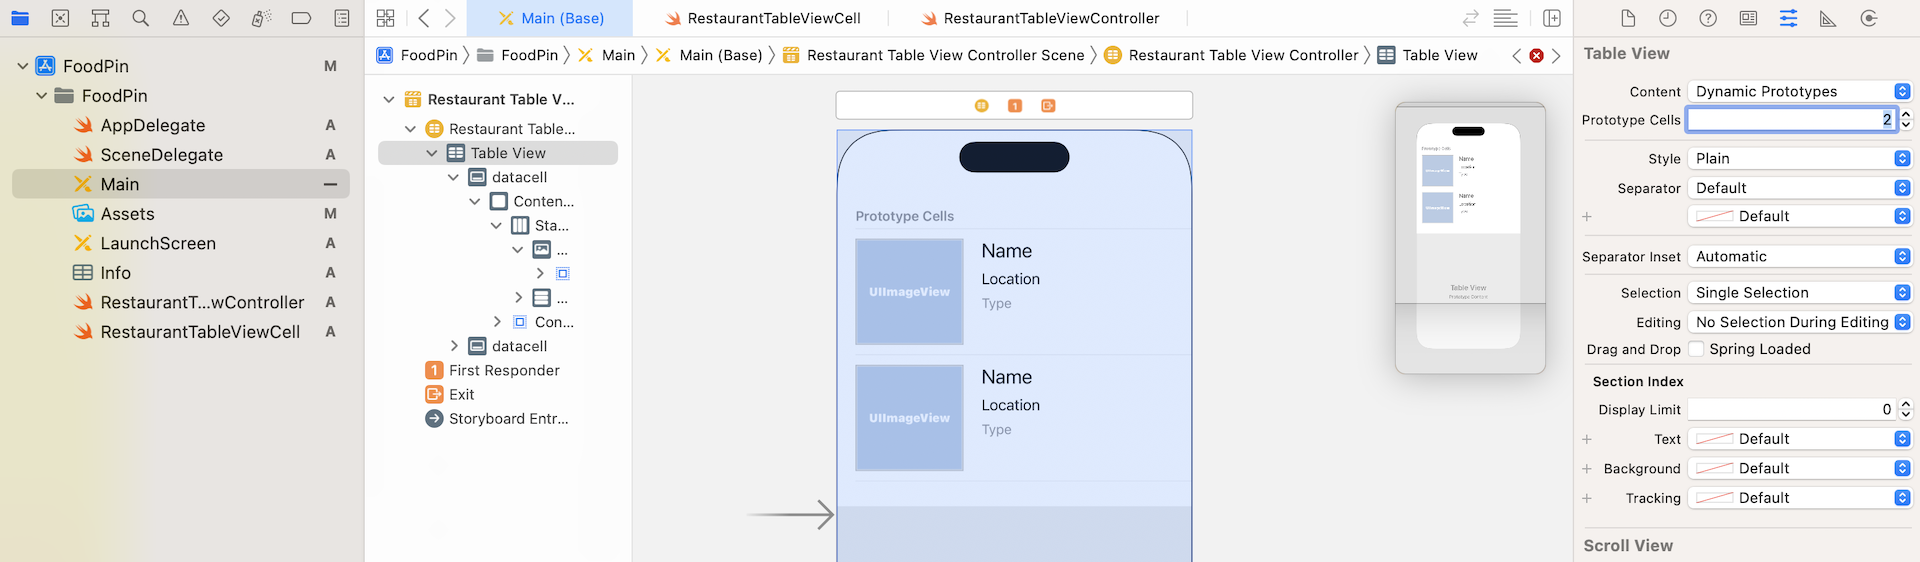
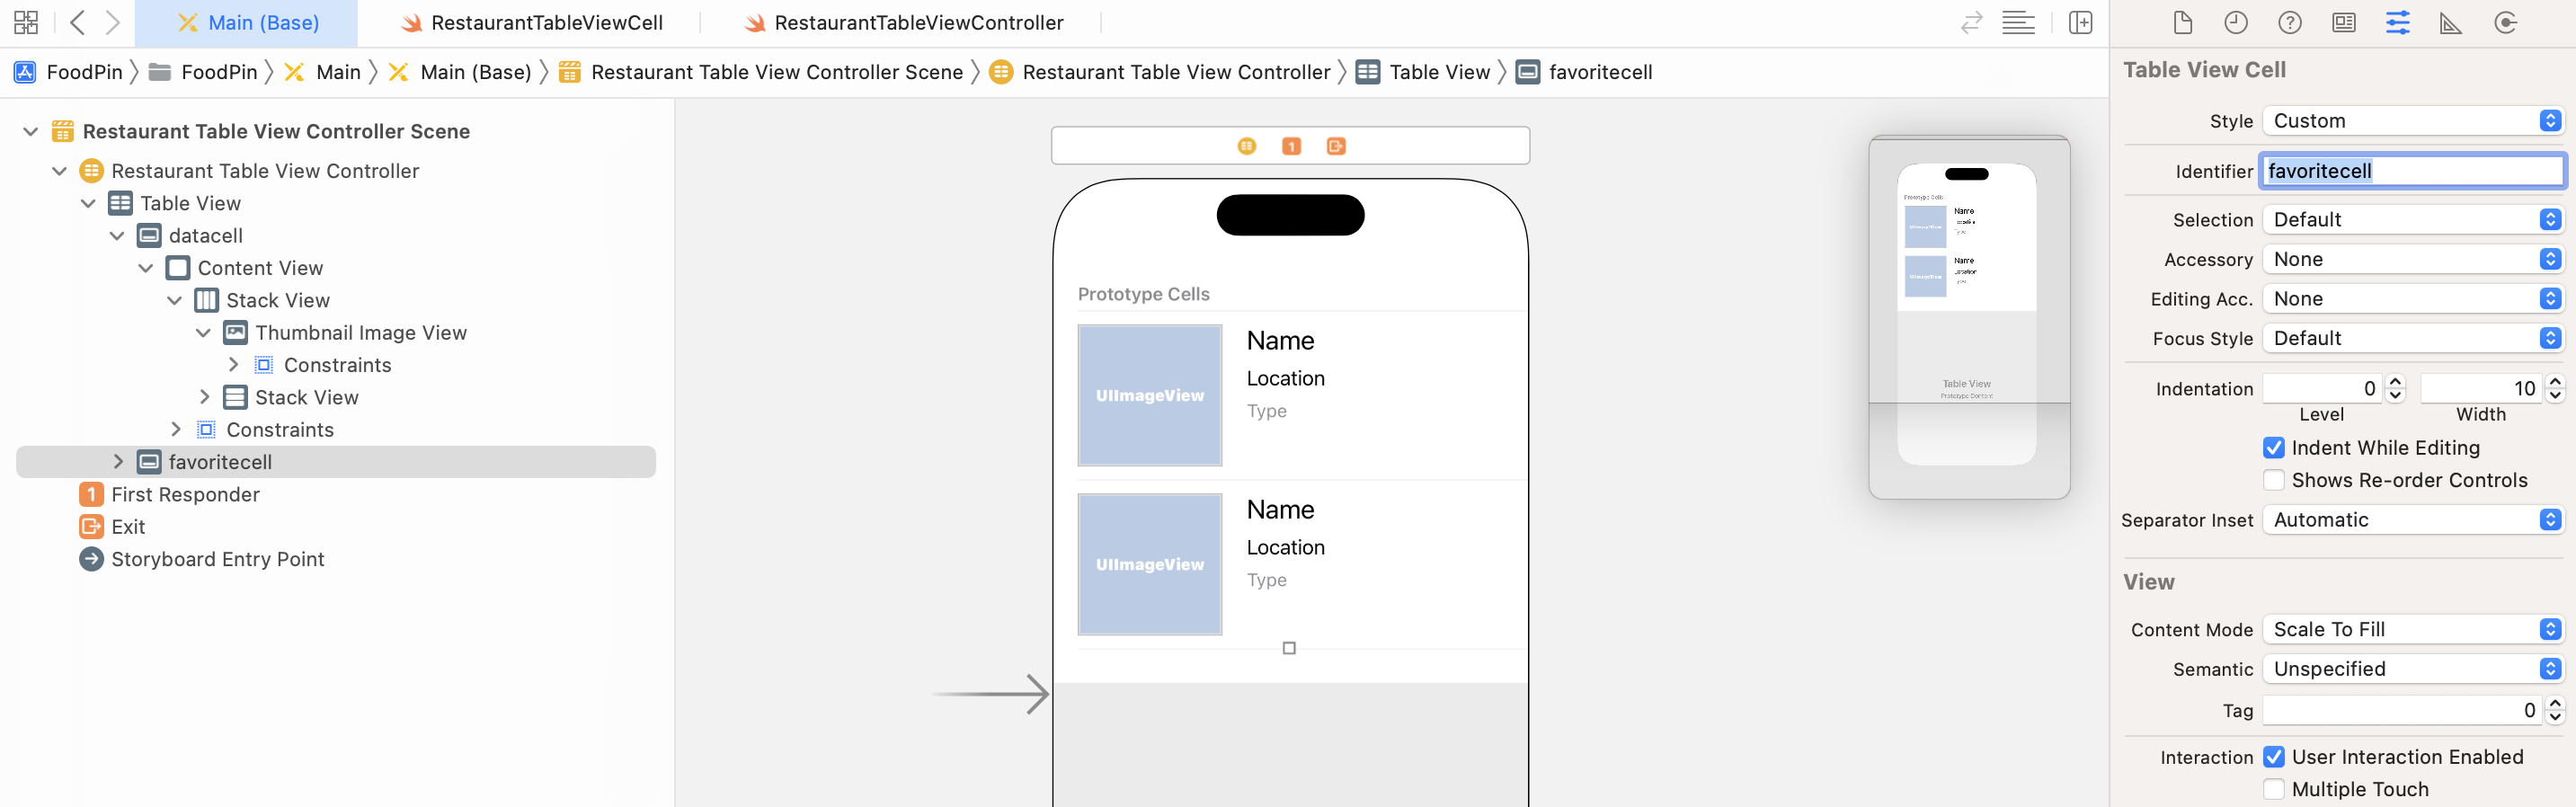
At the same time, Xcode displays an error indicator in Interface Builder. If you click the error indicator, Xcode complains that the two prototype cells have the same identifier which is not allowed. Now select the new prototype cell and change its identifier in the Attributes inspector. Let's name it favoritecell.
Once you made the change, the Xcode error disappears. Now it's time to redesign the new cell. You do not delete all the elements and create the new cell from scratch because we still need both the image view and the labels. Instead, we are going to rearrange the cell layout.
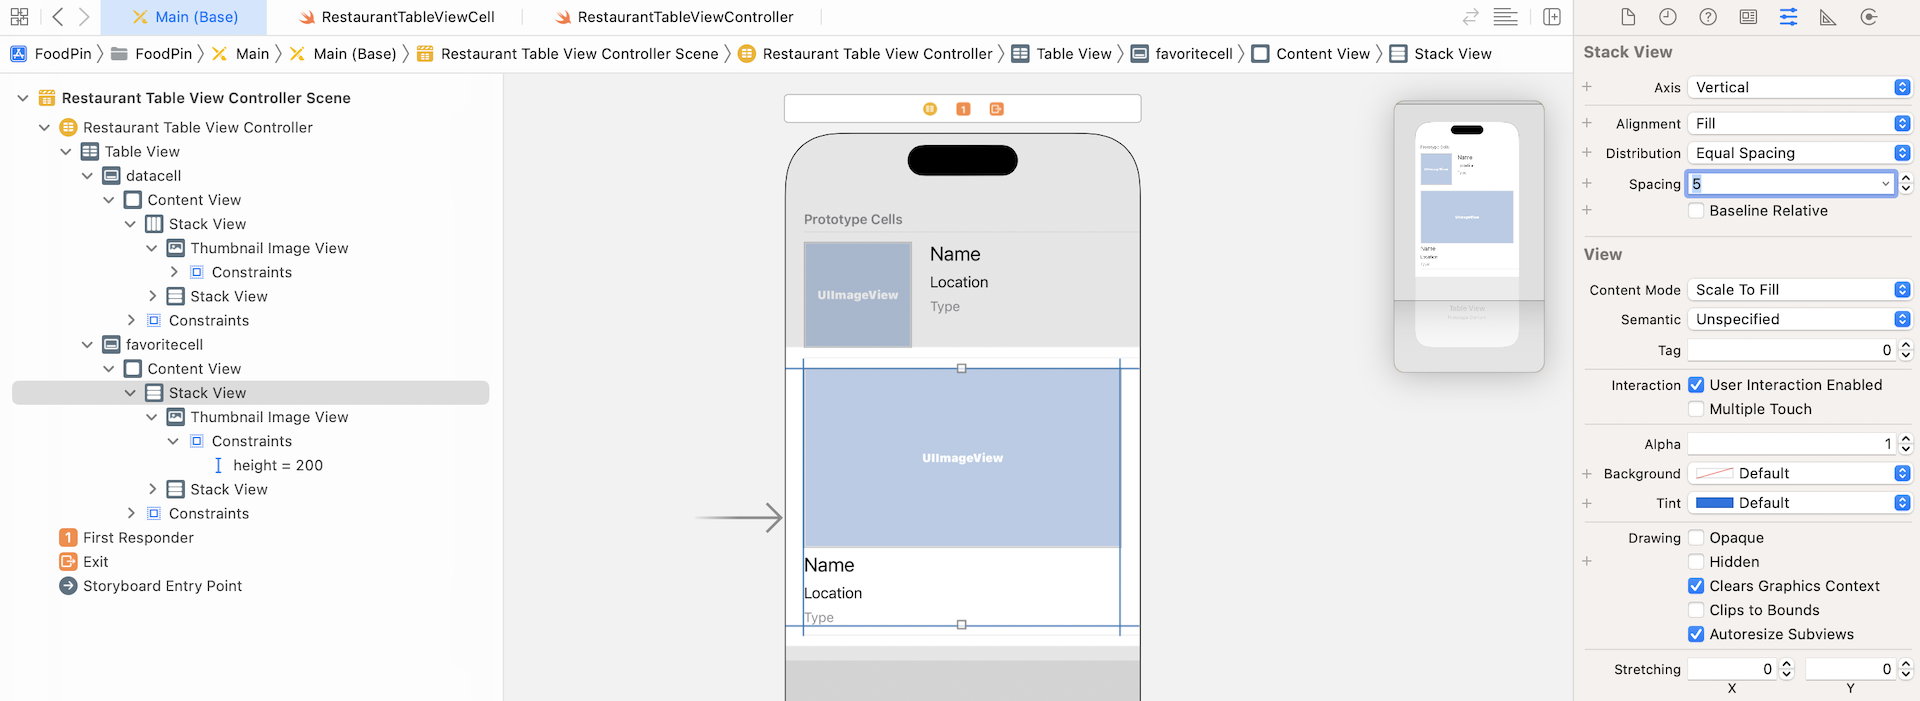
First, select the favoritecell and go to the Size inspector. Delete the height value (i.e. 140) and hit return. Xcode will then change the size of the cell automatically.
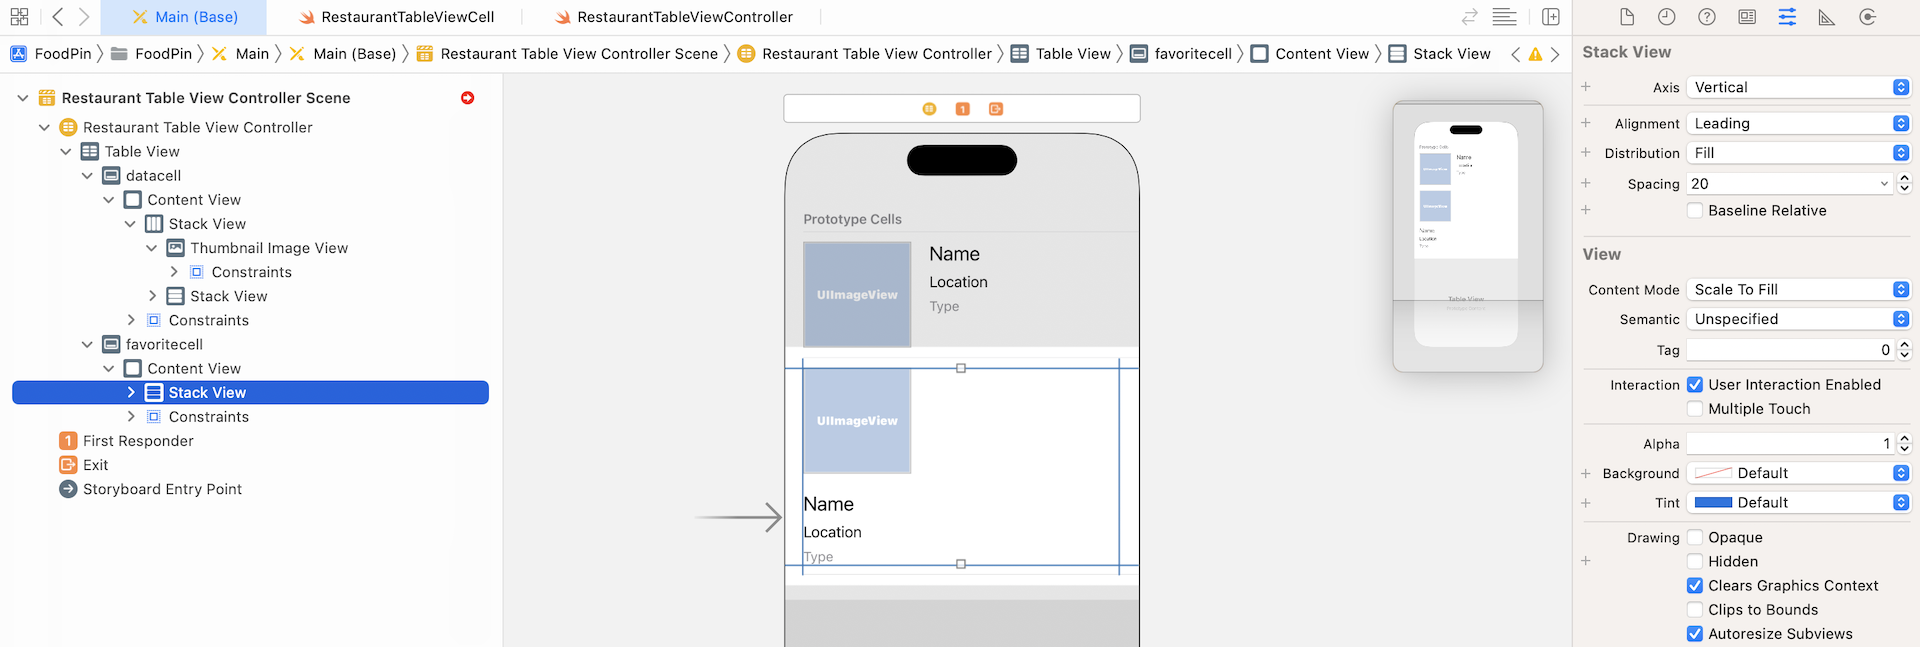
Next, select the root Stack View of the favoritecell. In the Attributes inspector, change the Axis option from Horizontal to Vertical and you will see a new cell layout. This is one of the benefits of Stack View. It makes it so easy to rearrange the layout of the embedded components.
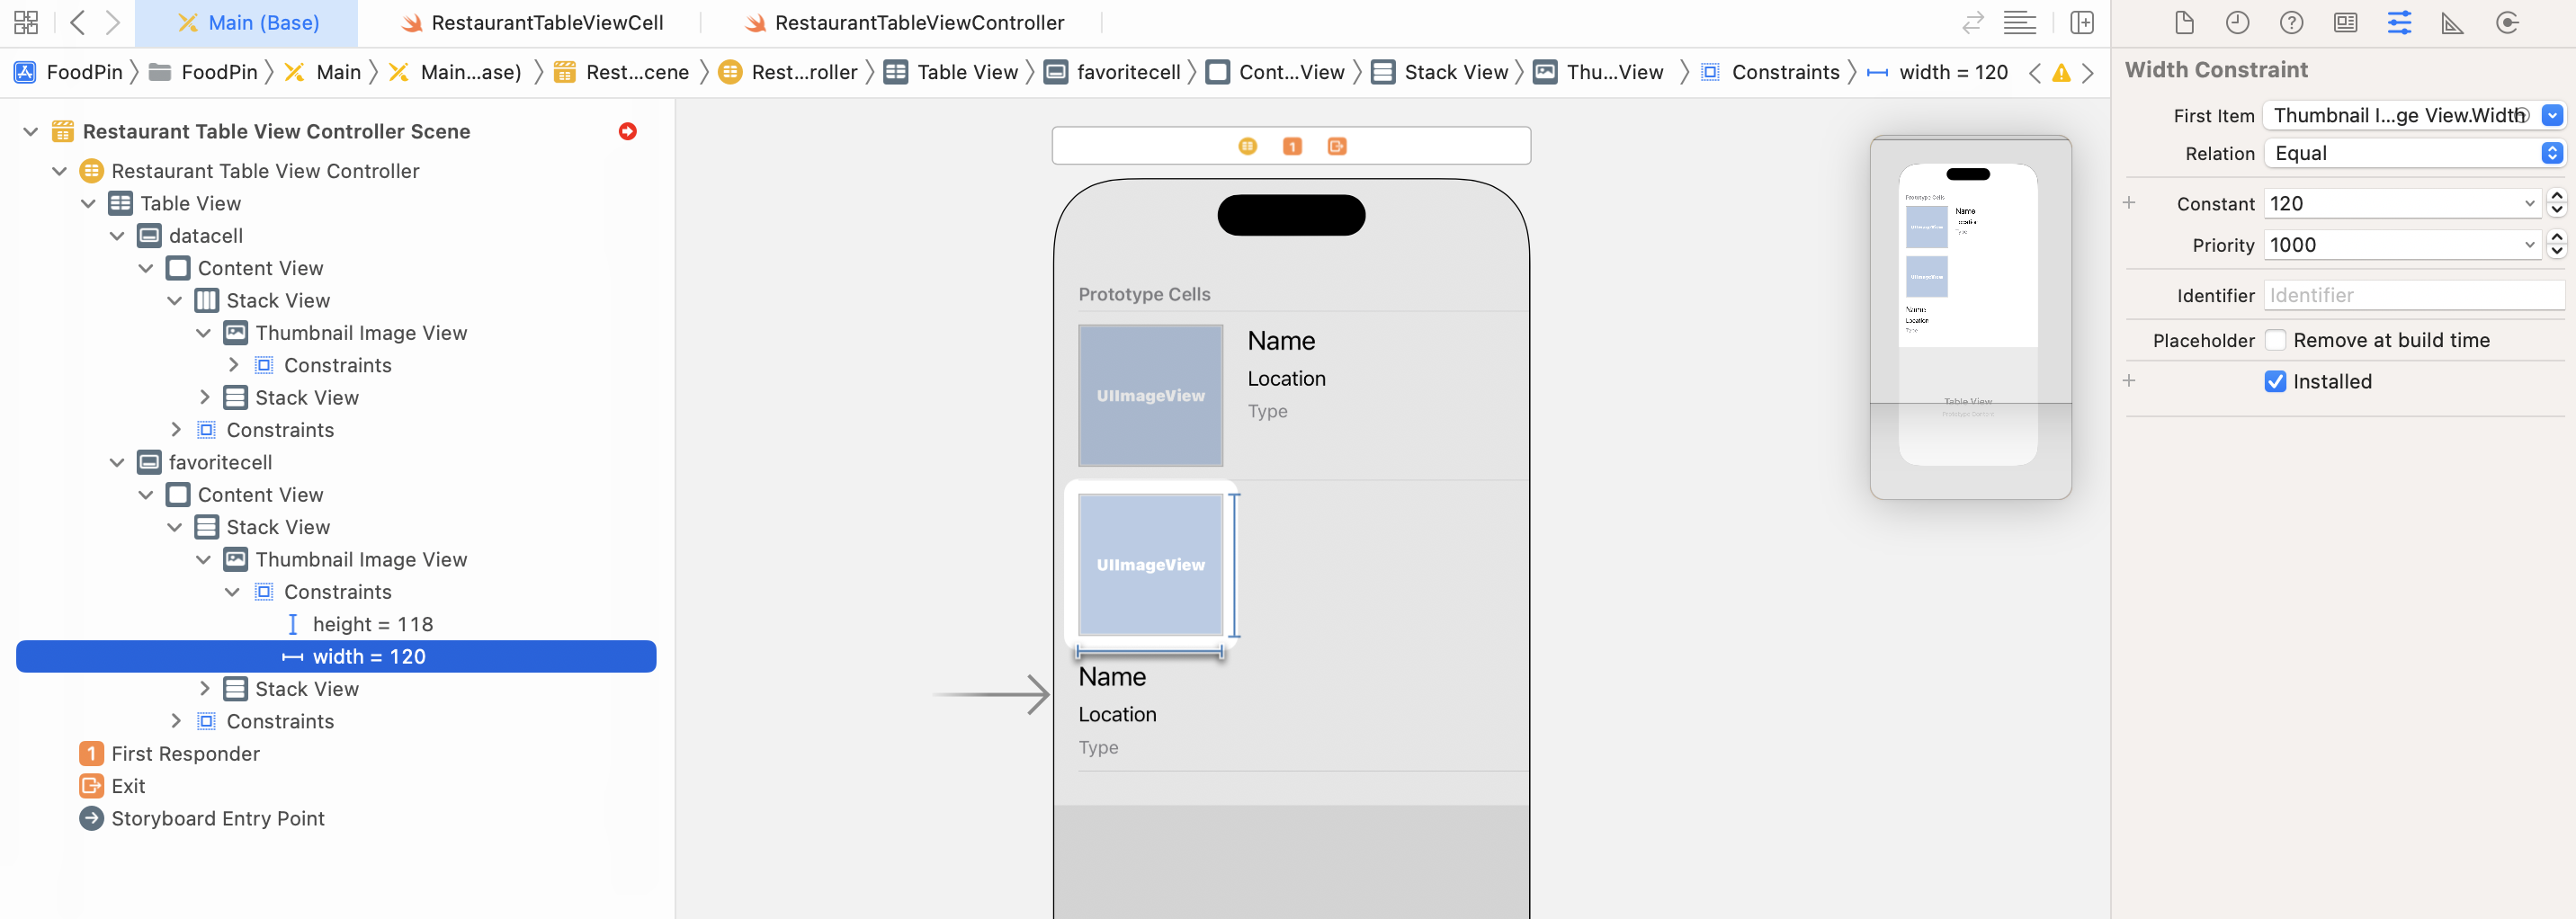
With the new design, we no longer fix the width of the image view. Therefore, select the width constraint of the image view and hit delete to remove it.
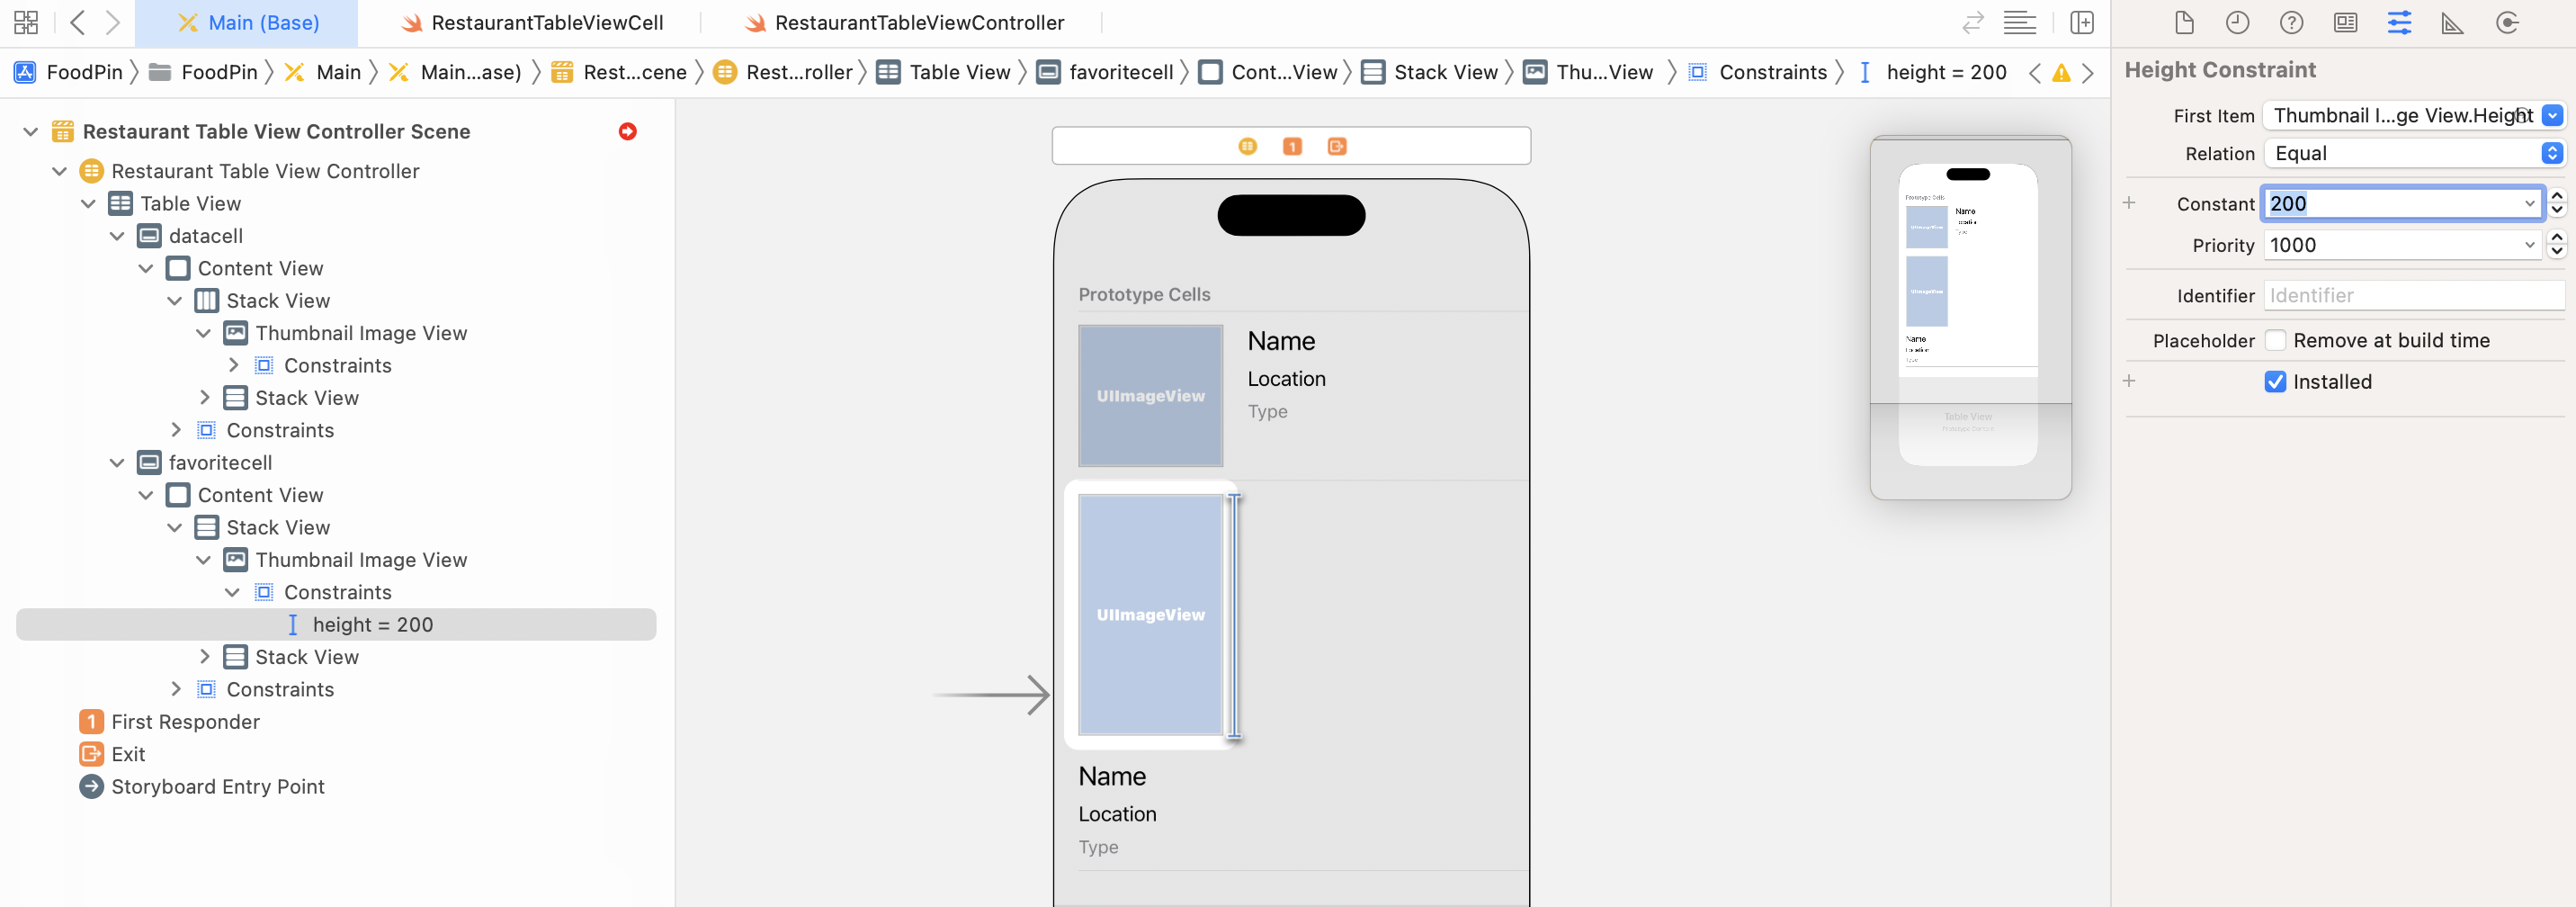
We also want to make the image a little bit bigger. So, select the height constraint of the image view and change its constant in the Attributes inspector to 200.
Meanwhile, the image view doesn't scale to take up the width of the stack view. This is due to a setting in the root Stack view. Now select the stack view again and change its alignment from Leading to Fill. The image view should automatically expand. To make the cell look a little bit better, you can also change the spacing value from 20 to 5. To fix the layout error (did you notice the red indicator in the document outline?), change the Distribution option from Fill to Equal Spacing. This tells the stack view to maintain an equal spacing between the subviews without resizing the subviews themselves.
The cell layout now looks nearly the same as the one shown in figure 10.2. However, if you take a closer at the cell in the figure, the labels are indented slightly. How can you cater for this kind of indentation in a stack view?
Now select the stack view that holds the labels and go to the Size inspector. You can indent the stack view by setting the Layout Margins. Change the value of Layout Margins to Language Directional and set both leading & trailing to 20 points. This should indent the label stack view.

If you run the app, it would still show the old design. This is we are still referring to the datacell in the code. To use the new cell layout, open RestaurantTableViewController.swift and change the cellIdentifier constant in configureDataSource():
let cellIdentifier = "favoritecell"
Instead of using datacell, we tell the table view to use the new favoritecell. Now you are ready to test the app. Choose any of the iPhone simulators and hit the Play button. Your app should show you a brand new look. If you want to remove the separator between the cells, insert this line of code in the viewDidLoad() method:
tableView.separatorStyle = .none
What happens if you want to switch back to the old design? Yes! You just need to change the cellIdentifier back to datacell. This is how you can create multiple prototype cells and apply different design. In later chapters, I will teach you how to show two different cell layouts in the same table view.
Understanding the UITableViewDelegate Protocol
Now let's move onto the next topic and discuss how you can detect a touch on the table view. When we first built the SimpleTable app in Chapter 8, we adopted two delegates, UITableViewDelegate and UITableViewDataSource, in the RestaurantTableViewController class. While we have a lengthy discussion on replacing the UITableViewDataSource protocol with UITableViewDiffableDataSource, I barely mentioned about the UITableViewDelegate protocol.
As said before, the delegate pattern is very common in iOS programming. Each delegate is responsible for a specific role or task to keep the system simple and clean. Whenever an object needs to perform a certain task, it depends on another object to handle it. This is usually known as "separation of concerns" in software design.
The UITableView class applies this design concept. The UITableViewDelegate protocol is designed to take care the configuration of the section headings and footers of the table view, as well as, handling cell selections and cell reordering. Therefore, to manage the row selection, we will need to adopt the UITableViewDelegate protocol and implement its methods.
Looking Up the Documentation
Before implementing the methods, you may wonder:
How do we know which methods in UITableViewDelegate to implement?
The answer is "Read the documentation". You're granted free access to the Apple's official iOS developer reference (https://developer.apple.com/documentation/). As an iOS developer, you need to get used to reading the API documentation. There is no single book on earth to cover everything about the iOS SDK. Most of the time when we want to learn more about a class or a protocol, we have to look up to the API document.
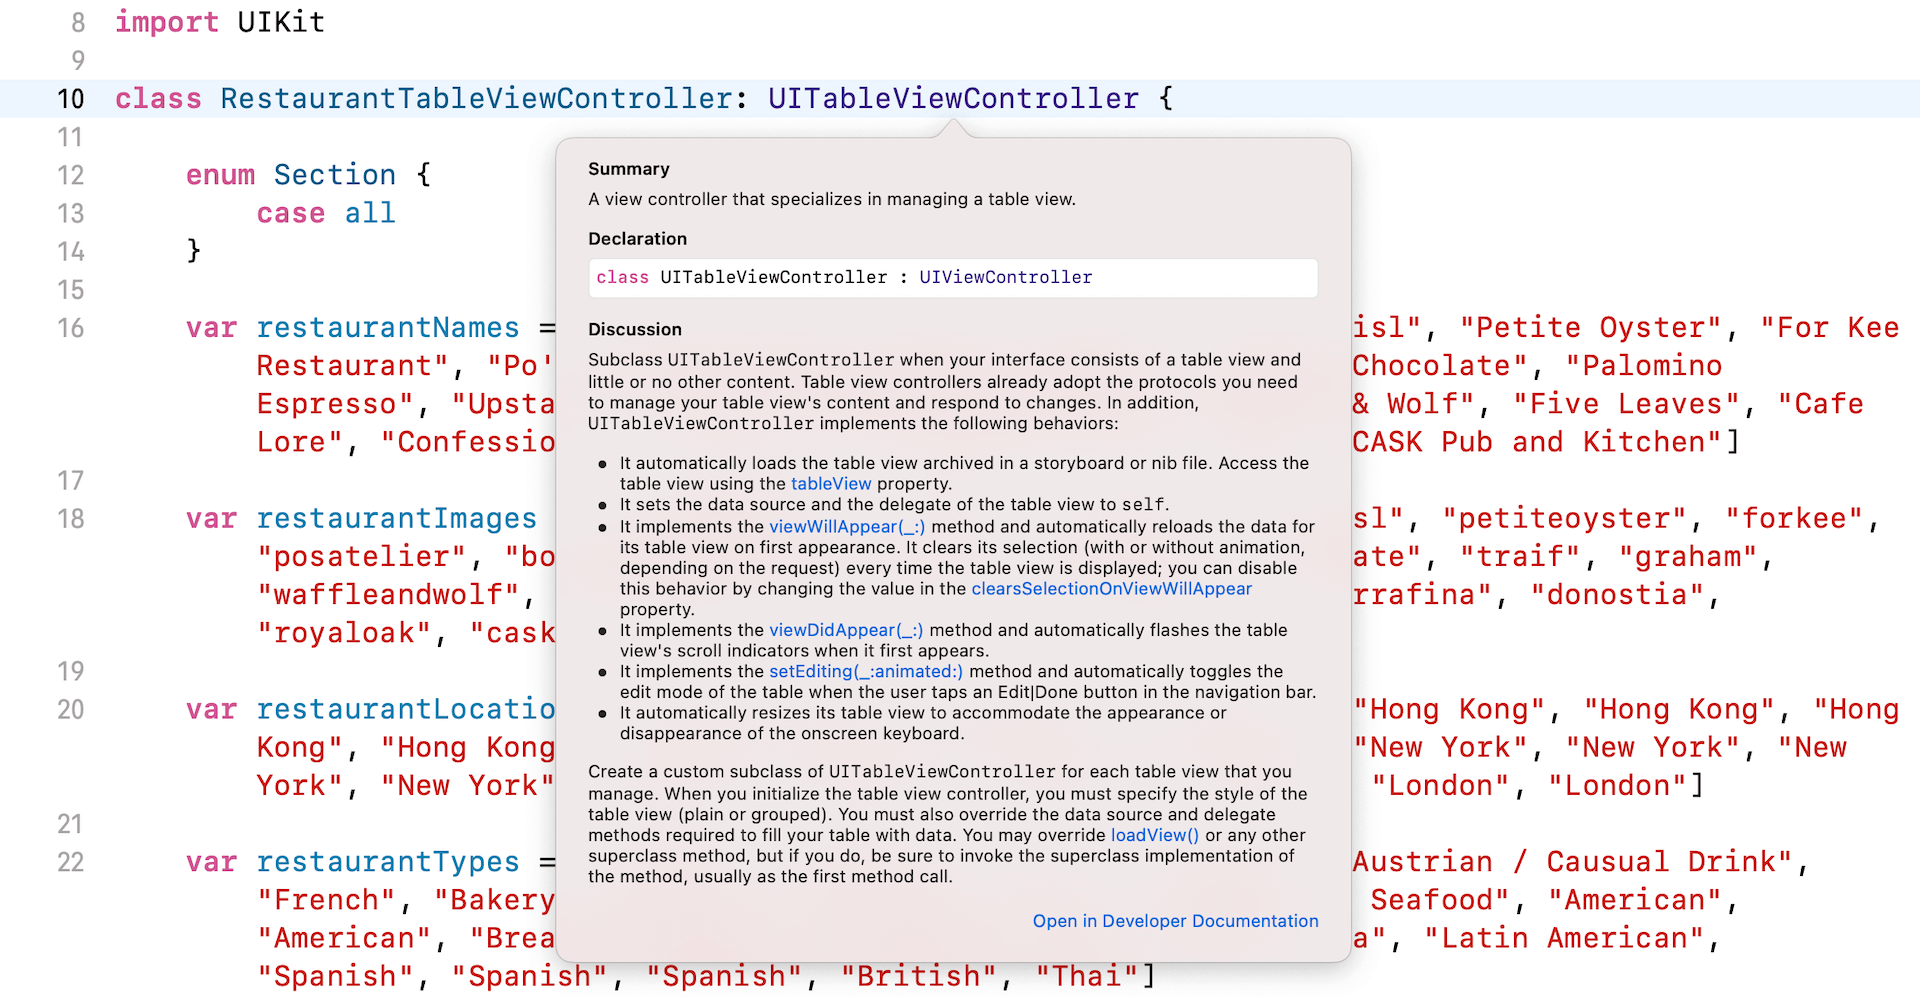
Apple provides a simple way to access the documentation in Xcode. You can press and hold the option key and click on the class name to bring up the documentation. Alternatively, you can use the keyboard shortcut control-command-? and then place the cursor over a class or a protocol (e.g. UITableViewController). This brings up a popover showing the details of the class.
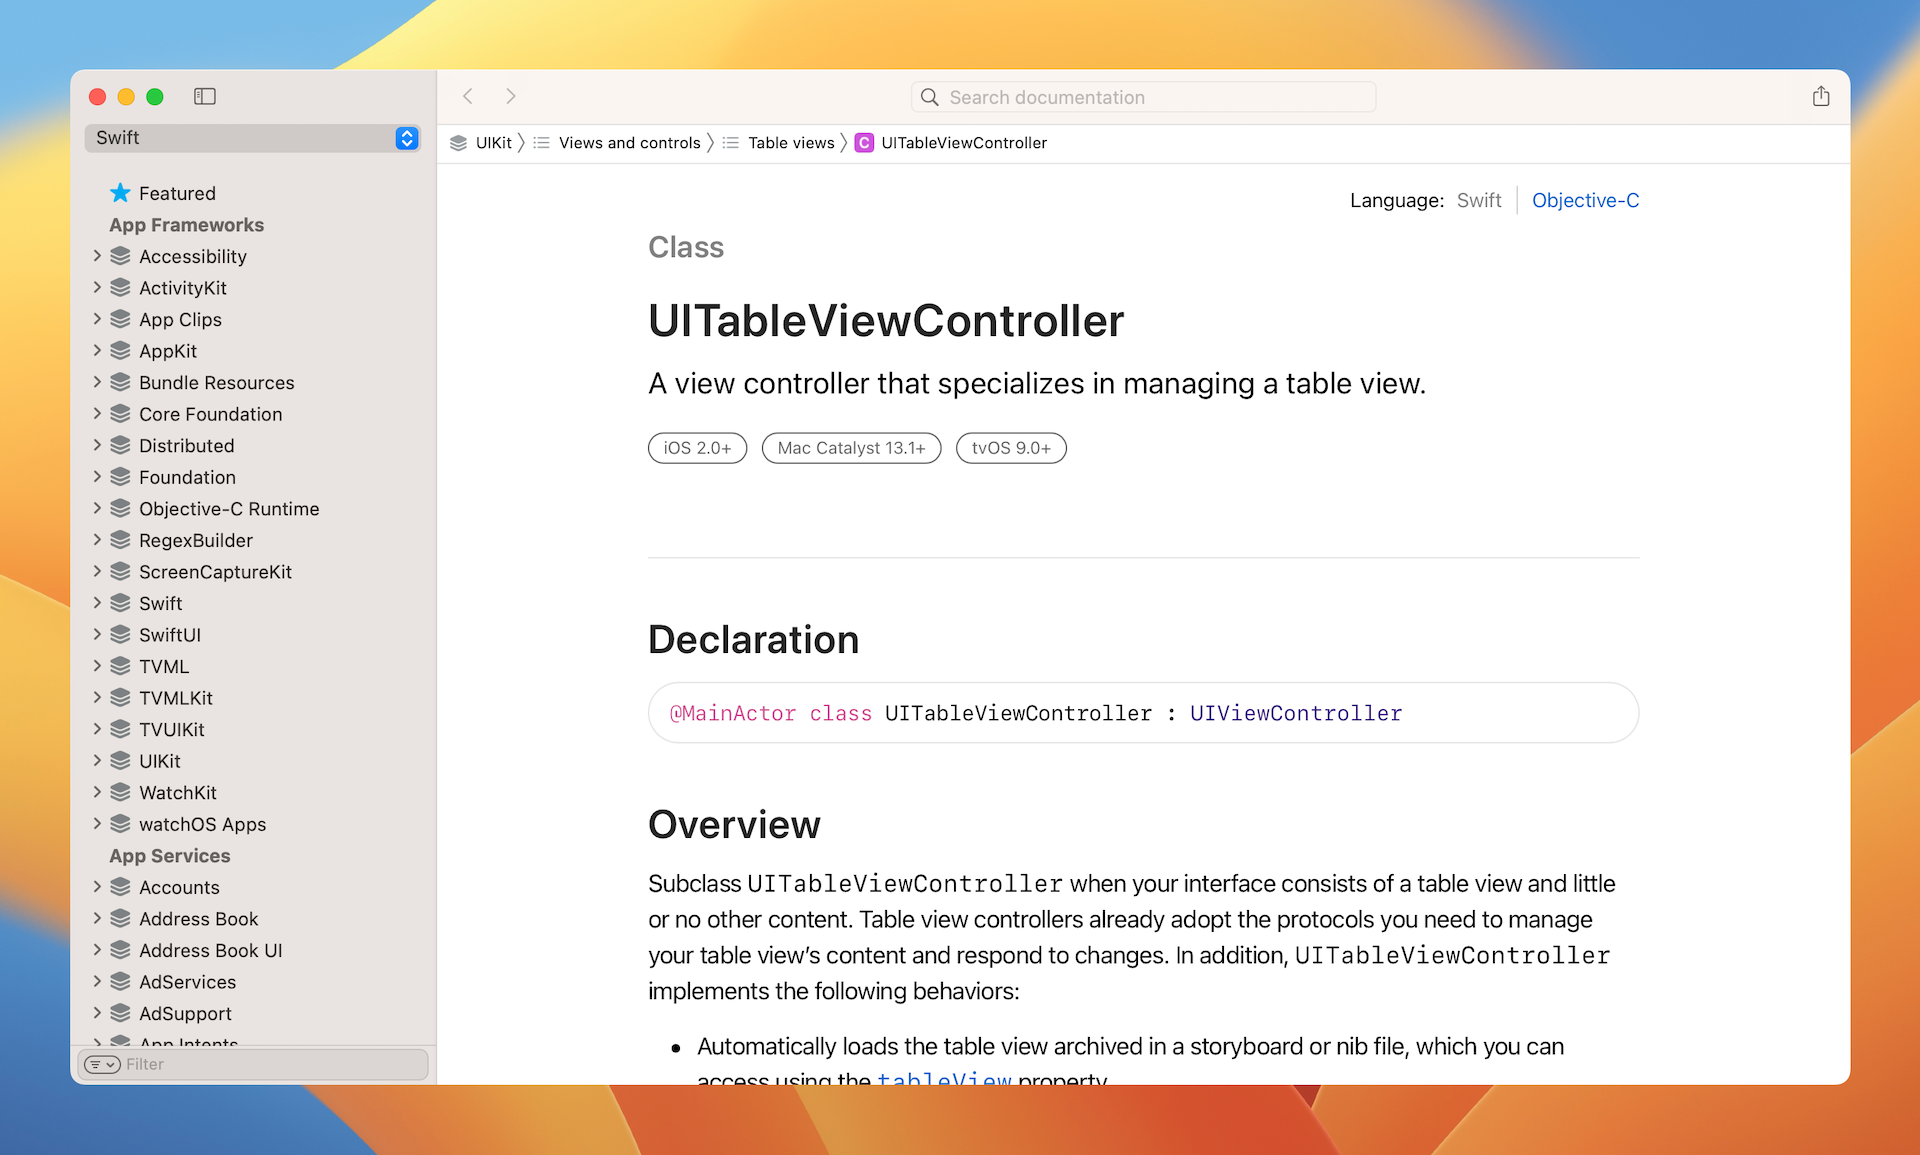
Scroll down and you will see the "Open in Developer Documentation" link. Click it to bring up the documentation browser. Here, you'll find all the usage of the class. If you scroll down to the end of the document, you should see a section named "Conforms To" that lists out all the protocols that this class adopts. One of them is the UITableViewDelegate protocol. Click it to access the documentation.
By glancing through the document, you will find the methods below for managing row selections:
func tableView(UITableView, willSelectRowAt: IndexPath) -> IndexPath?func tableView(UITableView, didSelectRowAt: IndexPath)
Both methods are designed for row selections. The only difference is that the first method is called when a specified row is about to be selected. You may use this method to prevent the selection of a particular cell from taking place. Typically, you use the tableView(_:didSelectRowAt:) method. It is called after the user selects a row, to handle the row selection. We will implement this method to perform additional tasks (e.g. bringing up a menu) after a row is selected.
Managing Row Selections by Implementing the Protocol
Okay, that's enough for the explanation. Let's move onto the interesting part and write some code. In the FoodPin project, open the RestaurantTableViewController.swift file and implement the tableView(_:didSelectRowAt:) method in the RestaurantTableViewController class:
override func tableView(_ tableView: UITableView, didSelectRowAt indexPath: IndexPath) {

    // Create an option menu as an action sheet
    let optionMenu = UIAlertController(title: nil, message: "What do you want to do?", preferredStyle: .actionSheet)

    // Add actions to the menu
    let cancelAction = UIAlertAction(title: "Cancel", style: .cancel, handler: nil)
    optionMenu.addAction(cancelAction)

    // Display the menu
    present(optionMenu, animated: true, completion: nil)
}
First, what's the override keyword? The documentation already tells us that the UITableViewController class adopted the UITableViewDelegate protocol and provided a default implementation for the method. Now we are overriding this method with our own code in RestaurantTableViewController. To override a method of a superclass, we add the override keyword at the very beginning of the method. When you do this, it's just like saying, "Hey, don't use the default method implementation. Use mine."
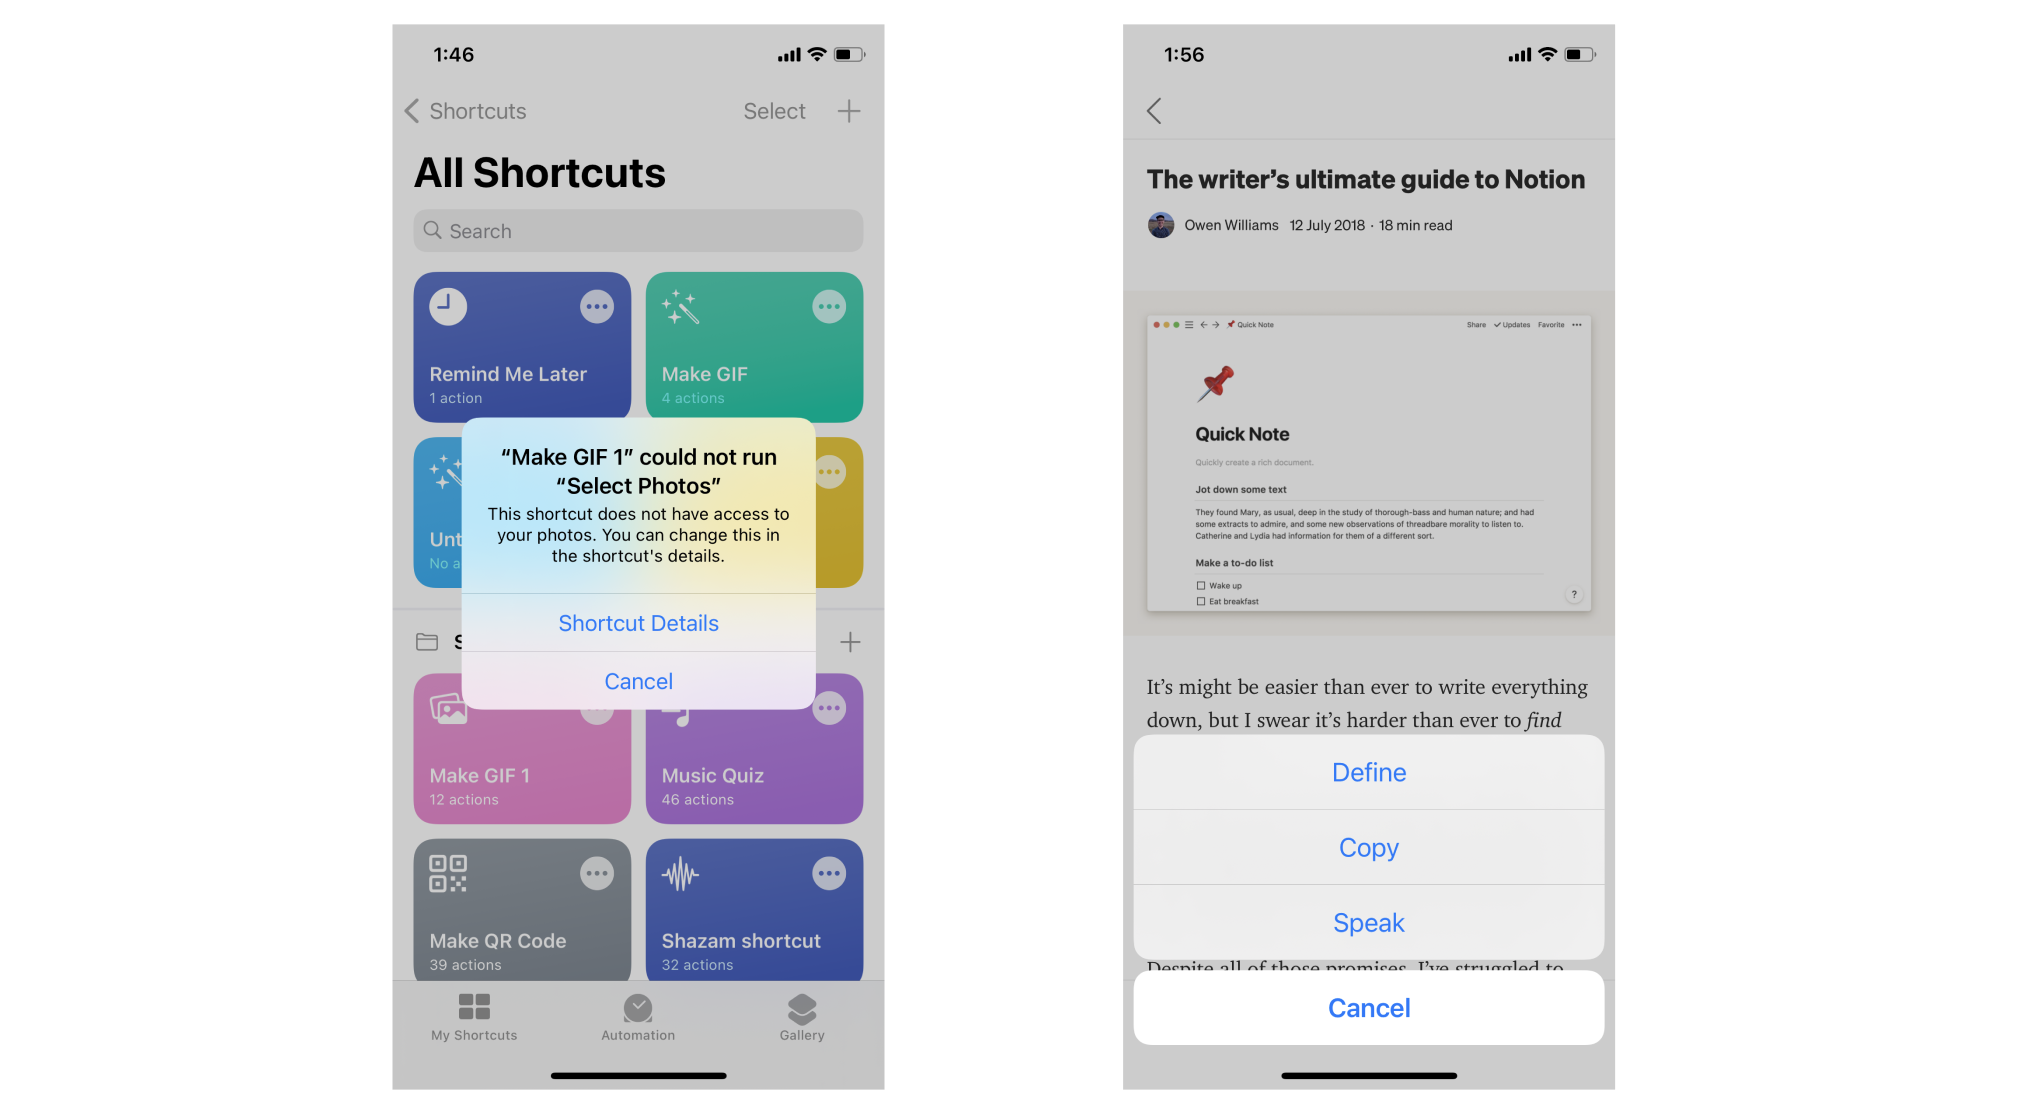
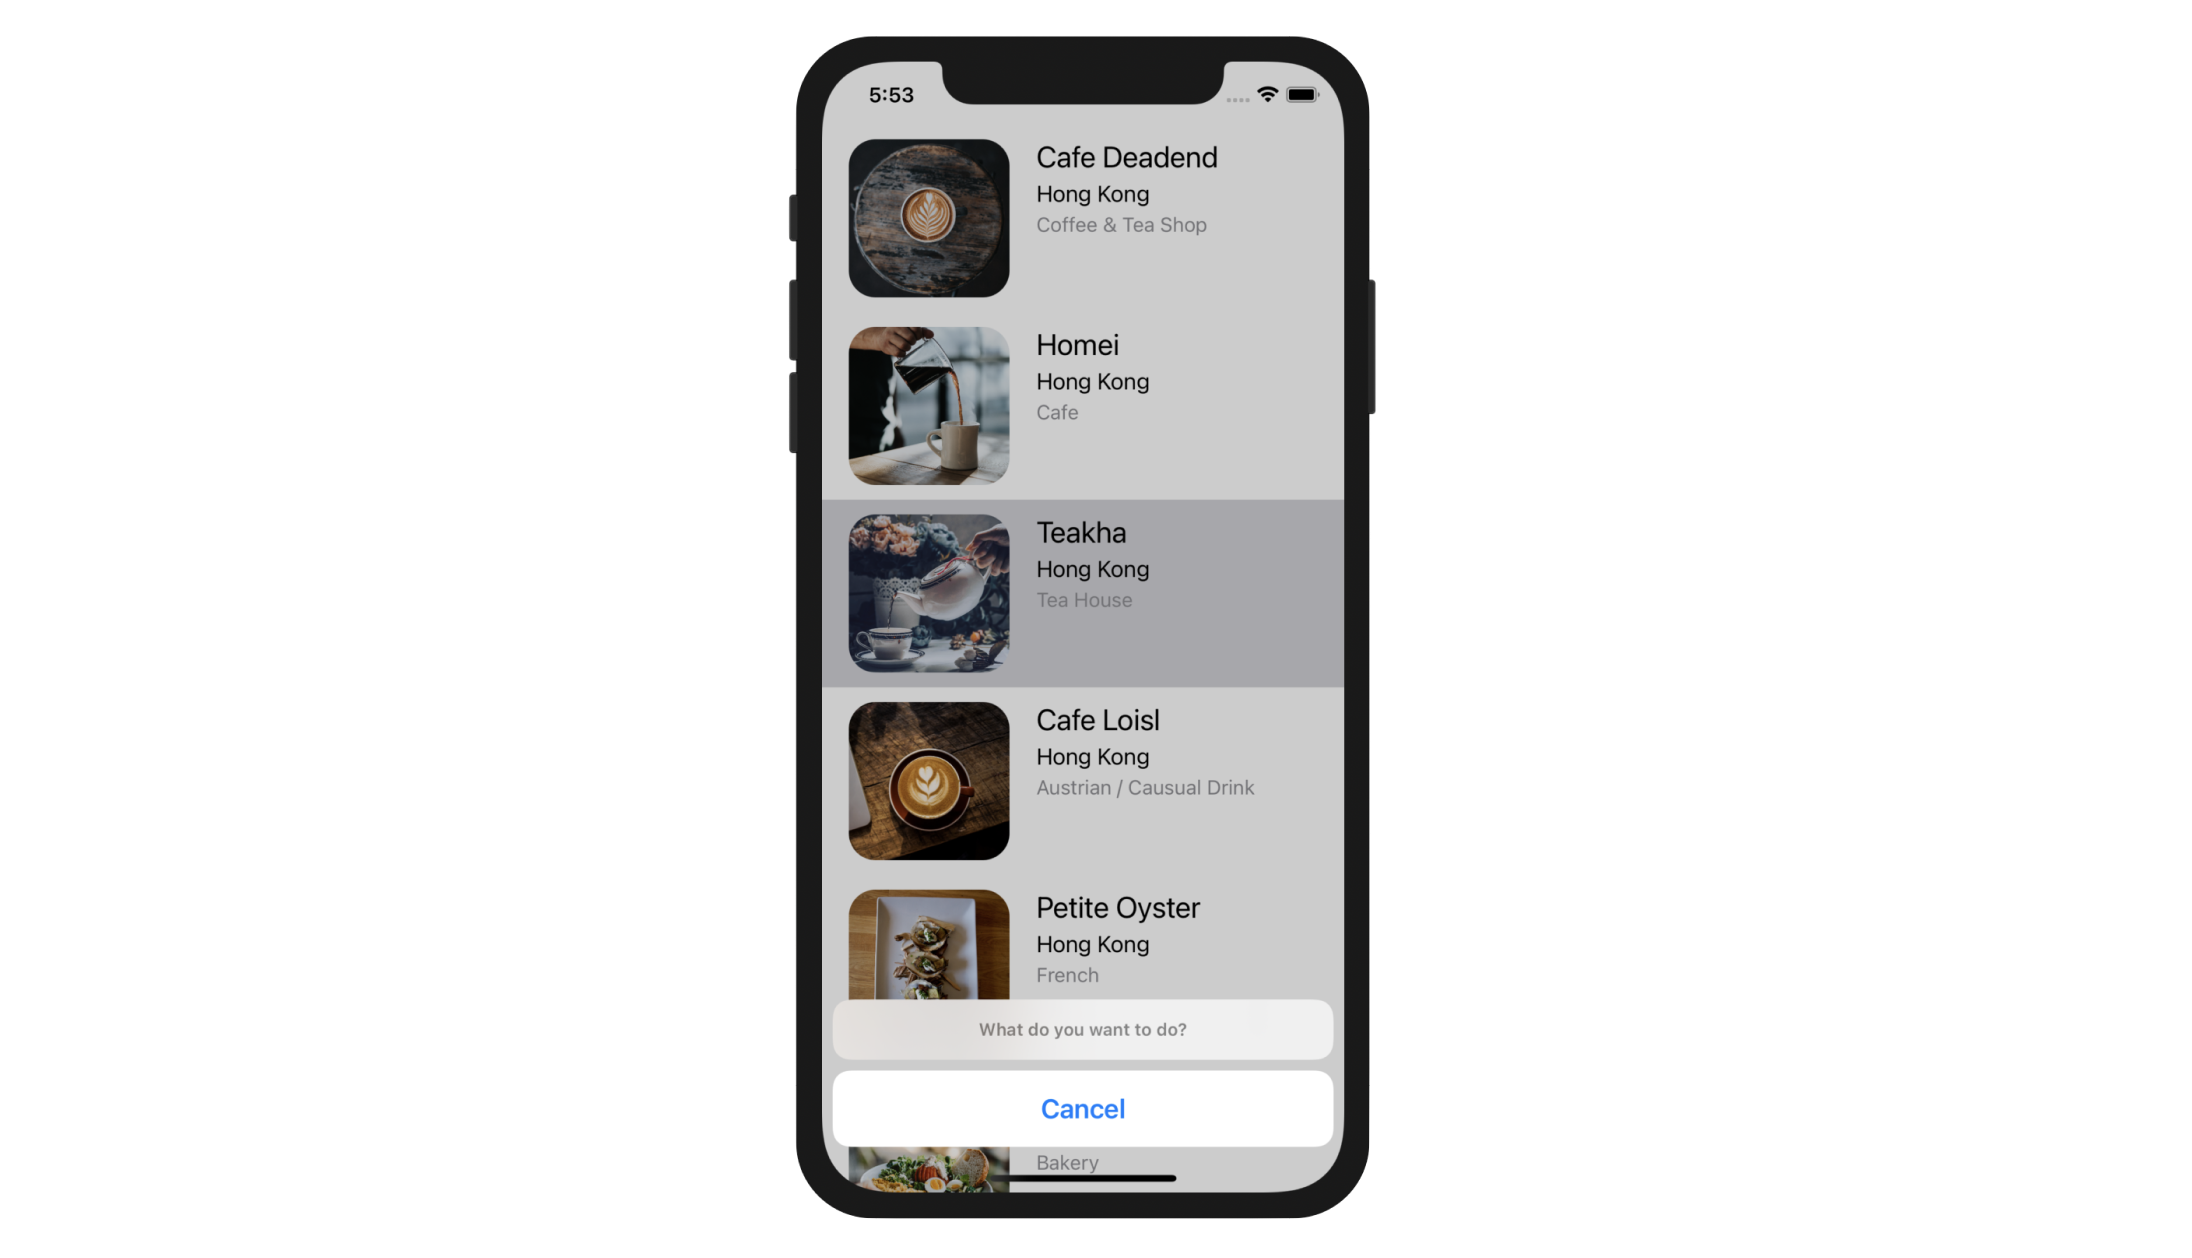
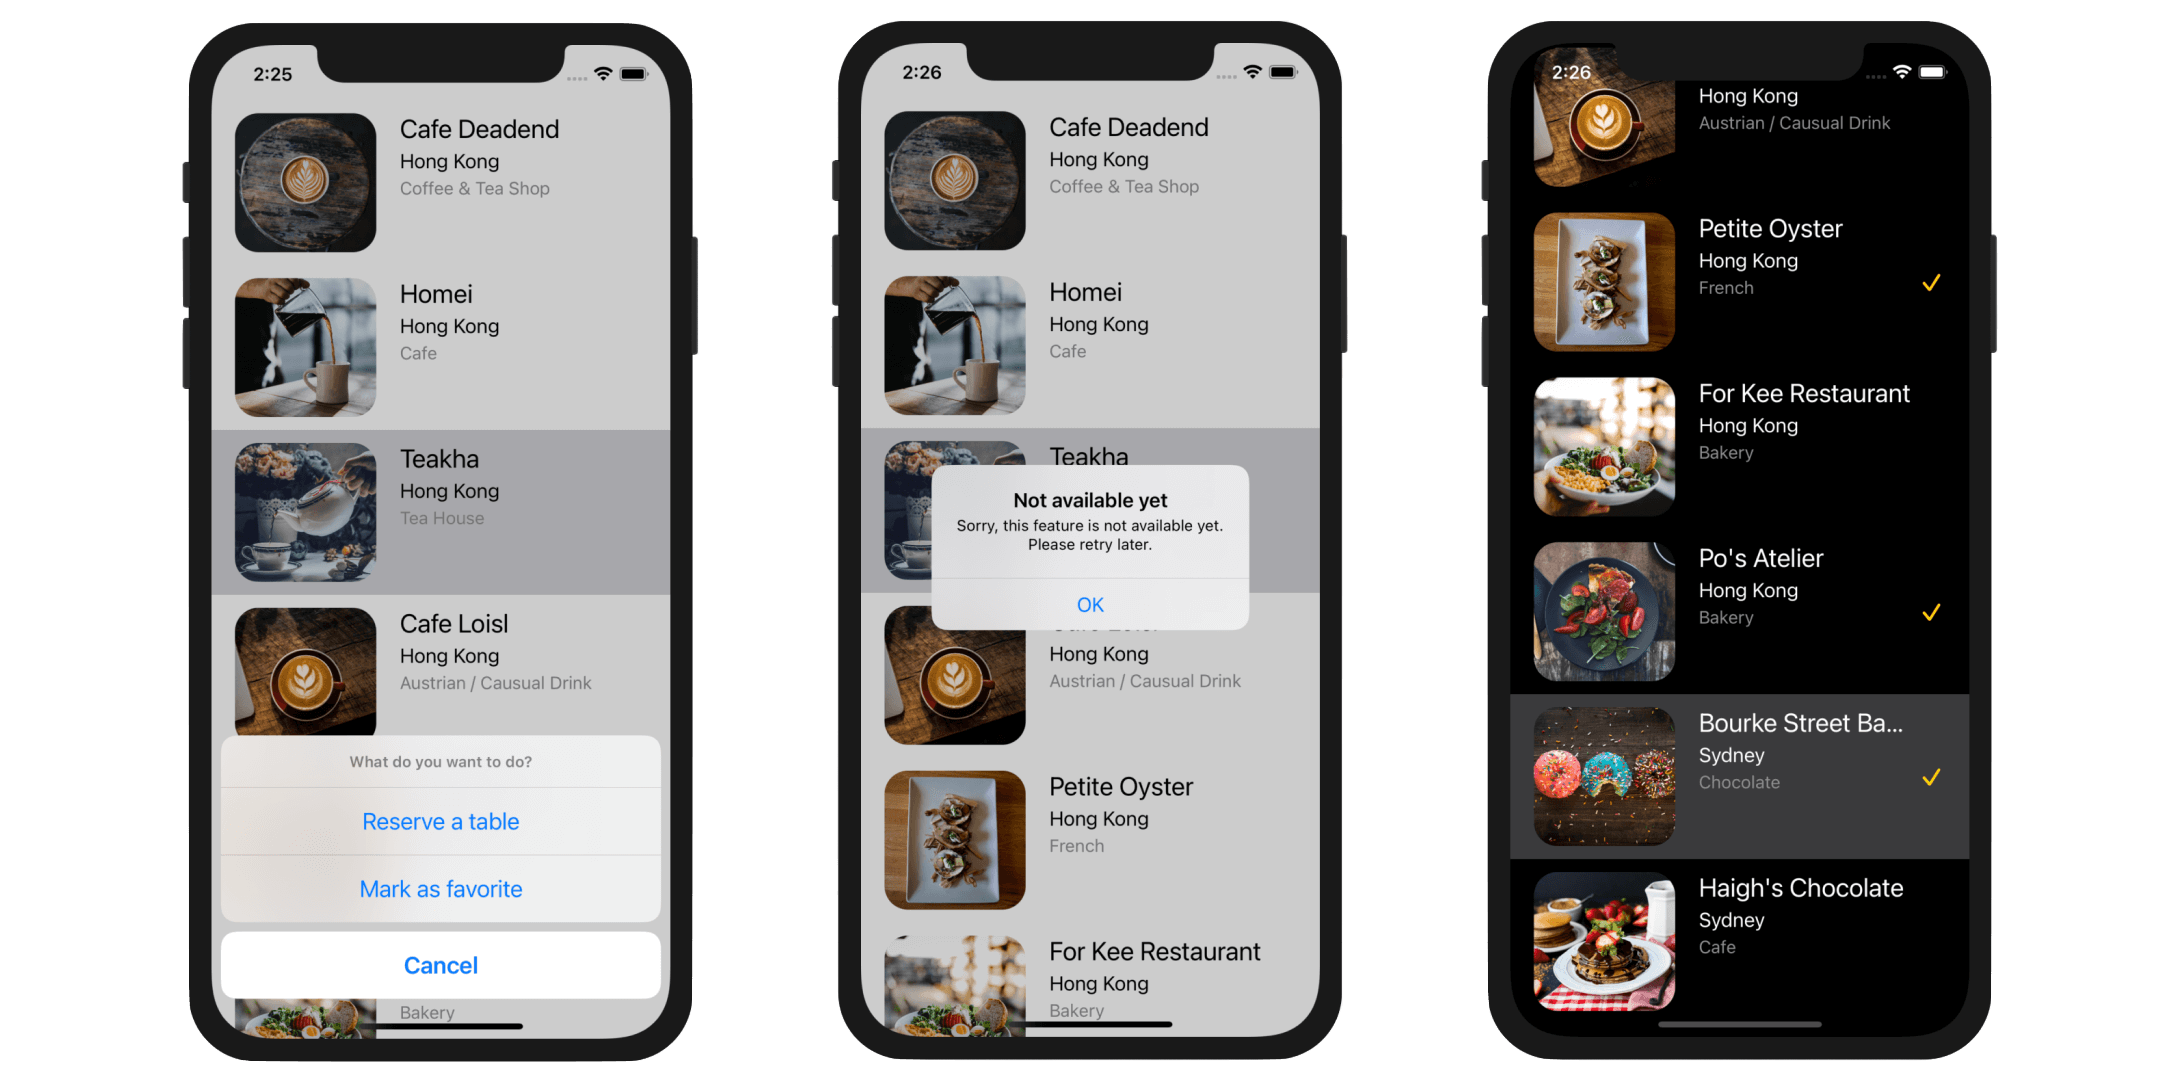
The code above creates an option menu by instantiating a UIAlertController object. When a user taps any rows in the table view, this method will be called automatically to bring up an action sheet showing a What do you want to do message and a Cancel button. Try to run the project to have a quick test. The app should now be able to detect a touch.
Understanding UIAlertController
Before we move on, let me talk more about the UIAlertController class. The UIAlertController class was first introduced in iOS 8 to replace both UIAlertView and UIActionSheet classes from older versions of iOS SDK. It is designed for displaying alert messages to a user.
Referring to the code snippet in the previous section, you can specify the style of the UIAlertController object through the preferredStyle parameter. The value we used is .actionSheet. Alternatively, you can set its value to .alert which gives you another alert style. Figure 10-14 displays the sample alert styles.

Other than displaying a message to users, the alert controller usually associates with an action to give users a way to respond. In the code, we created a UIAlertAction object with a preferred title, style, and the block of code to execute for the action. The cancelAction object has the title Cancel and is set to use the .cancel style. There is nothing to perform when a user selects the cancel action. Thus, the handler is set to nil. After the UIAlertAction object is created, you can assign it to the alert controller by using the addAction method.
When the alert controller is configured properly, you present it modally using the present method:
present(optionMenu, animated: true, completion: nil)
This is how you use the UIAlertController class to present an alert on screen. As a beginner, you may have a couple of questions in mind:
- How do I know the available values of the
preferredStyleparameter when creating aUIAlertControllerobject? - The dot syntax looks new to me. Shouldn't it be written as
UIAlertControllerStyle.actionSheet?
Both are good questions.
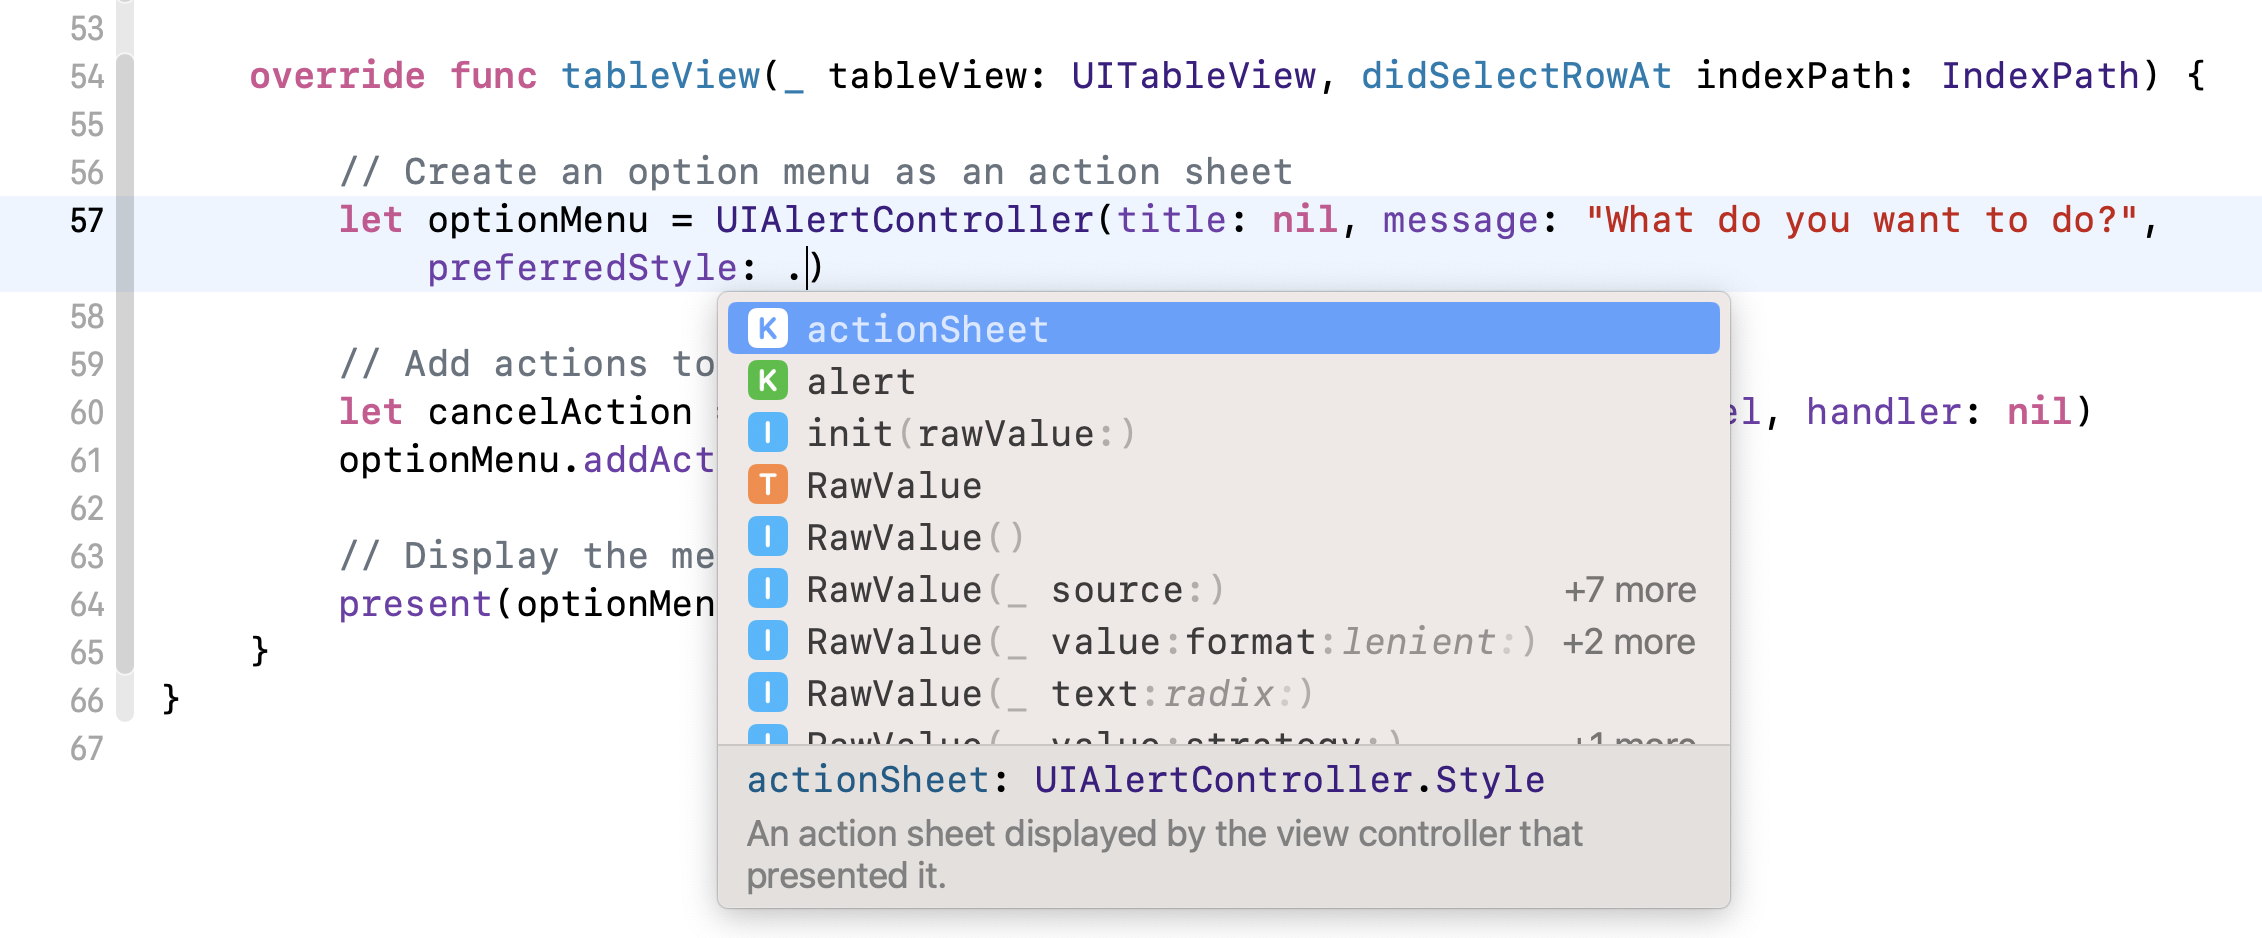
For the first question, again the answer is "Refer to the documentation". In Xcode, you can place the cursor over the preferredStyle parameter and press control-command-?. Xcode will show the method declaration. You can further click UIAlertController.Style to read the API reference. UIAlertController.Style is an enumeration, which defines two possible values: actionSheet and alert. That said, the most convenient way to find out the available values is by typing a . after preferredStyle:. Xcode automatically shows you all the possible values.
Quick note: An enumeration is a common type in Swift that defines a list of possible values for that type. The UIAlertController.Style is a good example.Now let me answer the second question.
Normally we can refer to the values using UIAlertController.Style.actionSheet or UIAlertController.Style.alert. You can write the code like this when creating a UIAlertController:
let optionMenu = UIAlertController(title: nil, message: "What do you want to do?", preferredStyle: UIAlertController.Style.actionSheet)
There is nothing wrong with the code above. Swift gives developers a shorthand and helps us type less code. Because the type of the preferredStyle parameter is already known (i.e. UIAlertController.Style), Swift lets you use a shorter dot syntax by omitting UIAlertController.Style. This is why we instantiate the UIAlertController object like this:
let optionMenu = UIAlertController(title: nil, message: "What do you want to do?", preferredStyle: .actionSheet)
The same applies to UIAlertAction.Style. The UIAlertAction.Style is an enumeration with three possible values: default, cancel and destructive. When creating the cancelAction object, we also use the shorthand syntax:
let cancelAction = UIAlertAction(title: "Cancel", style: .cancel, handler: nil)
Adding Actions to the Alert Controller
Now let's add two more actions to the alert controller:
- Reserve a table action - A fake feature to demo how to present an alert message. We will not implement this feature but simply display an alert prompt on screen.
- Mark as Favorite action - When selected, this option marks the selected restaurant as a favorite restaurant.
In the tableView(_:didSelectRowAt:) method, add the following code for the "Call" action. You can insert the code after the initialization of cancelAction:
// Add "Reserve a table" action
let reserveActionHandler = { (action:UIAlertAction!) -> Void in

    let alertMessage = UIAlertController(title: "Not available yet", message: "Sorry, this feature is not available yet. Please retry later.", preferredStyle: .alert)
    alertMessage.addAction(UIAlertAction(title: "OK", style: .default, handler: nil))
    self.present(alertMessage, animated: true, completion: nil)

}

let reserveAction = UIAlertAction(title: "Reserve a table", style: .default, handler: reserveActionHandler)
optionMenu.addAction(reserveAction)
In the code above, the reserveActionHandler object is new to you. As mentioned before, you can specify a block of code as the handler when creating a UIAlertAction object. The block of code will be executed when the user selects the action. Previously, we specify nil in the cancelAction object. That means we do not have any follow-up action for the Cancel button.
For the reserveAction object, it is a bit different. We assign it with reserveActionHandler. The code block displays an alert, telling the user that the feature is not yet available.
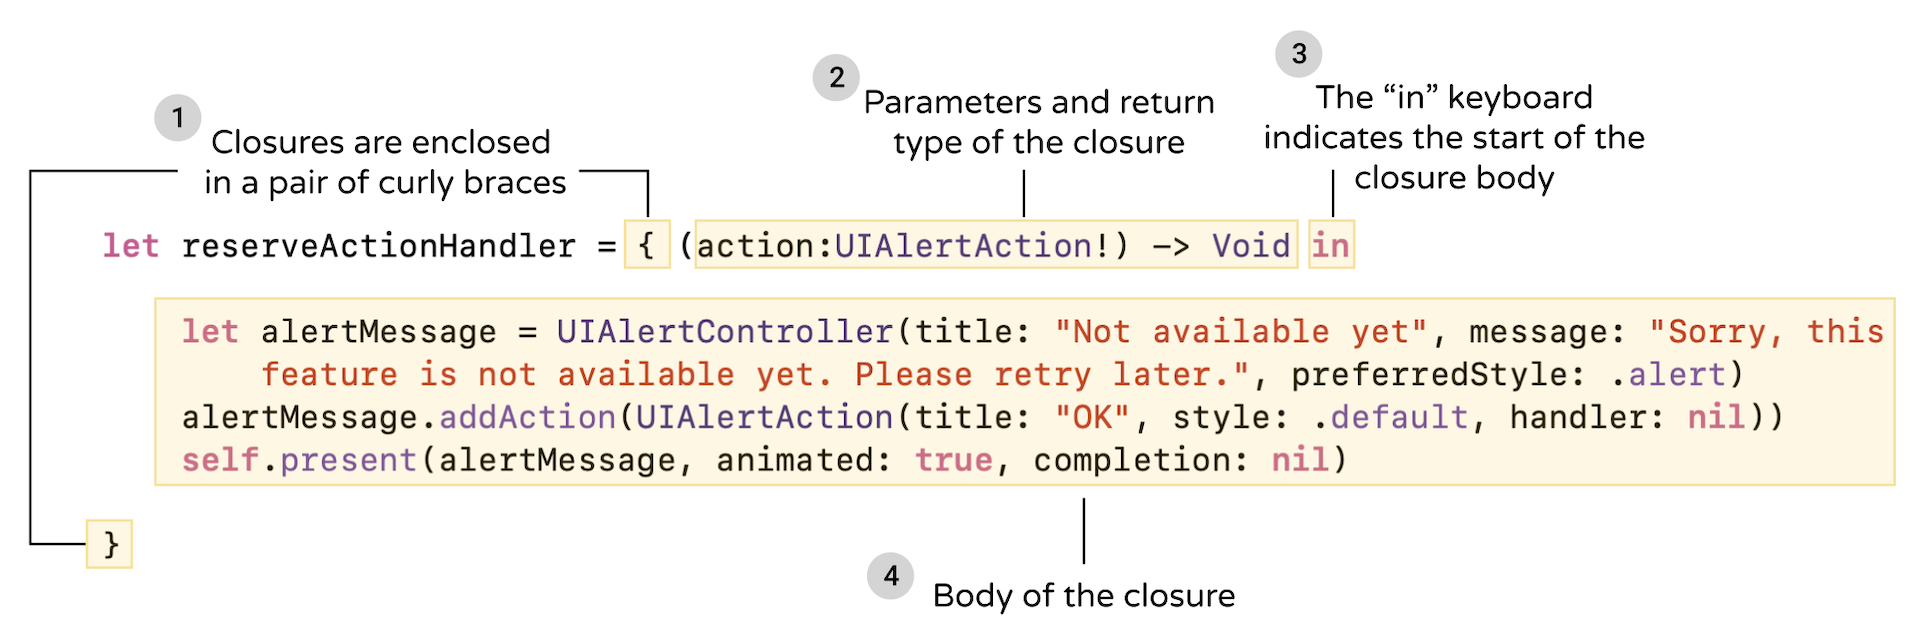
Technically, this block of code is known as Closure in Swift. Closures are self-contained blocks of functionality that can be passed around in your code. It is very similar to blocks in Objective-C. Like the example above, one way to provide the action closure is to declare it as a constant or a variable with the block of code as the value. The first part of the code block is identical to the definition of the handler parameter of UIAlertAction. The in keyword indicates that the definition of the closure's parameters and return type has finished, and the body of the closure will begin. Figure 10-16 illustrates the syntax of a closure.
The code specified in the body of the closure shouldn't be new to you. We create a UIAlertController to display the warning. However, instead of using the .actionSheet style, we use .alert. Later when you test the app, you will understand how an alert looks like.
Once we prepared the action handler, we create the UIAlertAction object and set its title to "Reserve a table". Most importantly, we assign the reserveActionHandler to the action object, followed by adding the action object to the option menu.
let reserveAction = UIAlertAction(title: "Reserve a table", style: .default, handler: reserveActionHandler)
optionMenu.addAction(reserveAction)
Next, insert the following lines of code for the Mark as favorite action:
// Mark as favorite action
let favoriteAction = UIAlertAction(title: "Mark as favorite", style: .default, handler: {
    (action:UIAlertAction!) -> Void in

    let cell = tableView.cellForRow(at: indexPath)
    cell?.accessoryType = .checkmark
})
optionMenu.addAction(favoriteAction)
The above code shows you another way to use closure. You can write the closure inline as a parameter of the handler.
When a user selects the "Mark as favorite" option, we add a checkmark to the selected cell. For a table view cell, the right part is reserved for an accessory view. There are four types of built-in accessory views including disclosure indicator, detail disclosure button, checkmark and detail. In this case, we use checkmark as the indicator.Optionals in Swift
Do you still remember what the question mark is for? If you've studied chapter 2, I hope you can answer the question. The cell is known as an optional in Swift. As mentioned before, Optional is a new type introduced in Swift. It simply means 'there is a value' or 'there isn't a value at all'. The cell returned bytableView.cellForRow(at:)is an optional. To access theaccessoryTypeproperty of the cell, you use the question mark. In this case, Swift will check if the cell has a value and allow you to set the value ofaccessoryTypeif the cell exists. In most cases, the autocomplete feature of Xcode automatically adds the question mark for you when accessing a property of an optional.
The first line of the code block retrieves the selected table cell using indexPath, which contains the index of the selected cell. The second line updates the accessoryType property of the cell with a check mark.
By default, the checkmark will be displayed in blue. Optionally, you can change its color by setting the tintColor property of a cell. In the awakeFromNib() method of RestaurantTableViewCell, you can add a line of code to set the cell's tint color:
override func awakeFromNib() {
    super.awakeFromNib()

    self.tintColor = .systemYellow
}
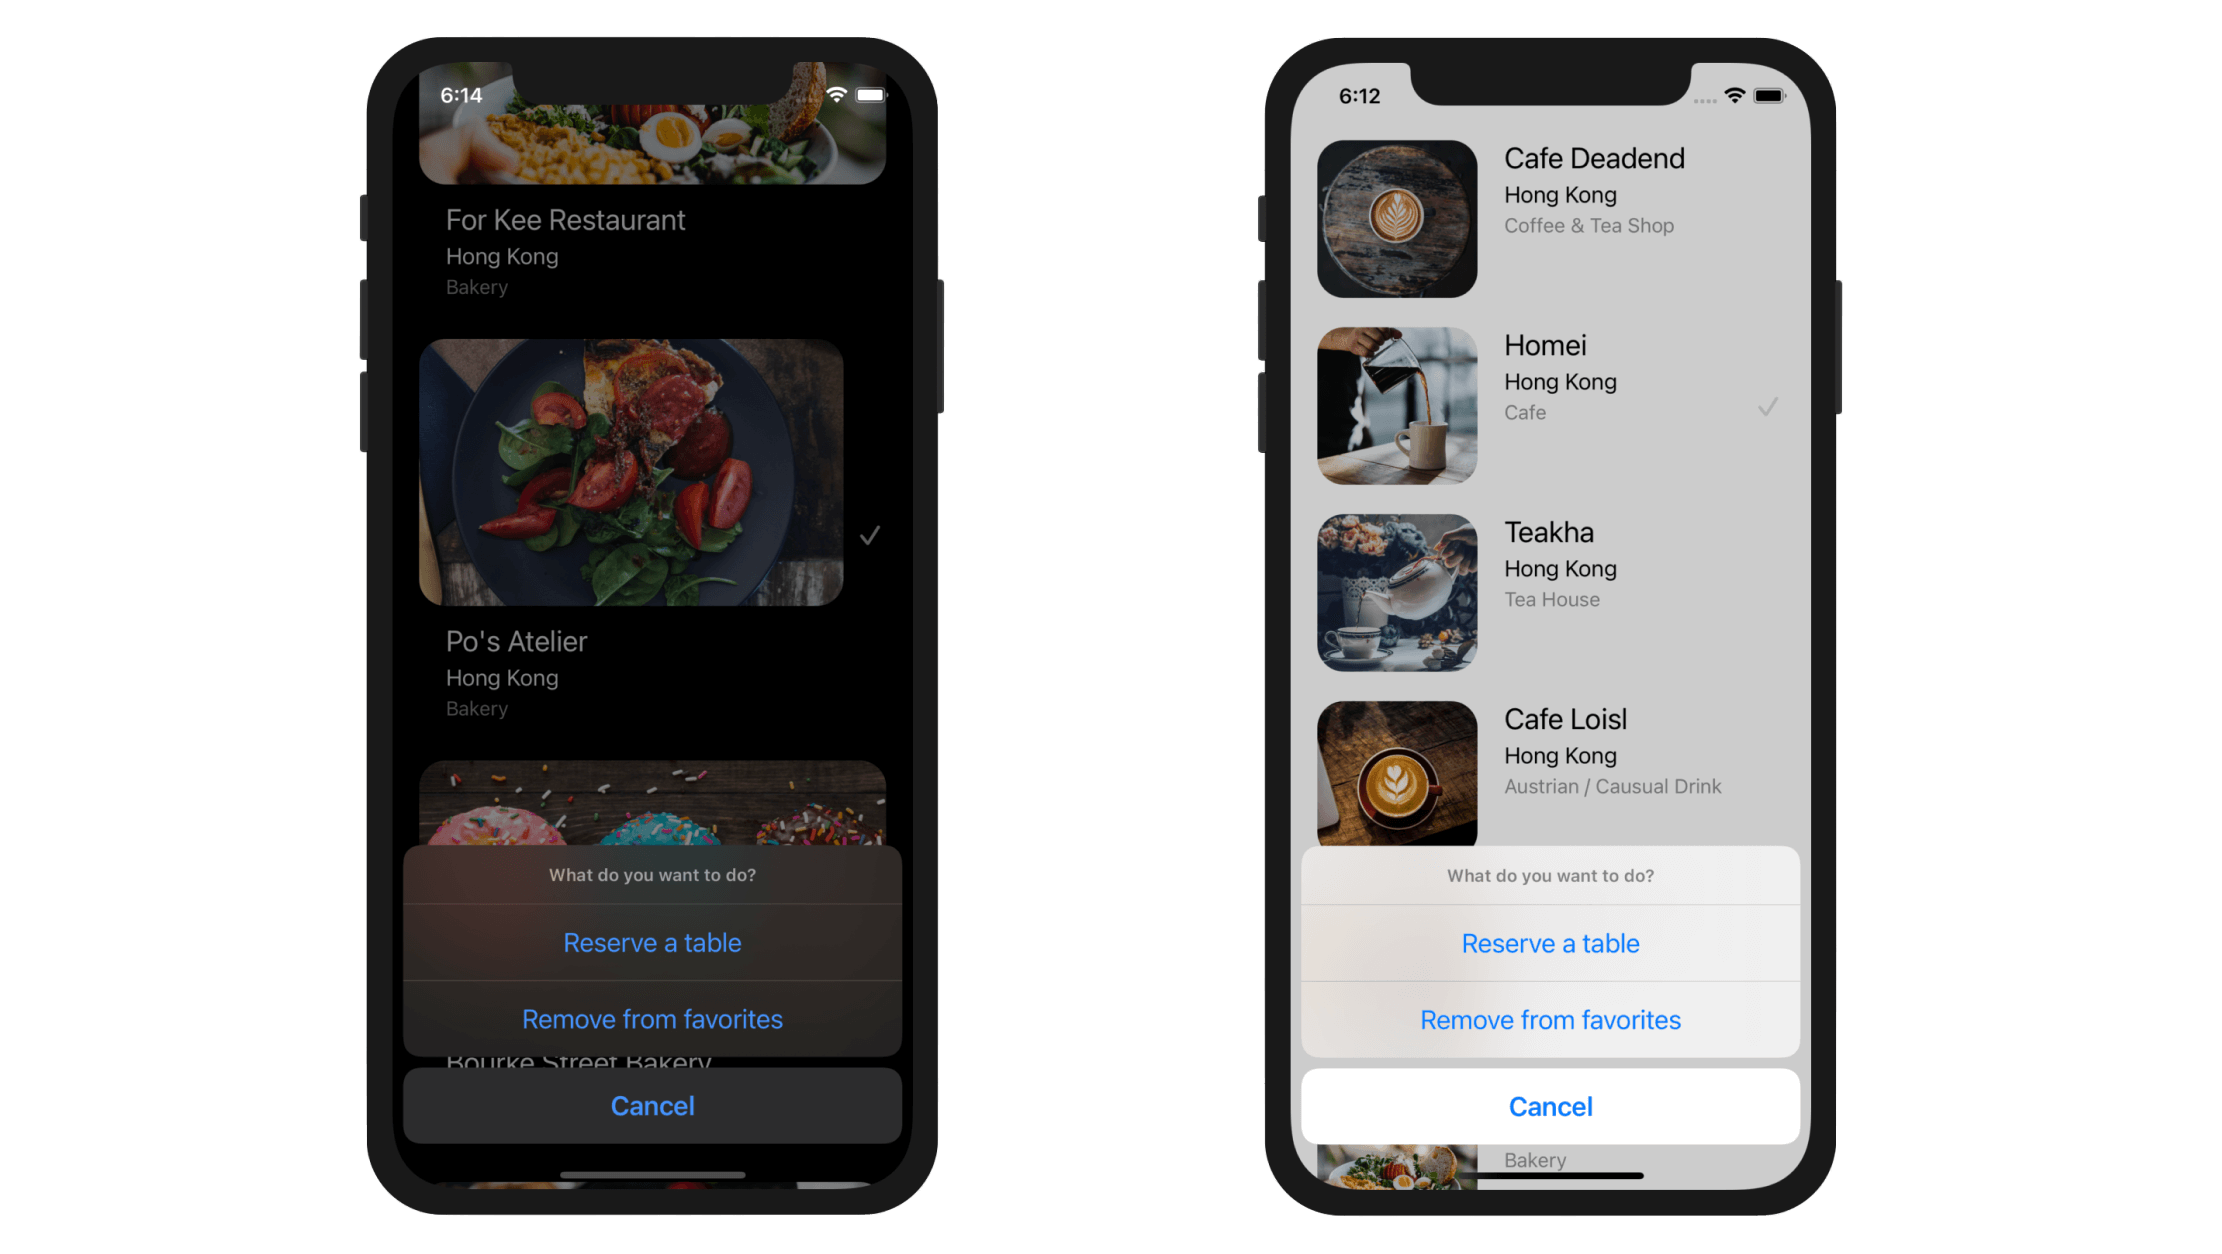
Compile and run the app. Tap a restaurant and choose one of the actions, it'll either show you a check mark or an alert.
For now, when you select a row, the row is highlighted in gray and stayed as selected. Add the following code at the end of the tableView(_:didSelectRowAt:) method to deselect the row.
tableView.deselectRow(at: indexPath, animated: false)
Your final code snippet of the tableView(_:didSelectRowAt:) method should like this:
override func tableView(_ tableView: UITableView, didSelectRowAt indexPath: IndexPath) {

    // Create an option menu as an action sheet
    let optionMenu = UIAlertController(title: nil, message: "What do you want to do?", preferredStyle: .actionSheet)

    // Add actions to the menu
    let cancelAction = UIAlertAction(title: "Cancel", style: .cancel, handler: nil)
    optionMenu.addAction(cancelAction)

    // Add "Reserve a table" action

    let reserveActionHandler = { (action:UIAlertAction!) -> Void in

        let alertMessage = UIAlertController(title: "Not available yet", message: "Sorry, this feature is not available yet. Please retry later.", preferredStyle: .alert)
        alertMessage.addAction(UIAlertAction(title: "OK", style: .default, handler: nil))
        self.present(alertMessage, animated: true, completion: nil)

    }

    let reserveAction = UIAlertAction(title: "Reserve a table", style: .default, handler: reserveActionHandler)
    optionMenu.addAction(reserveAction)

    // Mark as favorite action

    let favoriteAction = UIAlertAction(title: "Mark as favorite", style: .default, handler: {
        (action:UIAlertAction!) -> Void in

        let cell = tableView.cellForRow(at: indexPath)
        cell?.accessoryType = .checkmark

    })
    optionMenu.addAction(favoriteAction)

    // Display the menu
    present(optionMenu, animated: true, completion: nil)

    // Deselect the row
    tableView.deselectRow(at: indexPath, animated: false)
}
We Hit a Bug
The app looks great. If you look at it closely, however, there is a bug in the app. Say, you mark the "Cafe Deadend" restaurant using the Mark as favorite action. If you scroll down the table, you'll find that another restaurant (e.g. Palomino Espresso) also contains a checkmark. What's the problem? Why did the app add an extra checkmark?
Like every programmer, I hate bugs especially when facing a project deadline. However it's always the bugs that help me improve my programming skills. You'll hit a lot of bugs too as you continue to learn. Just get used to it.
The problem is due to cell reuse, that we have discussed in the earlier chapter. For example, the table view has 30 cells. For performance reasons, instead of creating 30 table cells, UITableView may just create 10 cells and reuses them as you scroll through the table. In this case, UITableView reuses the 1st cell (originally used for Cafe Deadend with a checkmark) for displaying another restaurant. In our code, we only update the image view and labels when the table view reuses the same cell. The accessory view is not updated. Thus, the next restaurant reusing the same cell shares the same accessory view. If the accessory view contains a checkmark, that restaurant will also carry a checkmark.
So how can we resolve the bug?
We have to find another way to keep track of the checked items. How about creating another array to save the checked restaurants? In the RestaurantTableViewController.swift file, declare a Boolean array:
var restaurantIsFavorites = Array(repeating: false, count: 21)
Bool is a data type in Swift that holds a Boolean value. Swift provides two Boolean values: true and false. We declare the restaurantIsVisited array to hold a collection of Bool values. Each value in the array indicates whether the corresponding restaurant is marked as "Check-in". For example, we can look into the value of restaurantIsVisited[0] to see if Cafe Deadend is checked or not.
The values in the array are initialized to false. In other words, the items are unchecked by default. The above line of code shows you a way to initialize an array in Swift with repeated values. The initialization is the same as the following:
var restaurantIsVisited = [false, false, false, false, false, false, false, false, false, false, false, false, false, false, false, false, false, false, false, false, false]
We have to make a couple of changes in order to fix the bug. First, we need to update the value of the Bool array when a restaurant is marked as favorite. Add a line of code in the handler of the reserveAction object:
let favoriteAction = UIAlertAction(title: "Mark as favorite", style: .default, handler: {
    (action:UIAlertAction!) -> Void in

    let cell = tableView.cellForRow(at: indexPath)
    cell?.accessoryType = .checkmark

    self.restaurantIsFavorites[indexPath.row] = true
})
The code is very straightforward. We update the value of the selected item from false to true.
Lastly, update the configureDataSource method and insert the following line of code in the closure of cellProvider:
cell.accessoryType = self.restaurantIsFavorites[indexPath.row] ? .checkmark : .none
This is a simplified way to write a if condition. The ? is known as the ternary conditional operator, an efficient shorthand for evaluating simple conditions. The purpose of this single code of code is exactly the same as the following:
if self.restaurantIsFavorites[indexPath.row] {
    cell.accessoryType = .checkmark
} else {
    cell.accessoryType = .none
}
Every time when the cell is rendered, we check if the restaurant to be displayed is marked as favorite. If the condition is true, we display a checkmark in the cell. Otherwise, just display nothing. Since we refer to the restaurantIsFavorites array to see if the restaurant should be marked, we can now display the accessory view correctly, even if the cell is reused.
Now, compile and run the app again. Your bug should now be resolved.
Working with iPad
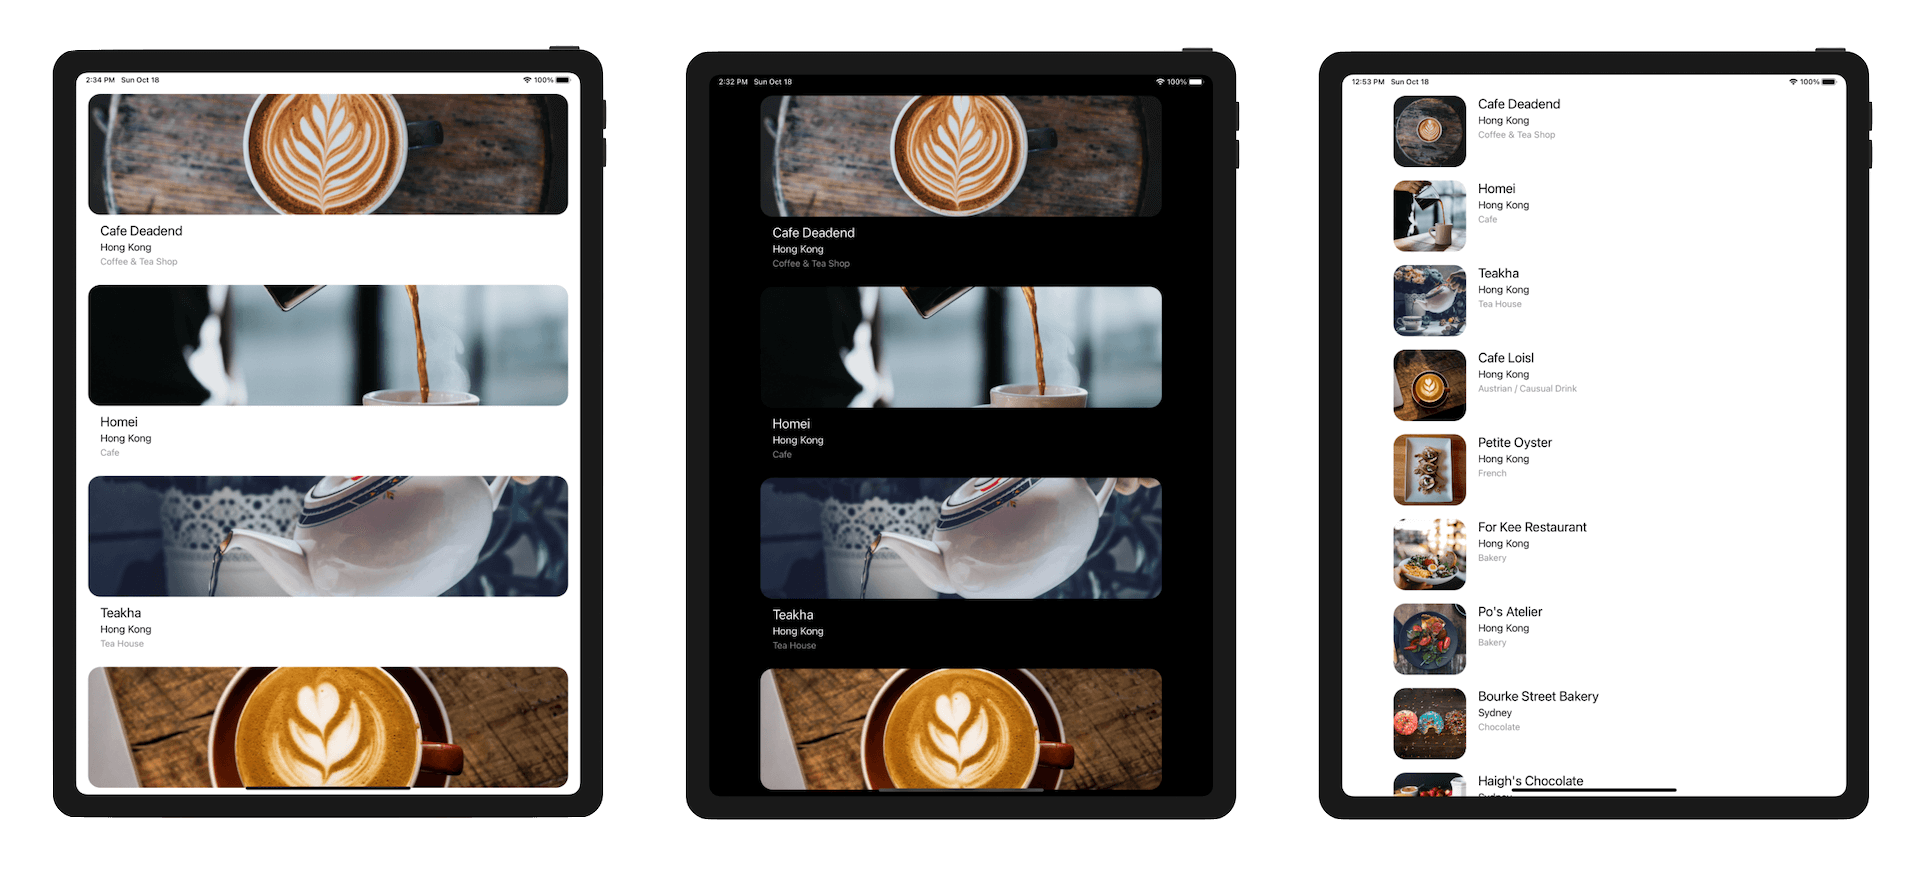
Have you tried to run the app on iPad? It looks pretty well. However, since the cell stretches across the width of the device, you may find the cells are a bit too long especially when you turn the iPad device sideway.
From iOS 9 and onwards, you can use a property called cellLayoutMarginsFollowReadableWidth to adjust the cell width automatically. If you insert the following line of code to the viewDidLoad method like below, you can enable the option:
override func viewDidLoad() {
    super.viewDidLoad()
    tableView.cellLayoutMarginsFollowReadableWidth = true

    .
    .
    .
}
After the change, run the app on the iPad simulator again. You will immediately find the difference. It is up to you if you want to keep this option enabled or not.
We Hit Another Bug on iPad
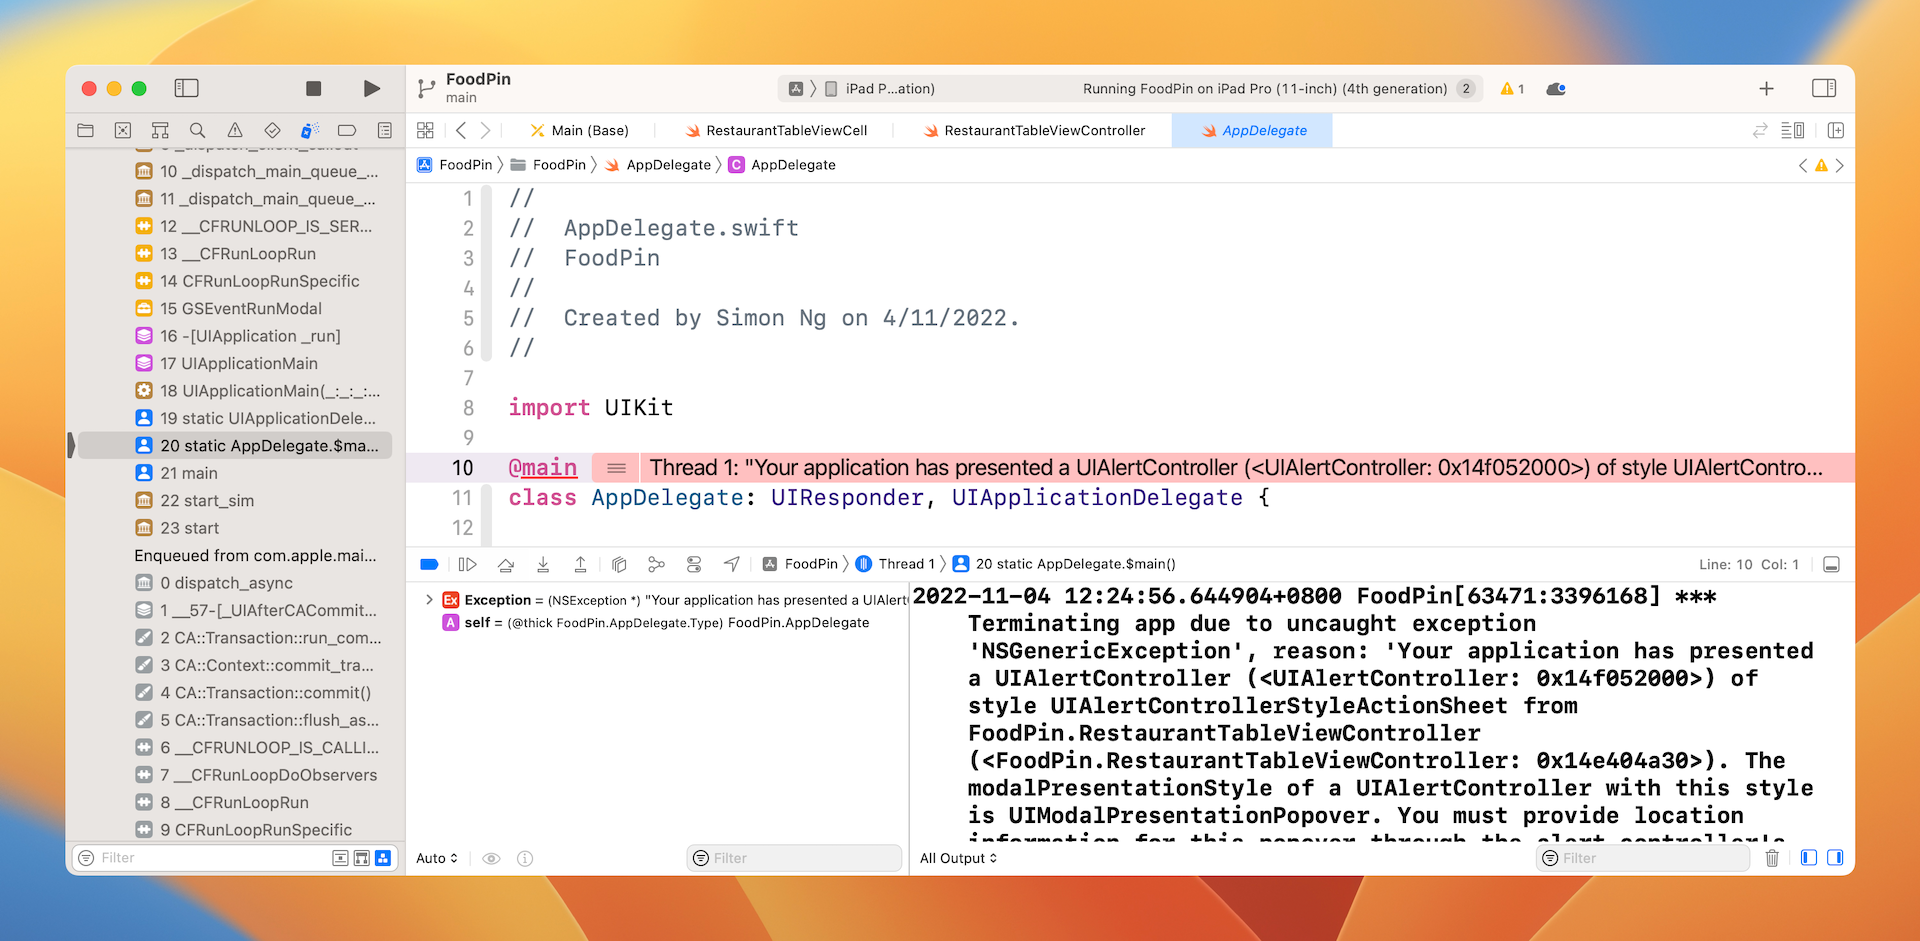
When you tap any of the table view cells on iPad, the app crashes and ends up with an error in console:
Terminating app due to uncaught exception 'NSGenericException', reason: 'Your application has presented a UIAlertController (<UIAlertController: 0x7ff068897400>) of style UIAlertControllerStyleActionSheet from FoodPin.RestaurantTableViewController (<FoodPin.RestaurantTableViewController: 0x7ff069704d20>). The modalPresentationStyle of a UIAlertController with this style is UIModalPresentationPopover. You must provide location information for this popover through the alert controller's popoverPresentationController. You must provide either a sourceView and sourceRect or a barButtonItem.  If this information is not known when you present the alert controller, you may provide it in the UIPopoverPresentationControllerDelegate method -prepareForPopoverPresentation.'
terminating with uncaught exception of type NSException
CoreSimulator 732.17 - Device: iPad Pro (11-inch) (2nd generation) (02AA483A-0CAA-4645-8B8F-90D3397769A3) - Runtime: iOS 14.1 (18A8394) - DeviceType: iPad Pro (11-inch) (2nd generation)
In case that you can't see the console message, go up to the Xcode menu and choose View > Debug Area > Activate Console. Take a look at figure 10-19 if you don't know where the console is. The console message is very useful in helping you find out the root cause of the error. Whenever you experience an exception in your app, look into the console and dig out the error message.
According to the error message, a UIActionController of style .actionSheet will behave differently on iPad. Instead of presenting the alert controller modally, iOS will present the controller using the popover style.
The presentation process is automatically handled by iOS. When the following line of the code is called, iOS will check if the device is an iPhone or iPad.
present(optionMenu, animated: true, completion: nil)
If it is an iPhone, the alert controller will be presented modally. On iPad, the alert controller will be presented in the popover style using the UIPopoverPresentationController object stored in its popoverPresentationController property.
Now try to look into the error message again. Can you find out the root cause of the error?
You must provide location information for this popover through the alert controller's popoverPresentationController. You must provide either a sourceView and sourceRect or a barButtonItem.
When presenting the activity view controller using the popover style, you have to configure the source view of its popoverPresentationController. The source view indicates the view containing the anchor rectangle for the popover. You will understand what it means after implementing the popover.
Now, insert the following code in the tableView(_:didSelectRowAt:) method and place the code after the instantiation of optionMenu:
if let popoverController = optionMenu.popoverPresentationController {
    if let cell = tableView.cellForRow(at: indexPath) {
        popoverController.sourceView = cell
        popoverController.sourceRect = cell.bounds
    }
}
When the app is run on iPhone, the popoverPresentationController property of the alert controller (i.e optionMenu) is set to nil. Conversely, it will store the popover presentation controller when the app is run on iPad. Therefore, we use if let to check if the popoverPresentationController property has a value. If yes, we configure its sourceView to the cell that triggers the action. Optionally, we set the sourceRect property to the cell's bounds, so that the popover will be originated from the center of the cell.
Test the app on the iPad simulator again. It should work now.
Exercise #1
Presently the app doesn't allow users to uncheck the checkmark. Think about how you can alter the code such that the app can toggle the checkmark. You'll also need to show a different title for the Remove from favorites button if the selected cell is marked. It's not too hard to make the changes. Take some time to work on the exercise. I'm sure you'll learn a lot.
Exercise #2
Instead of showing the default checkmark, replace it with a heart icon. Xcode has some built-in system images. After adding an image view, you can set the image to heart.fill to use the heart image built into the system. Figure 10-22 shows you the final layout.

You are expected to modify both prototype cells (i.e. datacell and favoritecell) to add the heart icon. Another hint is that you can use the isHidden property of an image view to control its visibility. For example, you can set the isHidden property to true to hide the image view like this:
cell.heartImageView.isHidden = true
I encourage you to take some time to work on this exercise too because it will help you revise everything you learned so far.
Summary
At this point, you should have a solid understanding of how to create table view, customize table cells and handle table row selection. You're ready to build a simple table view app on your own (e.g. a simple ToDo app). I always recommend you to create your own project. I don't mean you have to start a big one. If you love to travel, create a simple app that displays a list of your favorite destinations. If you love music, create your own app that shows a list of your favorite albums. Just play around with Xcode, make mistake and learn along the way.
For reference, you can download the complete Xcode project from http://www.appcoda.com/resources/swift57/FoodPinTableSelection.zip. For the solution of the exercise, you can download it from http://www.appcoda.com/resources/swift57/FoodPinTableSelectionExercise.zip.
In the next chapter, we'll continue to explore table view and see how you can delete a table row.