- Made by AppCoda
- Contact us / Support
- Tweet this book
- Preface
- 1. The Development Tools, the Learning Approach, and the App Idea
- 2. Your First Taste of Swift with Playgrounds
- 3. Hello World! Build Your First App in Swift
- 4. Hello World App Explained
- 5. Introduction to Auto Layout
- 6. Designing UI Using Stack Views
- 7. Introduction to Prototyping
- 8. Creating a Simple Table-based App
- 9. Customize Table Views Using Prototype Cell, Diffable Data Source and Dark Mode
- 10. Displaying Alerts with UIAlertController and Handling Table View Selection
- 11. Object Oriented Programming, Project Organization and Code Documentation
- 12. Table Row Deletion, Custom Action Button and MVC
- 13. Introduction to Navigation Controller and Segue
- 14. Detail View Enhancement and Navigation Bar Customization
- 15. Navigation Bar Customization, Extensions and Dynamic Type
- 16. Working with Maps
- 17. Basic Animations, Visual Effects and Unwind Segues
- 18. Working with Static Table Views, Camera and NSLayoutConstraint
- 19. Working with Core Data
- 20. Search Bar and UISearchController
- 21. Building Walkthrough Screens with UIPageViewController and Container Views
- 22. Exploring Tab Bar Controller and Storyboard References
- 23. Getting Started with WKWebView and SFSafariViewController
- 24. Exploring CloudKit
- 25. Localizing Your App to Reach More Users
- 26. Deploying and Testing Your App on a Real iOS Device
- 27. Beta Testing with TestFlight and CloudKit Production Deployment
- 28. Submit Your App to App Store
- 29. Adopting 3D Touch, Haptic Touch and Context Menus
- 30. Developing User Notifications in iOS
- 31. Appendix - Swift Basics
- Published with GitBook
Chapter 12
Table Row Deletion, Swipe for Actions, Activity Controller and MVC

If you spend too much time thinking about a thing, you'll never get it done. Make at least one definite move daily toward your goal.
– Bruce Lee
In the earlier chapter, you learned how to handle table row selection. But how about deletion? How can we delete a row from a table view? It's a common question when building a table-based app. Select, delete, insert and update are the basic operations when dealing with data. We've discussed how to select a table row. Let's talk about deletion in this chapter. In addition, we'll go through a couple of new features to the FoodPin app:
- Adding a custom action button when a user swipes horizontally in a table row. This is usually known as Swipe for More action.
- Adding a social sharing feature to the app, that enables users to easily share the restaurants.
There is a lot to learn in this chapter, but it's going to be fun and rewarding. Let's get started.
A Brief Introduction to Model View Controller
We briefly mentioned the term MVC in the previous chapter when organizing the source files. Before jumping into the coding part, I would like to give you an introduction of Model-View-Controller (MVC) model, which is one of the most quoted design patterns for user interface programming.
I try to keep this book as practical as possible and seldom talk about the programming theories. Similar to OOP, if your ultimate goal is to become a professional developer, you can't avoid learning Model-View-Controller. MVC is not a concept that applies to iOS programming only. You may have heard of it if you've studied other programming languages, such as Java or Ruby. It is a powerful design pattern used in designing software applications, whether it is a mobile app and a web app.
Understanding Model-View-Controller
At the heart of MVC, and the idea that was the most influential to later frameworks, is what I call Separated Presentation. The idea behind Separated Presentation is to make a clear division between domain objects that model our perception of the real world, and presentation objects that are the GUI elements we see on the screen. Domain objects should be completely self contained and work without reference to the presentation, they should also be able to support multiple presentations, possibly simultaneously. This approach was also an important part of the Unix culture, and continues today allowing many applications to be manipulated through both a graphical and command-line interface.
By Martin Fowler
No matter which programming language you learn, one important concept that you need to know is Separation of Concerns (SoC). The concept is pretty simple. Here, the Concerns are different aspects of software functionality. This concept encourages developers to break a complicated feature or program into several areas of concern such that each area has its own responsibility. The delegate pattern, that we explained in the earlier chapters, is one of the examples of SoC.
The model-view-controller (MVC) concept is another example of SoC. The core idea behind MVC is to separate a user interface into three areas (or groups of objects) that each area is responsible for a particular functionality. As the name suggests, MVC breaks a user interface into three parts:
- Model – a model is responsible for holding the data or any operations on the data. The model can be as simple as an array object that stores the table data. Add, update and delete are examples of the operations. In the business world, these operations are usually known as business rules.
- View – a view manages the visual display of information. For example, UITableView displays data in a list format.
- Controller – a controller is a bridge between the model and the view. It translates the user interaction from the view (e.g. tap) into the appropriate action to be performed in the model. For example, a user taps the delete button in the view. Consequently, the controller triggers a delete operation in the model. Once finished, the model requests the view to refresh itself so as to reflect the update of the data model.
To help you better understand MVC, let's use the FoodPin app as an example. The app displays a list of restaurants in the table view. If you turn the implementation into a visual illustration, here is how the table data is displayed:
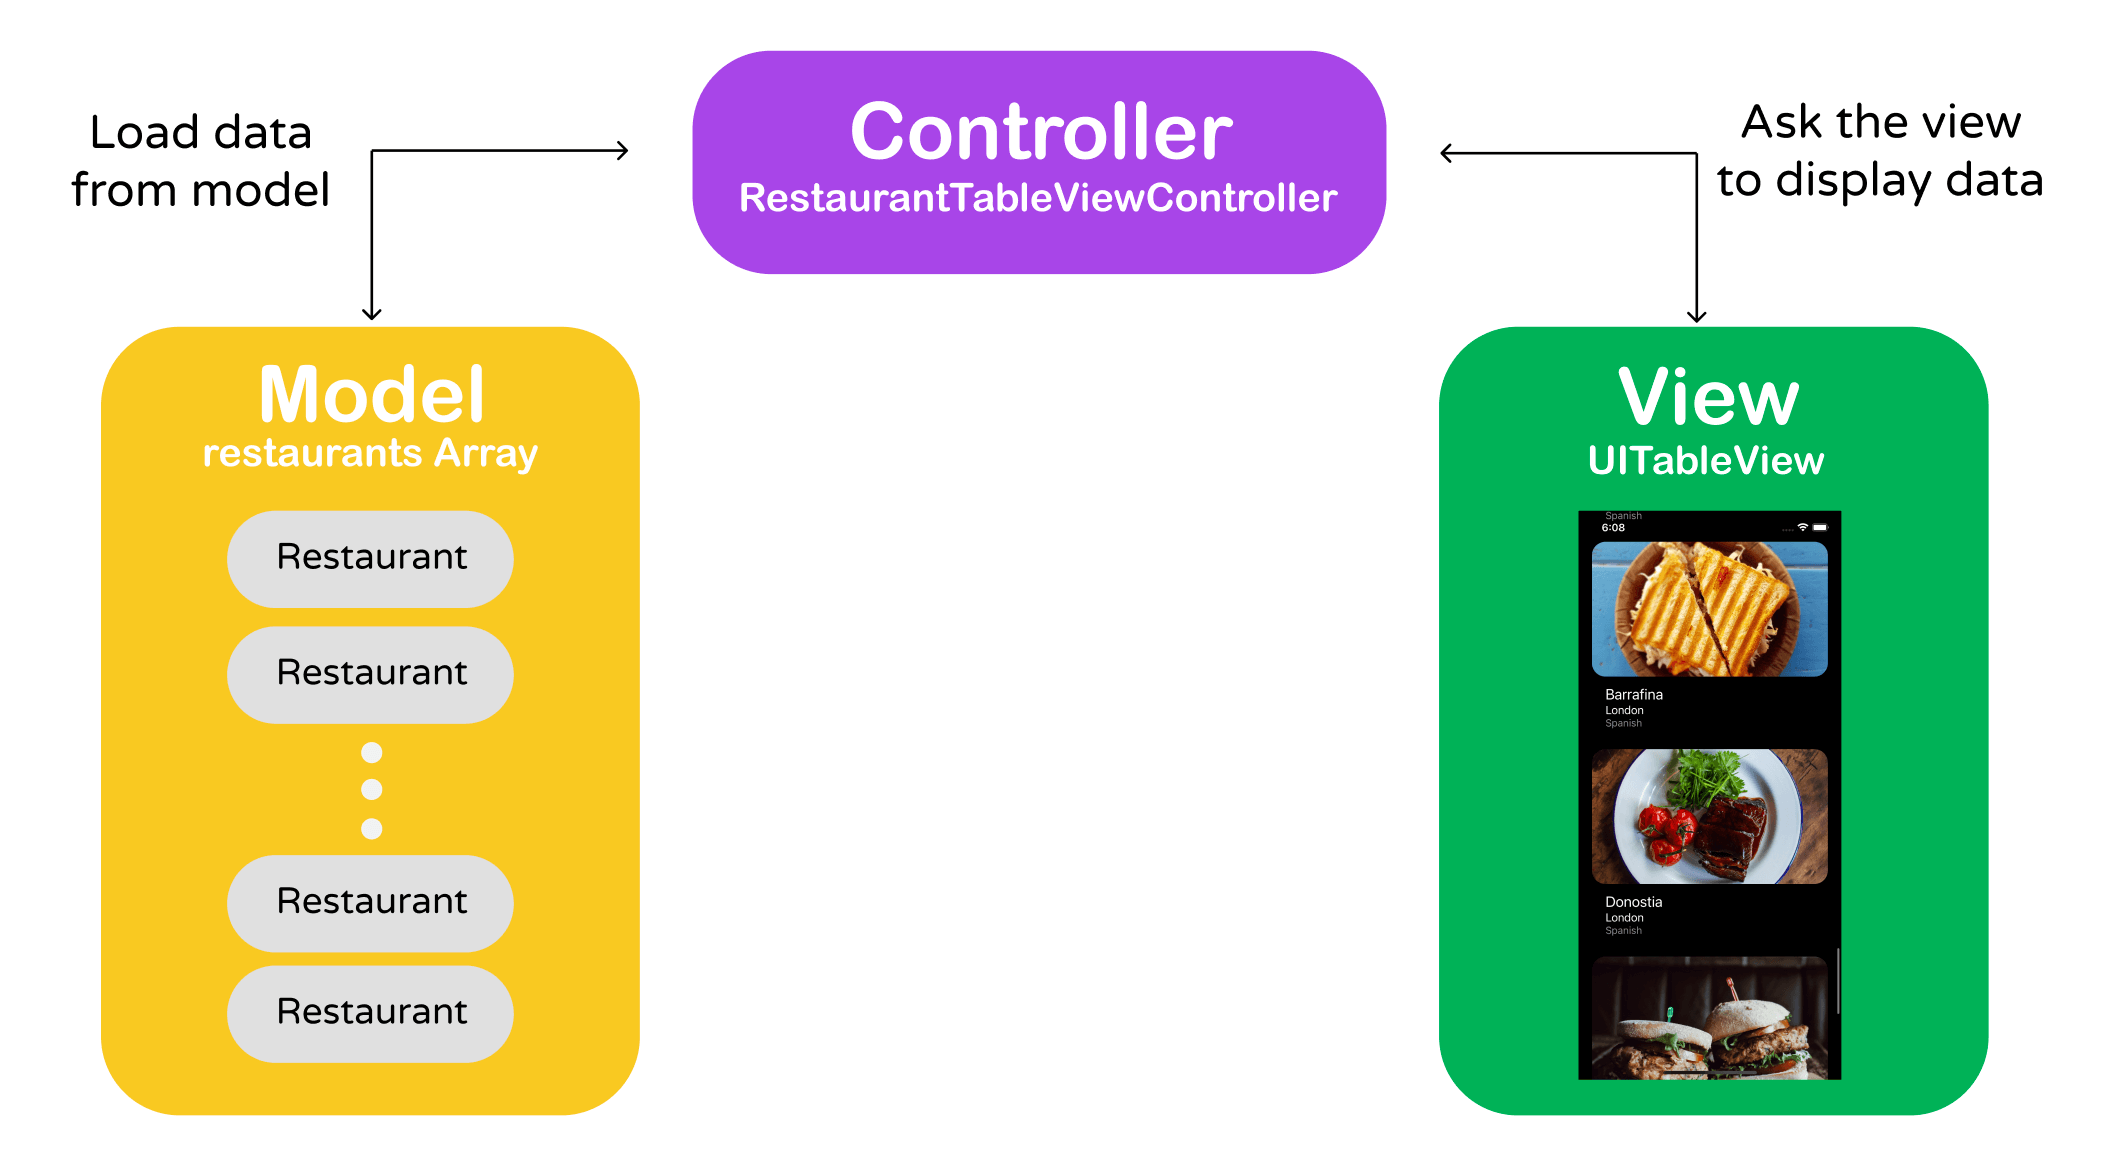
The Model is the restaurants array which holds the list of restaurants. Each table row maps to an item of the restaurants array. The UITableView object is the actual View to be seen by a user. It's responsible for all the visuals (e.g. color of the table rows, style of the tableview, separator style, etc). The UITableViewController object, which is the Controller, acts as the bridge between the table view and the data model. It manages the table view and is responsible to load the data from the model.
Deleting a Row from UITableView
I hope you now have a better understanding of Model-View-Controller. Let's move onto the coding part and see how we can delete a row from a table view. We'll continue to develop the FoodPin app (if you haven't completed the previous exercise, you can start with by downloading the project from (http://www.appcoda.com/resources/swift57/FoodPinOOP.zip) and add the "delete" feature.
If you understand the MVC model, you probably have some ideas on the implementation of row deletion. There are three main tasks we have to do:
- Enable the swipe-to-delete feature of the table view so that the user can select the Delete option
- Delete the corresponding table data from the data model
- Update the snapshot and apply the change of table data
Enable the Swipe-to-delete feature
In iOS apps, users normally swipe horizontally across a table row to reveal the Delete button. If you've read the documentation of the UITableViewDataSource protocol, you will find a method called tableView(_:commit:forRowAt:). This is the method that handles the deletion (or insertion) of a specific row.
The question is how can we implement the method? We are not using UITableViewDataSource but UITableViewDiffableDataSource to manage our data. If you dig deeper into the API documentation of UITableViewDiffableDataSource, this protocol actually conforms to UITableViewDataSource! In this case, we can override tableView(_:commit:forRowAt:) and create the swipe-to-delete feature.
But wait! Referring to the configureDataSource() method, we are using the UITableViewDiffableDataSource class directly. How can we override the method and provide our own implementation?
Things get a little bit tricky here. In order to override the default implementation of the method, we have to subclass UITableViewDiffableDataSource and create our own version of diffable data source class.
Now go to the project navigator. Right click the Model folder and choose New file.... Select the Cocoa Touch Class template and click Next. Name the class RestaurantDiffableDataSource and set its subclass to UITableViewDiffableDataSource.

Once the file is created, update the content like this:
import UIKit

enum Section {
    case all
}

class RestaurantDiffableDataSource: UITableViewDiffableDataSource<Section, Restaurant> {

    override func tableView(_ tableView: UITableView, canEditRowAt indexPath: IndexPath) -> Bool {
        return true
    }

    override func tableView(_ tableView: UITableView, commit editingStyle: UITableViewCell.EditingStyle, forRowAt indexPath: IndexPath) {

    }
}
We created our custom version of diffable data source with the section type Section and the item type Restaurant. In the body, we override the tableView(_:commit:forRowAt:) method and the tableView(_:canEditRowAt:) method. The reason why we need to override the default implementation of tableView(_:canEditRowAt:) is that the cell is non-editable by default. This is why we override the method and return the value true to make the cells editable. The swipe-to-delete feature will not work if the cell is non-editable.
While we override the tableView(_:commit:forRowAt:) method, we haven't provided any implementation. This is good enough to enable the swipe-to-delete feature of a table view. If the method exists, the table view will automatically display a Delete button when the user swipes across a row.
Before we can test the app, there are a couple of changes we have to make. Since we have our custom version of UITableViewDiffableDataSource, switch over to RestaurantTableViewController.swift and change the UITableViewDiffableDataSource in the configureDataSource() method to RestaurantDiffableDataSource. The method should be like this after change:
func configureDataSource() -> RestaurantDiffableDataSource {

    let cellIdentifier = "datacell"

    let dataSource = RestaurantDiffableDataSource(
        tableView: tableView,
        cellProvider: {  tableView, indexPath, restaurant in
            let cell = tableView.dequeueReusableCell(withIdentifier: cellIdentifier, for: indexPath) as! RestaurantTableViewCell

            cell.nameLabel.text = restaurant.name
            cell.locationLabel.text = restaurant.location
            cell.typeLabel.text = restaurant.type
            cell.thumbnailImageView.image = UIImage(named: restaurant.image)
            cell.favoriteImageView.isHidden = restaurant.isFavorite ? false : true

            return cell
        }
    )

    return dataSource
}
Please also note that I changed the value of cellIdentifier to datacell. You don't have to follow me. If you like, you can keep it to favoritecell.
There is one more change we have to make. Since we moved the Section enum to RestaurantDiffableDataSource.swift. We can delete the one declared in RestaurantTableViewController:
enum Section {
    case all
}
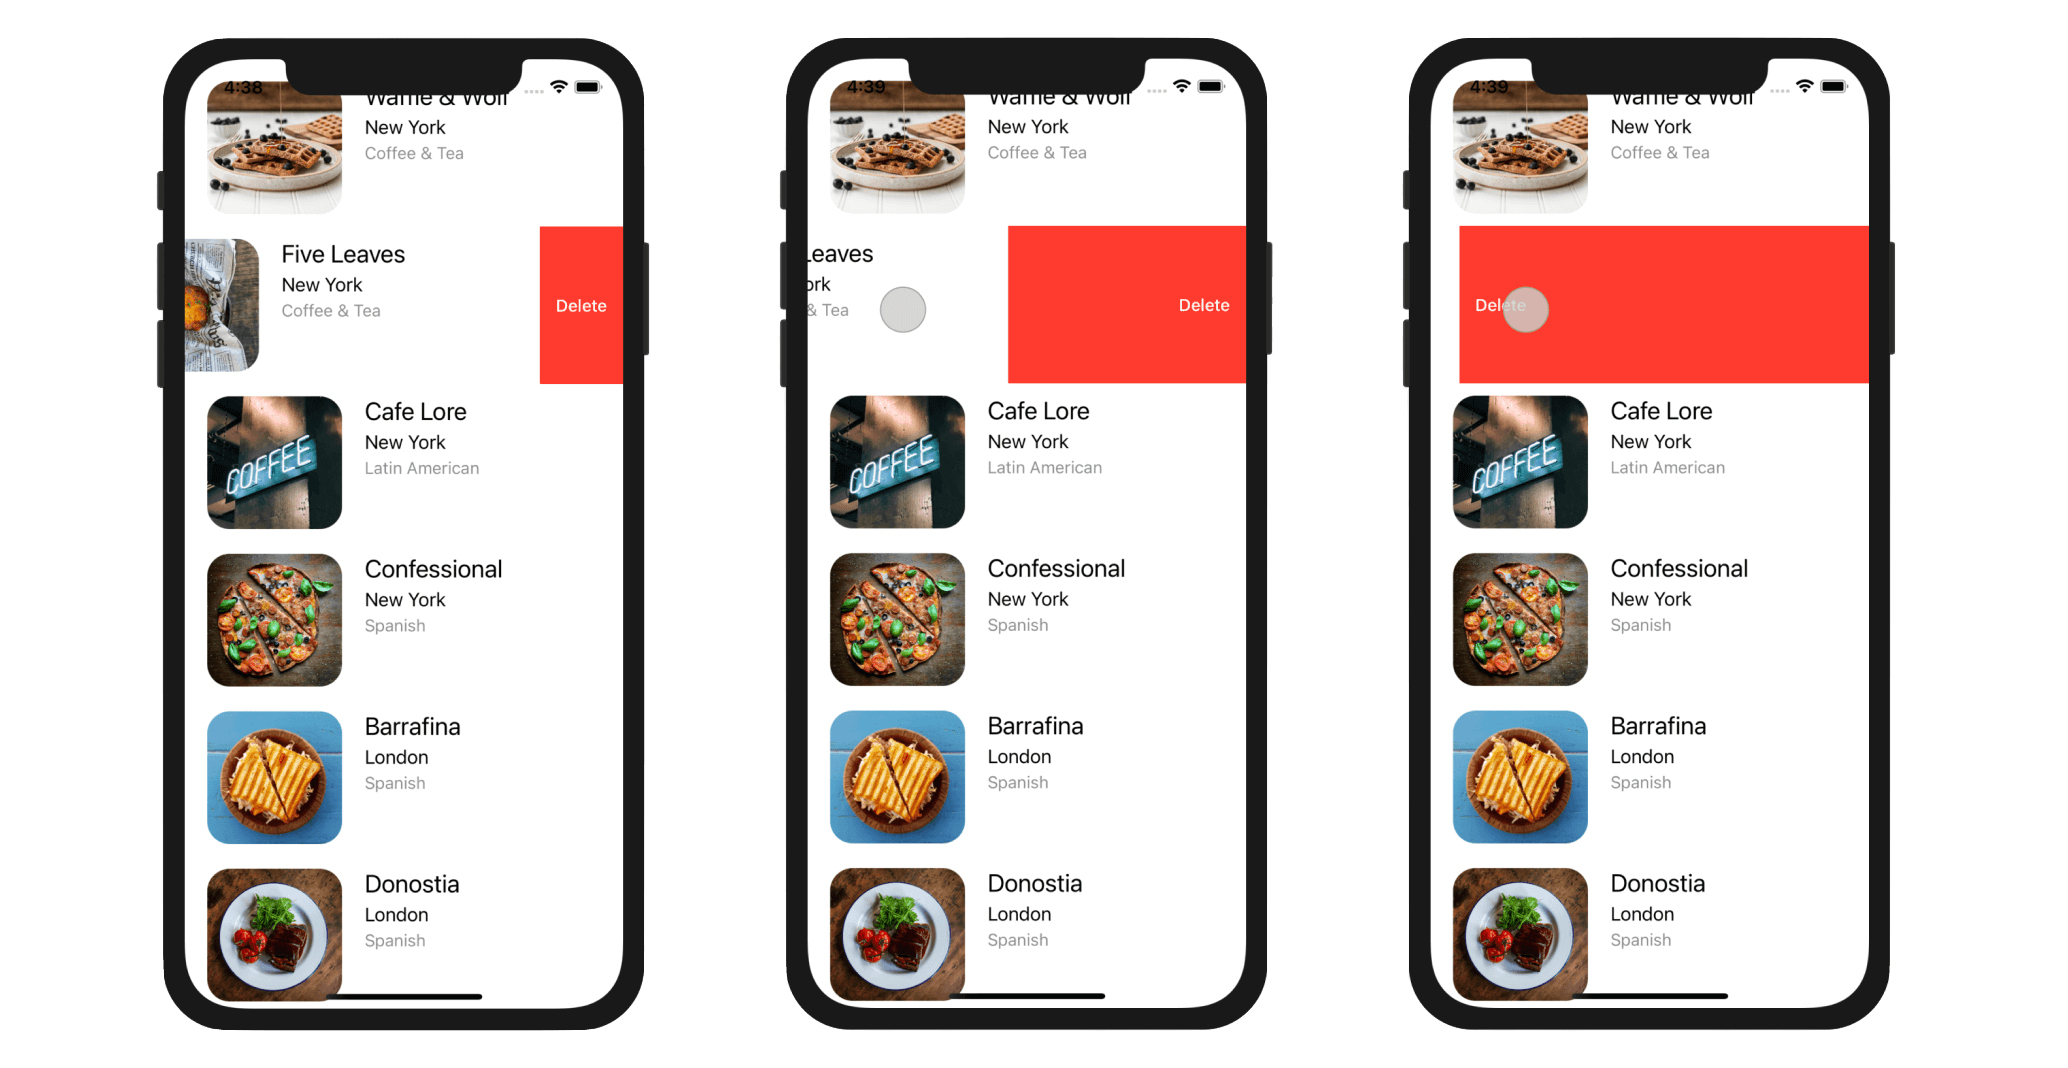
Now let's have a quick test. Run the app on an iPhone simulator. Though the method is currently without any implementation, you should see the Delete button when swiping across a row. If the delete button is functional, you can either tap the Delete button or continue to swipe to the left edge to remove the item.
Delete Row Data from the Table View Using Snapshot
The next thing is to implement the method and write the code for removing the actual table data from the table view. From the method declaration, the indexPath parameter contains the row number of the cell, which is about to delete. You can make use of this information to retrieve the restaurant that we are going to delete.
Update the tableView(_:commit:forRowAt:) method of RestaurantDiffableDataSource like this:
override func tableView(_ tableView: UITableView, commit editingStyle: UITableViewCell.EditingStyle, forRowAt indexPath: IndexPath) {

    if editingStyle == .delete {
        if let restaurant = self.itemIdentifier(for: indexPath) {
            var snapshot = self.snapshot()
            snapshot.deleteItems([restaurant])
            self.apply(snapshot, animatingDifferences: true)
        }
    }
}
The method supports two types of editing styles: insert and delete. Because we are only interested in the delete operation, we check the value of editingStyle before executing the code block. To find out the selected restaurant, we call the itemIdentifier method with the current indexPath.
The method returns us an optional, which means it can return a Restaurant object or nil. This is why we use the if let statement to perform a validation. Once we have the selected restaurant, we call the snapshot() method to get a copy of the data source’s current snapshot. Then we delete that restaurant by calling deleteItems. Lastly, we call apply with the updated snapshot to ask the table view to update its UI. Note that we also request the table view to animate the change by setting animatingDifferences to true.
Now run and test your app. Swipe any of the restaurants and delete the item. The table view should animate the deletion and remove the restaurant from the table.
If you've implemented the same "Delete" feature without diffable data sources, you should find that UITableViewDiffableDataSource make it very simple to keep the model data and view data in-sync. You no longer need to call reloadData to reload the table view or call deleteRows() to delete a specific table row. All you need is to grab a copy of the snapshot data, delete the item from the snapshot, and apply the changes to the table view.
Swipe for More Actions Using UIContextualAction
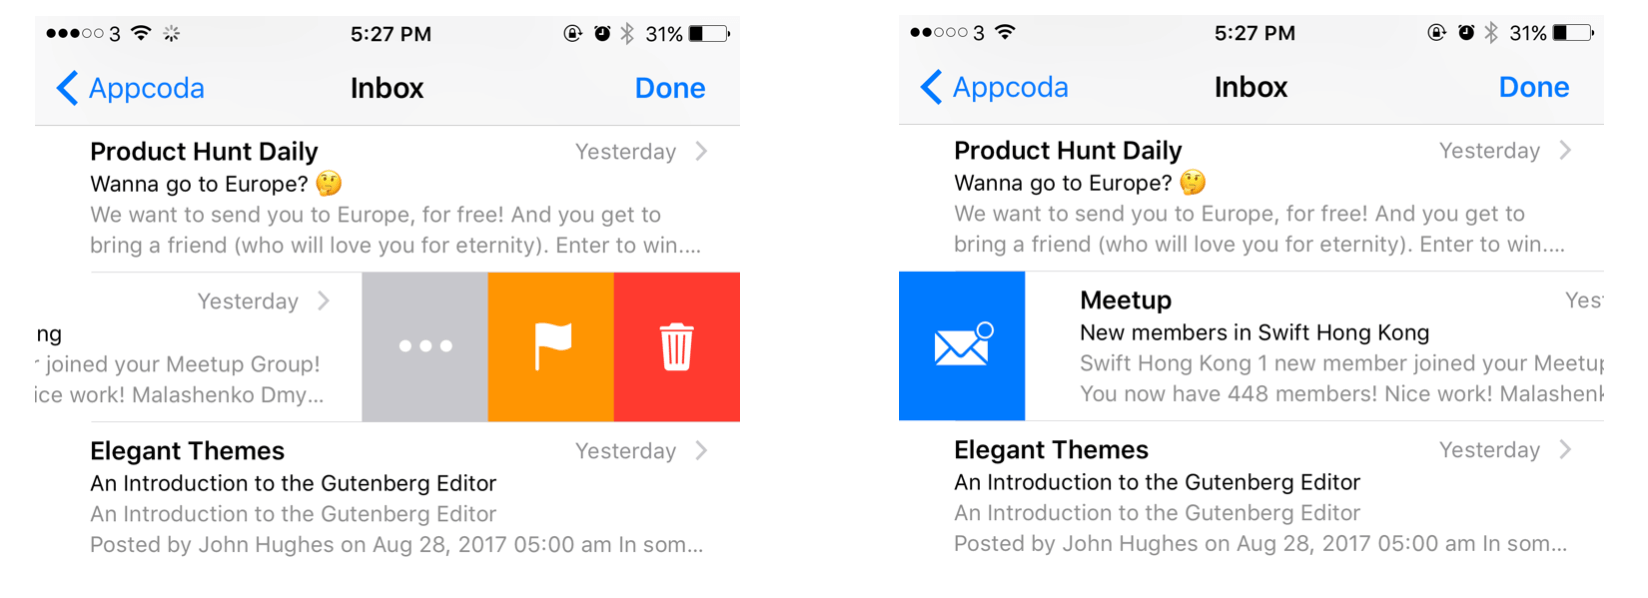
When you swipe left a table cell in the stock Mail app, you will see a Trash button, a Flag, and a More button. The More button will bring up an action sheet providing a list of options such as Reply, Flag, etc. If you swipe right, you will find the Archive button.
This swipe-for-more feature was first introduced in the stock iPhone apps in iOS 7. From iOS 8 to iOS 10, Apple made the "swipe-left" feature available to developers via a class named UITableViewRowAction. In iOS 11 (or up), Apple even lets developers implement the "swipe-right" feature in our own apps through new classes like UISwipeActionsConfiguration and UIContextualAction. You use the UIContextualAction class to create custom actions for table rows of any table view.
If we just need to implement the swipe to delete function in our app, the code that we implemented in the previous section is good enough. However, if we want to have a swipe-for-more feature, we need something more than that.
Before moving on, remove the whole method of tableView(_:commit:forRowAt:) in RestaurantDiffableDataSource:
override func tableView(_ tableView: UITableView, commit editingStyle: UITableViewCell.EditingStyle, forRowAt indexPath: IndexPath) {
    .
    .
    .
}
We no longer need the method. Instead, we will implement something new to replace it. iOS provided two methods for handling swipe actions in table view cells:
- tableView(_:leadingSwipeActionsConfigurationForRowAt:)
- tableView(_:trailingSwipeActionsConfigurationForRowAt:)
Both methods are defined in UITableViewDelegate. The first method is designed for handling swipe-to-right actions, while the second one is for swipe-to-left actions.
Now let's implement the second method in order to re-create the Delete function, plus adding a Share button. Insert the following method in RestaurantTableViewController:
override func tableView(_ tableView: UITableView, trailingSwipeActionsConfigurationForRowAt indexPath: IndexPath) -> UISwipeActionsConfiguration? {

    // Get the selected restaurant
    guard let restaurant = self.dataSource.itemIdentifier(for: indexPath) else {
        return UISwipeActionsConfiguration()
    }

    // Delete action
    let deleteAction = UIContextualAction(style: .destructive, title: "Delete") { (action, sourceView, completionHandler) in

        var snapshot = self.dataSource.snapshot()
        snapshot.deleteItems([restaurant])
        self.dataSource.apply(snapshot, animatingDifferences: true)

        // Call completion handler to dismiss the action button
        completionHandler(true)
    }

    // Share action
    let shareAction = UIContextualAction(style: .normal, title: "Share") { (action, sourceView, completionHandler) in
        let defaultText = "Just checking in at " + restaurant.name
        let activityController = UIActivityViewController(activityItems: [defaultText], applicationActivities: nil)

        self.present(activityController, animated: true, completion: nil)
        completionHandler(true)

    }

    // Configure both actions as swipe action
    let swipeConfiguration = UISwipeActionsConfiguration(actions: [deleteAction, shareAction])

    return swipeConfiguration
}
The usage of UIContextualAction is very similar to that of UIAlertAction. You specify the title, the style and the block of code (i.e. the completion handler) to execute when a user taps the button. In this example, we have two contextual actions: one for Delete and another for Share.
The first line of code may be new to you. We use guard let instead of if let to check if we can get a valid restaurant. The guard statement works like this:
- If the returned value of
itemIdentifier(for: indexPath)is not nil, save theRestaurantobject to therestaurantconstant. - Otherwise, return an empty swipe action configuration.
Can you use if let instead of guard let to perform the checking? Absolutely! However, the code looks cleaner when using guard let in this scenario.
To create the delete action, we instantiate a UIContextualAction object with the title "Delete" and .destructive style, indicating that the button should be in red. We also provide the code block to run after the delete action is selected. The code in the code block is similar to the one we wrote earlier, except that it has an additional line of code that calls completionHandler(true). After you successfully complete the action, you have to call the method to dismiss the action button. true indicates that the delete action has been performed.
Next, we create the share action using UIContextualAction with style .normal and title "Share". If the style is set to .destructive, the button's background color will be set to gray by default. When a user taps the button, it brings up an activity controller for social sharing.
The UIActivityViewController class is a standard view controller that provides several standard services, such as copying items to the clipboard, sharing content on social media sites, sending items via Messages, etc. The class is very simple to use. Let's say you have a message for sharing. All you need to do is create an instance of UIActivityViewController with the message object, and then present the controller on the screen. That is what we have done in the above code snippet.
The last two lines of code is the most important part. It returns a UISwipeActionsConfiguration object with an array of UIContextualAction objects (i.e. deleteAction and shareAction), telling the table view to create the swipe-for-more buttons.
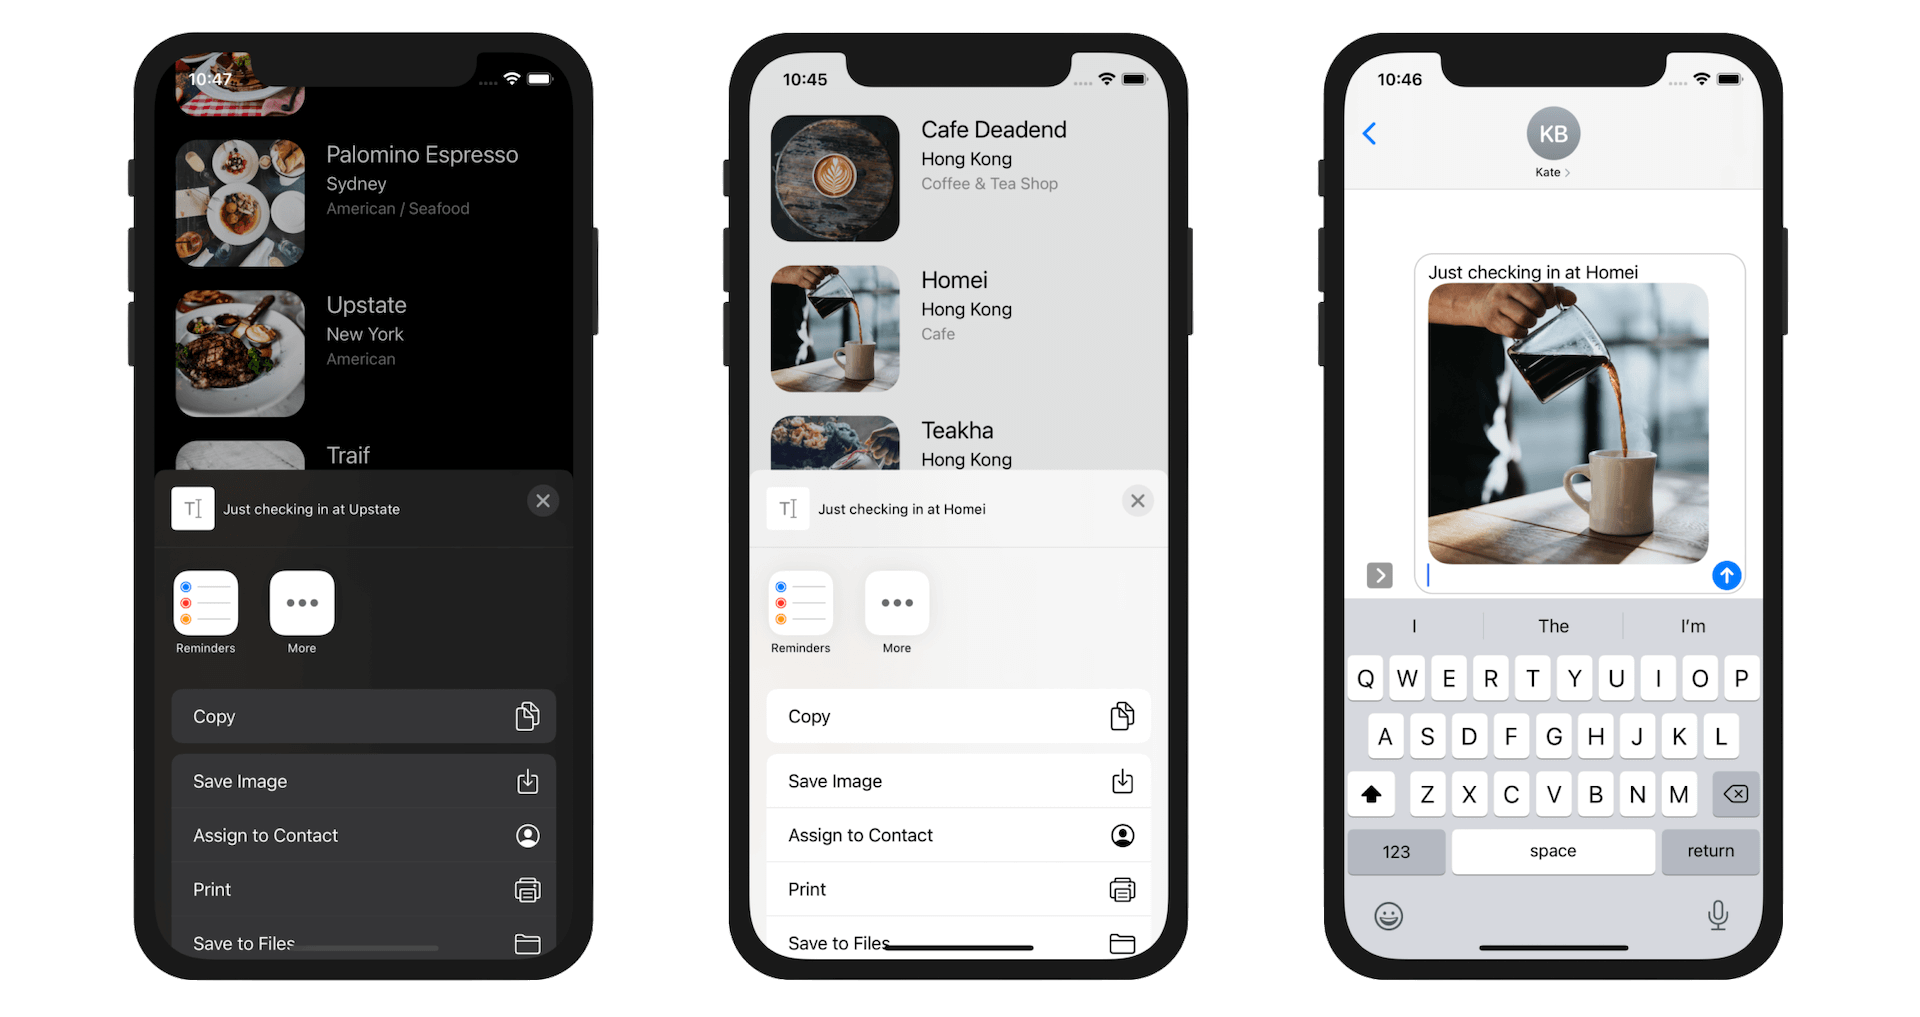
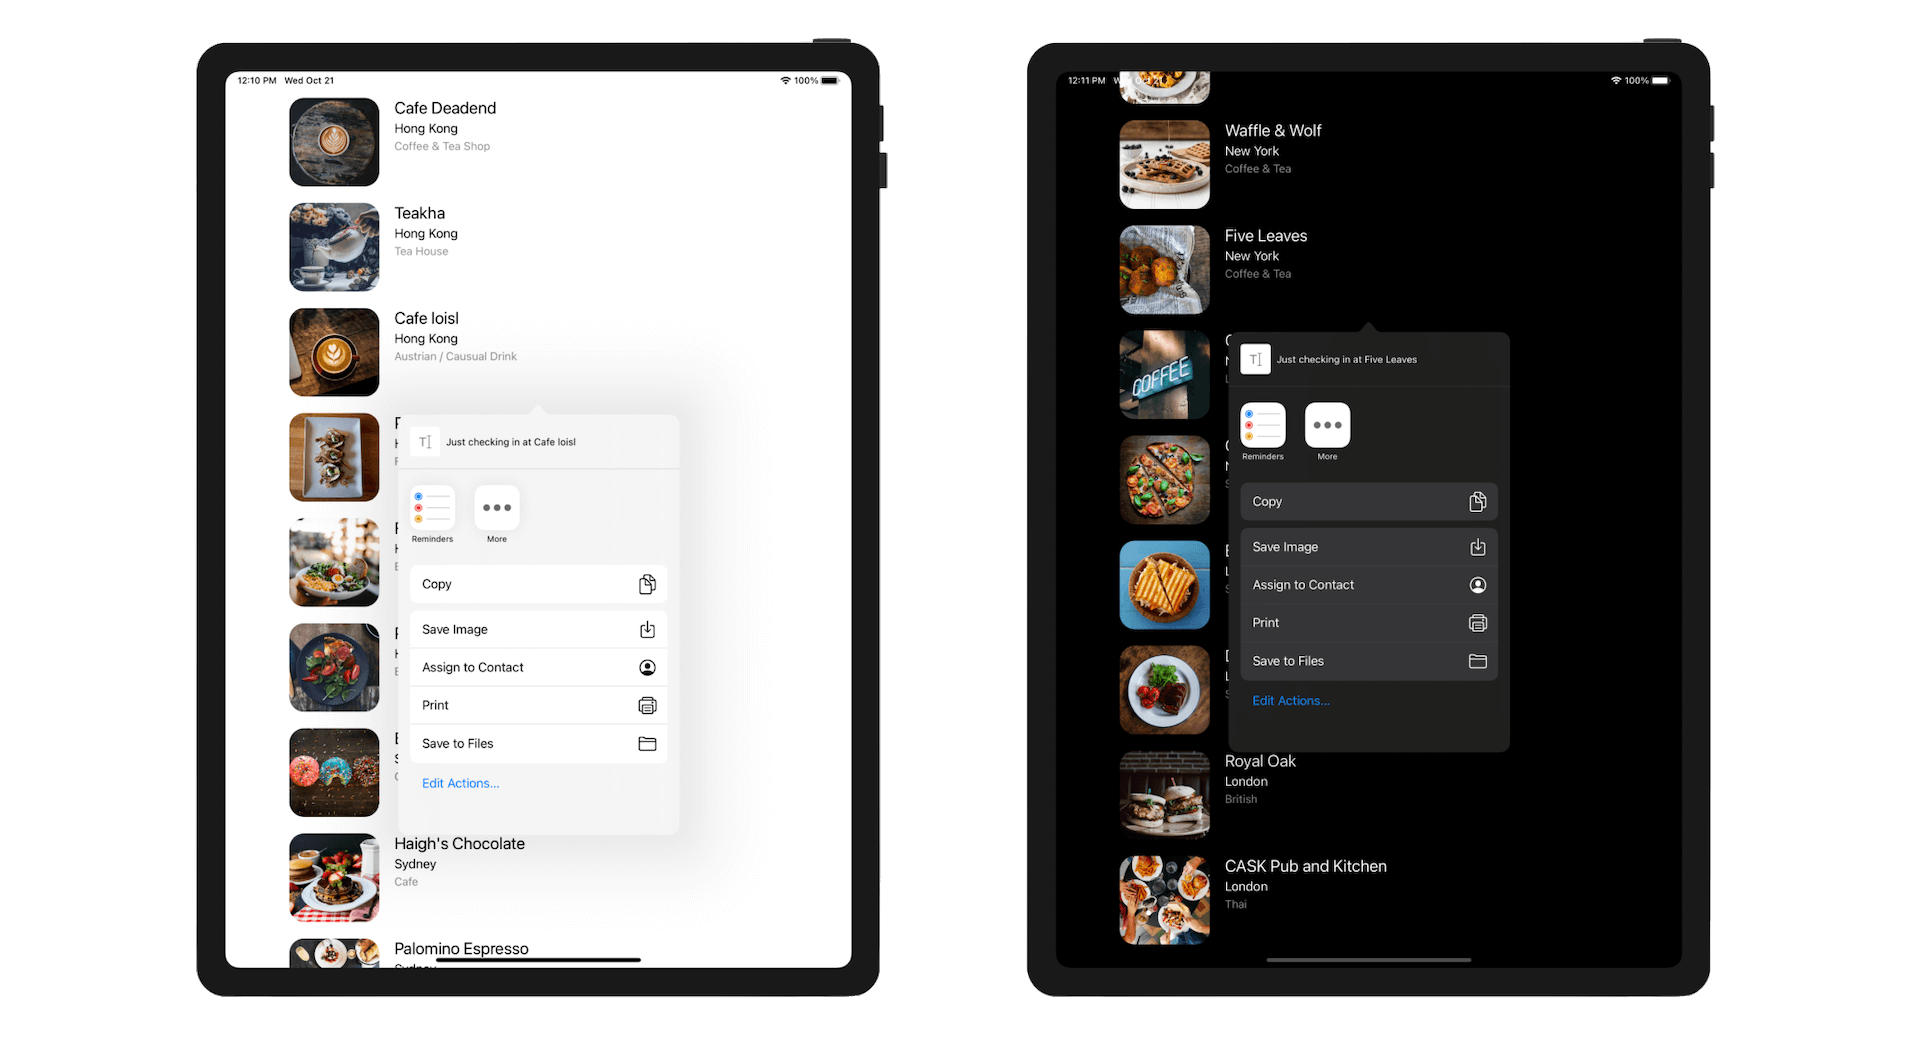
Compile and run the app. Swipe across a table row and it'll show you both Share and Delete buttons. Tapping the Share button will bring up a share menu like the one shown in figure 11-5.
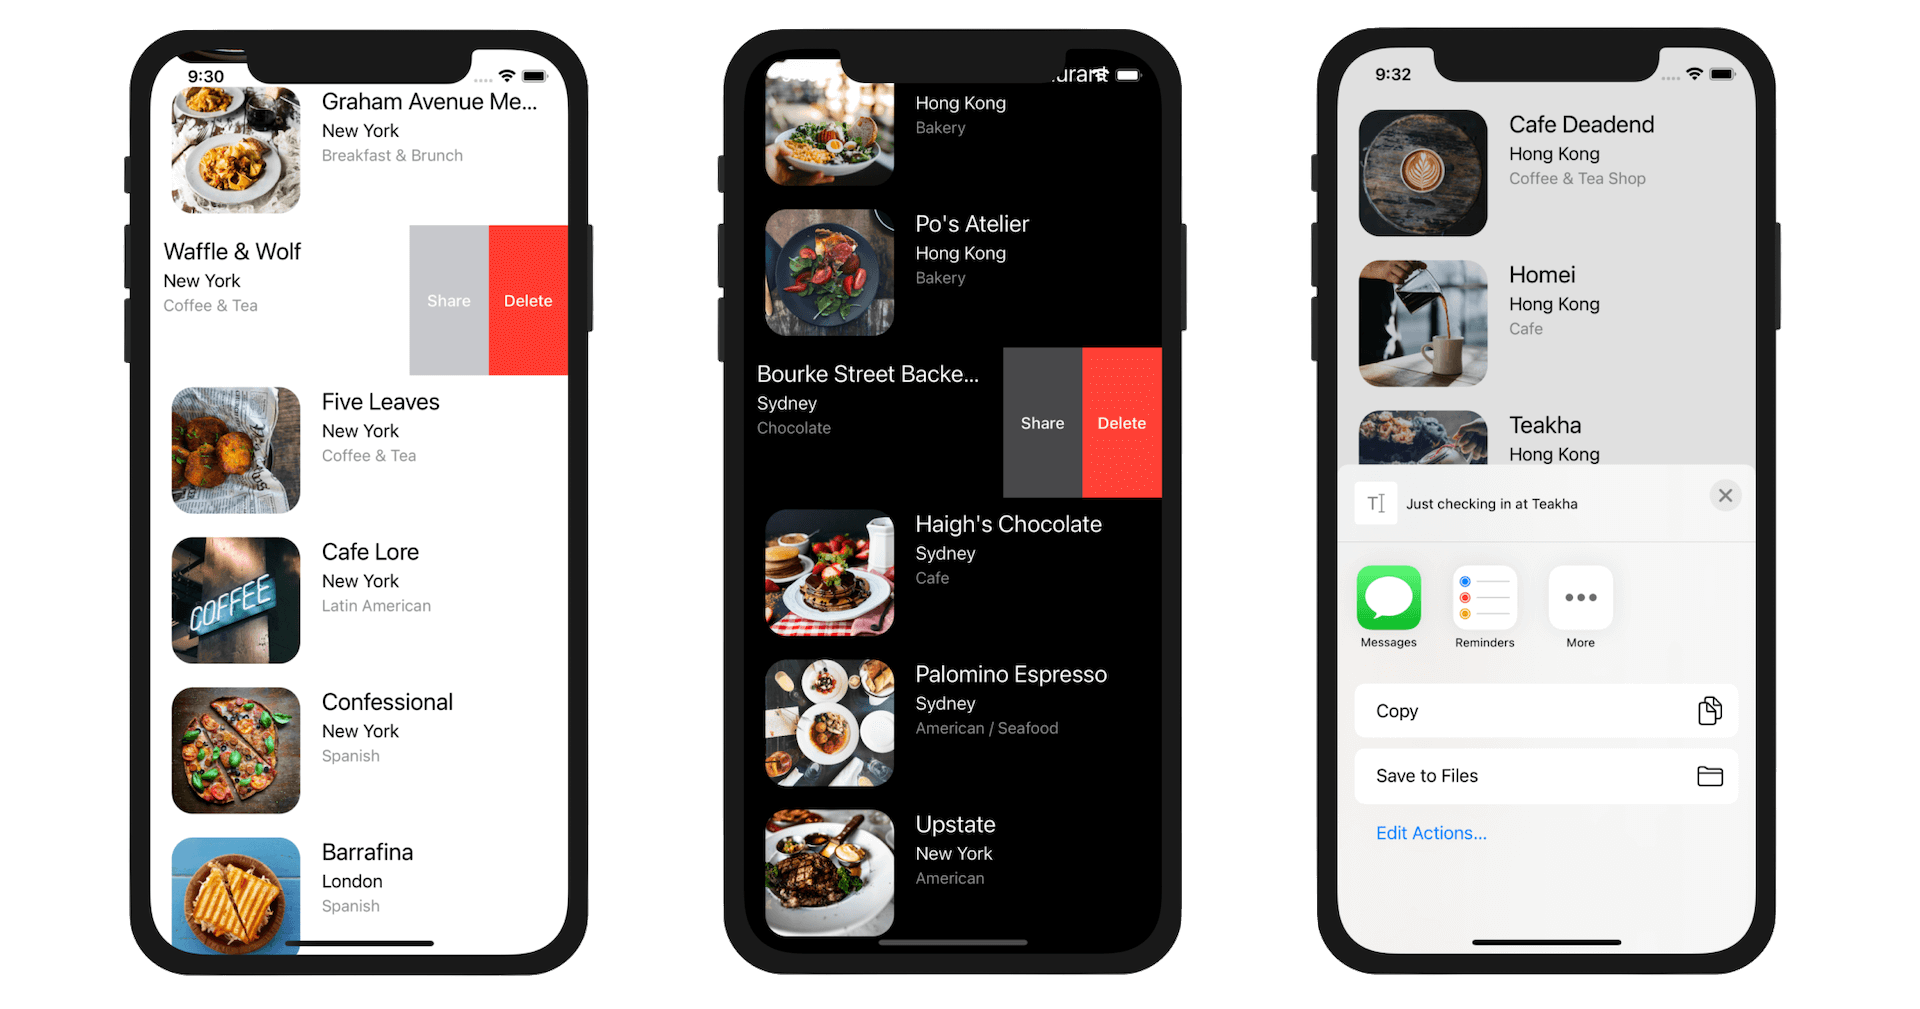
In the simulator, you can only find a few options such as copying items to the pasteboard and save to files. If the app is run on a real device, the share menu will offer more applications. Apple allows developers to define custom services that appear in the share menu. The available items vary from device to device, depending on the apps installed.
The UIActivityViewController class does not limit you from sharing content in text format. If you pass it a UIImage object during initialization, your app will allow users to copy images or share them to other applications. Modify the shareAction constant to the following:
let shareAction = UIContextualAction(style: .normal, title: "Share") { (action, sourceView, completionHandler) in
    let defaultText = "Just checking in at " + restaurant.name

    let activityController: UIActivityViewController

    if let imageToShare = UIImage(named: restaurant.image) {
        activityController = UIActivityViewController(activityItems: [defaultText, imageToShare], applicationActivities: nil)
    } else  {
        activityController = UIActivityViewController(activityItems: [defaultText], applicationActivities: nil)
    }

    self.present(activityController, animated: true, completion: nil)
    completionHandler(true)
}
In the code above, we added an imageToShare object for image sharing. When loading an image, it is possible that the image is failed to load. This is why the UIImage class returns an optional during initialization. Again, we use if let to verify if an optional contains a value or not. If the image can be loaded properly, we pass both defaultText and imageToShare to UIActivityViewController during initialization.
activityController = UIActivityViewController(activityItems: [defaultText, imageToShare], applicationActivities: nil)
UIActivityViewController will automatically embed the image of the selected restaurant when the user chooses to copy the content to the pasteboard. You can try it out by selecting Copy and then paste it into the built-in Messages app.
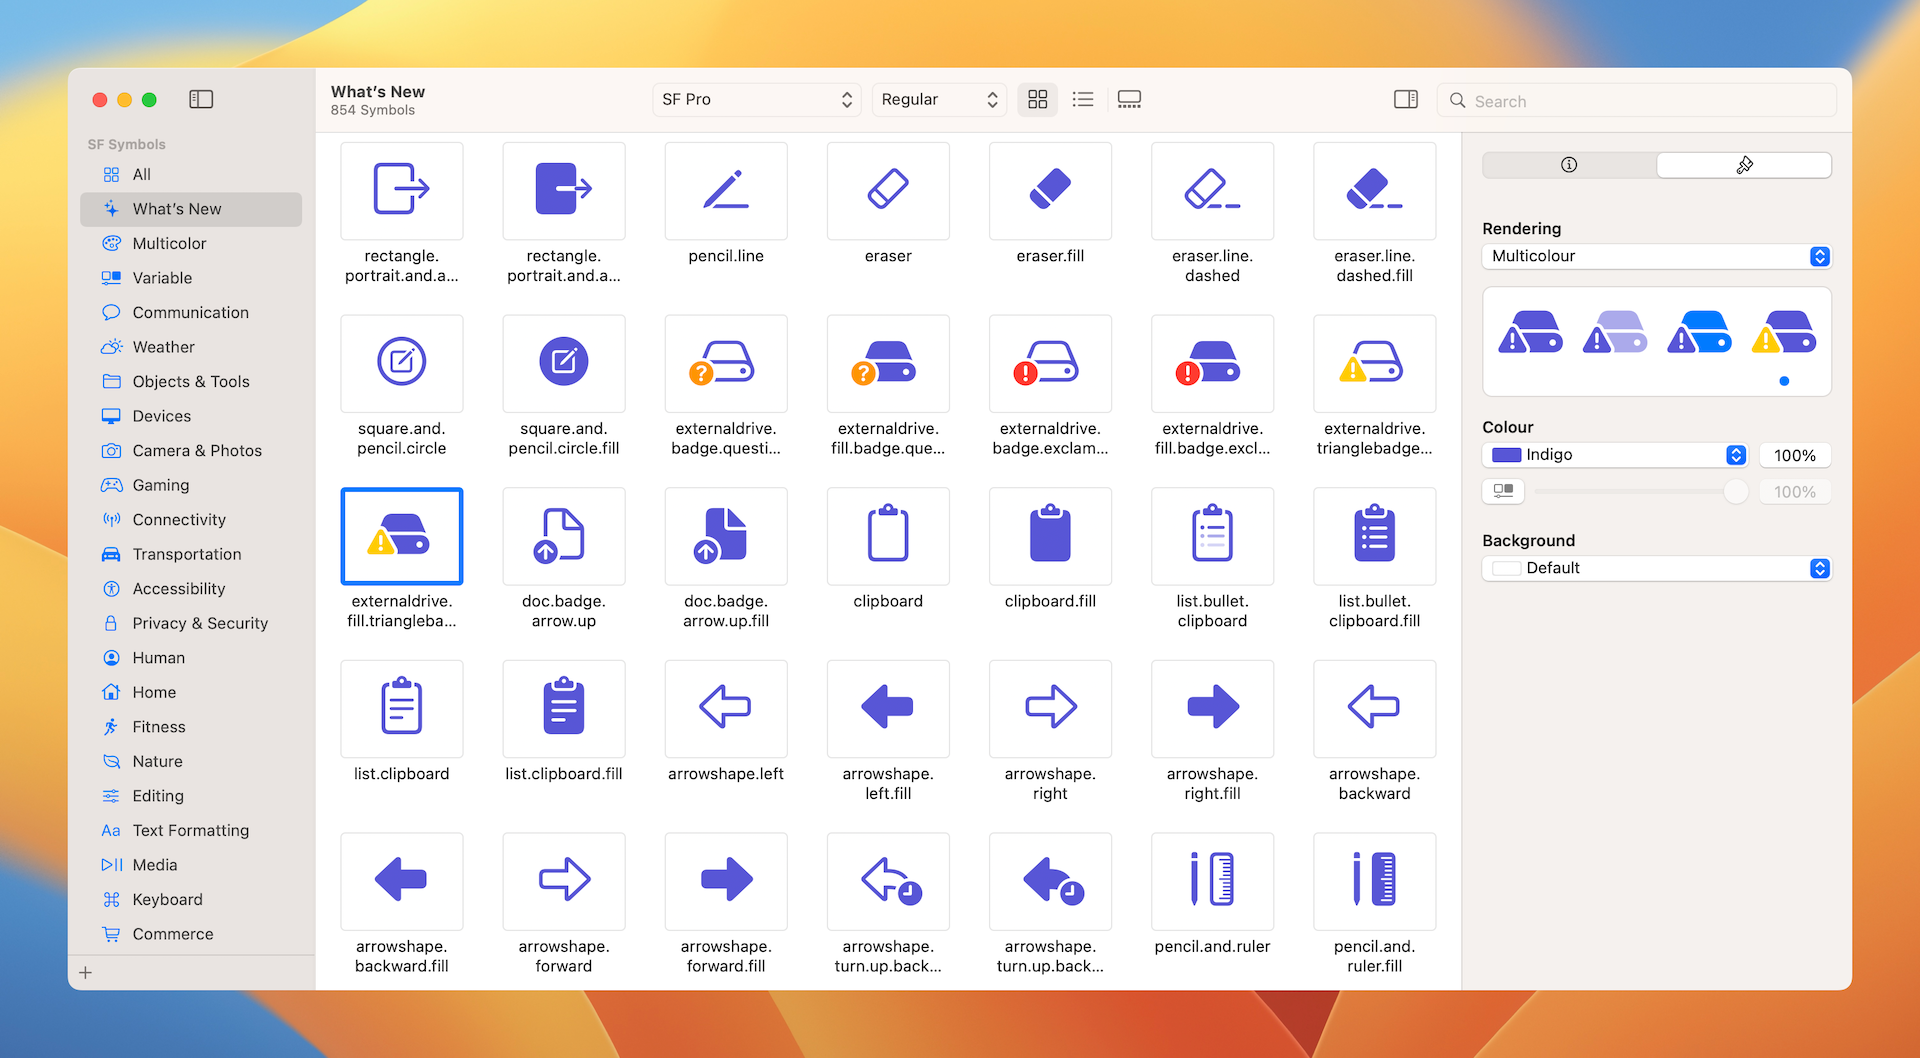
Understanding SF Symbols
With over 4,000 symbols, SF Symbols is a library of iconography designed to integrate seamlessly with San Francisco, the system font for Apple platforms. Symbols come in nine weights and three scales, and automatically align with text labels. They can be exported and edited using vector graphics editing tools to create custom symbols with shared design characteristics and accessibility features. SF Symbols 4 features over 700 new symbols, variable color, automatic rendering, and new unified layer annotation.
Before I showed you how to customize the contextual action with icons, let's first talk about where the icons come from. Needless to say, you can provide your own images to use in the app. In iOS 13, Apple introduced a large set of system images called SF Symbols that allows developers to use them in any apps. Along with the release of Xcode 14, Apple released SF Symbols 4 with more configurable symbols, multicolor support, and enhanced color customizations.
These images are referred as symbols since it's integrated with the built-in San Francisco font. To use these symbols, no extra installation is required. As long as your app is deployed to a device running iOS 13 (or later), you can access these symbols directly.
To use the symbols, all you need to prepare is find out the name of the symbol. With over 4,000 symbols available for your use, Apple has released an app called SF Symbols 4 (https://devimages-cdn.apple.com/design/resources/download/SF-Symbols-4.dmg), so that you can easily explore the symbols and locate the one that fits your need. I highly recommend you to install the app before proceeding to the next section.
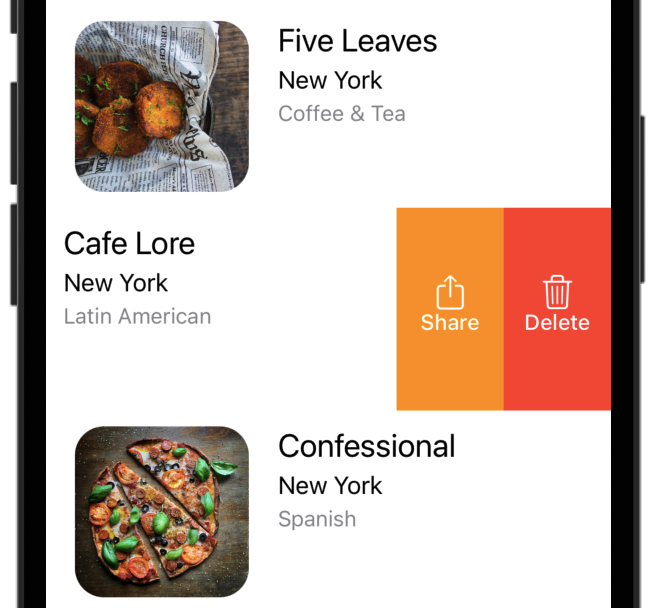
Customizing UIContextualAction
Okay, let's see how to customize the action buttons. By default, the action buttons are either in red or gray. The UIContextualAction class provides a couple of the properties for developers to customize its style including background color and icon. The code looks like this:
shareAction.backgroundColor = UIColor.systemOrange
shareAction.image = UIImage(systemName: "square.and.arrow.up")
You set the backgroundColor property to change its background color and the image property to add an icon. To use the built-in images provided by SF Symbols, you need to instantiate an UIImage and provide the image name in the systemName parameter.
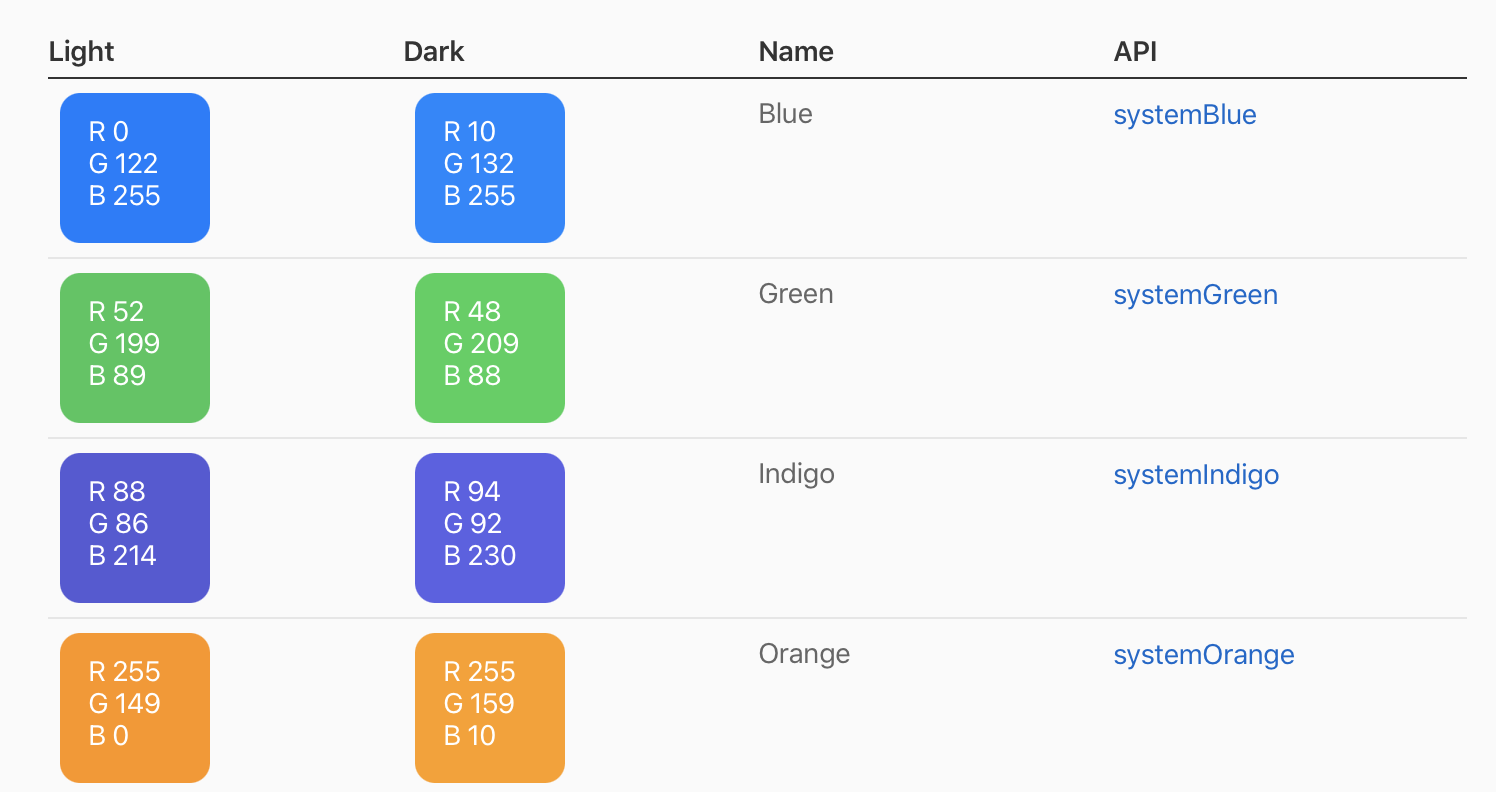
This is the first time we work with color programmatically. The UIKit framework provides a UIColor class to represent color. Many methods in UIKit require you to provide color using a UIColor object. iOS offers a wide range of system colors that you can use directly.
Alternatively, if you want to use your own color, you can create a UIColor object using RGB component values. The component values should be within 0 and 1. If you're a web designer or have some experience with graphics design, you know that the RGB values are on a scale of 0 to 255. To conform with the requirement of UIColor, you have to divide each of the component values by 255 when creating a UIColor object. Here is an example:
shareAction.backgroundColor = UIColor(red: 254.0/255.0, green: 149.0/255.0, blue: 38.0/255.0, alpha: 1.0)
Apple encourages us to use the built-in system color because it supports both light and dark modes. And, the colors automatically adapt to vibrancy and changes in accessibility settings like Increase Contrast and Reduce Transparency. Therefore, we will use the system color in our code change. You can refer to this link (https://developer.apple.com/design/human-interface-guidelines/ios/visual-design/color/) to check out all the supported system colors.
Now, insert the following lines of code in the tableView(_:trailingSwipeActionsConfigurationForRowAt:) method and place it before the instantiation of swipeConfiguration:
deleteAction.backgroundColor = UIColor.systemRed
deleteAction.image = UIImage(systemName: "trash")

shareAction.backgroundColor = UIColor.systemOrange
shareAction.image = UIImage(systemName: "square.and.arrow.up")
After you made the changes, test the app again and see if you like the new color. Otherwise, modify the system color and change to your preferred one.
Quick tip: Like me, if you are not a designer, you may need some color inspiration. You can check out Adobe Color CC (color.adobe.com) and Flat UI Color Picker (flatuicolorpicker.com). You'll find a lot of color combinations for designing your app.
Testing on iPad
Did you try to run the app on iPad? The app crashes when you tap the Share button and the following error shows up in console:
*** Terminating app due to uncaught exception 'NSGenericException', reason: 'UIPopoverPresentationController (<UIPopoverPresentationController: 0x7fadaa51f7e0>) should have a non-nil sourceView or barButtonItem set before the presentation occurs.'
terminating with uncaught exception of type NSException
CoreSimulator 732.17 - Device: iPad Pro (11-inch) (2nd generation) (02AA483A-0CAA-4645-8B8F-90D3397769A3) - Runtime: iOS 14.1 (18A8394) - DeviceType: iPad Pro (11-inch) (2nd generation)
When presenting the view controller, you must do so using the appropriate means for the current device. On iPad, you must present the view controller in a popover. On iPhone and iPod touch, you must present it modally.
https://developer.apple.com/documentation/uikit/uiactivityviewcontroller
Similar to what we have discussed in the previous chapter, UIActivityViewController will be presented in the popover style on large devices. I believe you know how to fix the bug.
You must provide location information for this popover through the view controller's popoverPresentationController. You must provide either a sourceView and sourceRect or a barButtonItem.
When presenting the activity view controller using the popover style, you have to configure the source view of its popoverPresentationController. The source view indicates the view containing the anchor rectangle for the popover. You will understand what it means after implementing the popover.
Now, insert the following code before calling the self.present(activityController, animated: true, completion: nil) method in shareAction:
if let popoverController = activityController.popoverPresentationController {
    if let cell = tableView.cellForRow(at: indexPath) {
        popoverController.sourceView = cell
        popoverController.sourceRect = cell.bounds
    }
}
Test the app on the iPad simulator again. It should work now.
Exercise
Up till now, we only implement the swipe left action. How about swipe right? I will leave you to implement the feature as an exercise. As mentioned before, all you need is to provide the implementation of the following method:
override func tableView(_ tableView: UITableView, leadingSwipeActionsConfigurationForRowAt indexPath: IndexPath) -> UISwipeActionsConfiguration? {

}
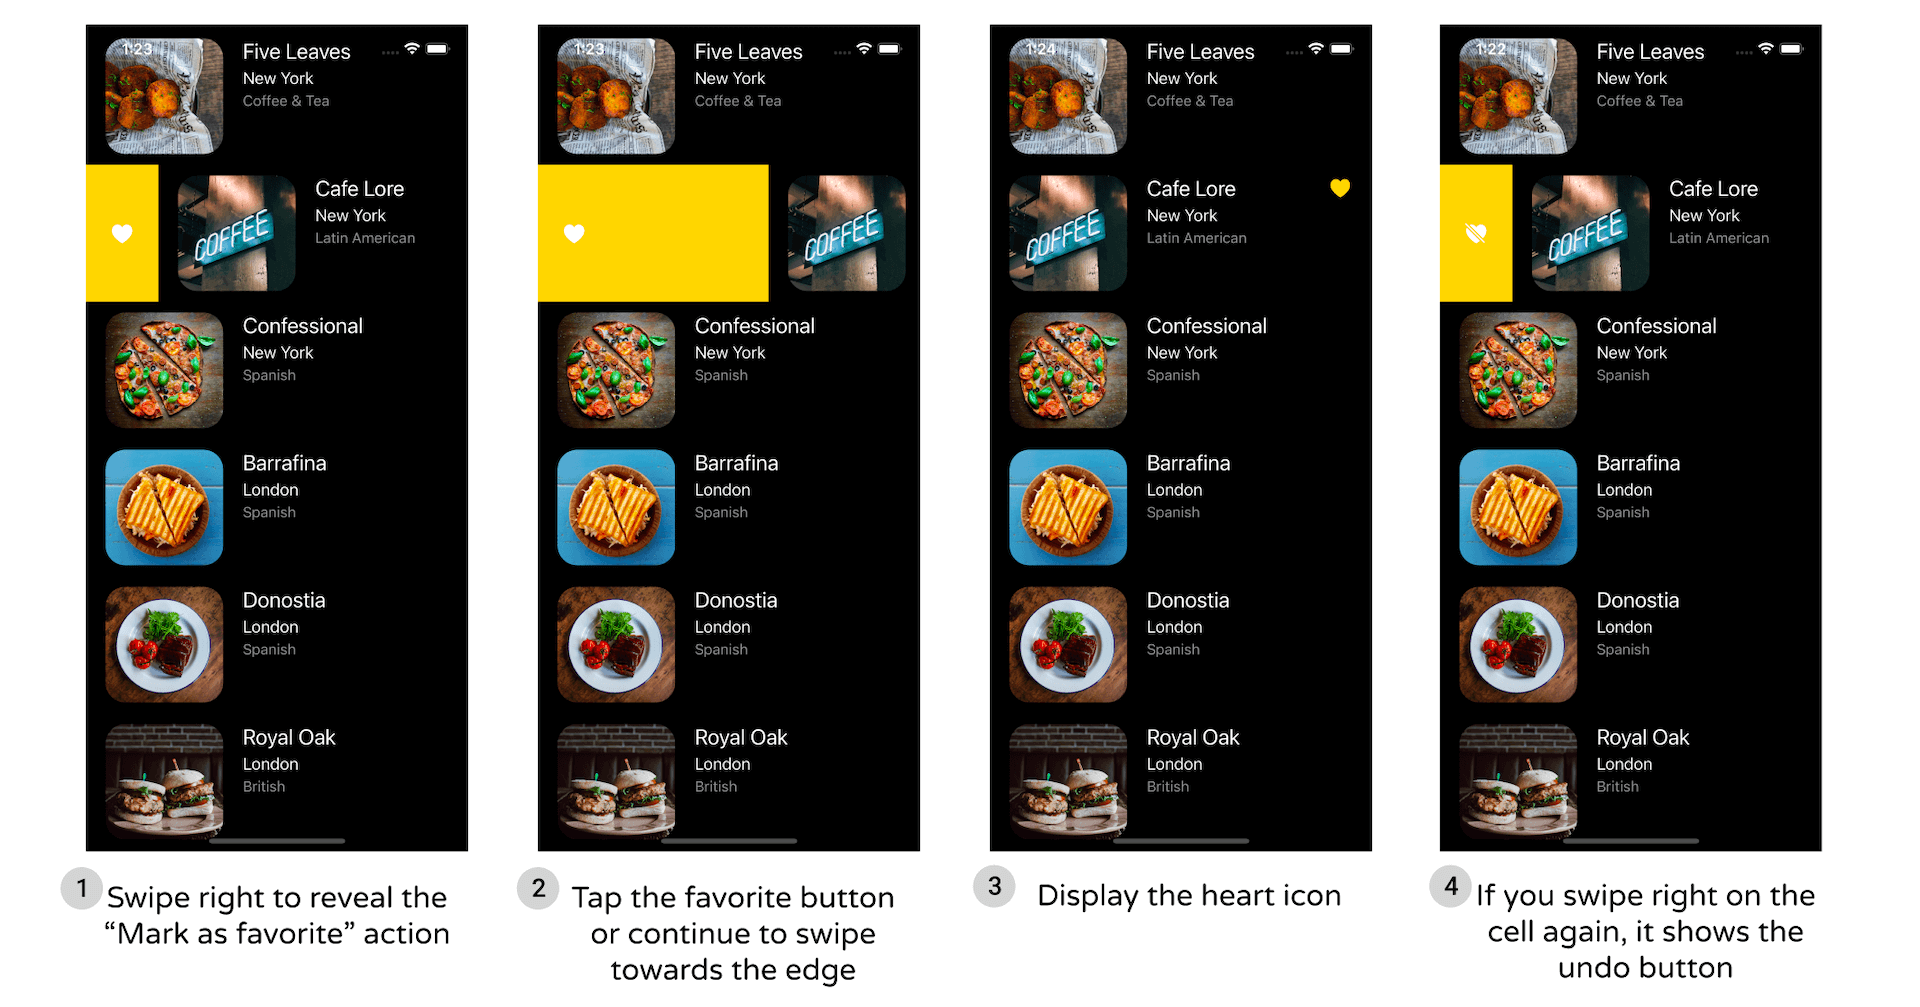
What I need you to do is add a check-in action when the user swipes right the cell. In the SF Symbols app, you should find the images named heart.fill and heart.slash.fill. You can use these images for the "Mark as favorite" action. After you finish the exercise, your app should allow users to swipe right to perform the "Mark as favorite" action that we covered before. When you swipe right on a cell with the heart icon, the tick icon will be replaced by the undo icon. Figure 12-11 illustrates the swipe-to-favorite action.
This exercise is more challenging than those you worked on before. It helps you revise what you have learned and explore something new. Don't miss this opportunity and take some time to figure out the solution. If you have any questions about the exercise, discuss it in our private Facebook group.
Summary
In this chapter, I gave you a brief overview of MVC, showed you how to manage deletion in a table view, and taught you how to create swipe action in table view cells using UIContextualAction. You also learned how to use UIActivityViewController for implementing a sharing feature. The FoodPin app is getting better and better. You should be proud of your achievement so far.
The MVC concept is important. If you're a programming newbie, it may take you some time to fully understand the material. Feeling confused? Just take a break and grab yourself a coffee. After your break, go over the chapter again. Probably you'll find it easier to digest.
For reference, you can download the complete Xcode project (including the solution to the exercise) from http://www.appcoda.com/resources/swift57/FoodPinTableDeletion.zip.
In the next chapter, we'll take a look at something new and create a navigation controller.