- Made by AppCoda
- Contact us / Support
- Tweet this book
- Preface
- 1. The Development Tools, the Learning Approach, and the App Idea
- 2. Your First Taste of Swift with Playgrounds
- 3. Hello World! Build Your First App in Swift
- 4. Hello World App Explained
- 5. Introduction to Auto Layout
- 6. Designing UI Using Stack Views
- 7. Introduction to Prototyping
- 8. Creating a Simple Table-based App
- 9. Customize Table Views Using Prototype Cell, Diffable Data Source and Dark Mode
- 10. Displaying Alerts with UIAlertController and Handling Table View Selection
- 11. Object Oriented Programming, Project Organization and Code Documentation
- 12. Table Row Deletion, Custom Action Button and MVC
- 13. Introduction to Navigation Controller and Segue
- 14. Detail View Enhancement and Navigation Bar Customization
- 15. Navigation Bar Customization, Extensions and Dynamic Type
- 16. Working with Maps
- 17. Basic Animations, Visual Effects and Unwind Segues
- 18. Working with Static Table Views, Camera and NSLayoutConstraint
- 19. Working with Core Data
- 20. Search Bar and UISearchController
- 21. Building Walkthrough Screens with UIPageViewController and Container Views
- 22. Exploring Tab Bar Controller and Storyboard References
- 23. Getting Started with WKWebView and SFSafariViewController
- 24. Exploring CloudKit
- 25. Localizing Your App to Reach More Users
- 26. Deploying and Testing Your App on a Real iOS Device
- 27. Beta Testing with TestFlight and CloudKit Production Deployment
- 28. Submit Your App to App Store
- 29. Adopting 3D Touch, Haptic Touch and Context Menus
- 30. Developing User Notifications in iOS
- 31. Appendix - Swift Basics
- Published with GitBook
Chapter 20
Search Bar and UISearchController

I knew that if I failed I wouldn't regret that, but I knew the one thing I might regret is not trying.
– Jeff Bezos
For most of the table-based apps, it is common to have a search bar at the top of the screen. How can you implement a search bar for data searching? In this chapter, we will add a search bar to the FoodPin app. With the search bar, we will enhance the app to let users search through the available restaurants.
Since the release of iOS 8, a new class called UISearchController was introduced to replace the UISearchDisplayController API that has been around since iOS 3. The UISearchController API simplifies the way to create a search bar and manage search results. You're no longer limited to embed search in table view controller but can use it in any view controller like collection view controller. Even more, it offers developers the flexibility to influence the search bar animation through a custom animator object.
Starting from iOS 11, Apple further simplified the implementation of the search bar. It introduced a new searchController property on navigationItem of the navigation bar. With just a few lines of code, you will be able to add a search bar to the navigation bar. You will understand what I mean in a while.
With UISearchController, adding a search bar to your app is quite an easy task. Let's get started to implement a default search bar and see how we can filter the restaurant data.
Using UISearchController
In general, to add a search bar in a navigation bar, it essentially comes down to the following lines of code:
let searchController = UISearchController(searchResultsController: nil)
searchController.searchResultsUpdater = self
self.navigationItem.searchController = searchController
The first line of code creates an instance of UISearchController. If you pass a nil value, that means the search results would be displayed in the same view that you're searching. Optionally, you can specify another view controller for displaying the search result.
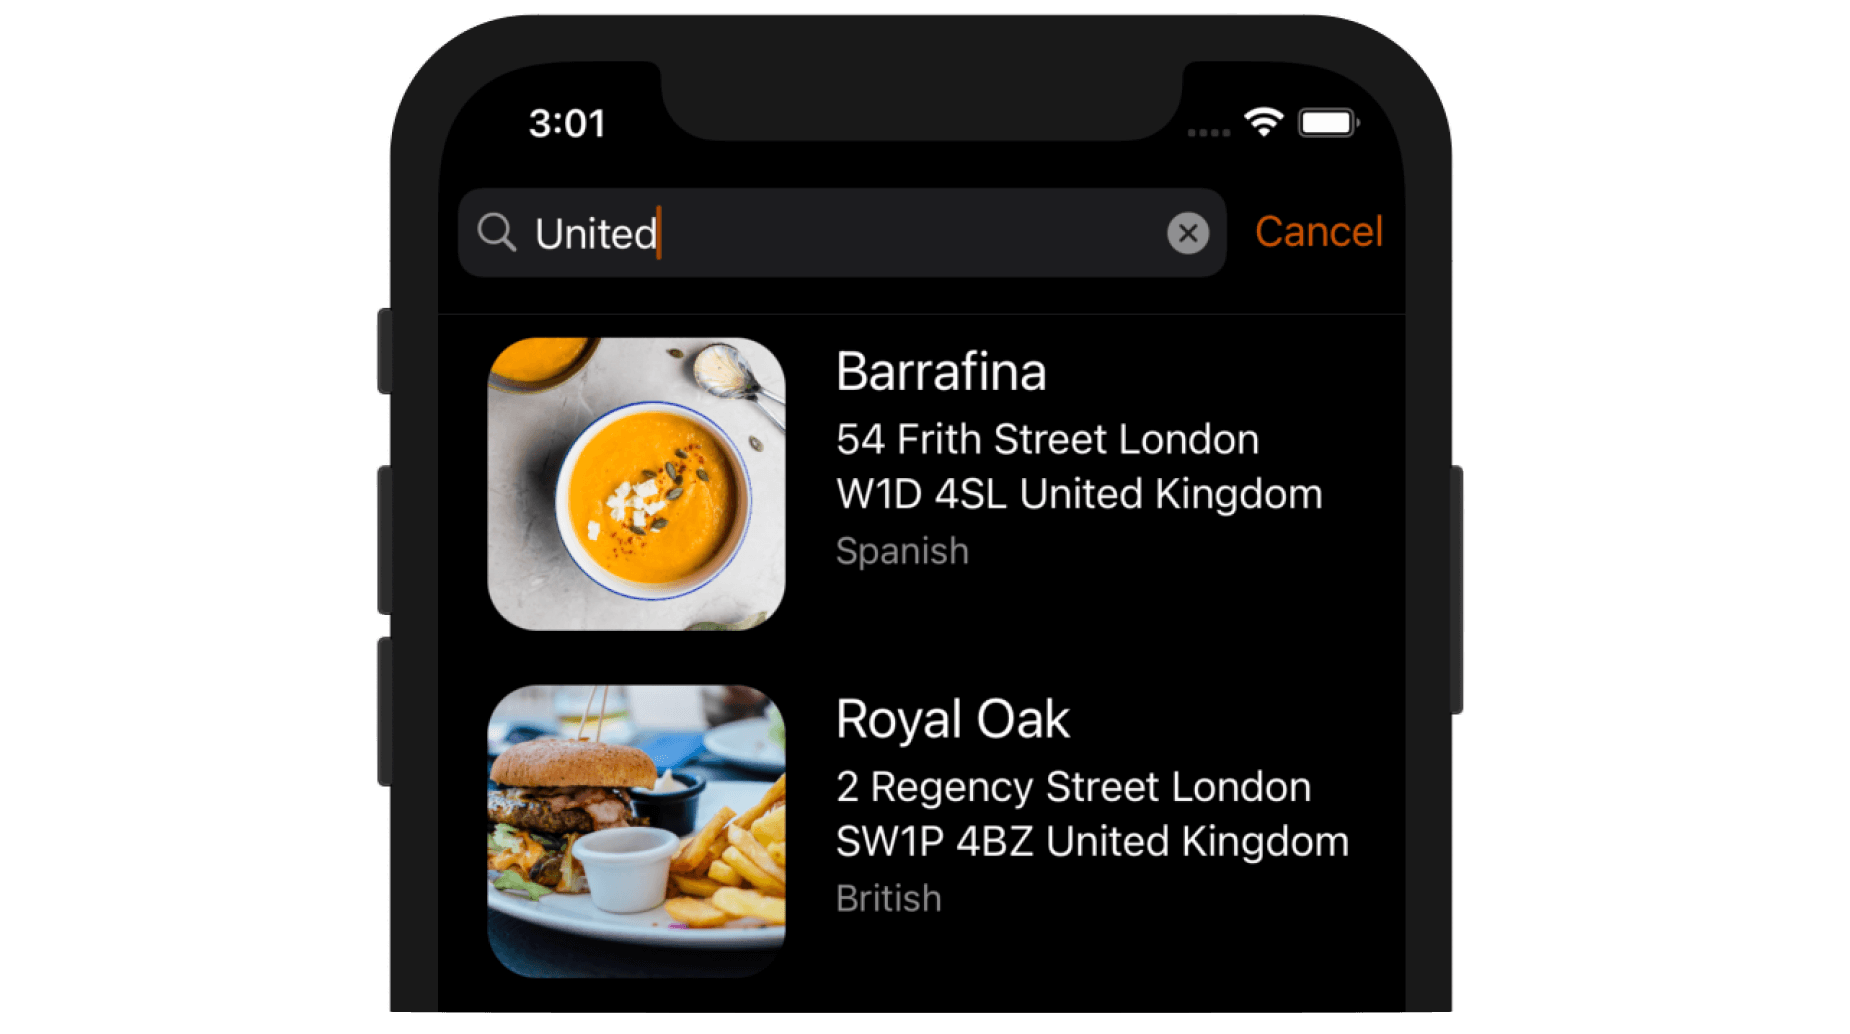
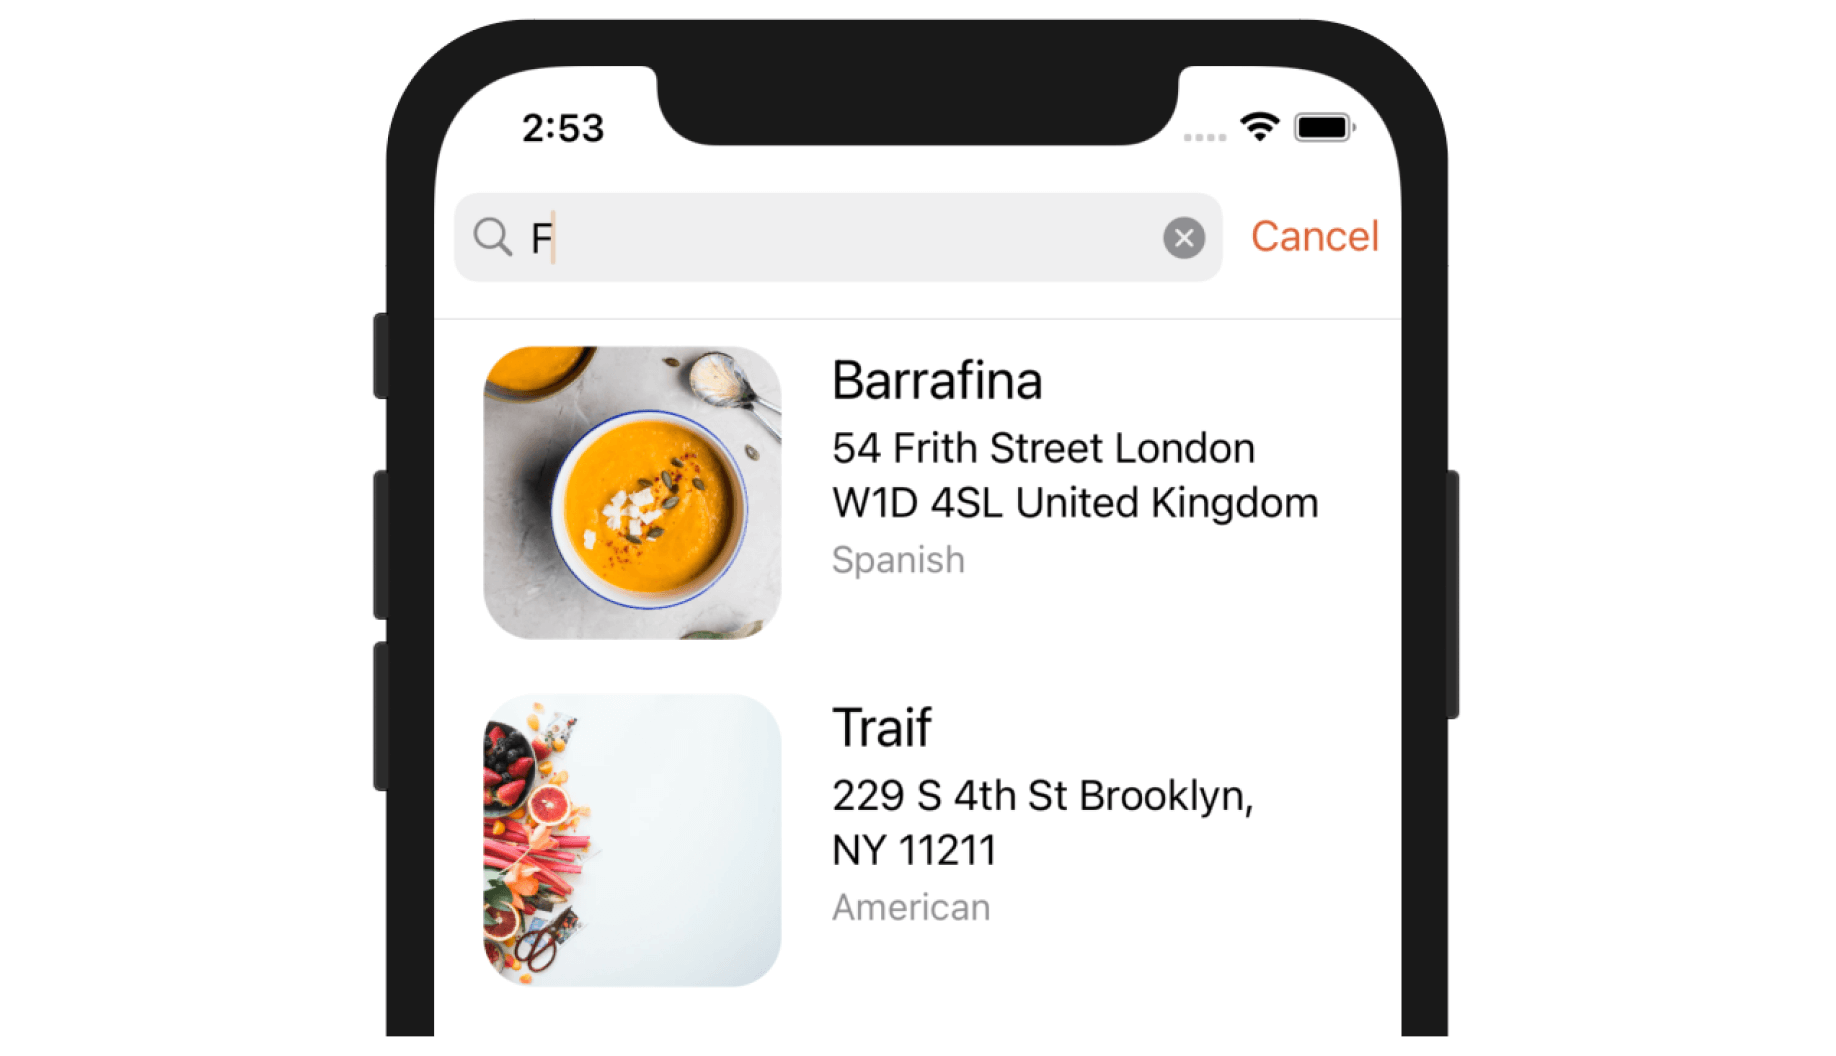
You may wonder when you need to define another view controller. Take the FoodPin app as an example. If nil is used, the search results will be displayed in the table view. Figure 20-1 shows the format of search results. As you can see, the display style is exactly the same as that of the table view. If you want to display the search results in a different format, you will need to create another view controller and specify it during the initialization of UISearchController.
The second line of code tells the search controller which object is responsible for updating the search result. It can be any object in your application or simply the current one.
The last line of code adds the search bar to the navigation bar.
Adding a Search Bar
Now let's try to add a search bar in the FoodPin app. Open RestaurantTableViewController.swift, declare the searchController variable:
var searchController: UISearchController!
Then add the following lines of code in the viewDidLoad method:
searchController = UISearchController(searchResultsController: nil)
self.navigationItem.searchController = searchController
As I have explained the code before, I will not go over it again. But as you can see, you can add a default search bar with just two lines of code. If you compile and run the app now, you should find a search bar below the navigation bar by dragging down the table view. However, it doesn't work yet because we haven't implemented the search logic.
Filtering Content
The search controller doesn't provide any default functions to filter your data. It's your responsibility to develop your own implementation to filter the content. For the FoodPin app, it allows users to do a search against the name of a restaurant. You have two ways to filter the content and search for the results. First, you may compute the search result by filtering the existing restaurants array. In Swift, there is a built-in method called filter for filtering an existing array. You use filter to loop over a collection and return a new array containing those items that match the specified condition. For example, the new array can only contain restaurants with the name starts with "up".
The filter method takes in a block of code in which you provide the filtering rule. For those elements to be included, you indicate with a return value of true. Otherwise, false is returned and that element will be excluded. Here is a sample code snippet:
let searchResults = restaurants.filter({ (restaurant) -> Bool in
    let isMatch = restaurant.name.localizedCaseInsensitiveContains(searchText)
    return isMatch
})
In the code above, we use the localizedCaseInsensitiveContains method to see if the restaurant name contains the search text, regardless of the case of the string (i.e. case-insensitive). If the search text is found, the method returns true, indicating the restaurant name should be included in the new array. Otherwise, a false is returned to exclude the item.
An alternate approach is to execute the search query using Core Data. The NSFetchRequest class allows developers to specify a predicate, which specifies which properties to filter by and the constraints on the selection of data. For example, if you want to fetch those restaurants with the name containing the term "cafe", you can assign the fetch request object a predicate like this:
fetchRequest.predicate = NSPredicate(format: "name CONTAINS[c] %@", "cafe")
The operator CONTAINS[c] will match all the restaurants that its name contains the word "cafe". The [c] part means it's a case insensitive search.
For this demo, we will use the second approach to implement the search feature. Therefore, update the fetchRestaurantData() method like this:
func fetchRestaurantData(searchText: String = "") {
    // Fetch data from data store
    let fetchRequest: NSFetchRequest<Restaurant> = Restaurant.fetchRequest()

    if !searchText.isEmpty {
        fetchRequest.predicate = NSPredicate(format: "name CONTAINS[c] %@", searchText)
    }

    let sortDescriptor = NSSortDescriptor(key: "name", ascending: true)
    fetchRequest.sortDescriptors = [sortDescriptor]

    if let appDelegate = (UIApplication.shared.delegate as? AppDelegate) {
        let context = appDelegate.persistentContainer.viewContext
        fetchResultController = NSFetchedResultsController(fetchRequest: fetchRequest, managedObjectContext: context, sectionNameKeyPath: nil, cacheName: nil)
        fetchResultController.delegate = self

        do {
            try fetchResultController.performFetch()
            updateSnapshot(animatingChange: searchText.isEmpty ? false : true)
        } catch {
            print(error)
        }
    }
}
We modify the method to accept a parameter called searchText with the default value set to blank. In this case, if the caller of the method doesn't specify any search term. This method will fetch all restaurants from database. The code is nearly the same as before but with a couple of lines of modifications. When the searchText is not empty, we assign a NSPredicate object to the fetch request. This is how we only filter those restaurants that match the search criteria.
Using Predicate for Searching the Results
Now that we have implemented the search logic, the question is how can we know the user is entering a search text? The trick is to adopt the UISearchResultsUpdating protocol. This protocol defines a method called updateSearchResults(for:). When a user selects the search bar or key in a search keyword, the method will be called.
By implementing the method, we can call the fetchRestaurantData(searchText:) method with the corresponding search term. Again, we will use an extension to adopt the protocol. Insert the following code snippet in the RestaurantTableViewController.swift file:
extension RestaurantTableViewController: UISearchResultsUpdating {
    func updateSearchResults(for searchController: UISearchController) {

        guard let searchText = searchController.searchBar.text else {
            return
        }

        fetchRestaurantData(searchText: searchText)
    }
}
The code is very straightforward - we get the search text as entered by the user and pass it to the fetchRestaurantData(searchText:) method. The method will trigger another fetch request and display the filtered content accordingly.
You're almost done. The very last thing is to add the following lines of code in the viewDidLoad method:
searchController.searchResultsUpdater = self
searchController.obscuresBackgroundDuringPresentation = false
The first line assigns the current class as the search results updater. The obscuresBackgroundDuringPresentation property controls whether the underlying content is dimmed during a search. Because we are presenting the search results in the same view, the property should be set to false.
Cool! You're ready to fire up your app and test out the search function. What's great is that you can navigate to the restaurant details by tapping the search results. Everything in the original table view controller is reused.
As you may aware, the table cell inherits the share and delete buttons. This is something that you probably don't want to show the buttons in the search results. To disable them, you can insert the following lines of code in tableView(trailingSwipeActionsConfigurationForRowAt:) method:
override func tableView(_ tableView: UITableView, trailingSwipeActionsConfigurationForRowAt indexPath: IndexPath) -> UISwipeActionsConfiguration? {

    if searchController.isActive {
        return UISwipeActionsConfiguration()
    }

    .
    .
    .

}
The searchController object has a property called isActive that indicates whether the user is using the search bar. We simply return an empty configuration if the search controller is active.
Search Bar in the Table Header View
It is not a mandate to place the search bar in the navigation bar. Alternatively, you can place it in the table view header. To do that, you can change the following line of code in the viewDidLoad() method of RestaurantTableViewController:
self.navigationItem.searchController = searchController
To:
tableView.tableHeaderView = searchController.searchBar
This will place the search bar in the table's header view. Run the app again and you will see the search bar.
Customizing the Appearance of the Search Bar
UISearchBar provides several options for customizing the appearance of a search bar. You can access its properties by using the following line of code:
searchController.searchBar.tintColor
Here are some of the common properties for the customization.
- placeholder - you can use the
placeholderproperty to set the default text when there is no other text in the text field. - prompt - the
promptproperty allows you to display a single line of text at the top of the search bar. - barTintColor - set the background color of the search bar.
- tintColor - set the tint color of the key elements in the search bar. For example, you can use the property to change the color of the Cancel button in the search bar.
- searchBarStyle - specify the search bar's style. By default, it is set to
.prominent. When this style is set, the search bar has a translucent background, and the search field is opaque. Alternatively, you can change it to.minimalto remove the background and make the search field translucent.
As an example, you can insert the following lines of code at the end of the viewDidLoad method of the RestaurantTableViewController class:
searchController.searchBar.placeholder = "Search restaurants..."
searchController.searchBar.backgroundImage = UIImage()
searchController.searchBar.tintColor = UIColor(named: "NavigationBarTitle")
Figure 20-5 shows the custom search bar after customization. You can further refer to the official documentation (https://developer.apple.com/documentation/uikit/uisearchbar) for the full set of customizable properties.
Exercise #1
Now the app only allows users to search restaurants by name. Your exercise is to enhance the search feature so that it supports location search too. For example, if your user keys in Sydney in the search field, the app searches through the restaurant list and shows you the restaurants that are either located in Sydney or have "Sydney" in the restaurant name.
Summary
By now, you should know how to implement a search bar in an iOS app. We've made the FoodPin app even better by enhancing it with a search feature; this search feature is particularly important when you have a large amount of information to display. If you still don't fully understand the search bar feature, go back and work through this chapter the second time before moving onto the next one.
In this chapter, we only covered the basics of UISearchController. However, there are numerous other ways to use a search bar in your app. For instance, you may want to display the search bar only when the user taps a search button. To explore new ways of search bar integration, I encourage you to check out the UICatalog demo from Apple (https://developer.apple.com/library/prerelease/ios/samplecode/UICatalog/Introduction/Intro.html).
For reference, you can download the complete Xcode project from http://www.appcoda.com/resources/swift57/FoodPinSearch.zip. The solution of the exercise is included.