- Made by AppCoda
- Contact us / Support
- Tweet this book
- Preface
- 1. The Development Tools, the Learning Approach, and the App Idea
- 2. Your First Taste of Swift with Playgrounds
- 3. Hello World! Build Your First App in Swift
- 4. Hello World App Explained
- 5. Introduction to Auto Layout
- 6. Designing UI Using Stack Views
- 7. Introduction to Prototyping
- 8. Creating a Simple Table-based App
- 9. Customize Table Views Using Prototype Cell, Diffable Data Source and Dark Mode
- 10. Displaying Alerts with UIAlertController and Handling Table View Selection
- 11. Object Oriented Programming, Project Organization and Code Documentation
- 12. Table Row Deletion, Custom Action Button and MVC
- 13. Introduction to Navigation Controller and Segue
- 14. Detail View Enhancement and Navigation Bar Customization
- 15. Navigation Bar Customization, Extensions and Dynamic Type
- 16. Working with Maps
- 17. Basic Animations, Visual Effects and Unwind Segues
- 18. Working with Static Table Views, Camera and NSLayoutConstraint
- 19. Working with Core Data
- 20. Search Bar and UISearchController
- 21. Building Walkthrough Screens with UIPageViewController and Container Views
- 22. Exploring Tab Bar Controller and Storyboard References
- 23. Getting Started with WKWebView and SFSafariViewController
- 24. Exploring CloudKit
- 25. Localizing Your App to Reach More Users
- 26. Deploying and Testing Your App on a Real iOS Device
- 27. Beta Testing with TestFlight and CloudKit Production Deployment
- 28. Submit Your App to App Store
- 29. Adopting 3D Touch, Haptic Touch and Context Menus
- 30. Developing User Notifications in iOS
- 31. Appendix - Swift Basics
- Published with GitBook
Chapter 29
Adopting Haptic Touch and Context Menus

As your first app, the FoodPin app is pretty good. That said, if you want to make it even better and adopt some modern technologies provided by the iOS devices, I have two more chapters for you.
Since the release of the iPhone 6s and 6s Plus, Apple introduced us an entirely new way to interact with our phones known as 3D Touch. It literally adds a new dimension to the user interface and offers a new kind of user experience. Not only can it sense your touch, iPhone can now sense how much pressure you apply to the display.
Since the release of iPhone 11, 11 Pro, and 11 Pro Max, Apple was replacing 3D Touch with Haptic Touch across its entire iPhone lineup. Haptic Touch is pretty similar to 3D Touch. While 3D Touch supports force touch, Haptic Touch is a touch and hold gesture.
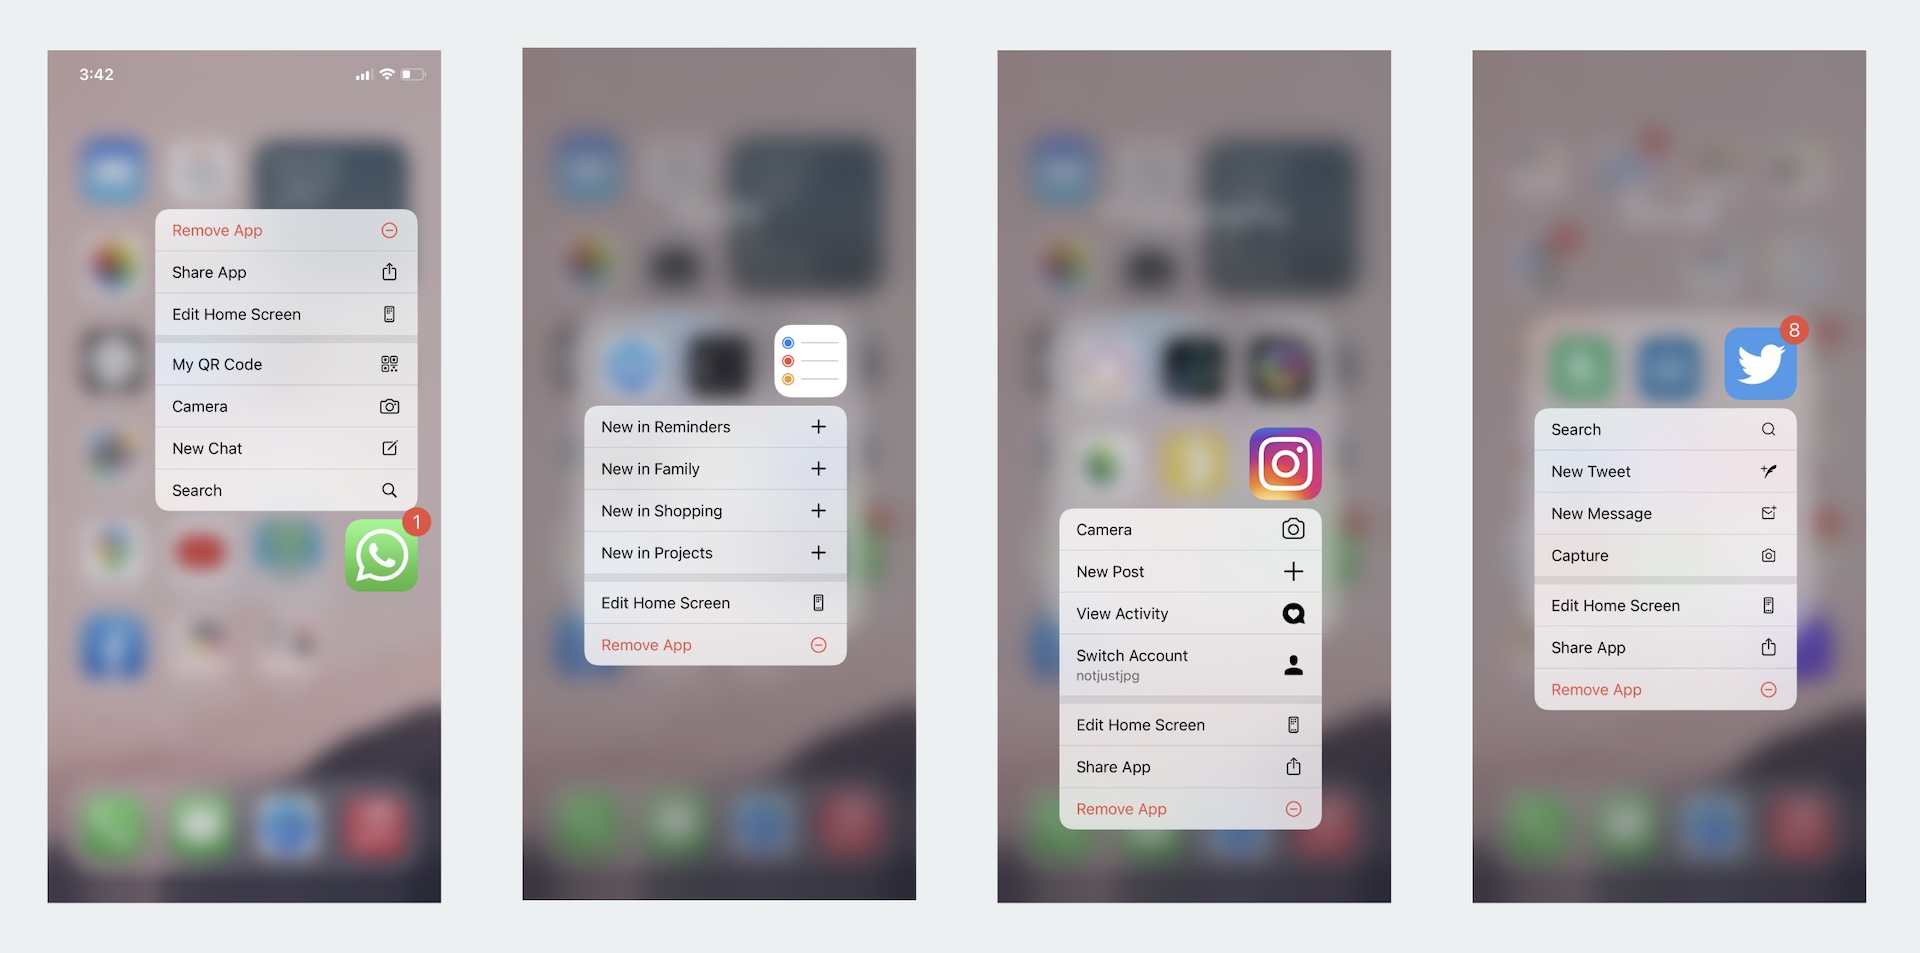
In the home screen, have you tried to press an app icon a little harder? When you did that, it shows a set of quick actions, each of which allows you to jump straight to a particular part of an app. This is a sample usage of Haptic Touch, known as Quick Actions.
If you've used 3D Touch before, Peep and Pop is a very nice feature that gives users a quicker access to the app's contents. In iOS 13, this feature is replaced by Context Menus. It's very similar to Peep and Pop but with an instant access to a list of action items. What's more is that Context Menus work on all devices running on iOS 13 (or later).
So, you still have no ideas about Context Menus? Open the Photos app to try it out. When you touch and hold a thumbnail, you can bring the photo preview and a contextual menu that lets you have a quick access to some common functions. If you want more than a preview, just tap the photo preview to bring up a full view.
In this chapter, we will see how to work with context menus in iOS 13 (or later). More specifically, we will add Quick Actions and Context Menus to the FoodPin app.
Home Screen Quick Actions
First, let's talk about Quick Actions. Apple offers two types of quick actions: static and dynamic. Static quick actions are hardcoded in the Info.plist file. Once the user installs the app, the quick actions will be accessible, even before the first launch of the app.
As the name suggests, dynamic quick actions are dynamic in nature. The app creates and updates the quick actions at runtime. Take the News app as an example. Its quick actions show some of the most frequently accessed channels. They must be dynamic because these channels will change over time. For some quick actions, it even bundles a widget that shows users some useful information without opening the app.
But one thing they have in common is that you can create at most 4 quick actions, no matter you're using static or dynamic quick actions.
It's pretty simple to create static quick actions. All you need to do is edit the Info.plist file and add a UIApplicationShortcutItems array. Each element of the array is a dictionary containing the following properties:
UIApplicationShortcutItemType(required) - a unique identifier used to identify the quick action. It should be unique across all apps. So a good practice is to prefix the identifier with the app bundle ID (e.g. com.appcoda.). UIApplicationShortcutItemTitle(required) - the name of the quick action visible to the user.UIApplicationShortcutItemSubtitle(optional) - the subtitle of the quick action. It is an optional string displayed right below the title of the quick action.UIApplicationShortcutItemIconType(optional) - an optional string to specify the type of an icon from the system library. Refer to this document for the available icon type.UIApplicationShortcutItemIconFile(optional) - if you want to use your own icon, specify the icon image to use from the app's bundle. Alternatively, specify the name of the image in an asset catalog. These icons should be square, single colour with sizes 35x35 (1x), 70x70 (2x) and 105x105 (3x).UIApplicationShortcutItemUserInfo(optional) - an optional dictionary containing some extra information you want to pass. For example, one use for this dictionary is to pass the app version.
If you want to add some static quick actions, here is an example of the UIApplicationShortcutItems array, which creates a "New Restaurant" shortcut:

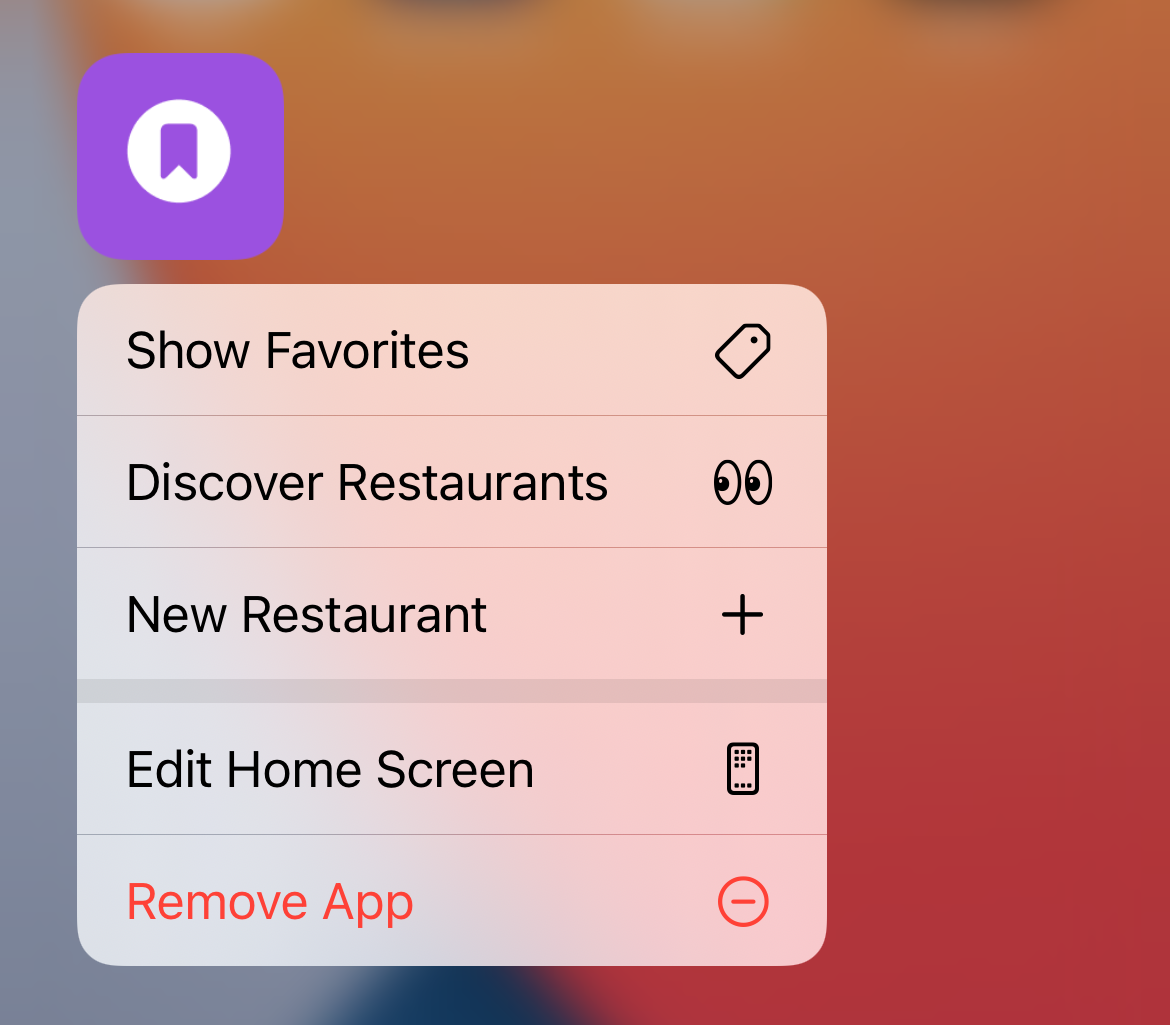
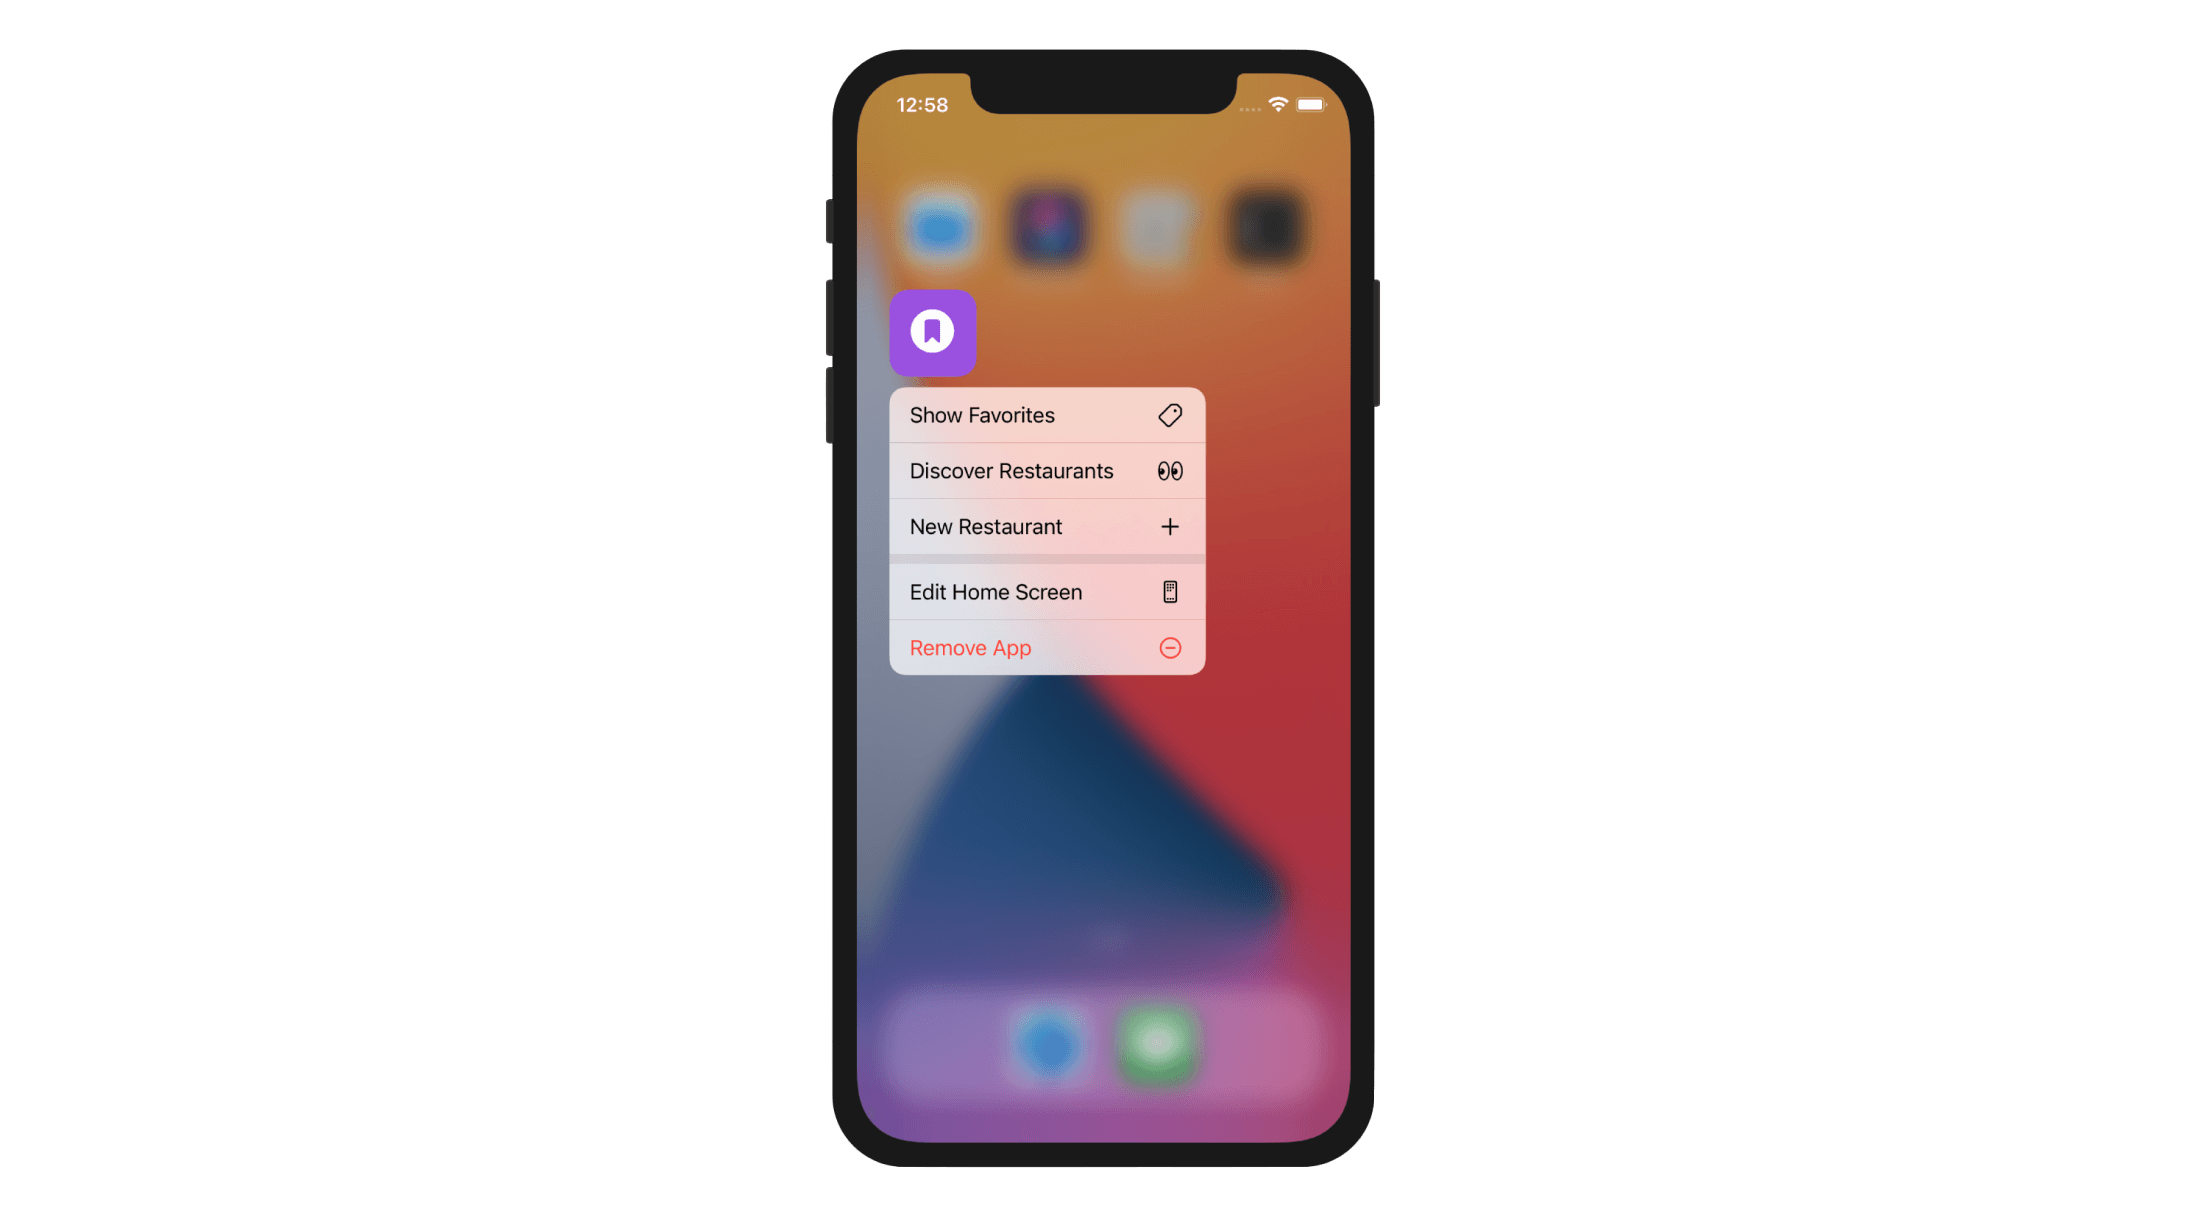
Now that you should have some ideas about static quick actions, let's talk about the dynamic ones. As a demo, we will modify the FoodPin project, and add three quick actions to the app:
- New Restaurant - go to the New Restaurant screen directly
- Discover restaurants - jump right into the Discover tab
- Show Favorites - jump right into the Favorites tab
First things first, why do we use dynamic quick actions? A simple answer is that I want to show you how to work with dynamic quick actions. But the actual reason is that I want to enable these quick actions only after the user goes through the walkthrough screens.
To create a quick action programmatically, you just need to instantiate a UIApplicationShortcutItem object with the required properties and then assign it to the shortcutItems property of UIApplication. Here is an example:
let shortcutItem = UIApplicationShortcutItem(type: "com.appcoda.NewRestaurant", localizedTitle: "New Restaurant", localizedSubtitle: nil, icon: UIApplicationShortcutIcon(type: .add), userInfo: nil)
UIApplication.shared.shortcutItems = [shortcutItem]
The first line of code defines a shortcut item with the quick action type com.appcoda.NewRestaurant and system icon .add. The title of the quick action is set to New Restaurant. The second line of code initializes an array with the shortcut item and set it to the shortcutItems property.
To create the quick actions, let's create a helper method in the WalkthroughViewController class:
func createQuickActions() {
    // Add Quick Actions
    if let bundleIdentifier = Bundle.main.bundleIdentifier {
        let shortcutItem1 = UIApplicationShortcutItem(type: "\(bundleIdentifier).OpenFavorites", localizedTitle: "Show Favorites", localizedSubtitle: nil, icon: UIApplicationShortcutIcon(systemImageName: "tag"), userInfo: nil)
        let shortcutItem2 = UIApplicationShortcutItem(type: "\(bundleIdentifier).OpenDiscover", localizedTitle: "Discover Restaurants", localizedSubtitle: nil, icon: UIApplicationShortcutIcon(systemImageName: "eyes"), userInfo: nil)
        let shortcutItem3 = UIApplicationShortcutItem(type: "\(bundleIdentifier).NewRestaurant", localizedTitle: "New Restaurant", localizedSubtitle: nil, icon: UIApplicationShortcutIcon(type: .add), userInfo: nil)
        UIApplication.shared.shortcutItems = [shortcutItem1, shortcutItem2, shortcutItem3]
    }
}
The code is pretty much the same as what I have covered before. We create three quick action items. Each of which has its own identifier, title, and icon. For the Discover restaurant and Show favorites shortcuts, we use our own icons.
So where should we call this createQuickActions() method?
Do you still remember how we indicate a user has gone through the walkthrough screens? We set the key named hasViewedWalkthrough to true into the user defaults after the user completes the walkthrough. This line of code can be found in the nextButtonTapped method and the skipButtonTapped method of the WalkthroughViewController class:
UserDefaults.standard.set(true, forKey: "hasViewedWalkthrough")
Therefore, make the call createQuickActions() after the code above.
Now you're ready to go. Hit the Run button and deploy the app to your iPhone. After launching the app once and going through the walkthrough screens, you will be able to see the quick actions. You do not need to test 3D Touch/Haptic Touch on a real iOS device, just test the feature on a simulator.
The quick actions are not ready to work yet because we haven't implemented the required methods to launch the quick actions. Since iOS 13, there is a method called windowScene(_:performActionFor:completionHandler:) defined in the UIWindowSceneDelegate protocol. When the user selects a quick action, this method is called. So we will implement the method in SceneDelegate.swift.
Let's first declare an enum for the quick actions in the delegate:
enum QuickAction: String {
    case OpenFavorites = "OpenFavorites"
    case OpenDiscover = "OpenDiscover"
    case NewRestaurant = "NewRestaurant"

    init?(fullIdentifier: String) {

        guard let shortcutIdentifier = fullIdentifier.components(separatedBy: ".").last else {
            return nil
        }

        self.init(rawValue: shortcutIdentifier)
    }
}
The Enumeration type in Swift is particularly useful for defining a group of related values. In the QuickAction enum, we define the available quick actions in each case. We also create an initialization method that turns a full identifier (e.g. com.appcoda.NewRestaurant) into the corresponding enumeration case (e.g. NewRestaurant).
Now implement the windowScene(_:performActionFor:completionHandler:) method in the SceneDelegate class like this:
func windowScene(_ windowScene: UIWindowScene, performActionFor shortcutItem: UIApplicationShortcutItem, completionHandler: @escaping (Bool) -> Void) {

    completionHandler(handleQuickAction(shortcutItem: shortcutItem))
}

private func handleQuickAction(shortcutItem: UIApplicationShortcutItem) -> Bool {

    let shortcutType = shortcutItem.type
    guard let shortcutIdentifier = QuickAction(fullIdentifier: shortcutType) else {
        return false
    }

    guard let tabBarController = window?.rootViewController as? UITabBarController else {
        return false
    }

    switch shortcutIdentifier {
    case .OpenFavorites:
        tabBarController.selectedIndex = 0
    case .OpenDiscover:
        tabBarController.selectedIndex = 1
    case .NewRestaurant:
        if let navController = tabBarController.viewControllers?[0] {
            let restaurantTableViewController = navController.children[0]
            restaurantTableViewController.performSegue(withIdentifier: "addRestaurant", sender: restaurantTableViewController)
        } else {
            return false
        }
    }

    return true
}
When a quick action is activated, the windowScene(_:performActionFor:completionHandler:) method is called. The selected shortcut (quick action) is passed as a parameter. We created a separate method, which we will discuss later, for handling the quick action. When the quick action is complete, you are expected to call the completion handler with an appropriate boolean value, depending on the success/failure of the quick action.
Let's now talk about the handleQuickAction method. It takes in a shortcut item and has a switchstatement to perform the action accordingly:
- For
.OpenFavoritesand.OpenDiscover, we simply change the selected index of the tab bar controller, so the app jumps right into the particular screen. - It takes a little more work for handling the New Restaurant action. We need to first retrieve the restaurant table view controller from the tab bar controller, and then programmatically invoke the addRestaurant segue. This will open the New Restaurant screen directly.
You can now run the app and see the results. The quick actions should now work.
Context Menu and Preview
In iOS 13 (or later), you can implement context menus to display additional functionalities for onscreen items. On top of that, it allows your users to preview content without opening the actual screen. A context menu can be triggered by touch and hold gesture. Usually, the user taps and holds an item on screen (e.g. image), iOS then displays a preview of the item with additonal options. The user can further tap the preview item to pop into the full view of the content.
If you've worked with Peek and Pop in 3D Touch before, context menus are very similar to that, except that context menus work on all devices running iOS 13 (or later).
To create a context menu for items in a table view, you can adopt the following methods:
tableView(_:contextMenuConfigurationForRowAt:point:)tableView(_:willPerformPreviewActionForMenuWith:animator:)
Both methods are from the UITableViewDelegate protocol and newly introduced in iOS 13 SDK. The first method requires you to return a UIContextMenuConfiguration object. This object contains the configuration details for the contextual menu including the action items in the menu and the view controller for previewing the content.
The second method controls what to be performed when the preview is tapped. If this method is not implemented, tapping the preview does nothing. But, say for example, if you want to display the full content of the preview in a view controller, you can provide the implementation in the method.
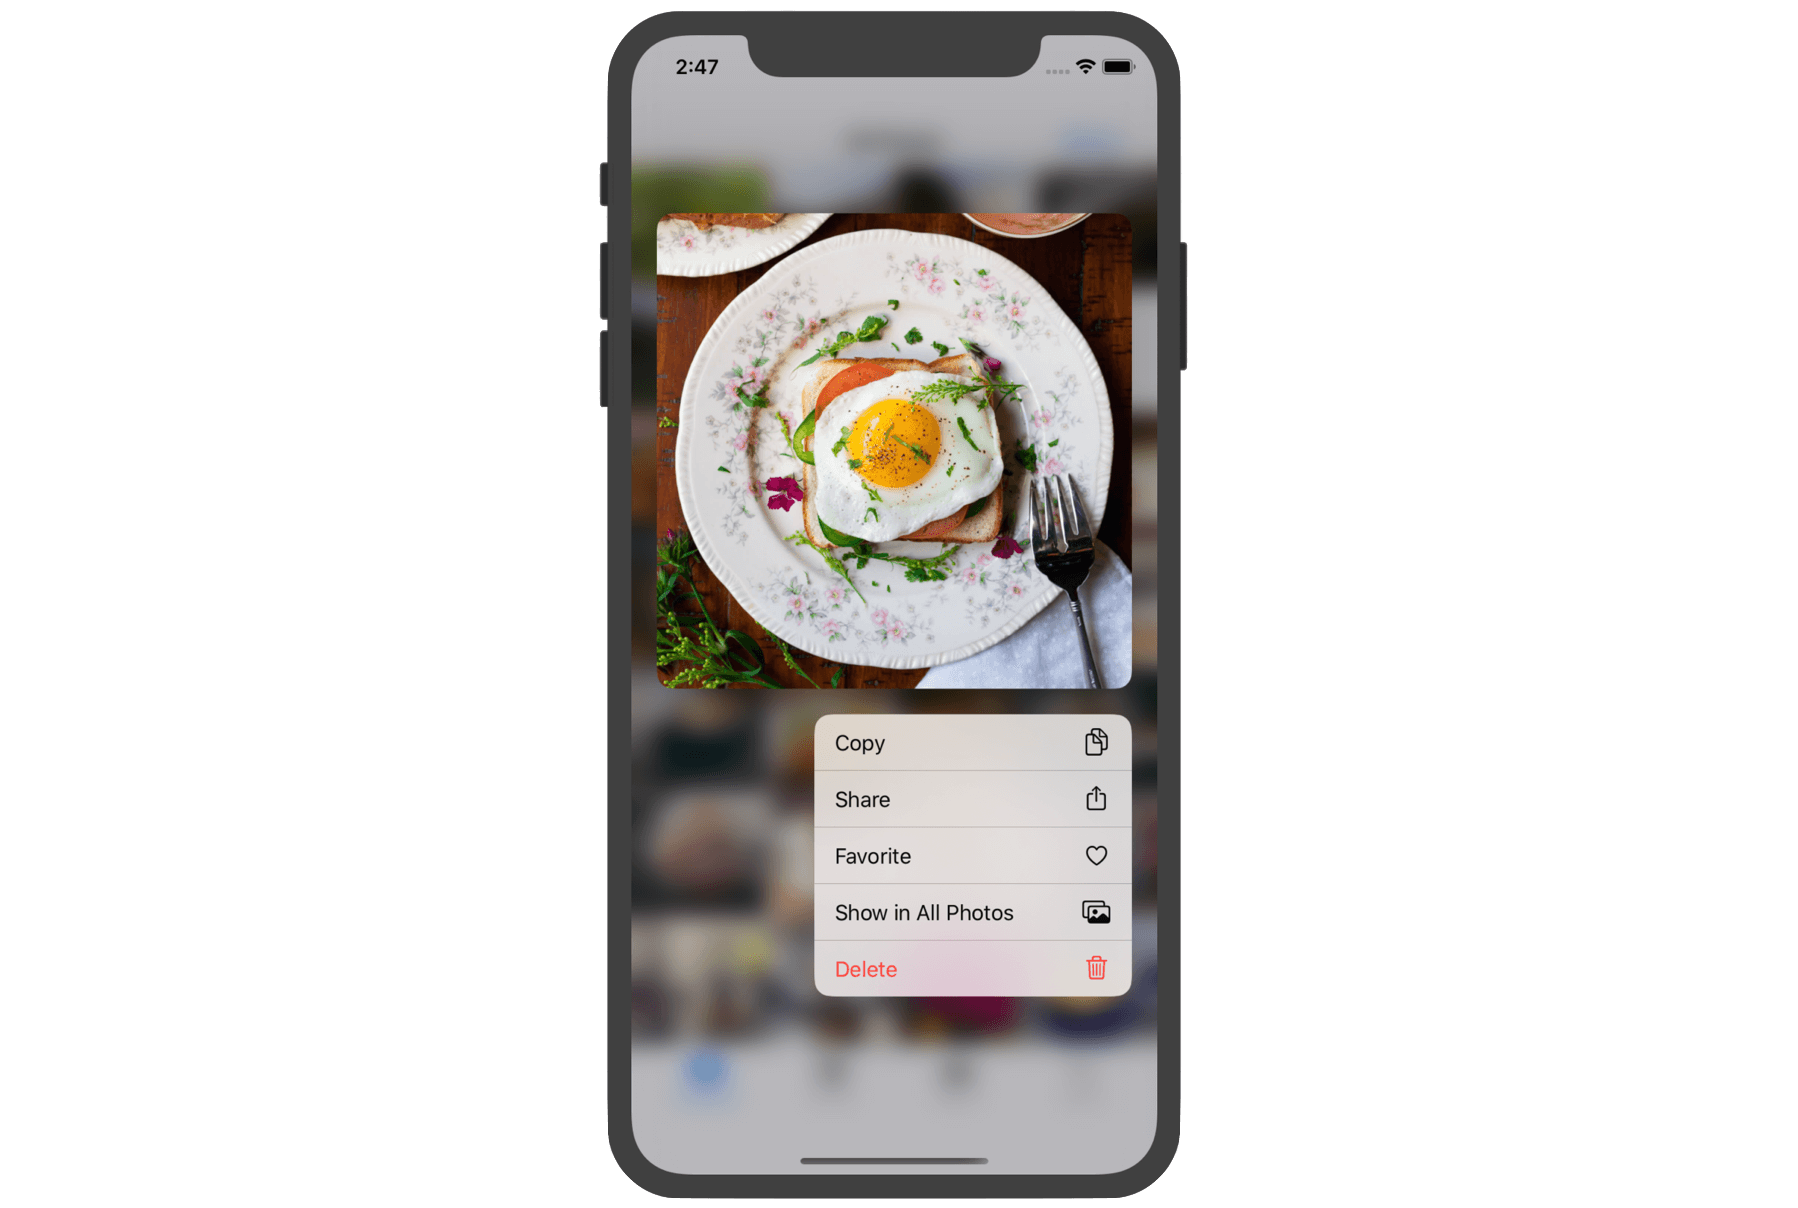
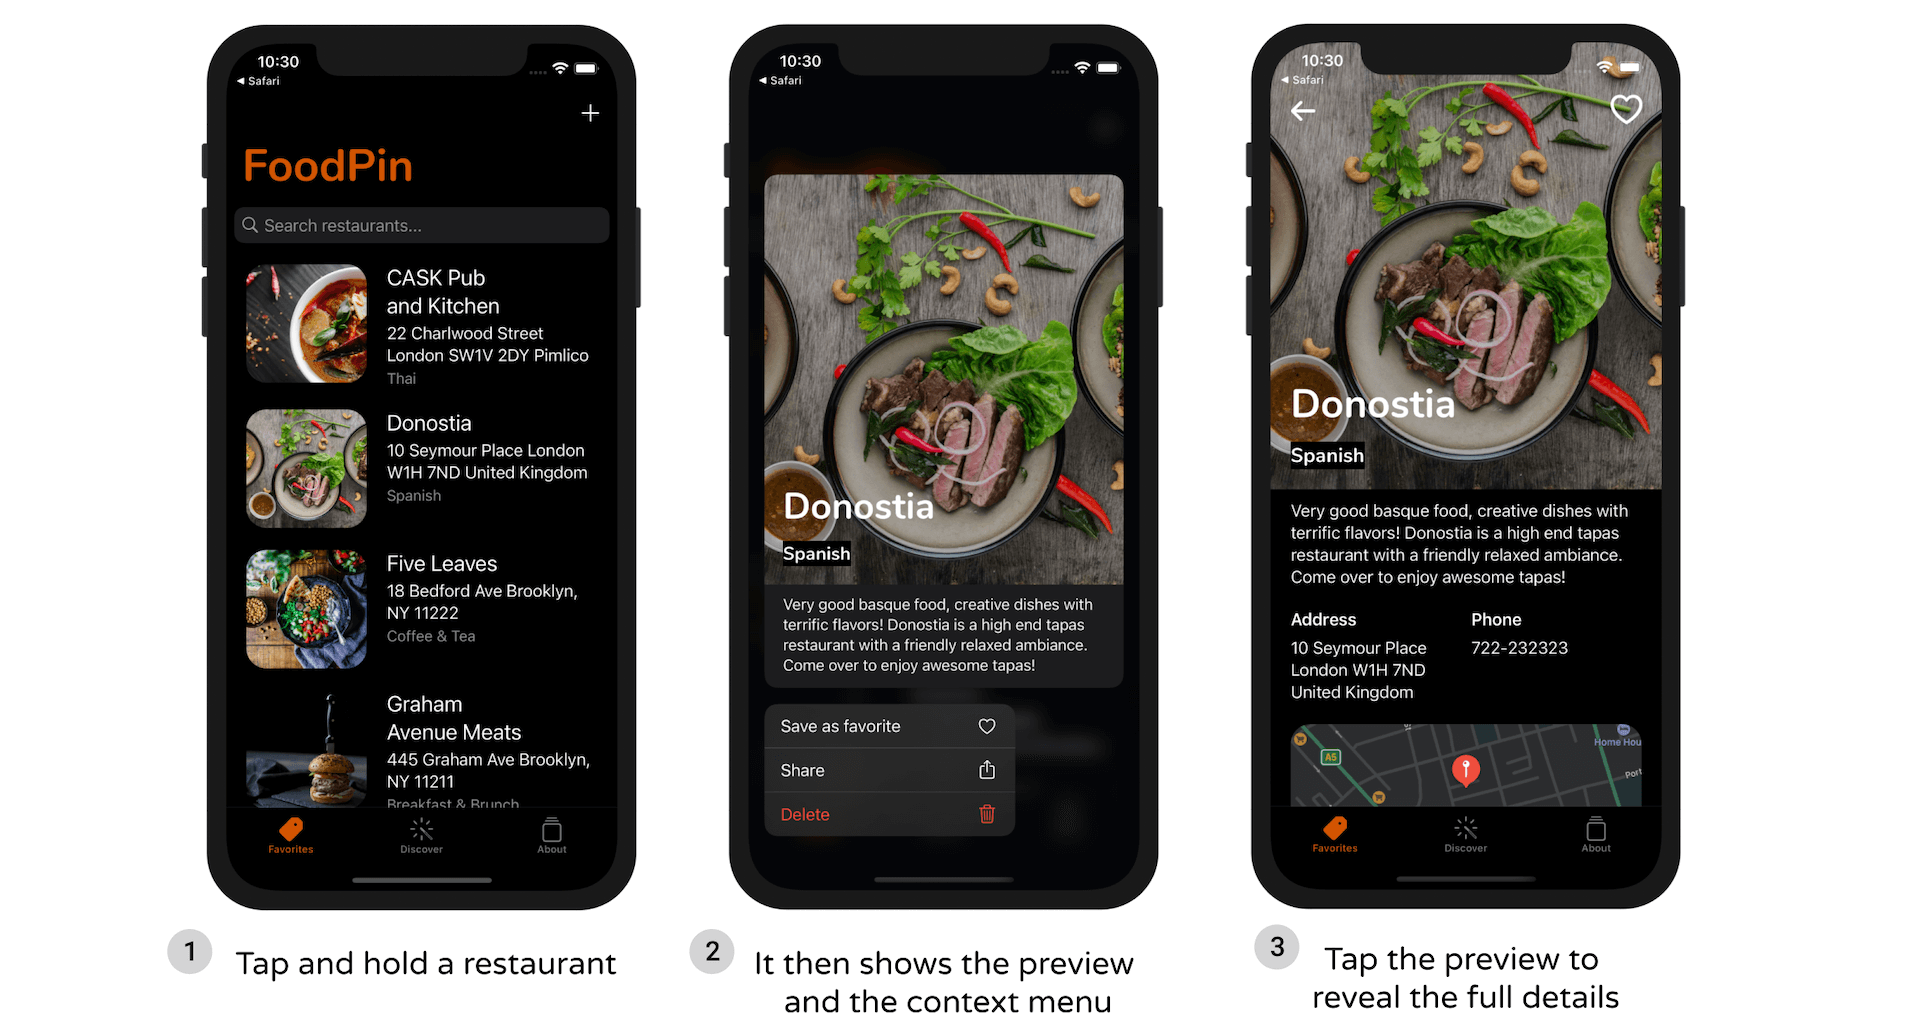
Now that you have some basic understanding of the implementation, we will modify the FoodPin app to build the context menu in the Favorites tab. This menu shows a preview of the restaurant and three menu items. Figure 29-6 illustrates how it works.
Building a Context Menu with Action Items
As mentioned earlier, to create a context menu in a table view, you need to implement the following method in RestaurantTableViewController:
func tableView(_ tableView: UITableView, contextMenuConfigurationForRowAt indexPath: IndexPath, point: CGPoint) -> UIContextMenuConfiguration? {

}
We have to create a UIContextMenuConfiguration object that contains the menu items and the preview provider. Here is the code:
override func tableView(_ tableView: UITableView, contextMenuConfigurationForRowAt indexPath: IndexPath, point: CGPoint) -> UIContextMenuConfiguration? {

    // Get the selected restaurant
    guard let restaurant = self.dataSource.itemIdentifier(for: indexPath) else {
        return nil
    }

    let configuration = UIContextMenuConfiguration(identifier: indexPath.row as NSCopying, previewProvider: {

        guard let restaurantDetailViewController = self.storyboard?.instantiateViewController(withIdentifier: "RestaurantDetailViewController") as? RestaurantDetailViewController else {
            return nil
        }

        restaurantDetailViewController.restaurant = restaurant

        return restaurantDetailViewController

    }) { actions in

        let favoriteAction = UIAction(title: "Save as favorite", image: UIImage(systemName: "heart")) { action in

            let cell = tableView.cellForRow(at: indexPath) as! RestaurantTableViewCell
            self.restaurants[indexPath.row].isFavorite.toggle()
            cell.favoriteImageView.isHidden = !self.restaurants[indexPath.row].isFavorite
        }

        let shareAction = UIAction(title: "Share", image: UIImage(systemName: "square.and.arrow.up")) { action in

            let defaultText = NSLocalizedString("Just checking in at ", comment: "Just checking in at") + self.restaurants[indexPath.row].name

            let activityController: UIActivityViewController

            if let imageToShare = UIImage(data: restaurant.image as Data) {
                activityController = UIActivityViewController(activityItems: [defaultText, imageToShare], applicationActivities: nil)
            } else  {
                activityController = UIActivityViewController(activityItems: [defaultText], applicationActivities: nil)
            }

            self.present(activityController, animated: true, completion: nil)
        }

        let deleteAction = UIAction(title: "Delete", image: UIImage(systemName: "trash"), attributes: .destructive) { action in

            // Delete the row from the data store
            if let appDelegate = (UIApplication.shared.delegate as? AppDelegate) {
                let context = appDelegate.persistentContainer.viewContext
                let restaurantToDelete = self.fetchResultController.object(at: indexPath)
                context.delete(restaurantToDelete)

                appDelegate.saveContext()
            }
        }

        // Create and return a UIMenu with the share action
        return UIMenu(title: "", children: [favoriteAction, shareAction, deleteAction])
    }

    return configuration
}
This code snippet looks a bit complicated but actually you've come across most of the code. The UIContextMenuConfiguration class accepts three parameters for initialization:
- identifier - this is a unique identifier for the menu configuration object. You may use
nilto let the system generate a unique identifier for you. Or you provide your own. Here, we use the row number of the selected restaurant as identifier. - previewProvider - this is a block that returns the custom view controller for previewing the content. In the code above, we instantiate the
RestaurantDetailViewControllerfor previewing the restaurant. - actionProvider - the last parameter accepts a block for creating the menu items of the contextual menu. In the menu, we list three action items including check-in, share, and delete. The action items are very similar to the swipe-for-action items that we created before. To create the menu, you return a
UIMenuobject with the preferred title and action items.
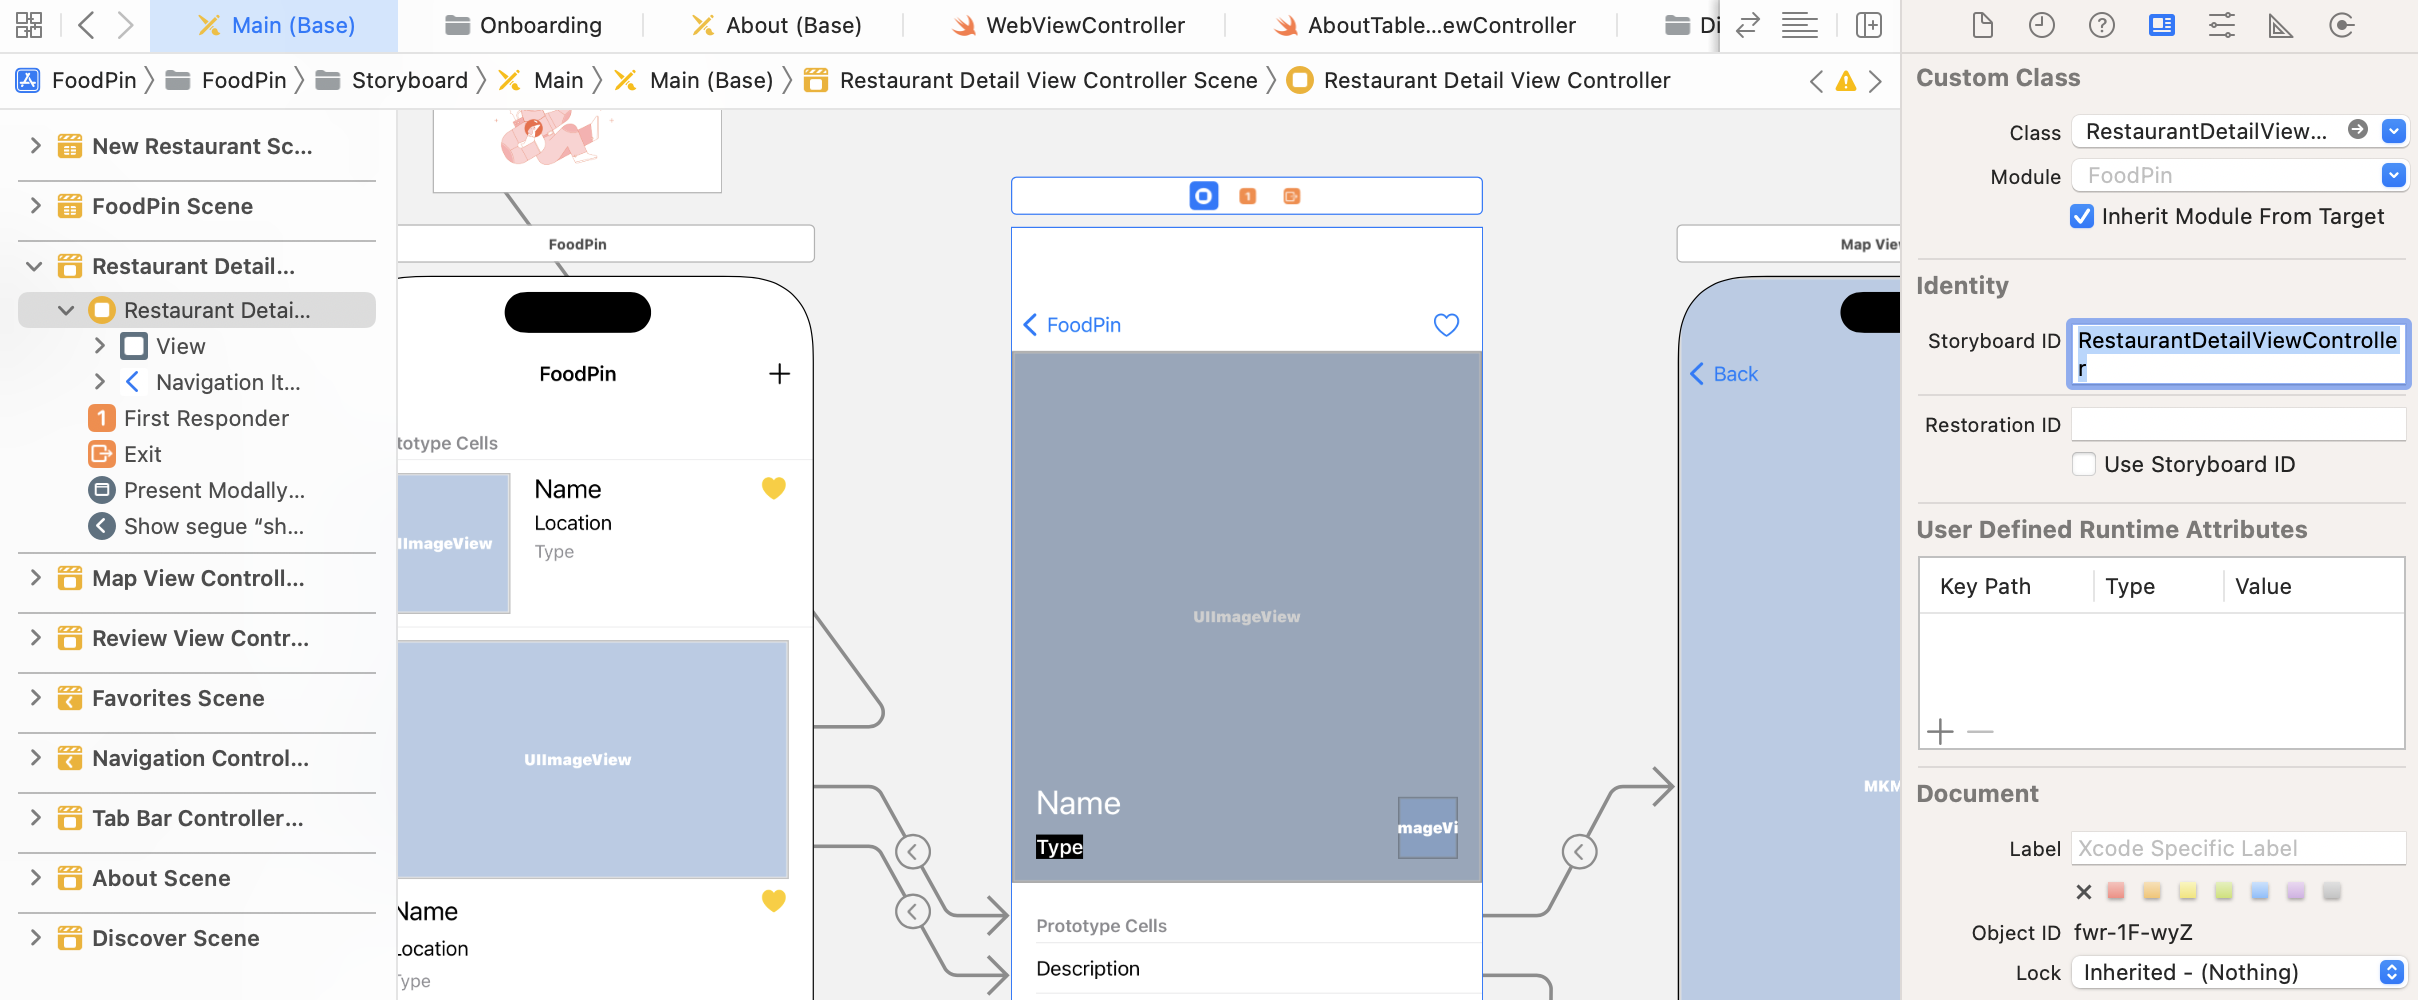
That's it! However, before testing the changes on your device, remember to set the identifier of the Restaurant Detail View Controller to RestaurantDetailViewController. Otherwise, you will not be able to instantiate the controller programmatically. Go to Main storyboard and select Restaurant Detail View Controller. Under the Identity inspector, set the storyboard ID to RestaurantDetailViewController.
Once you have completed the changes, you can run the app to have a quick test. By tapping and holding a restaurant record, you can bring up a contextual menu similar to the one displayed in figure 29-6.
Showing the Full Content
For now, if you further tap the preview, the system simply dismisses the preview and does nothing. What we want to do is display the full content when the user taps the preview. To make this happen, we have to implement the following method and tell the system the custom view controller to display:
func tableView(_ tableView: UITableView, willPerformPreviewActionForMenuWith configuration: UIContextMenuConfiguration, animator: UIContextMenuInteractionCommitAnimating) {

}
Now insert the following code snippet in the RestaurantTableViewController class:
override func tableView(_ tableView: UITableView, willPerformPreviewActionForMenuWith configuration: UIContextMenuConfiguration, animator: UIContextMenuInteractionCommitAnimating) {

    guard let selectedRow = configuration.identifier as? Int else {
        print("Failed to retrieve the row number")
        return
    }

    guard let restaurantDetailViewController = self.storyboard?.instantiateViewController(withIdentifier: "RestaurantDetailViewController") as? RestaurantDetailViewController else {

        return
    }

    restaurantDetailViewController.restaurant = self.restaurants[selectedRow]

    animator.preferredCommitStyle = .pop
    animator.addCompletion {
        self.show(restaurantDetailViewController, sender: self)
    }
}
Our goal is to show the restaurant detail view controller for displaying the full details of a restaurant. For the configuration's identifier, we can reveal the selected row number. By using that, we can create a RestaurantDetailViewController with the selected restaurant.
To bring up the view controller, we provide a completion block for the animator. This animator will animate the change and display the specified view controller. Optionally, you can specify your preferred commit style. In the code above, we use the .pop style. Later, you may change it to .dismiss and try out a different style if you want.
You're good to go. Run the app in the simulator or test it on a real device. The FoodPin app should now let you preview the restaurant and see the full content when you tap the preview.
Summary
In this chapter, I have walked you through some basic APIs of context menus. As you can see, the APIs are pretty easy to use. And you can add quick actions without writing a line of code.
Context menus provides an entirely new way for users to interact with their phones. As an app developer, it is your responsibility to deliver a great user experience for your users. Now is the best time to start thinking about how to make use of this new technology to further improve your apps.
For reference, you can download the complete Xcode project from http://www.appcoda.com/resources/swift57/FoodPinContextMenu.zip.