Chapter 13 Introduction to Navigation Controller and Segue
Just build something that you'd want to use today, not something you think people would use somehow.
– Paul Graham
First things first, what's navigation controller? Like table views, navigation controllers are another common UI components in iOS apps. It provides a drill-down interface for hierarchical content. Take a look at the built-in Photos app, YouTube, and Contacts. They all use navigation controllers to display hierarchical content. Generally, you combine a navigation controller with a stack of table view controllers to build an elegant interface for your apps. Being that said, this doesn't mean you have to use both together. Navigation controllers can work with any types of a view controller.
Scenes and Segues in Storyboards
Up till now, we just lay out a table view controller in the storyboard of the FoodPin app. Storyboarding allows you to do more than that. You can add more view controllers in the storyboard, link them up, and define the transitions between them. All these can be done without a line of code. When working with storyboards, scene and segues are two of the terms you have to understand. In a storyboard, a scene usually refers to the on-screen content (e.g. a view controller). Segues sit between two scenes and represent the transition from one scene to another. Push and Modal are two common types of transition.
Note: You can make storyboards more manageable and modular by using a feature called storyboard references. When your project becomes large and complex, you can break a large storyboard into multiple storyboards and link them up using storyboard references. This feature is particularly useful when you are collaborating with your team members to create a storyboard.
Creating Navigation Controller
We'll continue to work on the Food Pin app by embedding the table view controller into a navigation controller. When a user selects any of the restaurants, the app navigates to the next screen to display the restaurant details.
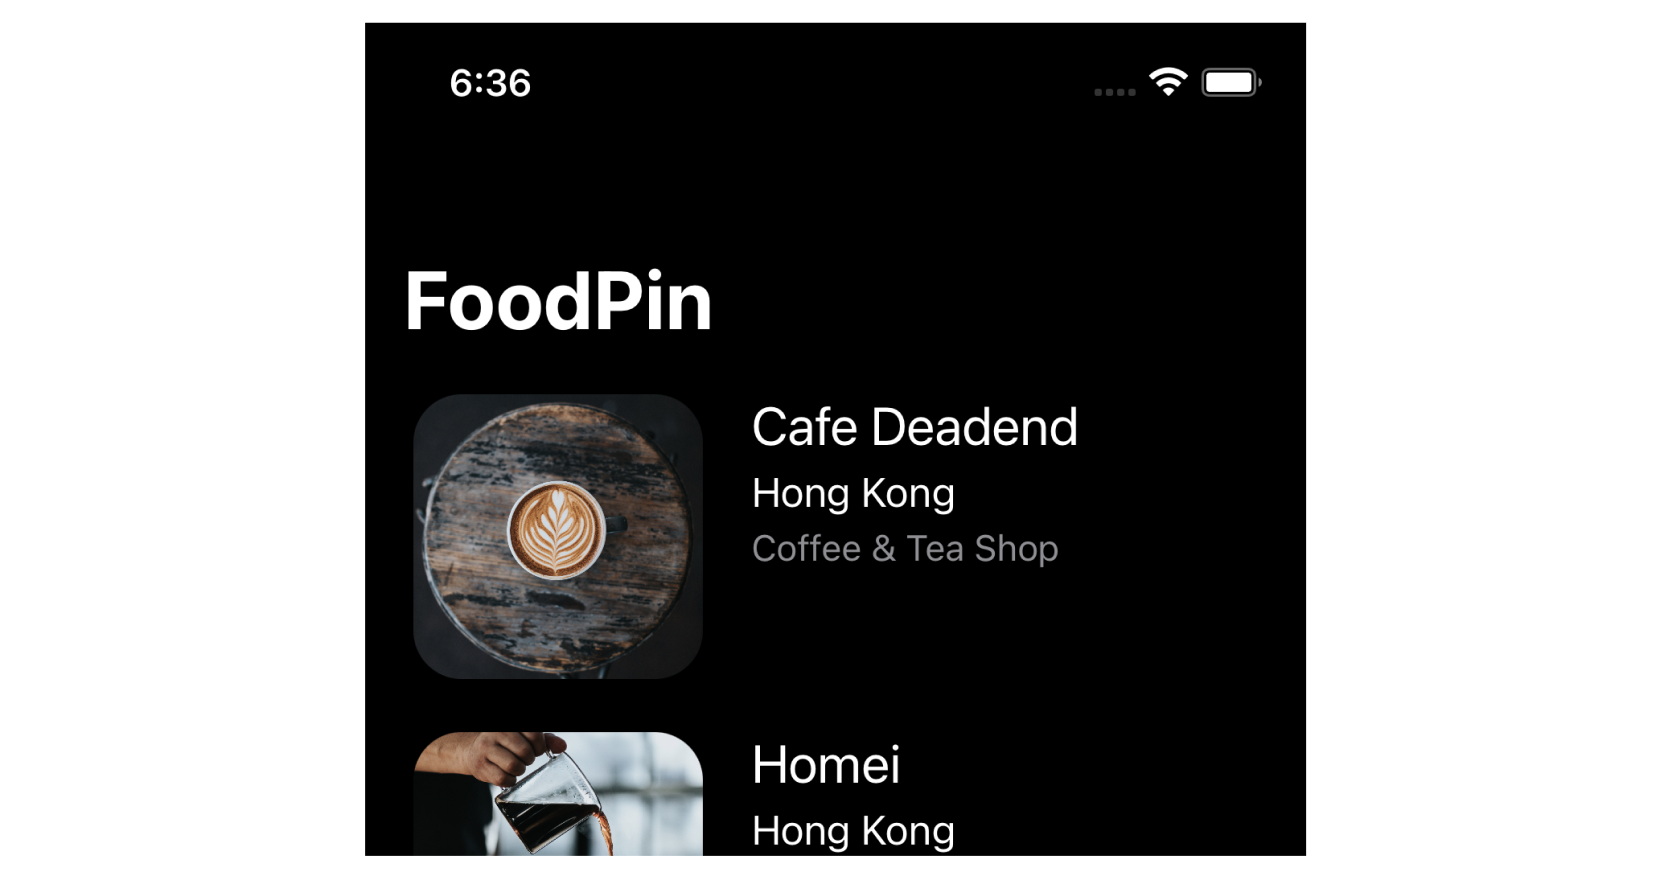
Figure 13-1. FoodPin app with a navigation bar in dark mode
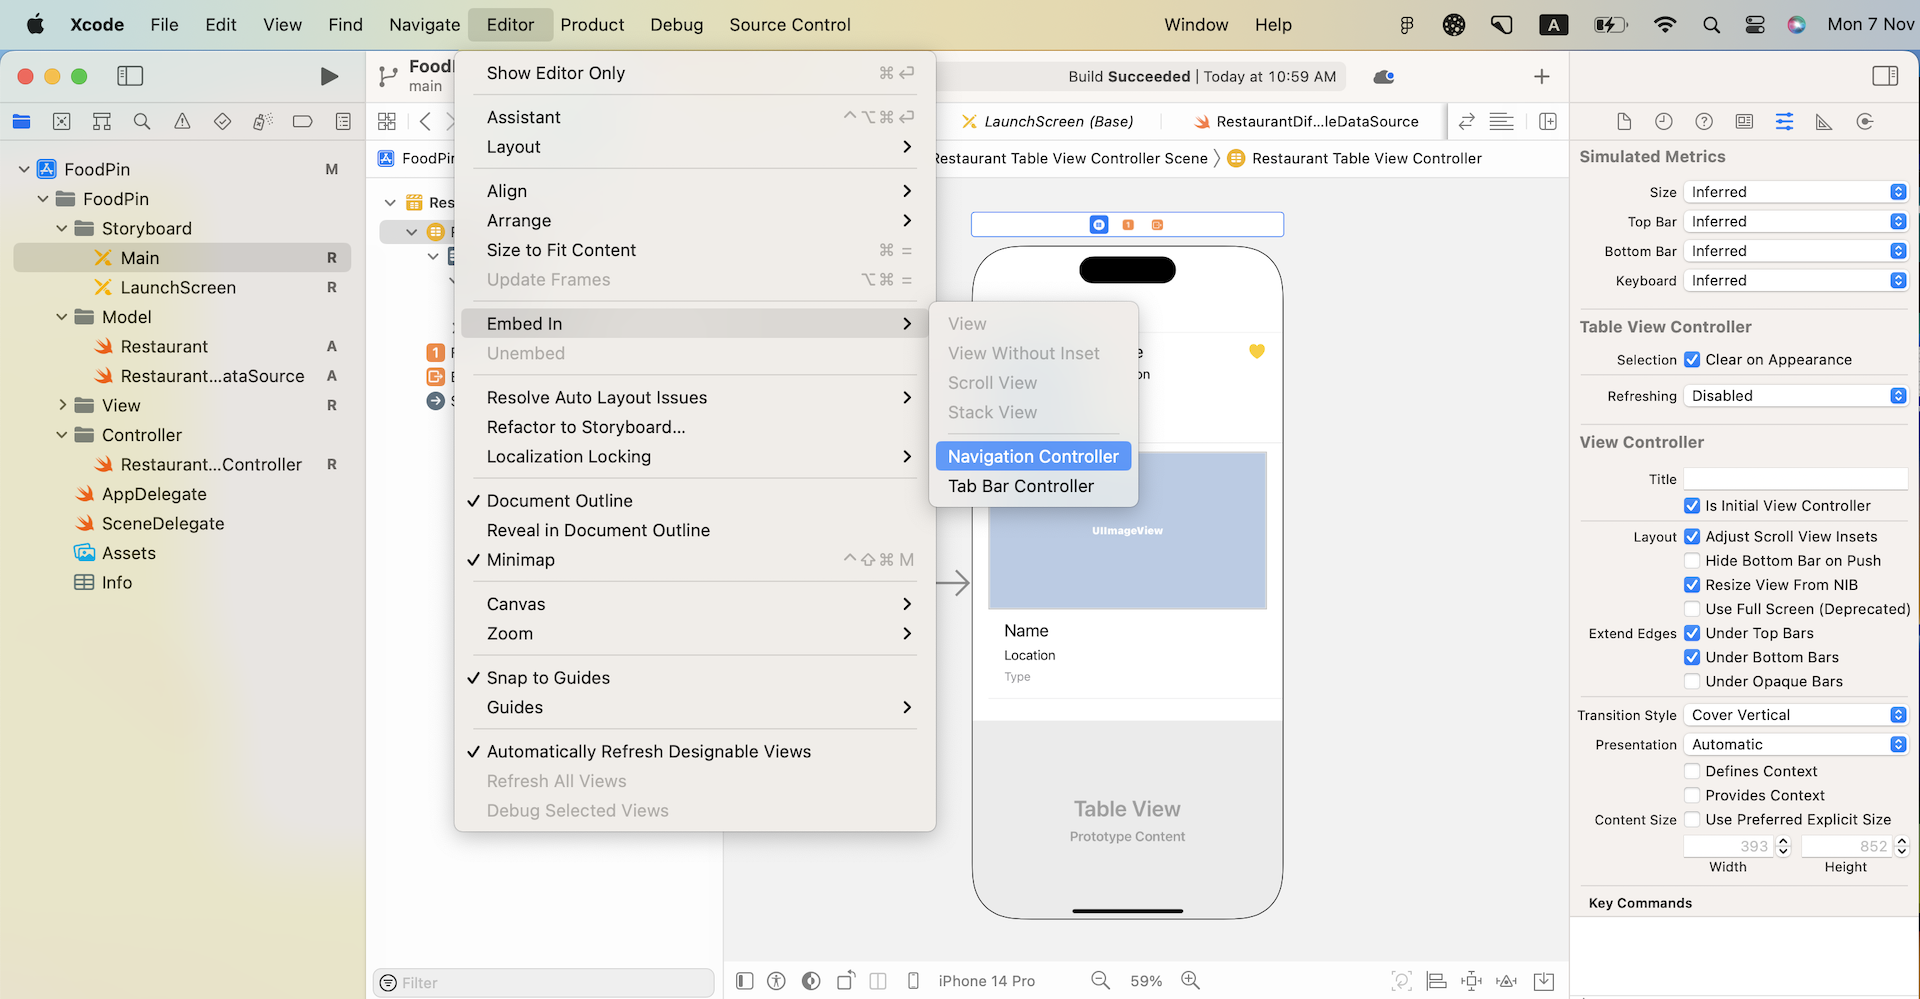
If you've closed the FoodPin project (http://www.appcoda.com/resources/swift57/FoodPinTableDeletion.zip), it is time to fire up Xcode and open the project again. Select Main to switch to the Interface Builder editor. Xcode provides an embed feature that makes it easy to embed any view controller in a navigation controller. Select the table view controller and click Editor in the menu. Choose Embed in > Navigation Controller.
Figure 13-2. Embed in option in Xcode menu
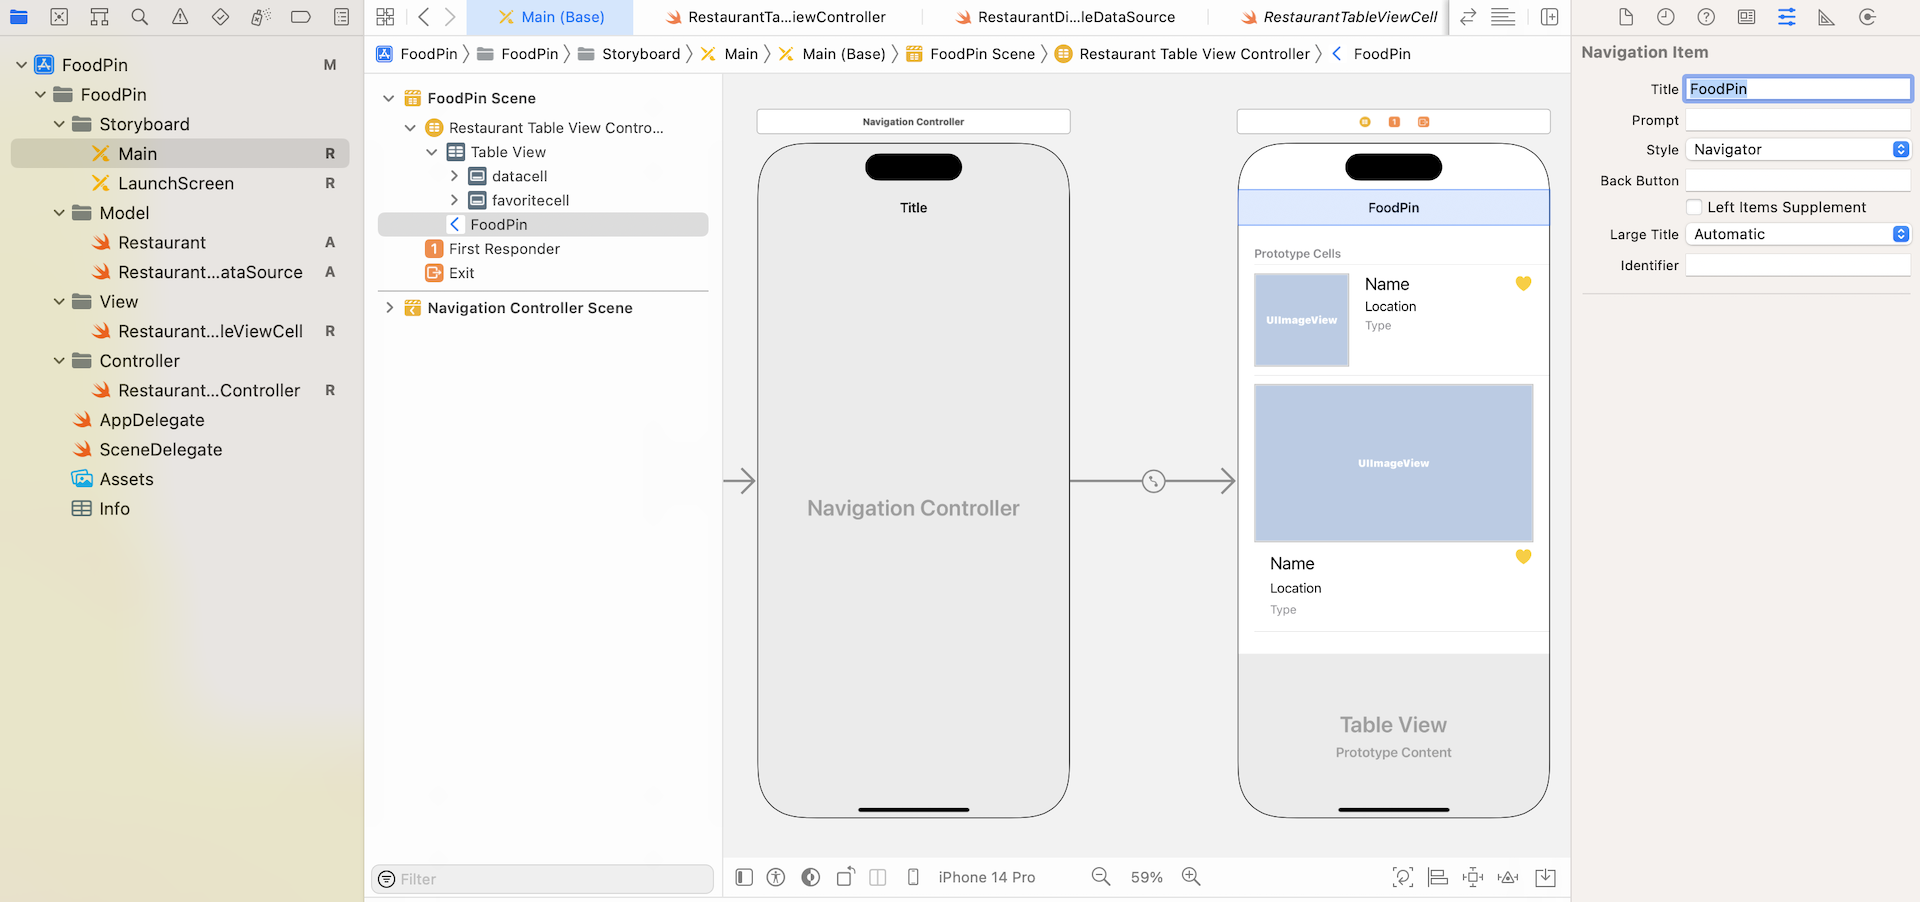
Xcode automatically embeds the controller in a navigation controller. Let's set the title of the navigation bar. Select the navigation bar of the table view controller. Under the Attributes inspector, change the value of the title to FoodPin.
Figure 13-3. Embedding the table view controller in a navigation controller
Now run the app and see how it looks. The app is the same as before, but added with a navigation bar.
Large Navigation Bar Titles
Starting from version 11, iOS comes with large navigation bar titles. The stock apps, such as Mail and Settings, use large titles in the navigation bar. The size of the bar is not fixed, however. When you scroll the content, the navigation bar shrinks back down its size to that appears in iOS 10.
Figure 13-4. Default navigation bar title in iOS (left & middle), Large title enabled (right)
By default, large title is not enabled in Xcode. If you want to use large title in the navigation bar, you can insert this line of code in the viewDidLoad() method of the RestaurantTableViewController class and place it after super.viewDidLoad():
Test the app again, and you will see the result as shown in figure 13-4.
Adding a Detail View Controller
With just a few clicks and a line of code, you've added a navigation bar to your app with large titles. What's missing is another view controller that displays the restaurant details. When a user selects a restaurant, the app transits to the detail view controller and displays the restaurant details. This is what we are going to do.
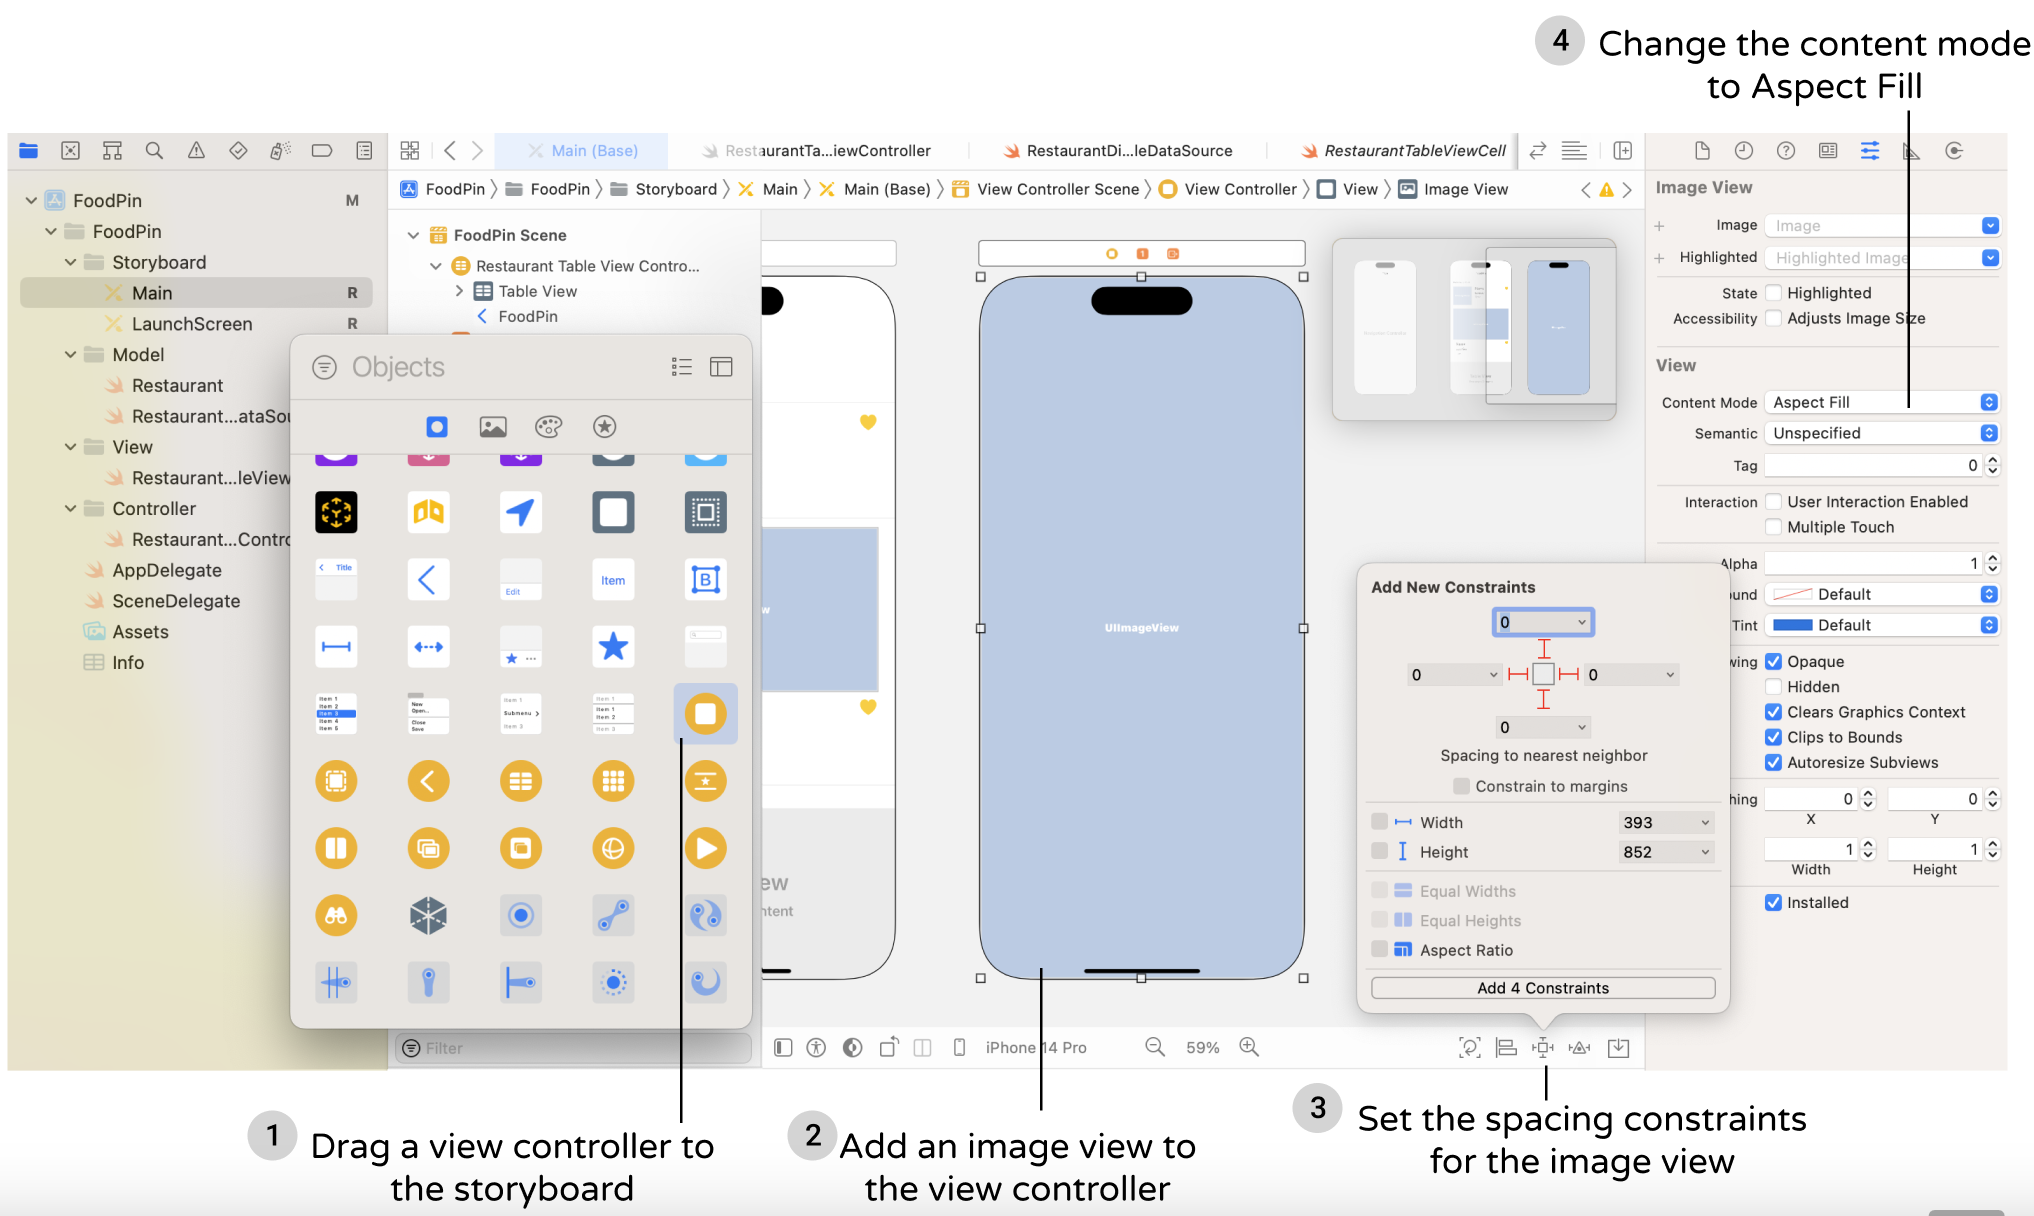
In Interface Builder, drag a view controller from the Object library to create the detail view controller. The primary purpose of this chapter is to show you how to implement navigation controller. We'll keep the detail view as simple as possible. Let's just display the restaurant photo in the detail view. Drag an Image View from the Object library to the view controller. Resize it to fit the view, and add spacing constraints for each side of the image view. To ensure the image is scaled properly, go to the Attributes inspector and change the mode from Scale to Fill to Aspect Fill.
Figure 13-5. Adding an image view to the detail view controller
Now you have a table view controller and a detail view controller configured in the storyboard. The question is how can you connect them together? In storyboards, we need to connect them through a segue. In music, a segue is a seamless transition between one piece of music and another. In storyboards, the transition between two scenes is called segue.
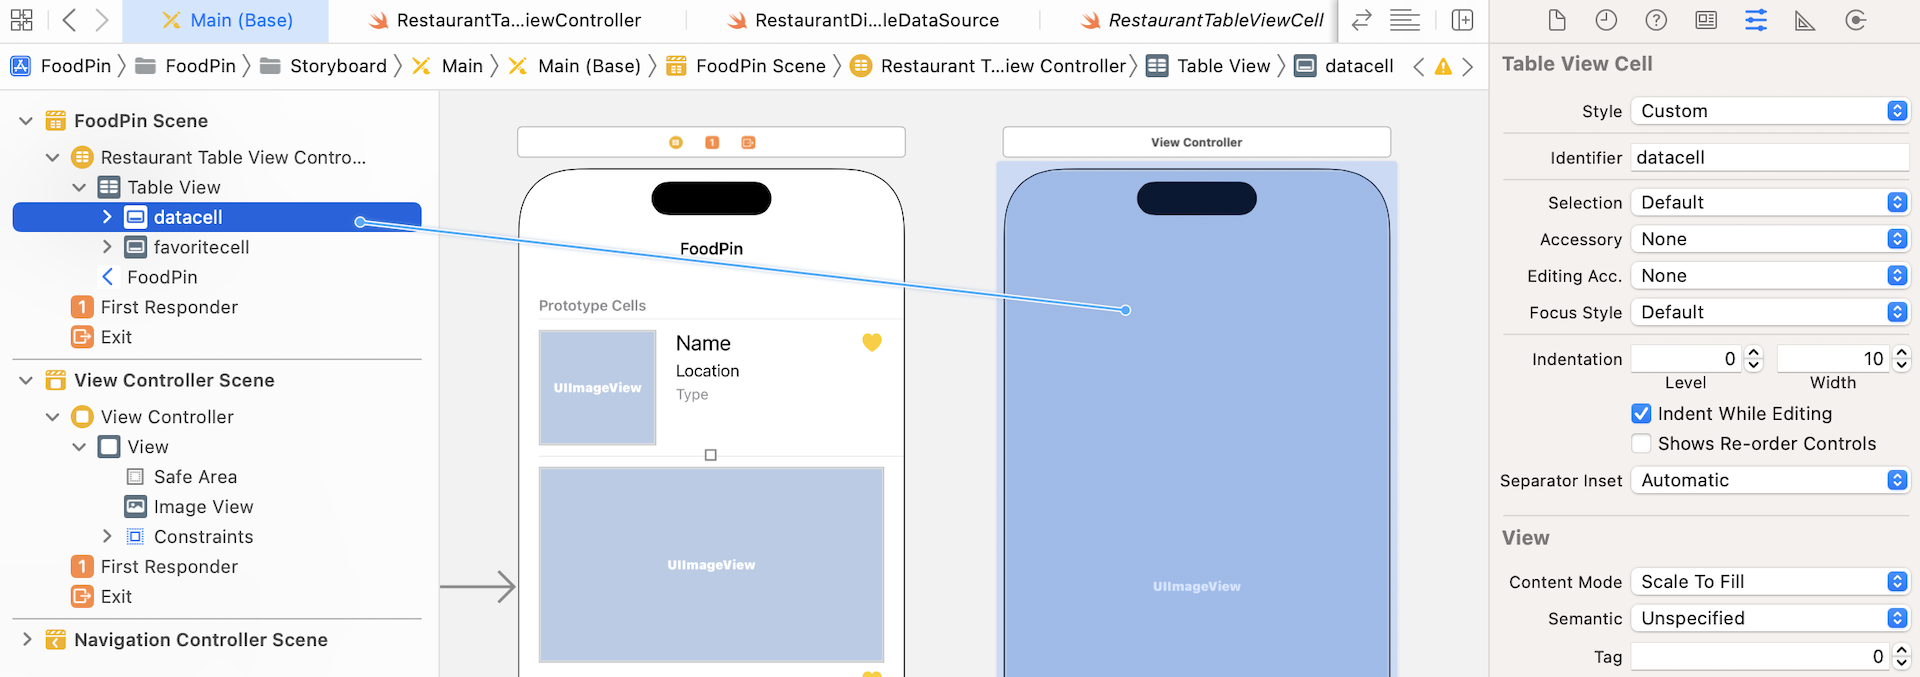
The table view controller will transit to the detail scene when a user taps a cell. So, we will add a segue to connect the prototype cell and the detail scene. It's very straightforward to add a segue object. Press and hold the control key, click on the prototype cell (i.e. datacell) and drag to the Detail View Controller.
Figure 13-6. Connecting scenes with segue
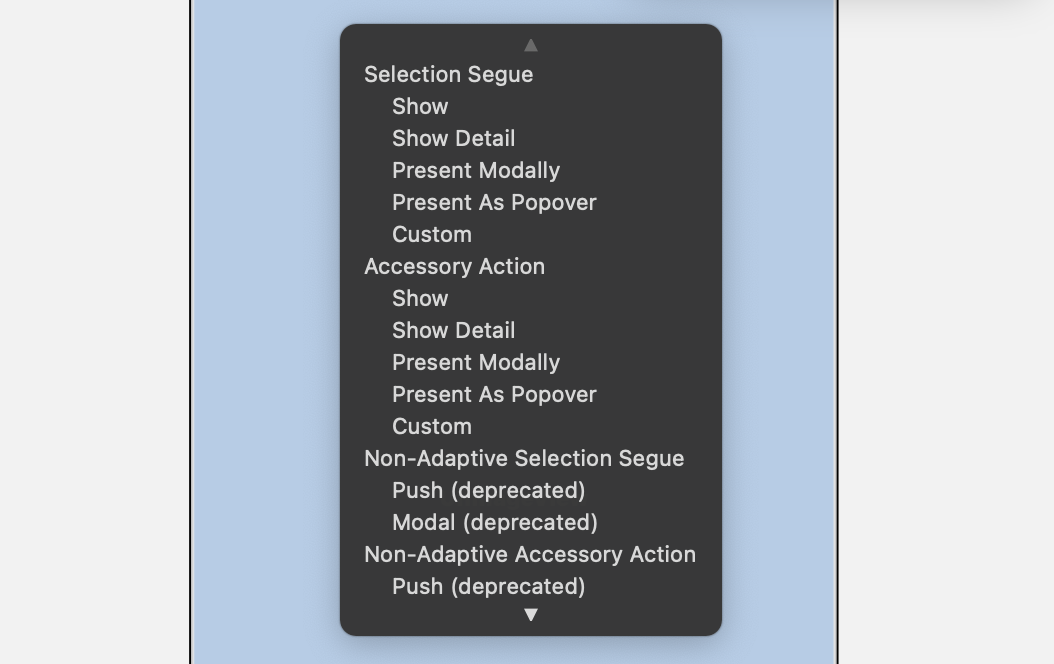
Sometimes it is pretty difficult to select the prototype cell in the table view controller, I suggest you open the document outline view, and drag from the datacell to the view controller. When you release the buttons, a pop-up menu appears for you to choose the style for the segue. Select "Show" for the style.
Figure 13-7. Choosing a segue style
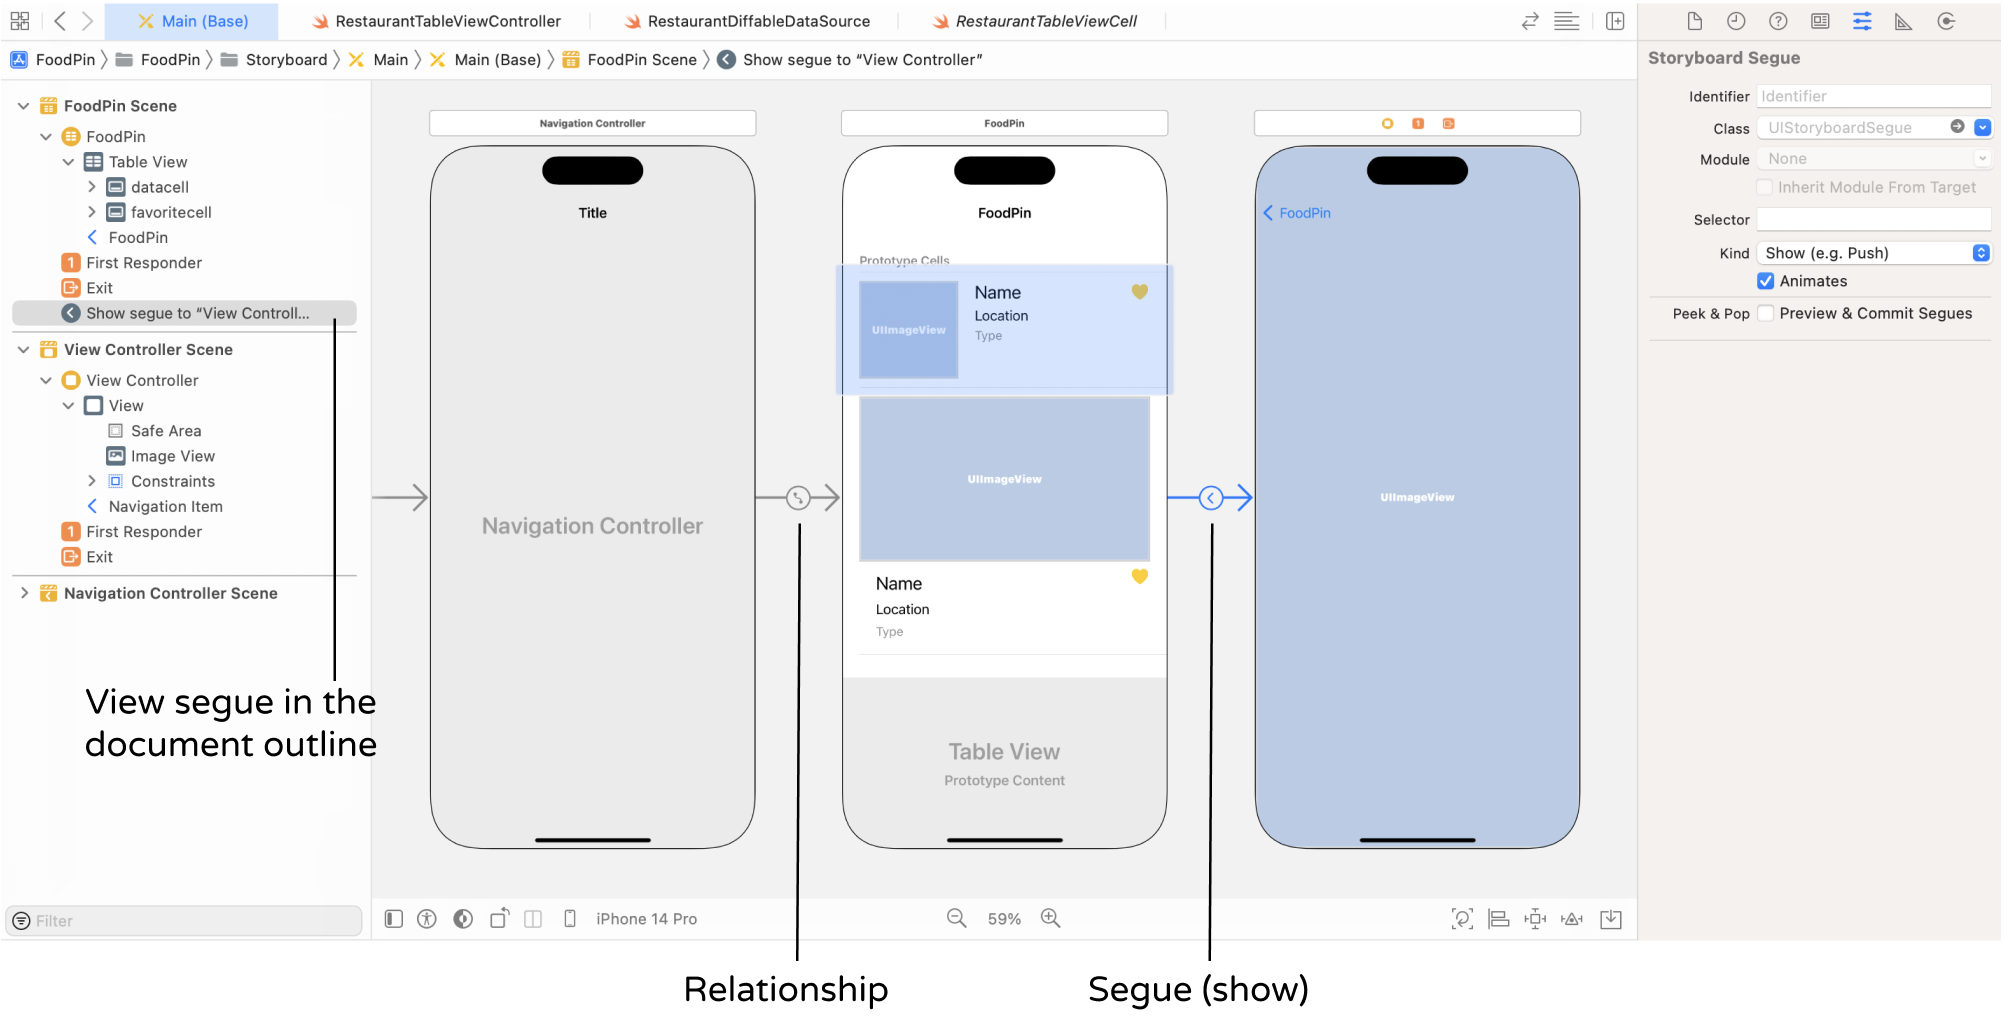
Once chosen, Xcode automatically connects the datacell and the detail view controller with a show segue.
Figure 13-8. Viewing a segue
Repeat the same procedures to connect the favoritecell to the view controller. You will then in another segue between the table view controller and the view controller.
In iOS, it supports the following types of segue:
Show - when the show style is used, the content is pushed on top of the current view controller stack. A back button will be displayed in the navigation bar for navigating back to the original view controller. Typically, we use this segue type for navigation controllers.
Show detail - similar to the show style, but the content in the detail (or destination) view controller replaces the top of the current view controller stack. For example, if you select show detail instead of show in the FoodPin app, there will be no navigation bar and back button in the detail view.
Present modally - presents the content modally. When used, the detail view controller will be animated up from the bottom and cover the entire screen on iPhone. A good example of present modally segue is the "Add" feature of the built-in Calendar app. When you click the + button in the app, it brings up a "New Event" screen from the bottom.
Present as popover - Present the content as a popover anchored to an existing view. Popover is commonly found in iPad apps, and you have already implemented popover in earlier chapters.
Note: These segue types are deprecated since the release of iOS 8: Push, Modal, Popover, Replace. When you see the word "deprecated", it means those functions are not recommended to use. They will probably be removed in the future version of iOS SDK.
Now, you're ready to run the app. Once launched, select a restaurant and the app should navigate to the detail view controller. Meanwhile, the detail view controller just shows a blank screen. The good news is that you already created a navigation interface.
Without writing a single line of code, you've added a navigation controller in your app. However, I guess you got a couple of questions in your mind:
How can you pass the restaurant information from RestaurantTableViewController to the detail view controller?
How can you display the photo of the selected restaurant in the detail view controller?
We'll look into them one by one in a minute.
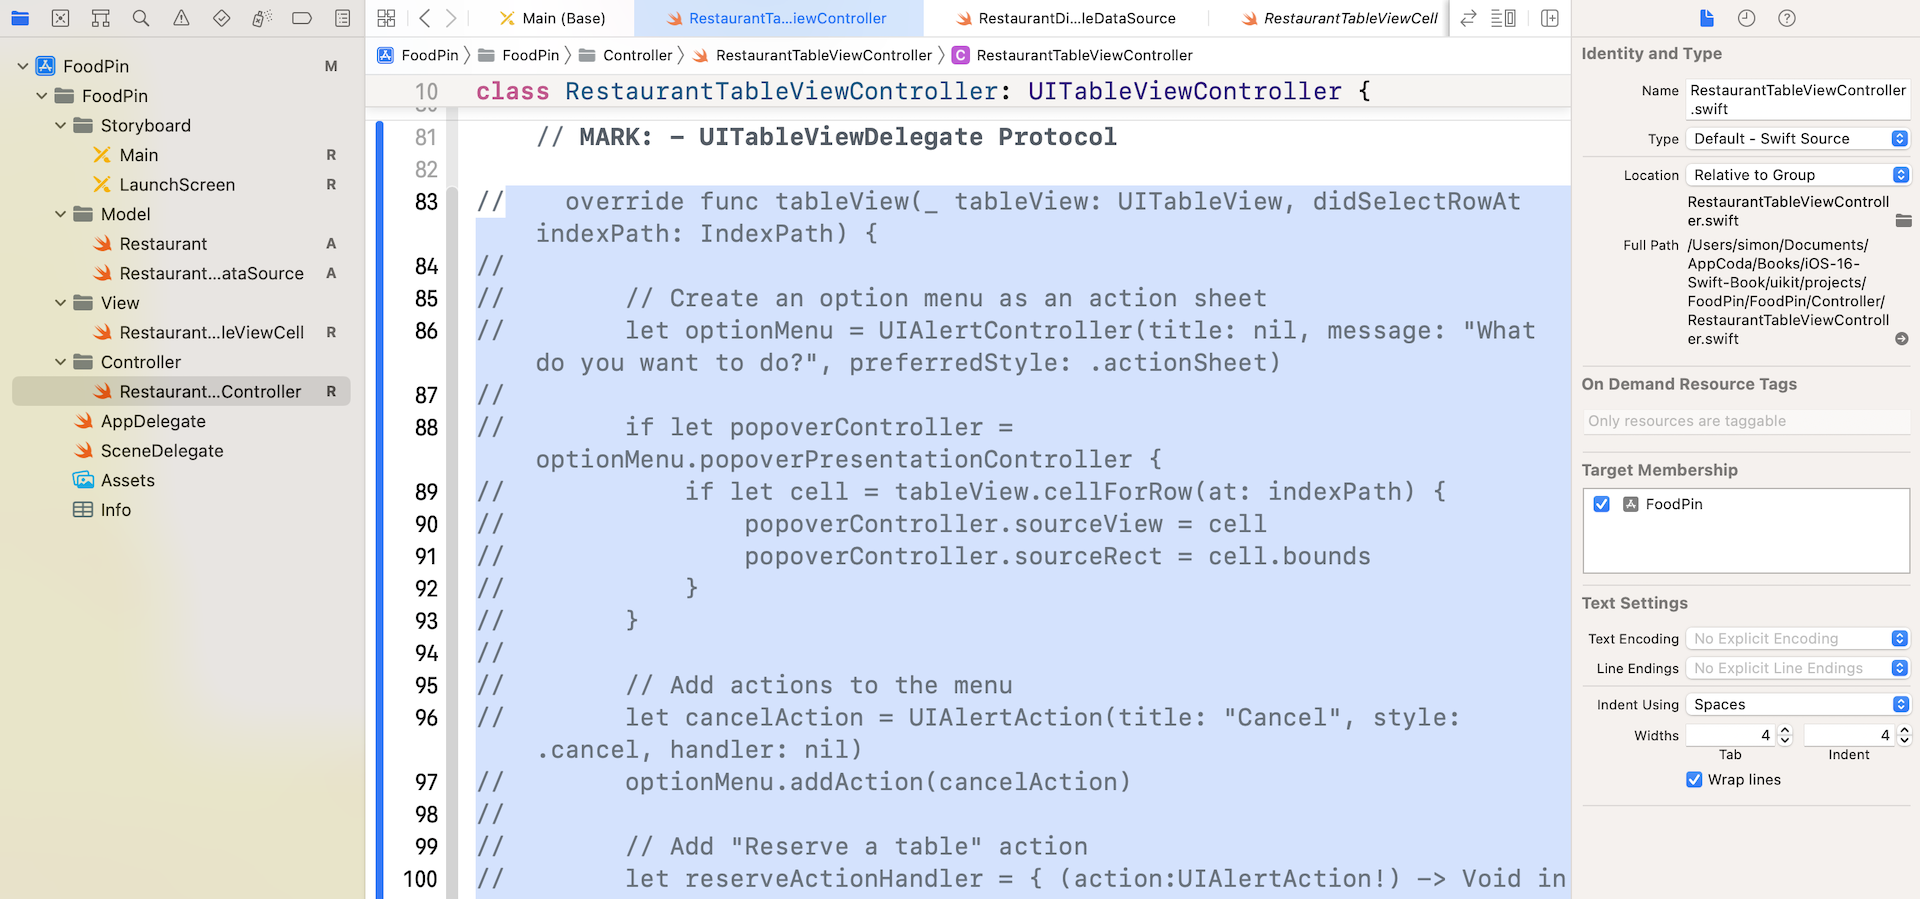
Before moving on to the next section, let's make a little tweak. When you run the app and select a cell, it now navigates to the blank screen and shows an action sheet that we have implemented earlier. We no longer need that action sheet. Later we'll add the same function in the detail view controller. Therefore, remove the tableView(_:didSelectRowAt:) method from RestaurantTableViewController.swift.
Quick tip: Sometimes you may just want to comment out a block of code instead of deleting them. Xcode provides a shortcut key to comment multiple lines of code. First, select the block of code and press command+slash. Xcode automatically marks the code block with comment indicators. To remove the comment, do the same procedures again.
Figure 13-9. Use a shortcut key to comment a block of code quickly
Creating a New Class for the Detail View Controller
Okay, let's go back to the detail view controller. Our goal is to update the image view in the view controller with the selected restaurant. The view controller is now associated with the UIViewController class by default. As explained before, the UIViewController class only provides the fundamental view management model. There is no variable for storing the restaurant image. We have to extend UIViewController to create our own class so that we can add a new variable for the image view.
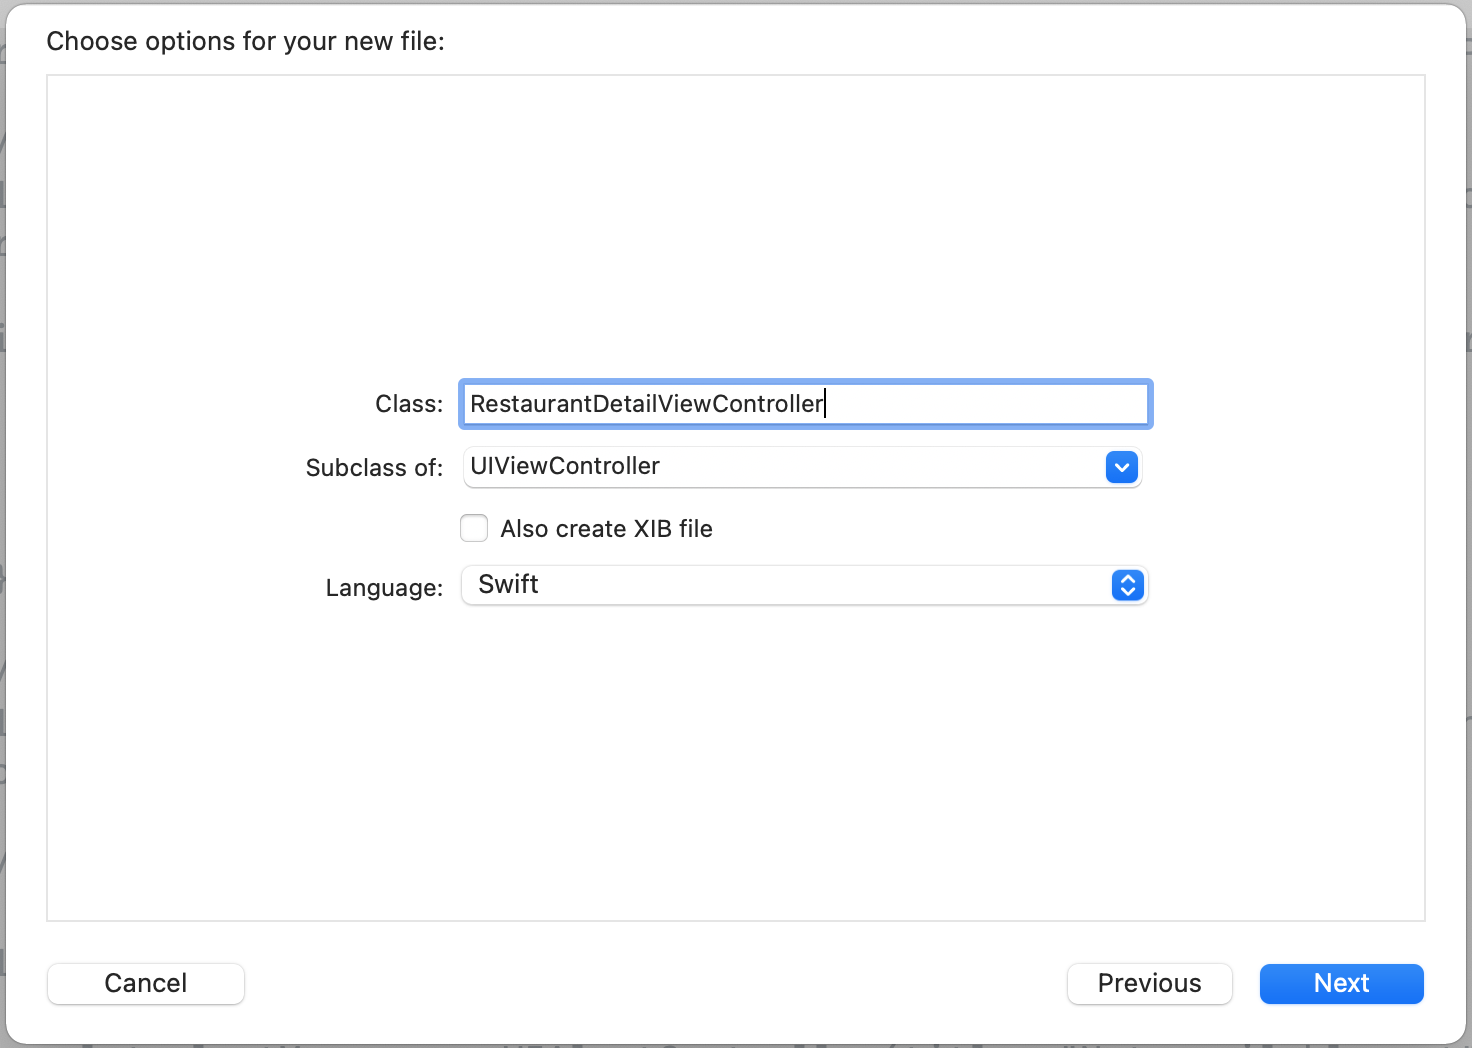
In the Project Navigator, right-click the Controller folder and select New File…. Choose Cocoa Touch Class as the class template. Name the class RestaurantDetailViewController and set it as a subclass of UIViewController. Click Next and save the file in your project folder.
Figure 13-10. Create a DetailViewController class
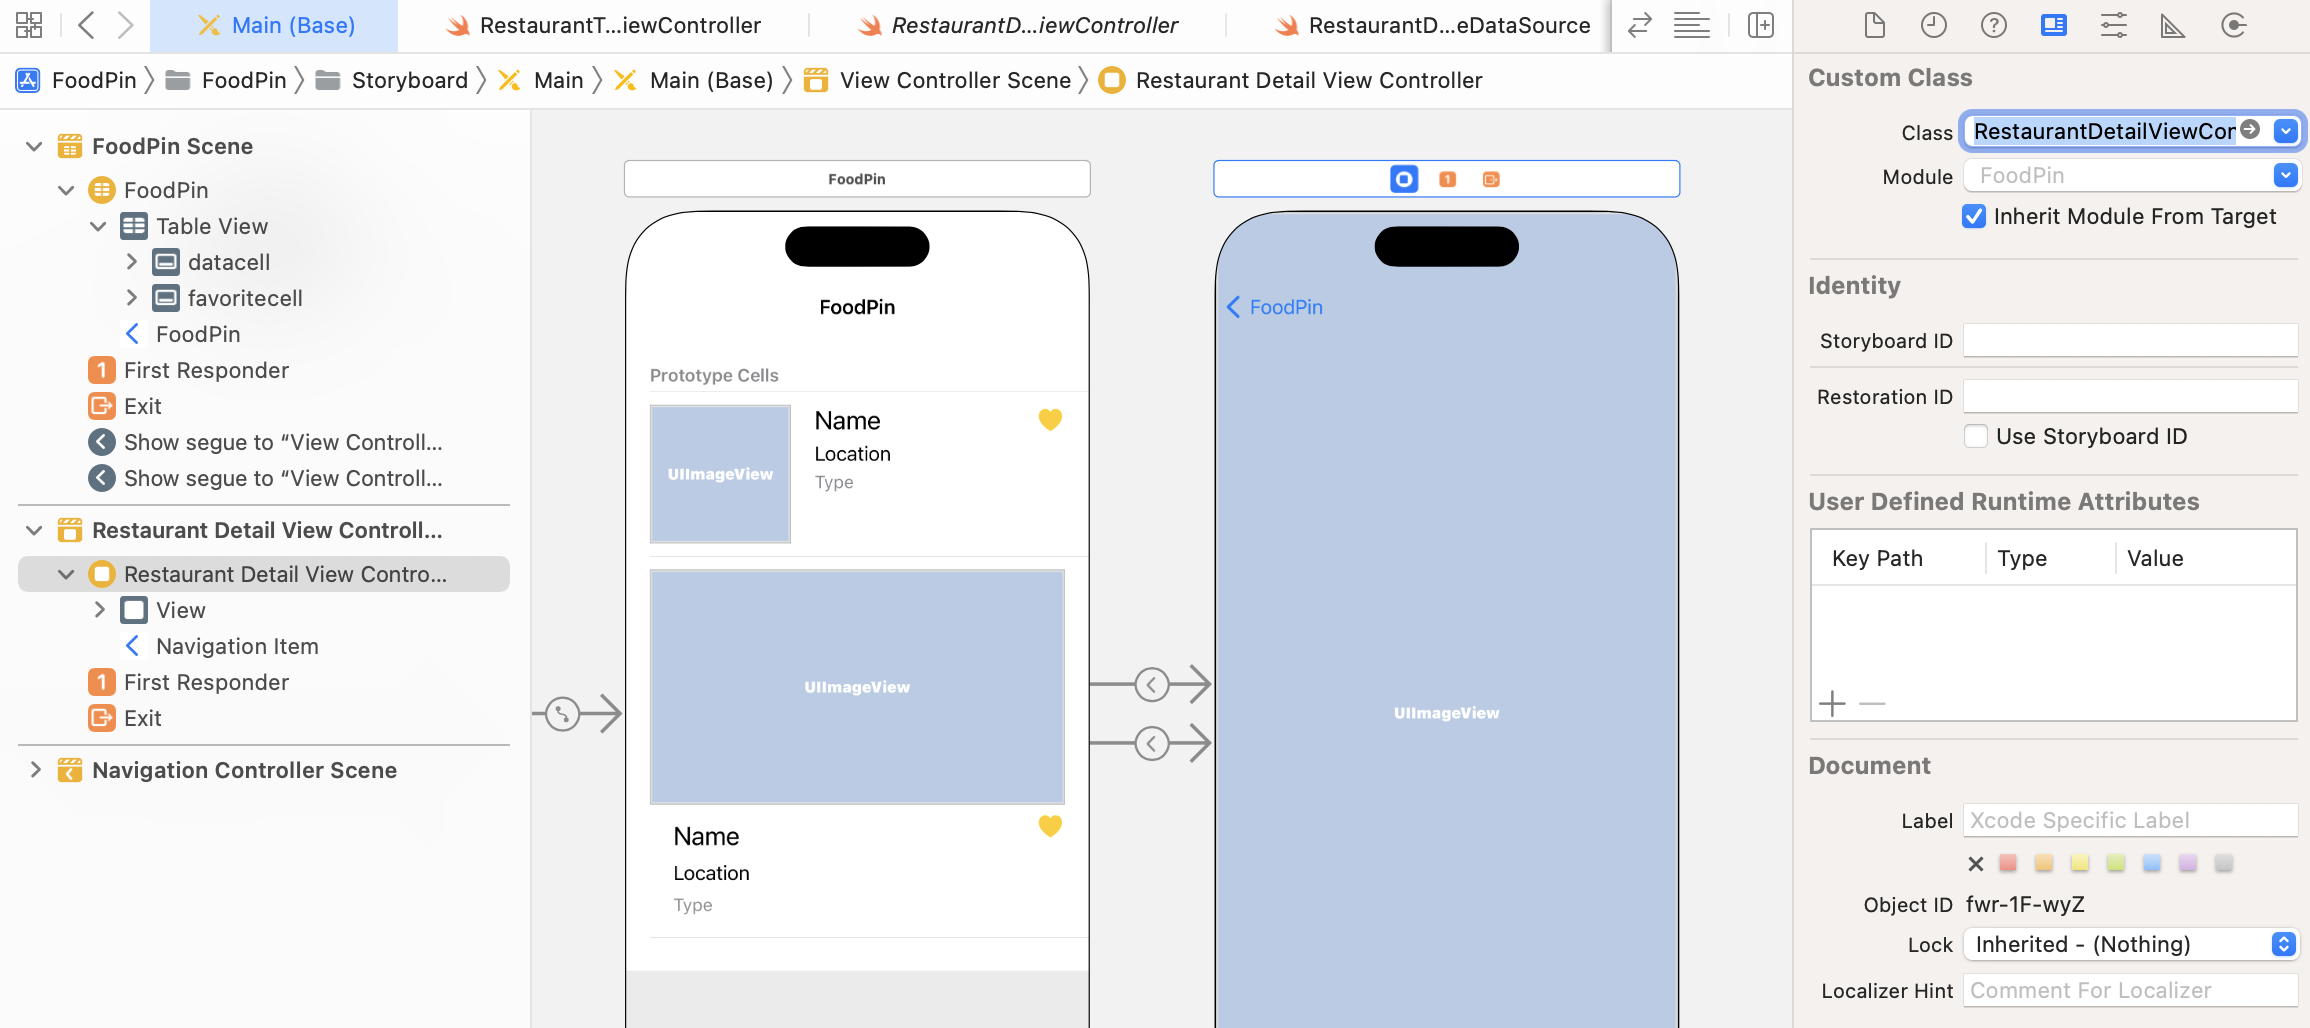
First, we have to establish a relationship between the view controller in Interface Builder and the new class. Go to Main storyboard and assign the RestaurantDetailViewController class to the detail view controller. In Interface Builder, select the view controller and open the Identity inspector. Change the custom class to RestaurantDetailViewController.
Figure 13-11. Assign a custom class for the detail view controller
Adding Variables to the Custom Class
There are a couple of things we have to add in the custom class:
Create a variable named restaurantImageName – when a user selects a restaurant in the table view controller, there must be a way to pass the image name to the detail view. This variable will be used for data passing.
Create an outlet called restaurantImageView for the image view – we need a reference to update the image view of the detail view controller, so we have to create an outlet.
Okay, insert the following code to the RestaurantDetailViewController class:
@IBOutletvar restaurantImageView: UIImageView!
var restaurantImageName = ""
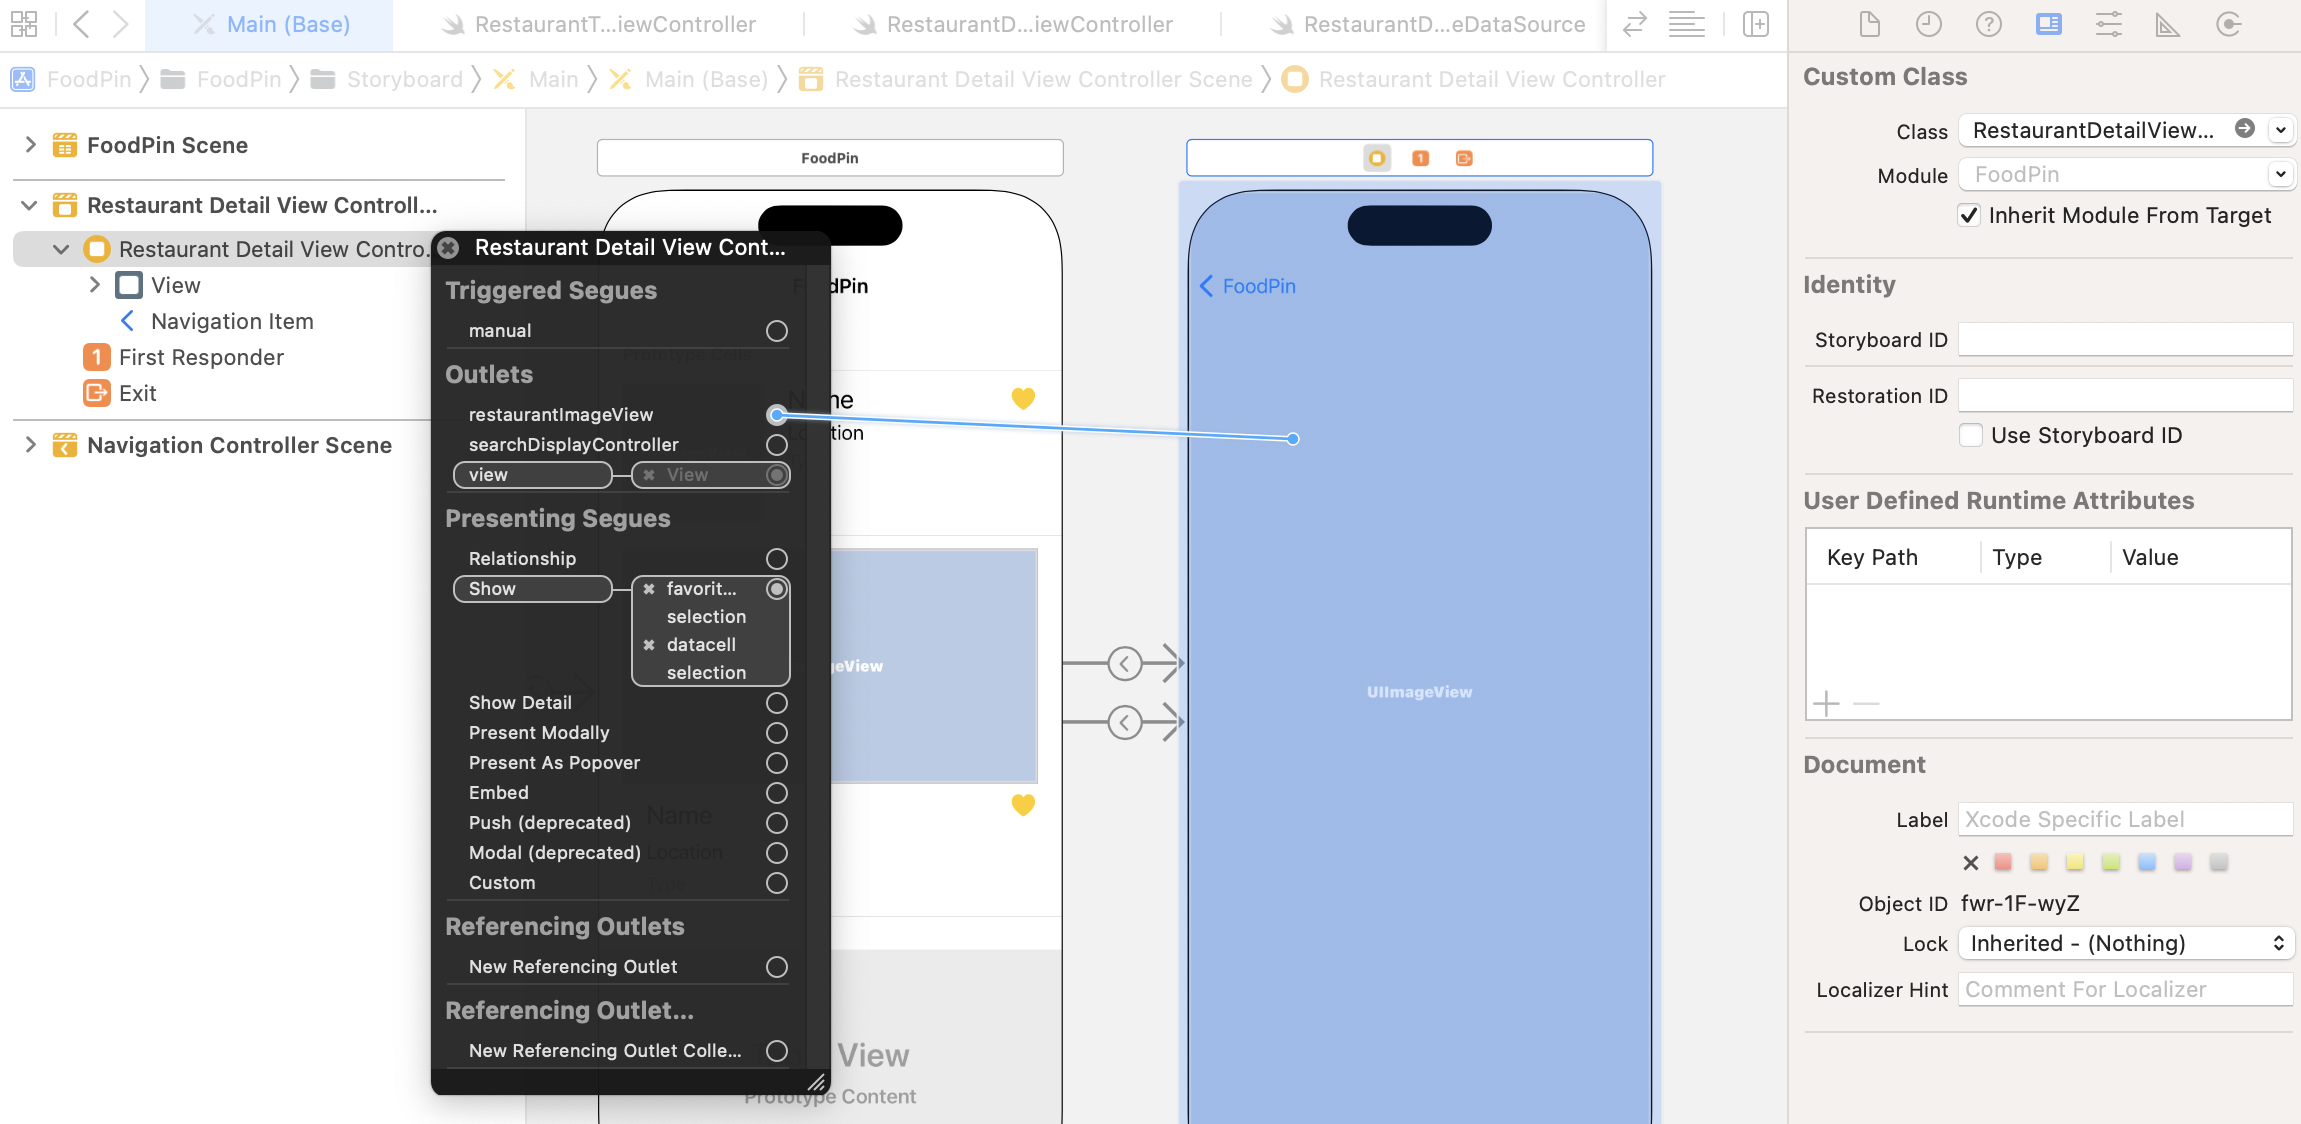
Next, establish a connection between the restaurantImageView variable and the image view of the detail view controller. Go back to the Main storyboard. Right click the Restaurant Detail View Controller object in the document outline. In the popover menu, connect the restaurantImageView outlet with the image view of the controller.
Figure 13-12. Establish the connection between the image view and the outlet
Now that you've linked up the outlet variable with the image view object in the storyboard, but there is still one thing left. You haven't provided the image yet. The image view should display the selected restaurant image. In the viewDidLoad method of the RestaurantDetailViewController class, insert a line of code. Your method should look like this:
The viewDidLoad method is called when the view is loaded into memory. You can provide additional customization of the view in this method. In the above, we simply set the image view's image to the selected restaurant image.
Try to compile and run your app. Oops! The detail view is still blank after selecting a restaurant. We still miss one thing. We haven't passed the image name of the selected restaurant from the table view controller to the detail view controller. This is why the restaurantImageName variable is not assigned with any value.
Passing Data Using Segues
This comes to the core part of this chapter about data passing with segues. A segue manages the transition between view controllers, and contains the view controllers involved in the transition. When a segue is triggered, before the visual transition occurs, the storyboard runtime notifies the source view controller (i.e. RestaurantTableViewController) by calling the prepare(for:sender:) method:
The default implementation of the prepare(for:sender:) method does nothing. By overriding the method, you can pass any relevant data to the new controller, which is RestaurantDetailViewController in our project.
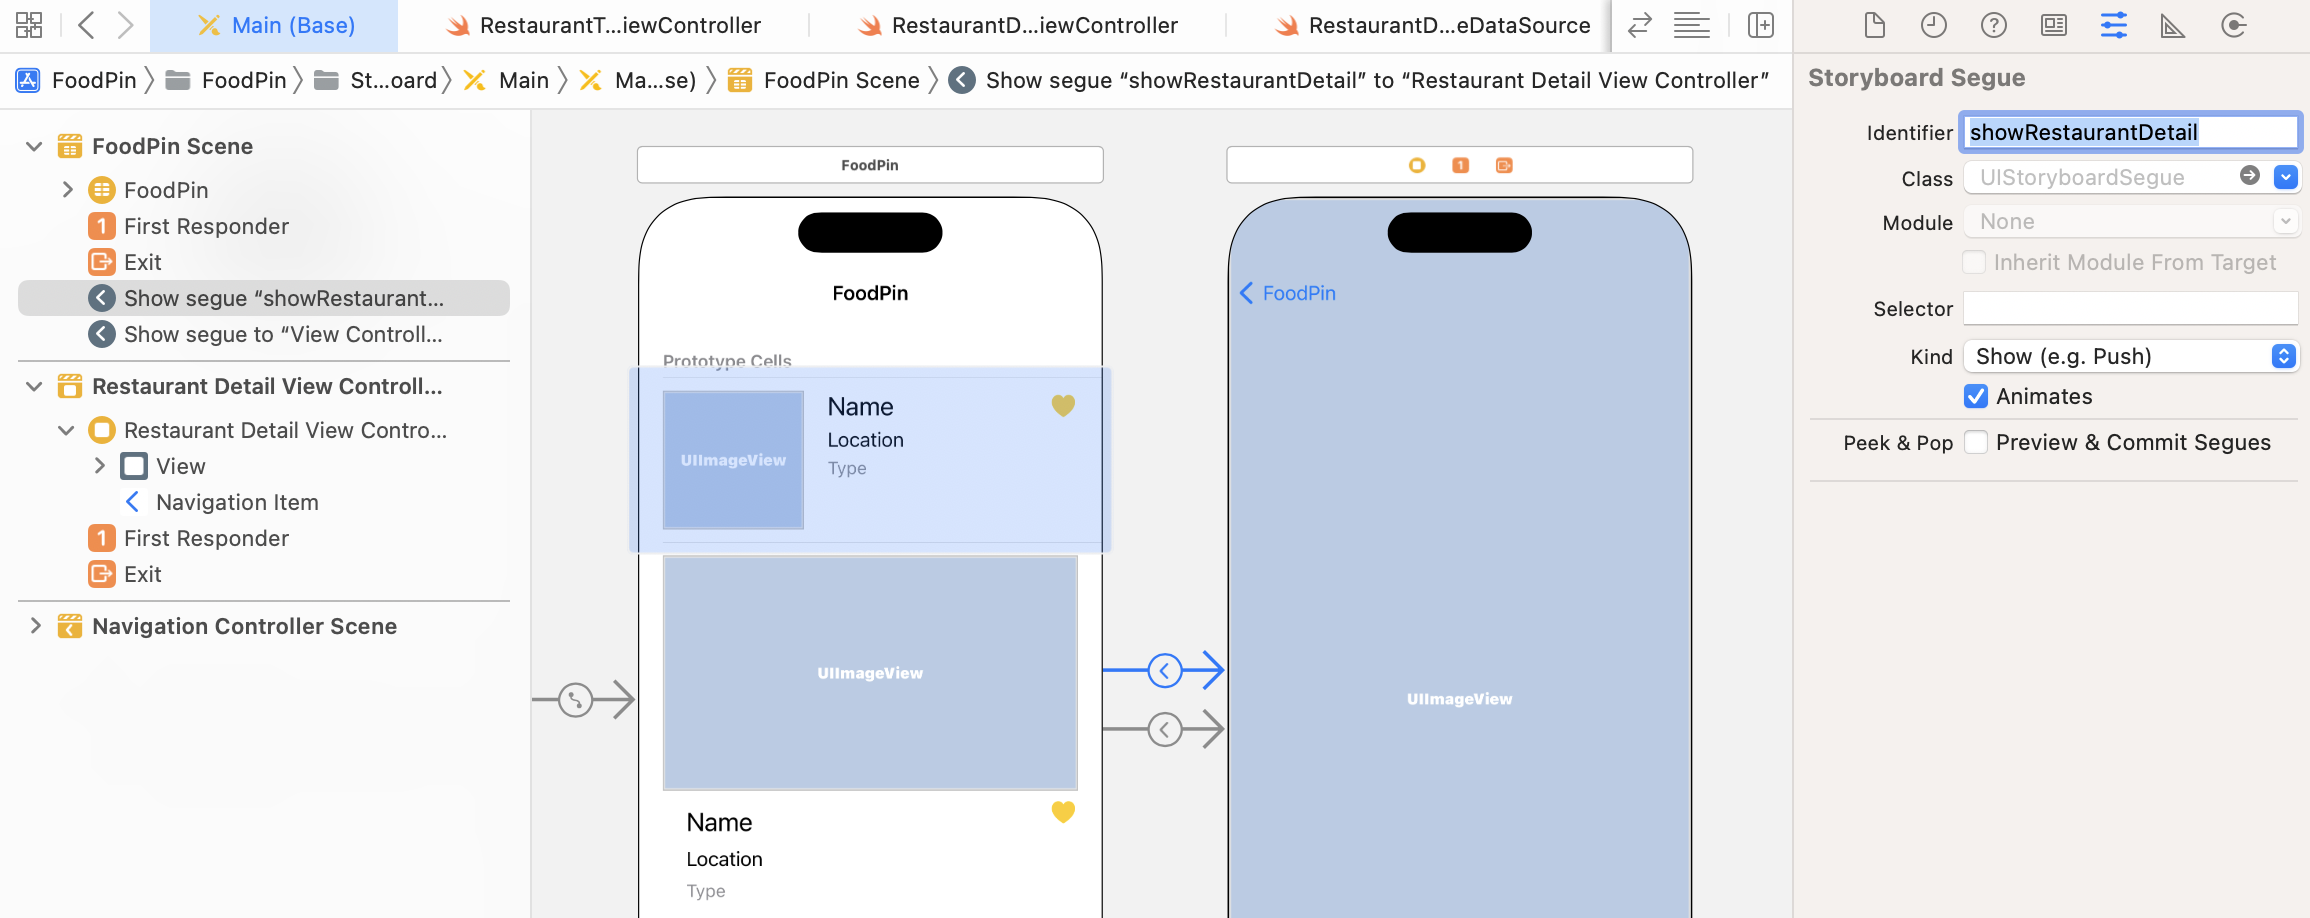
Segues can be triggered by multiple sources. As your storyboard becomes more complex, it is very likely that you'll have more than one segue between view controllers. Therefore, the best practice is to give each segue a unique identifier. This identifier is a string to distinguish one segue from another. To assign an identifier for a segue, select the segue in the storyboard editor, and then go to the Attributes inspector. Set the value of the identifier to showRestaurantDetail.
Figure 13-13. Adding a segue identifier
You have to set both segue for datacell and favoritecell to the same identifier (i.e. showRestaurantDetail) because your app can switch between these two types of cells.
With the segue configured, insert the following code in the RestaurantTableViewController class to override the default implementation of the prepare(for:sender:) method:
The first line of code is used to check the segue's identifier. The block of code is only executed for the showRestaurantDetail segue. In the code block, we first retrieve the selected row by accessing tableView.indexPathForSelectedRow. The indexPath object should contain the selected cell.
A segue object contains both the source and destination view controllers involved in the transition. You use segue.destination to retrieve the destination controller. In this case, the destination controller is the RestaurantDetailViewController object. This is why we have to downcast it by using the as! operator. Lastly, we pass the image name of the selected restaurant to the destination controller.
Now, it's ready to test the app. Hit the Run button to compile and run the app. This time, your app should work as expected. Select a restaurant in the table view, the detail view should display the image of the selected item.
Disabling Large Titles
Other than the home screen of the app, you may not want to use large titles to catch users' attention. Apple provides developers an option to disable large titles in a particular view controller. For example, if you want to disable large titles in the detail view controller, you can insert the following line of code in the viewDidLoad() method of RestaurantDetailViewController:
navigationItem.largeTitleDisplayMode = .never
The code above changes the largeTitleDisplayMode of the navigation item to .never, indicating that it does not want to have the large title. The display mode can also be .always or .automatic. As the name suggests, .always means large title should always be used. If .automatic is set, it inherits the large title mode in the previous view controller.
Your Exercise
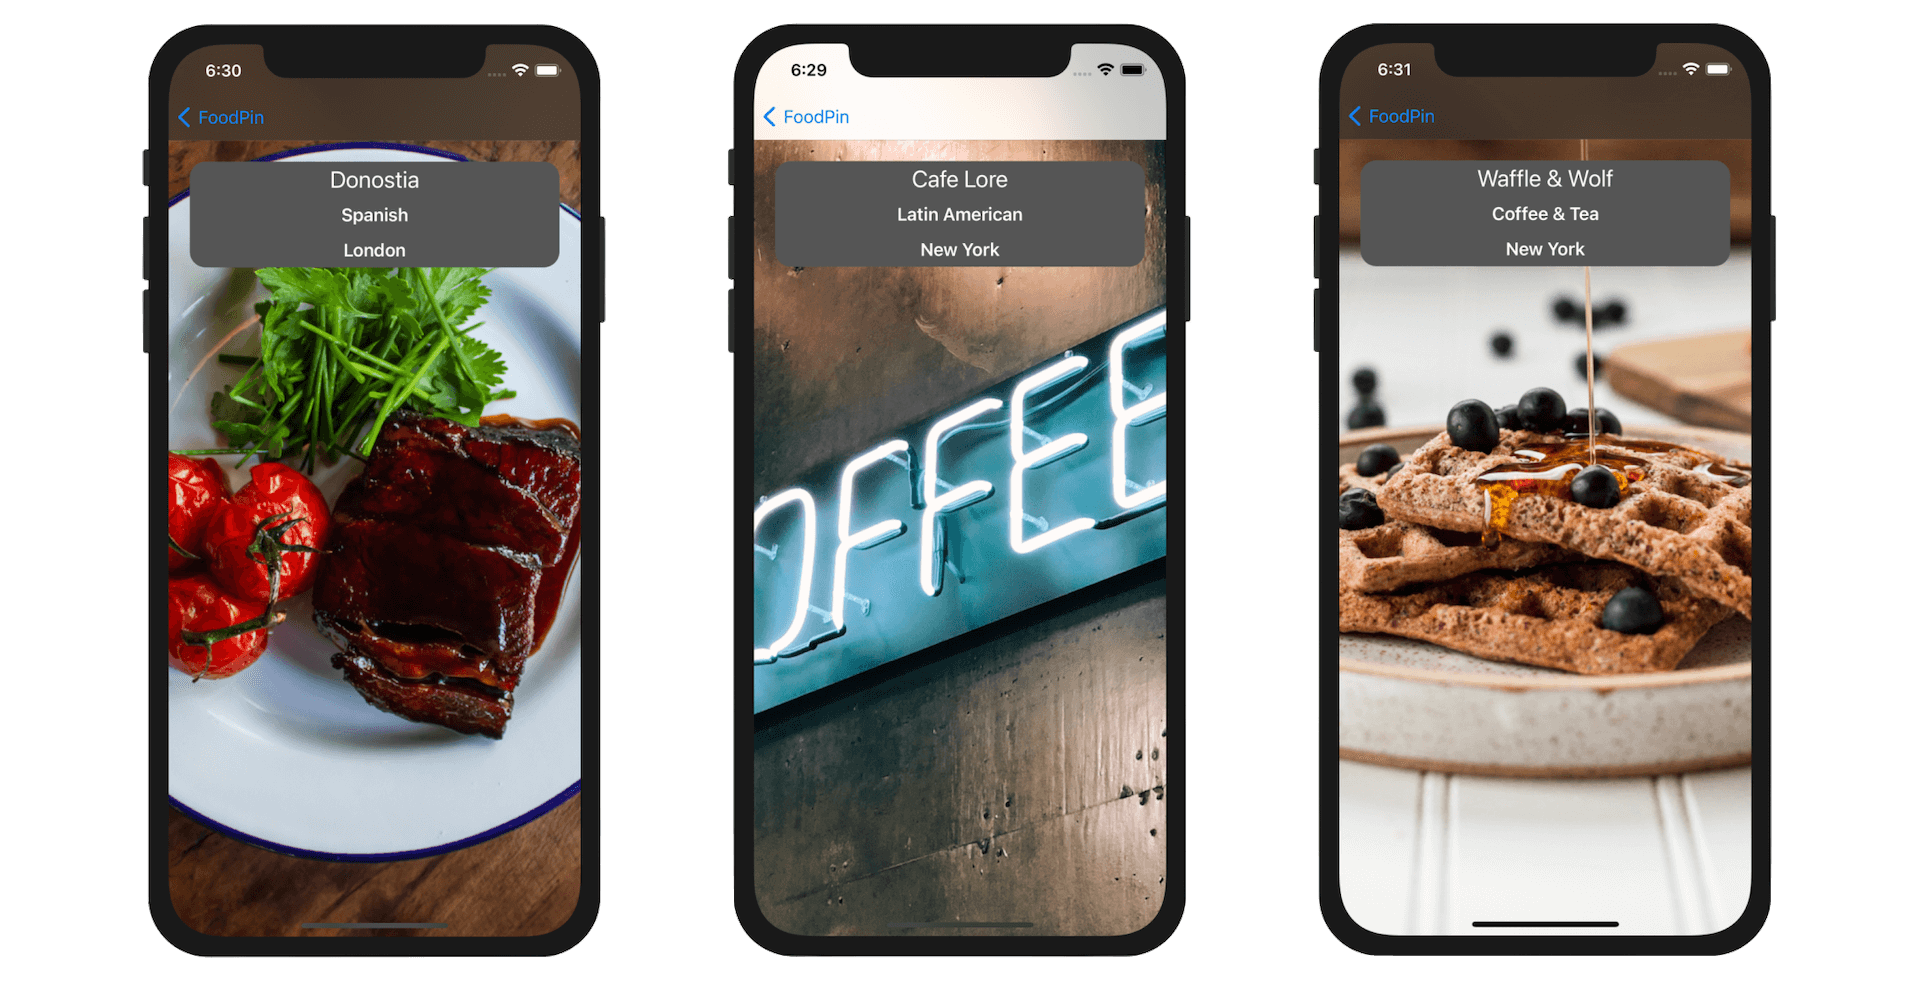
Wouldn't it be better to show more restaurant information in the detail view? In this exercise, you're required to add a few labels for displaying the name, type and location of the selected restaurant. Your resulting screen should look figure 13-14. If you understand how data passing works, it shouldn't be difficult for you to make these changes. A hint is that instead of passing the name of the restaurant image, you need to pass the restaurant object to the detail view controller.
Figure 13-14. The detail view with more restaurant information
I highly recommend you to complete this exercise before moving onto the next chapter. Not only it helps you better understand the concept of segue and data passing, it will revise your knowledge of stack views and auto layout.
Summary
In this chapter, I have walked you through the basics of navigation controllers and segues. What we have built is really simple. We only pass the restaurant image from one view controller to another. But, by now you should know how to handle data passing between view controllers through segues.