- Made by AppCoda
- Contact us / Support
- Tweet this book
- Preface
- 1. The Development Tools, the Learning Approach, and the App Idea
- 2. Your First Taste of Swift with Playgrounds
- 3. Hello World! Build Your First App in Swift
- 4. Hello World App Explained
- 5. Introduction to Auto Layout
- 6. Designing UI Using Stack Views
- 7. Introduction to Prototyping
- 8. Creating a Simple Table-based App
- 9. Customize Table Views Using Prototype Cell, Diffable Data Source and Dark Mode
- 10. Displaying Alerts with UIAlertController and Handling Table View Selection
- 11. Object Oriented Programming, Project Organization and Code Documentation
- 12. Table Row Deletion, Custom Action Button and MVC
- 13. Introduction to Navigation Controller and Segue
- 14. Detail View Enhancement and Navigation Bar Customization
- 15. Navigation Bar Customization, Extensions and Dynamic Type
- 16. Working with Maps
- 17. Basic Animations, Visual Effects and Unwind Segues
- 18. Working with Static Table Views, Camera and NSLayoutConstraint
- 19. Working with Core Data
- 20. Search Bar and UISearchController
- 21. Building Walkthrough Screens with UIPageViewController and Container Views
- 22. Exploring Tab Bar Controller and Storyboard References
- 23. Getting Started with WKWebView and SFSafariViewController
- 24. Exploring CloudKit
- 25. Localizing Your App to Reach More Users
- 26. Deploying and Testing Your App on a Real iOS Device
- 27. Beta Testing with TestFlight and CloudKit Production Deployment
- 28. Submit Your App to App Store
- 29. Adopting 3D Touch, Haptic Touch and Context Menus
- 30. Developing User Notifications in iOS
- 31. Appendix - Swift Basics
- Published with GitBook
Chapter 25
Localizing Your App to Reach More Users

Good code is its own best documentation. As you're about to add a comment, ask yourself, "How can I improve the code so that this comment isn't needed?" Improve the code and then document it to make it even clearer.
- Steve McConnell
In this chapter, let's talk about localization. The iOS devices including iPhone and iPad are available globally. The App Store is available in more than 150 countries around the world. Your users are from different countries and speak different languages. To deliver a great user experience and reach a global audience, you definitely want to make your app available in multiple languages. The process of adapting an app to support a particular language is usually known as localization.
Xcode has the built-in support for localization. It's fairly easy for developers to localize an app through the localization feature and a few API calls.
You may have heard of the terms: localization and internationalization. You probably think that both terms refer to the process of translation; that's partially correct. In iOS development, internationalization is considered a milestone in building a localized app. Before your app can be adapted to different languages, you design and structure the app to be language and region independent. This process is known as internationalization. For instance, your app displays a price field. As you may know, some countries use a dot to indicate decimal place (e.g. $1000.50), while many other countries use a comma instead (e.g. $1000,50). The internationalization process involves designing the price field so that it can be adapted to different regions.
Localization is the process of adapting an internationalized app for different languages and regions. This involves translating static and visible text to a specific language and adding country-specific elements such as images, videos, and sounds.
In this chapter, we'll localize the FoodPin app into Chinese and German. However, don't expect me to translate all the text in the app - I just want to show you the overall process of localization using Xcode.
Internationalizing Your App
The first step in building a localized app is internationalization. In this section, we will modify the app so that it can be easily adapted to various languages.
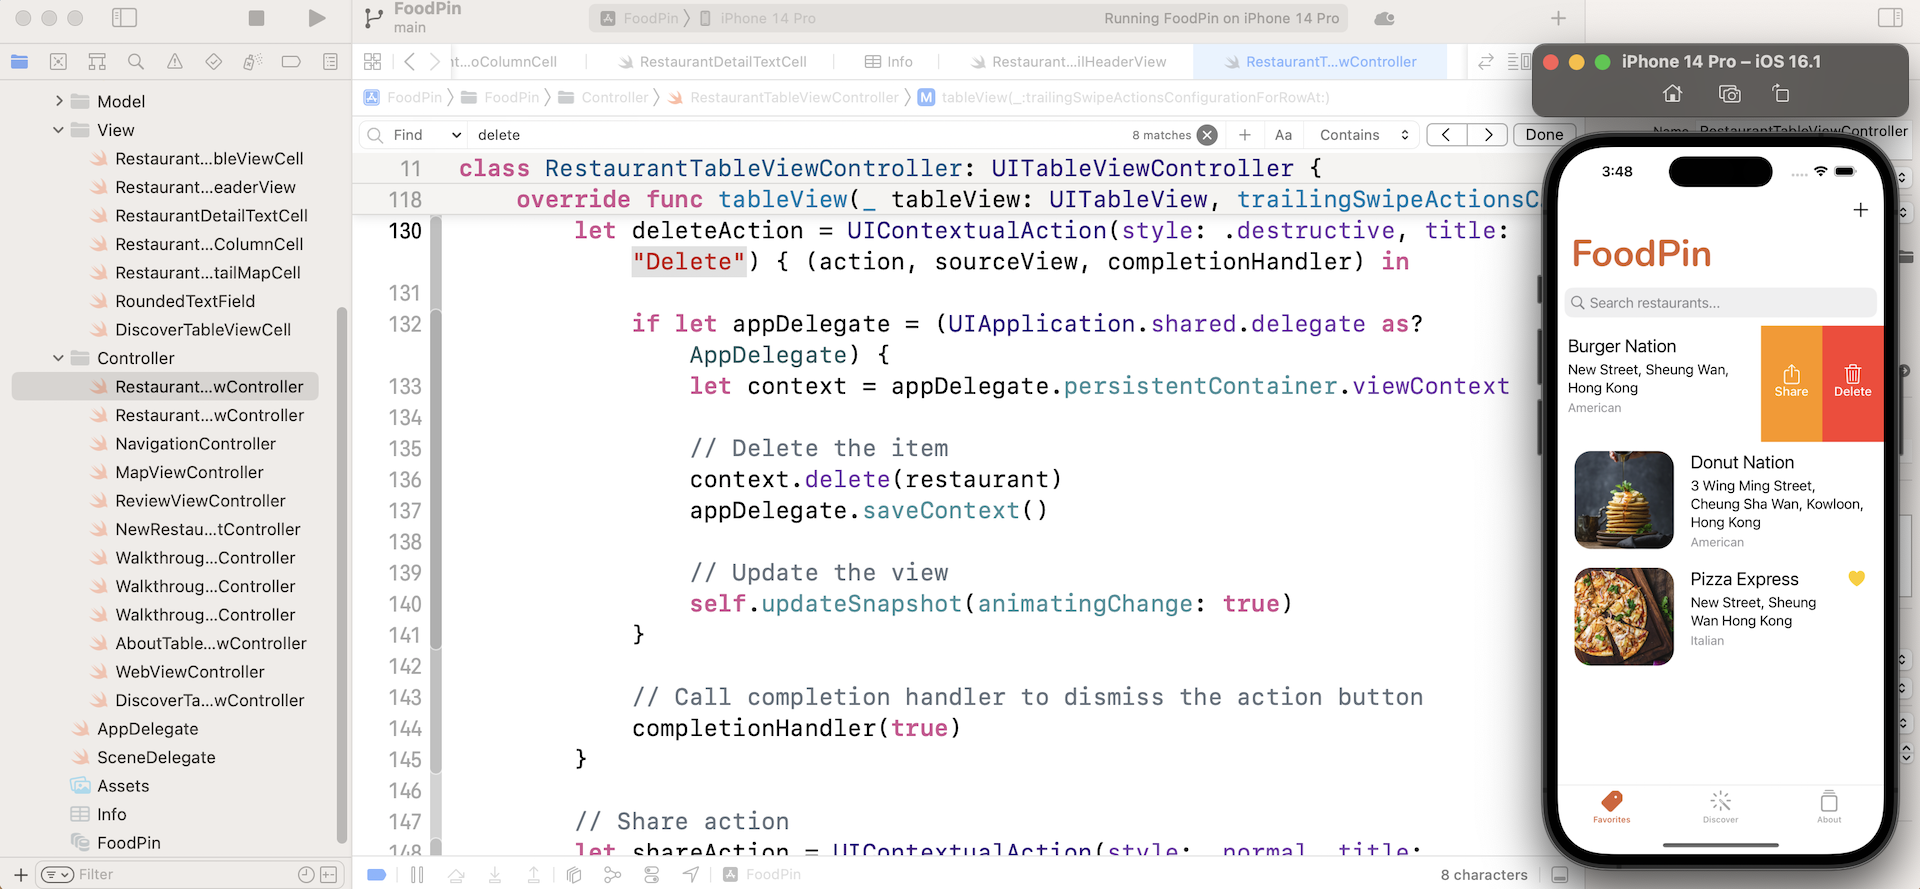
First, let's talk about the user-facing text of the app. There is tons of user-facing text in the source code. For convenience, we just define the strings in the source code. Figure 25-1 displays a few user-facing texts in the RestaurantTableViewController class. When it comes to localization, these hardcoded strings are not localizable. We have to internationalize them first.
At the heart of string internationalization is the String(localized:) macro. The macro allows you to internationalize the user-facing strings with ease. It has two arguments:
key- the string to be localizedcomment- the string that is used to provide additional information for translation.
The macro returns a localized version of String. To internationalize the user-facing strings in your app, one thing that you need to do is wrap the existing strings with String(localized:), which was introduced in Xcode 13.
Let's do some code changes so you can fully understand the macro. Take a look at the below code snippet from the AboutTableViewController class:
var sectionContent = [ [LinkItem(text: "Rate us on App Store", link: "https://www.apple.com/ios/app-store/", image: "store"),
                        LinkItem(text: "Tell us your feedback", link: "http://www.appcoda.com/contact", image: "chat")
                        ],
                       [LinkItem(text: "Twitter", link: "https://twitter.com/appcodamobile", image: "twitter"),
                        LinkItem(text: "Facebook", link: "https://facebook.com/appcodamobile", image: "facebook"),
                        LinkItem(text: "Instagram", link: "https://www.instagram.com/appcodadotcom", image: "instagram")]
                        ]
The text is displayed in English and non-localizable. To make them language independent, you need to wrap the strings with String(localized:) like this:
var sectionContent = [ [LinkItem(text: String(localized: "Rate us on App Store", comment: "Rate us on App Store"), link: "https://www.apple.com/ios/app-store/", image: "store"),
                        LinkItem(text: String(localized: "Tell us your feedback", comment: "Tell us your feedback"), link: "http://www.appcoda.com/contact", image: "chat")
                        ],
                       [LinkItem(text: String(localized: "Twitter"), link: "https://twitter.com/appcodamobile", image: "twitter"),
                        LinkItem(text: String(localized: "Facebook"), link: "https://facebook.com/appcodamobile", image: "facebook"),
                        LinkItem(text: String(localized: "Instagram"), link: "https://www.instagram.com/appcodadotcom", image: "instagram")]
                        ]
The comment parameter is optional, but you can include additional information to tell the translators what the text is for.
Xcode actually stores the localized strings in the Localizable.strings files. Each language has its own Localizable.strings file. Say, your user's device is using German as the default language, String(localized:) looks up the German version of the Localizable.strings file and returns the string in German.
Tip: If you don't know how an app picks a language, it actually refers to the language settings of iOS (General > International > Language). An app refers to that setting and accesses the corresponding localized resources.That's all we need to do to internationalize the user-facing strings. In the coming section, we will discuss how to create the Localizable.strings file, and show you how to localize those labels in the storyboard.
Exercise #1
Now choose a couple of Swift files in your FoodPin project (say, RestaurantTableViewController.swift and NewRestaurantController.swift), modify all the user-facing text and wrap them with String(localized:).
Adding Your Supported Languages
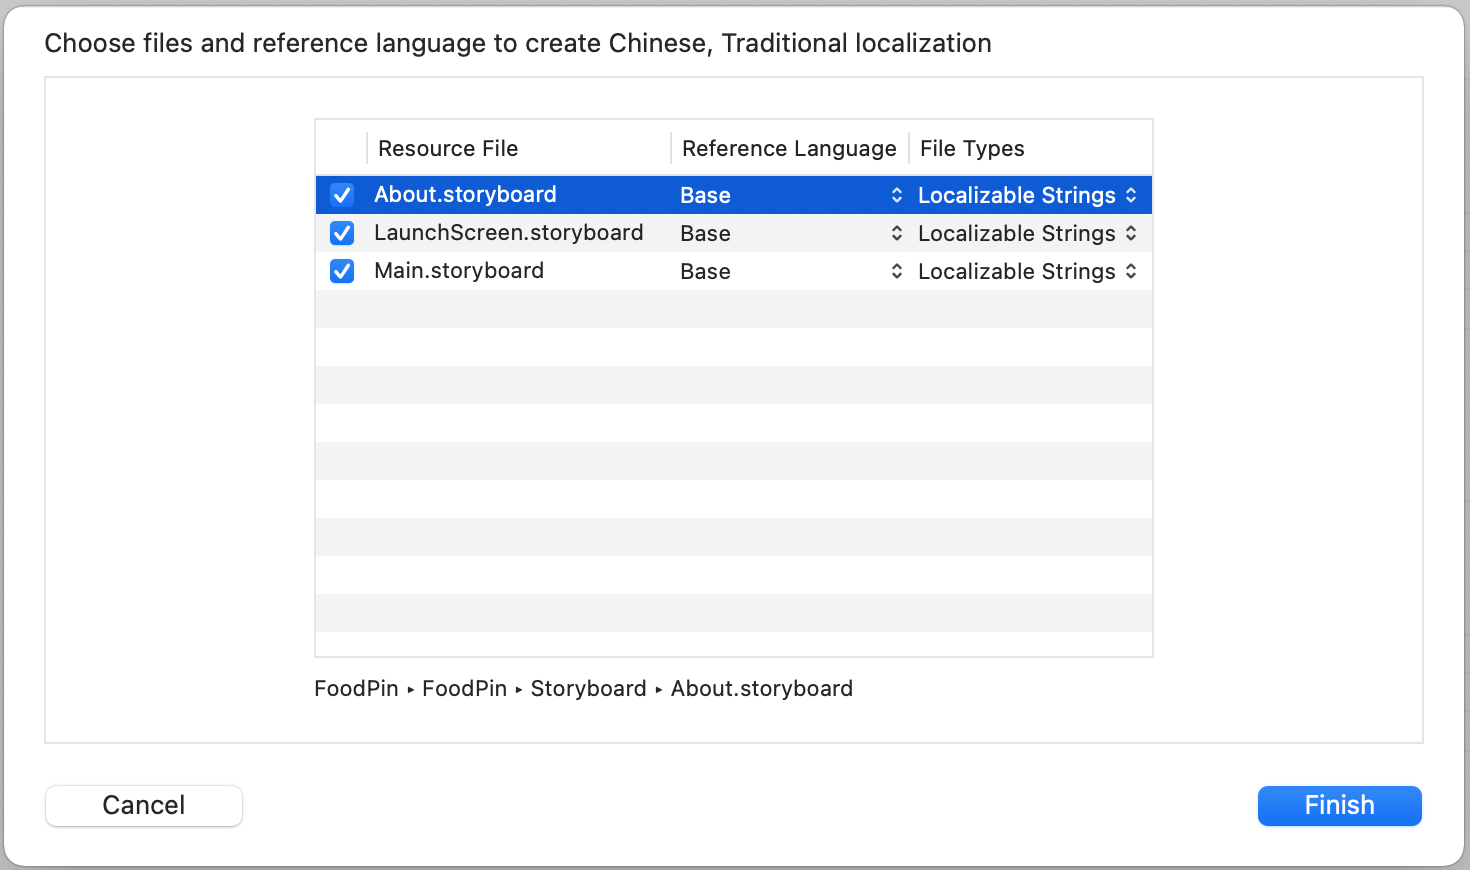
For now, your app only supports English. To support other languages, select the FoodPin project in the project navigator. Then select Info and choose FoodPin under the Project section. To add another language, click the + button under the Localizations section. Pick the language you want to support. For this demo, I will choose Chinese (Traditional) (zh-Hant).

Once you chose the language, Xcode will prompt you to pick the files for creating the localization. Check all the resource files because we want to localize all of them.
You will then see the Chinese (Traditional) language added to the Localizations section. You can continue to add more languages as long as you are going to support them. For this app, other than Chinese, we are going to support German. Therefore, repeat the procedures and add the German language.
Export for Localization
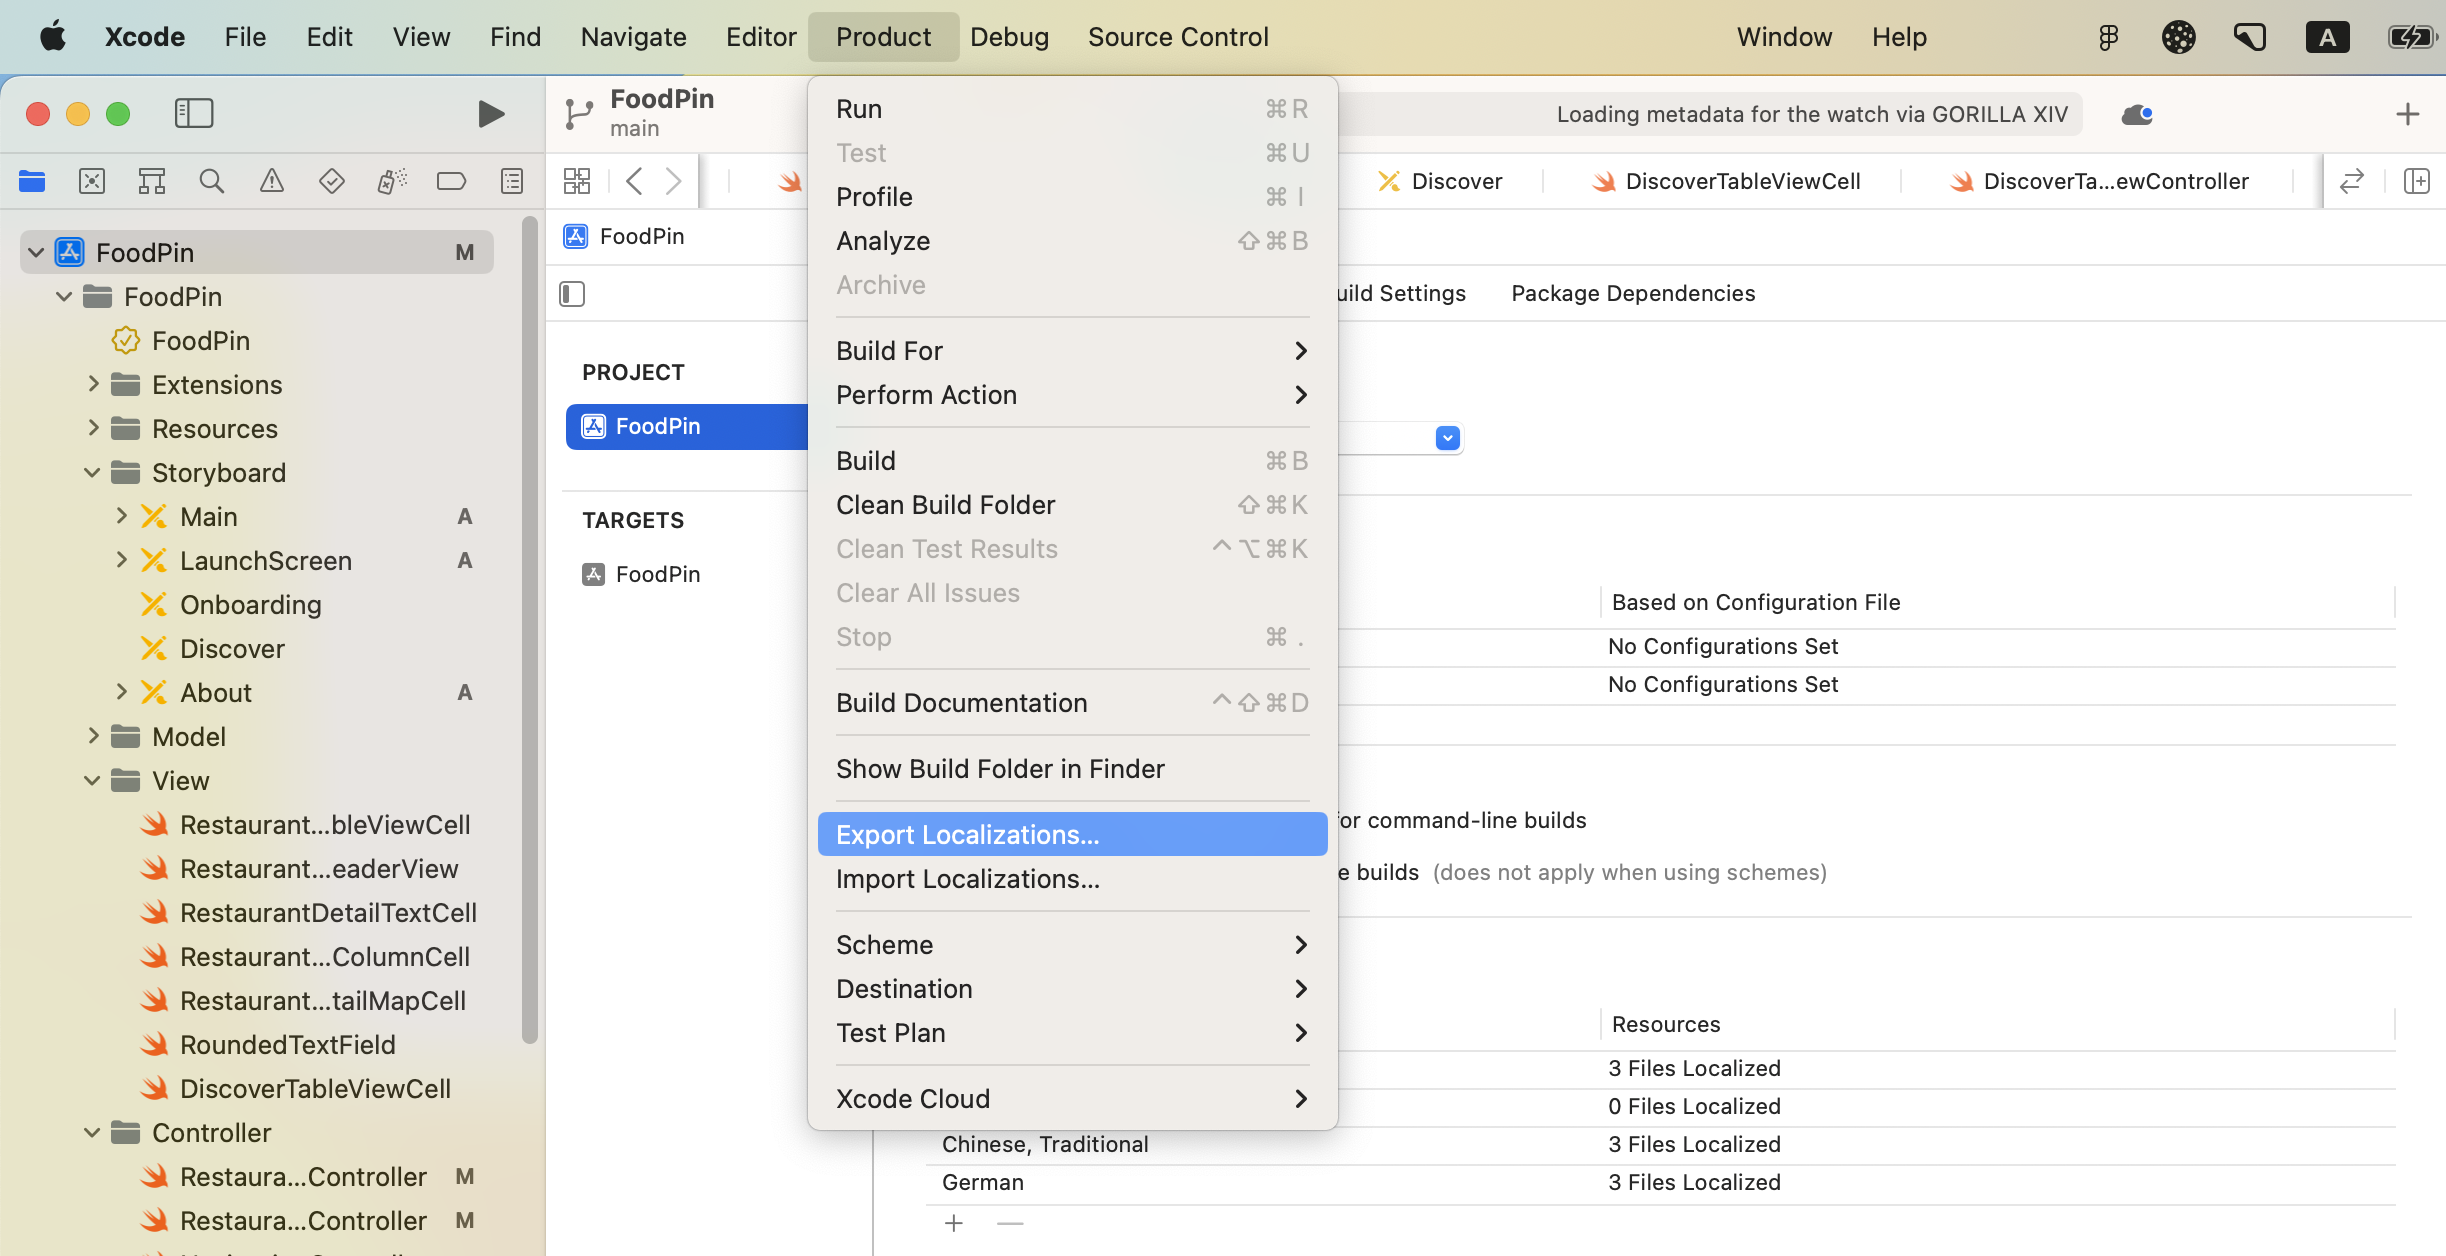
Xcode comes with an export feature to streamline the translation process. The export feature is intelligent enough to extract all localizable strings from your source code and Interface Builder/Storyboard files. The extracted strings will be stored in an XLIFF file. If you haven't heard of the term, XLIFF stands for XML Localization Interchange File, which is a well-known and globally-recognized file format for localization.
To use the export feature, select the FoodPin project in the project navigator. Then head up to the Xcode menu and select Product > Export For Localization. When prompted, choose a folder to save the localization files. Xcode then examines all your files and generates the what-so-called "Localization Catalog."
The Localization Catalog is a new type of localization artifact with the .xcloc extension. Prior to version 10, Xcode only generated the XLIFF file for localization. Starting from Xcode 10, it introduced the localization catalog to provide additional contextual information and support asset localization.
Assuming you save the localization to a FoodPin folder, if you open Finder and go to FoodPin, you should find three sub-folders with the .xcloc extension:
- en.xcloc
- de.xcloc
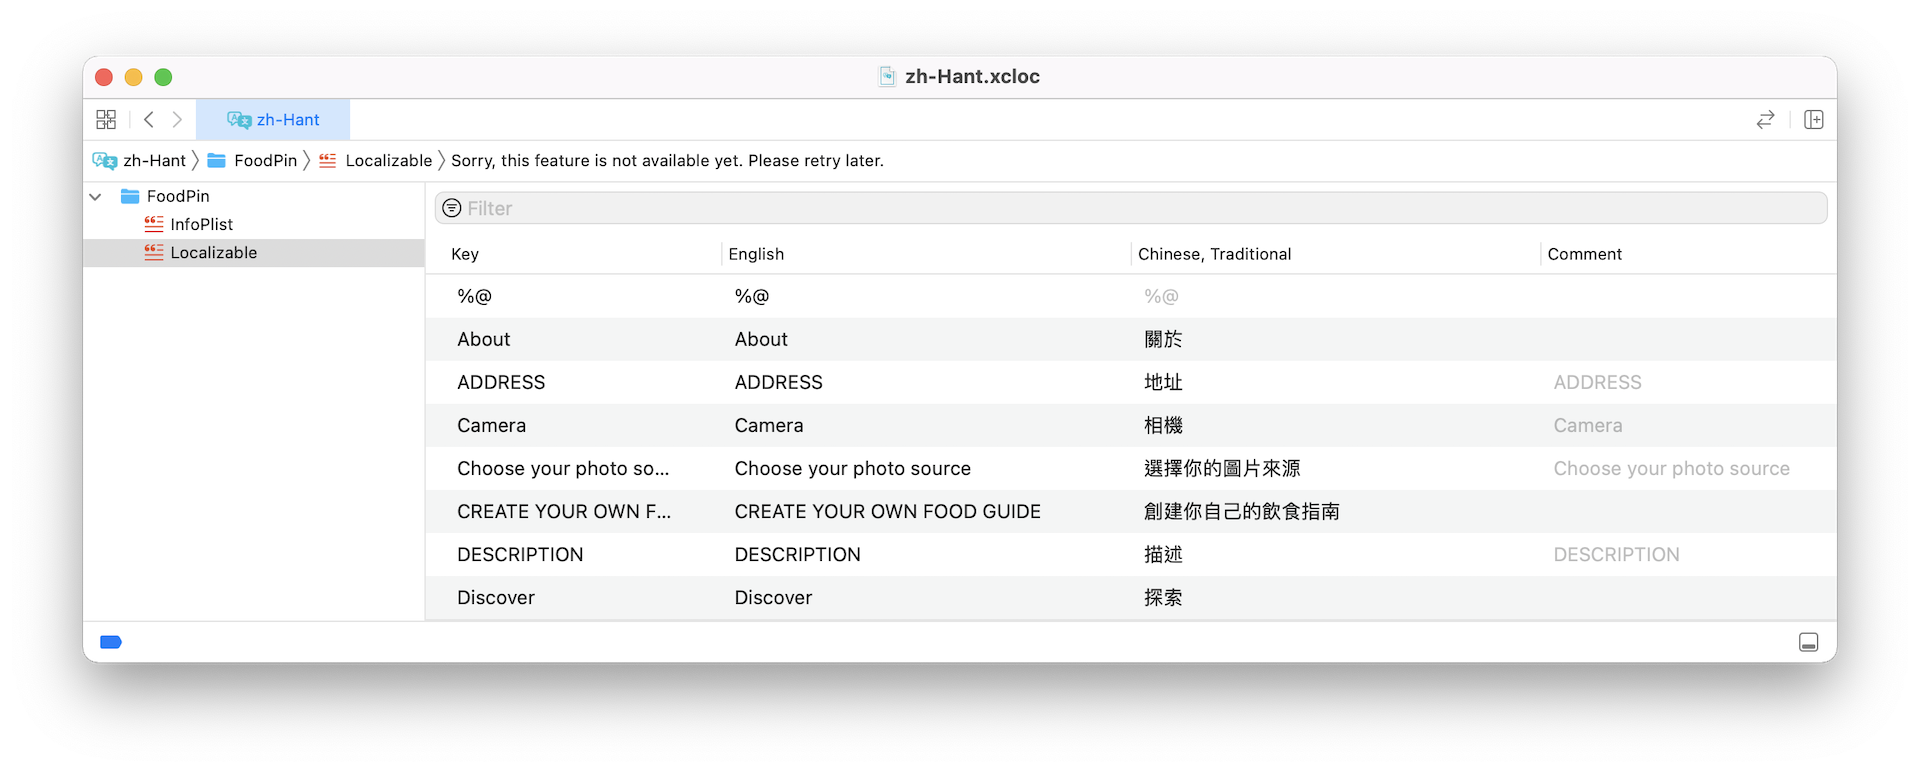
- zh-Hant.xcloc
Each of the languages has its own localization catalog. Say, for Chinese (Traditional), the localization catalog is named zh-Hant.xcloc. If you show the content of the .xcloc file, you will find a JSON file and three sub-folders:
- contents.json - it contains the meta data about the localization catalog like development region, target locale, tool info, and version.
- Localized Contents - this is the folder you would pass to your translator. It contains the .xliff file and other assets (e.g. images) for localization.
- Source Contents - this content of this folder is not for localization but just to provide additional contextual information to the localizers.
- Note - by default, this folder is empty. However, in case you want to provide additional information (e.g. screenshot) for the translators or localizers for reference, you can put the files here.
Now let's take a look at the zh-Hant.xliff file under Localized Contents. Open it with a text editor, you will find something like this:
<trans-unit id="Feedback" xml:space="preserve">
  <source>Feedback</source>
  <note>Feedback</note>
</trans-unit>
<trans-unit id="Find restaurants shared by your friends and other foodies" xml:space="preserve">
  <source>Find restaurants shared by your friends and other foodies</source>
  <note>Find restaurants shared by your friends and other foodies</note>
</trans-unit>
<trans-unit id="Follow Us" xml:space="preserve">
  <source>Follow Us</source>
  <note>Follow Us</note>
</trans-unit>
<trans-unit id="Instagram" xml:space="preserve">
  <source>Instagram</source>
  <note>Instagram</note>
</trans-unit>
Xcode has extracted the strings that we have wrapped with the NSLocalizedString macro in the previous section. Other than the above, the file should have something like this:
<file original="FoodPin/Storyboard/Base.lproj/Main.storyboard" source-language="en" target-language="zh-Hant" datatype="plaintext">
  <header>
    <tool tool-id="com.apple.dt.xcode" tool-name="Xcode" tool-version="11.2" build-num="11B52"/>
  </header>
  <body>
    <trans-unit id="4gn-hN-6RK.placeholder" xml:space="preserve">
      <source>Fill in your restaurant name</source>
      <target>Fill in your restaurant name</target>
      <note>Class = "UITextField"; placeholder = "Fill in your restaurant name"; ObjectID = "4gn-hN-6RK";</note>
    </trans-unit>
    <trans-unit id="40d-lO-w2k.text" xml:space="preserve">
      <source>ADDRESS</source>
      <target>ADDRESS</target>
      <note>Class = "UILabel"; text = "ADDRESS"; ObjectID = "40d-lO-w2k";</note>
    </trans-unit>
The export feature automatically examines the storyboard and extracts all the localizable strings, including labels and button titles. Before the release of Xcode 13, you would have to pass the file to a professional translator for translation. The translator then uses an XLIFF-enabled tool to add all the missing translations.
In Xcode 14, it already comes with a built-in editor for editing the translation files. You can open the zh-Hant.xcloc or de.xcloc file using Xcode and edit the translation directly.
Once you save the translation, you are good to go. However, if you are like me and want to know how the translations are stored, you can show the package content of zh-Hant.xcloc or de.xcloc in Finder. And then you can open the .xliff file using any text editor.
The translated text is placed inside the <target> tag. Below is a part of the Traditional Chinese translation file:
<file original="FoodPin/Storyboard/Base.lproj/Main.storyboard" source-language="en" target-language="zh-Hant" datatype="plaintext">
  <header>
    <tool tool-id="com.apple.dt.xcode" tool-name="Xcode" tool-version="11.2" build-num="11B52"/>
  </header>
  <body>
    <trans-unit id="4gn-hN-6RK.placeholder" xml:space="preserve">
      <source>Fill in your restaurant name</source>
      <target>請填寫餐廳名字</target>
      <note>Class = "UITextField"; placeholder = "Fill in your restaurant name"; ObjectID = "4gn-hN-6RK";</note>
    </trans-unit>
    <trans-unit id="40d-lO-w2k.text" xml:space="preserve">
      <source>ADDRESS</source>
      <target>地址</target>
      <note>Class = "UILabel"; text = "ADDRESS"; ObjectID = "40d-lO-w2k";</note>
    </trans-unit>
The first line of the XML code specifies the original file and the target language of the translation. The target-language attribute specifies the language code of the translation. zh-Hant is the language code of Chinese. For German, the language code is de.
Import Localizations
Assuming your translator has completed the translations and passed you the localized files (download them from http://www.appcoda.com/resources/swift55/FoodPinTranslation.zip), you just need a few clicks to import the translations.
In the project navigation, select the FoodPin project. Head up to the Editor menu and select Import Localizations. When prompted, select the localization catalog of the translated language (e.g. zh-Hant.xcloc). Xcode then automatically compares the translation with the existing files and shows you the differences (see figure 25-5).
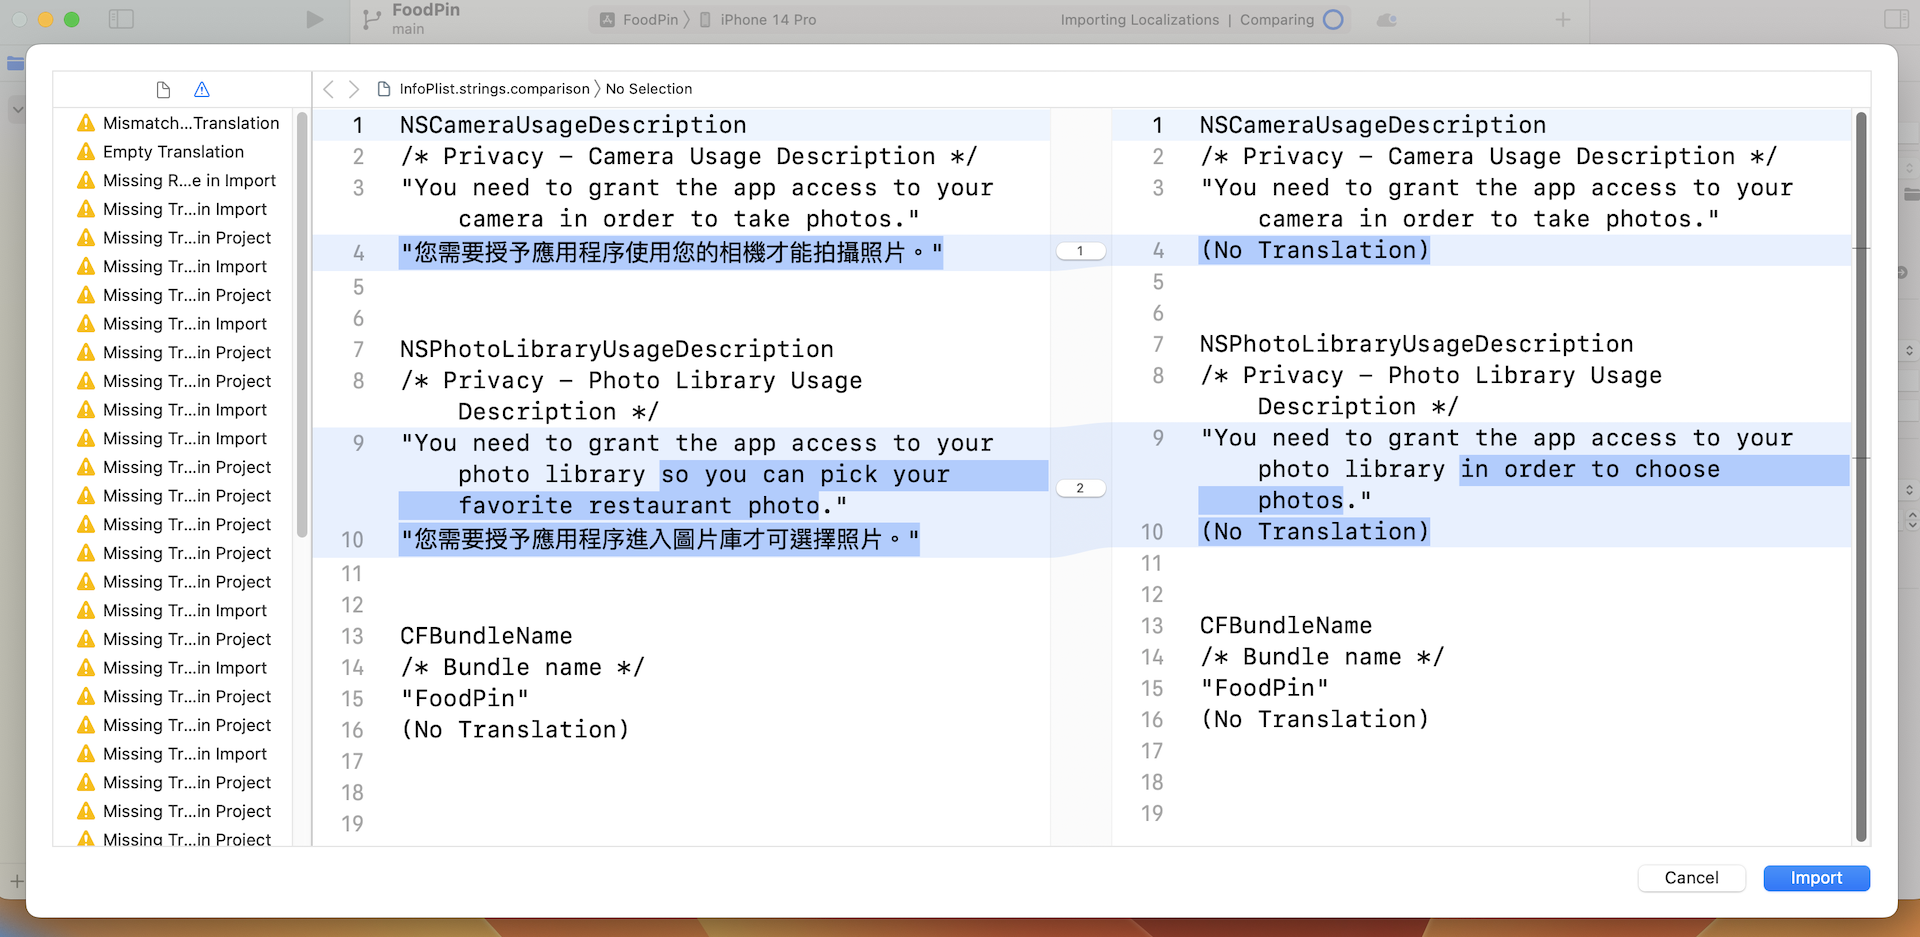
If you confirm the translation is correct, click the Import button to import it right away. To import other translation files (e.g. de.xcloc), repeat the same procedures to add them. When finished, Xcode displays the available localizations in the project screen. Say, if you expand Main.storyboard, you should find the two additional string files got translated.
Before we move on to testing the localized app, let me give you some more information about base internationalization and the localized resource files. In the project navigator, you should also find the Localizable.strings files. These files are automatically generated when you added a new localization. The localized strings in the source code (i.e. those wrapped with NSLocalizedString) are stored in a language-dependent Localizable.strings file. As we have created the zh-Hant and de localizations, there are two versions of Localizable.strings files.
If you look into any of the Localizable.strings file (say, the Chinese version), you will find the translation of the localizable strings. At the beginning of each entry, it is the comment you put in the source code. On the left side of the equal sign, it is the key you specify when using the NSLocalizedString macro.
/* Address */
"Address" = "地址";

/* Camera */
"Camera" = "相機";

/* Choose your photo source */
"Choose your photo source" = "選擇相片來源";

/* CREATE YOUR OWN FOOD GUIDE */
"CREATE YOUR OWN FOOD GUIDE" = "創建熟於你自己的飲食指南";

/* Delete */
"Delete" = "删除";

/* DISCOVER GREAT RESTAURANTS */
"DISCOVER GREAT RESTAURANTS" = "發掘更多值得拜訪的餐廳";

/* Facebook */
"Facebook" = "臉書";

/* Walkthrough descriptionn #3 */
"Find restaurants shared by your friends and other foodies" = "查找由您的朋友和其他美食家分享的餐館廳";
While you can edit the translations directly, I would recommend you to use the export feature as I have just demonstrated.
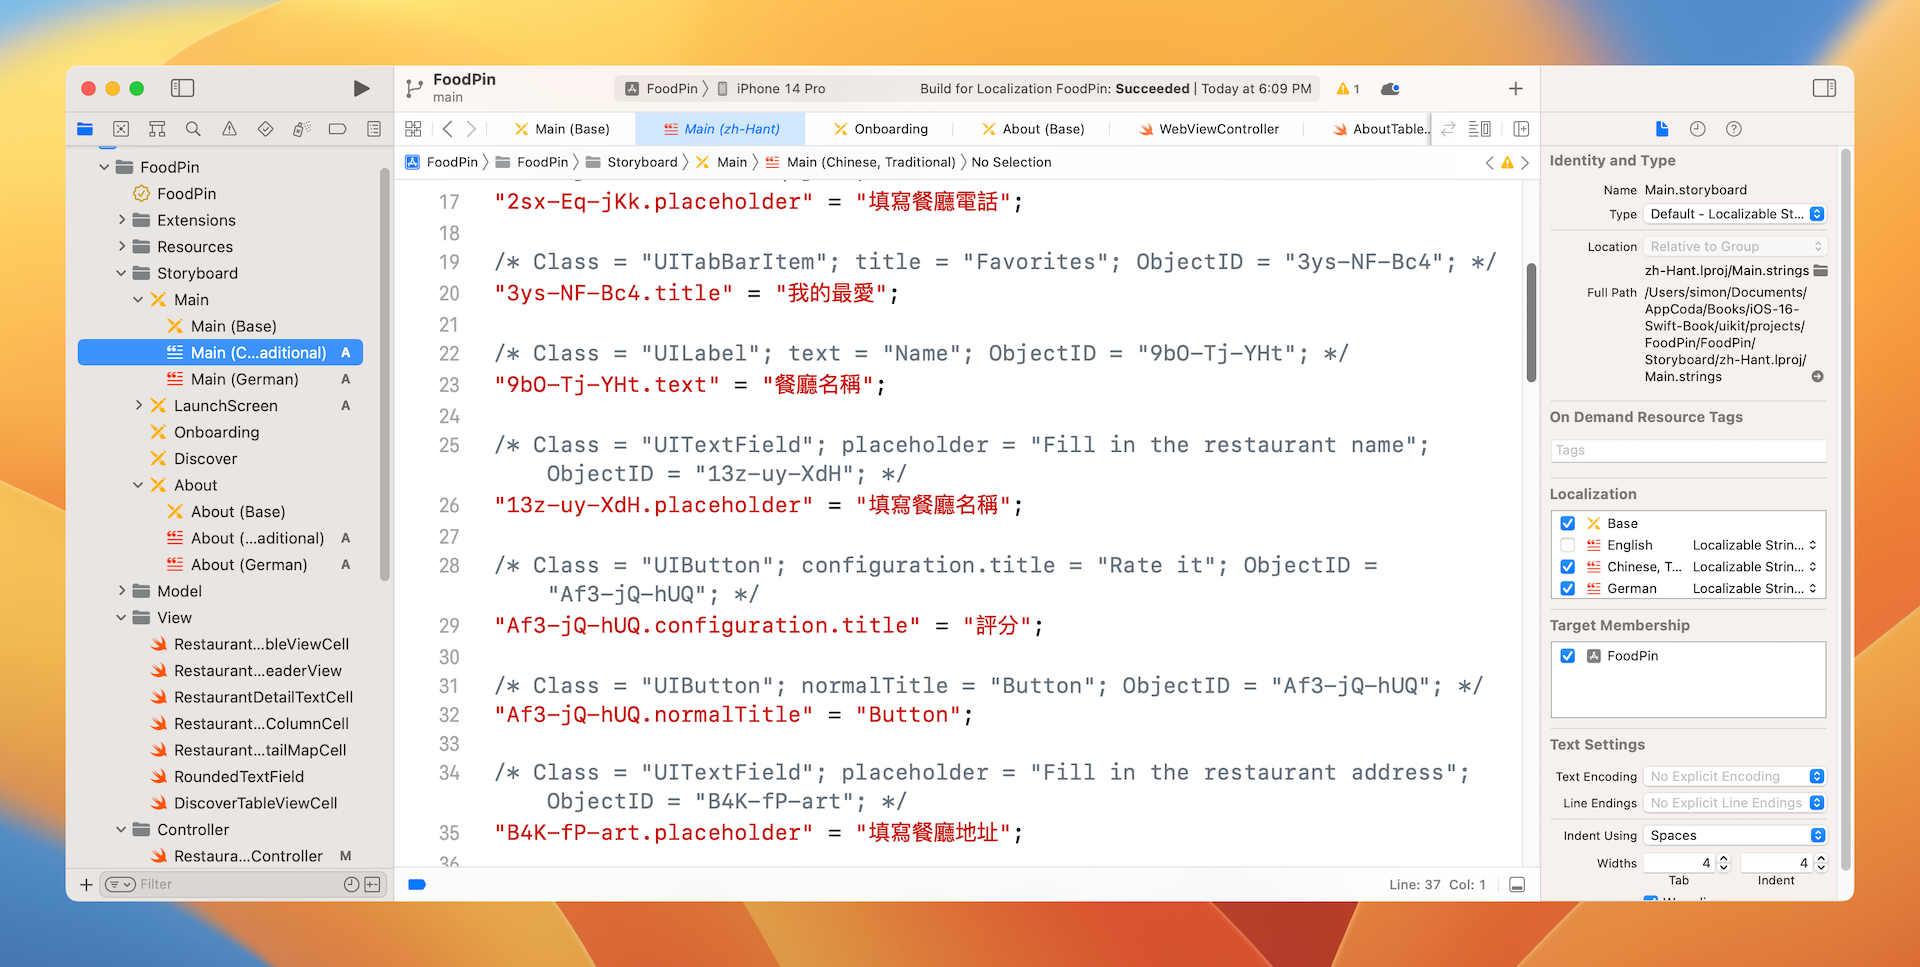
The second thing I want to talk about is base internationalization. As you can see from figure 25-6, Main.storyboard is now split into three files: the base file, the Chinese translation file, and the German translation file. But what is Main.storyboard (Base)?
The concept of base internationalization was first introduced in Xcode 4.5. Prior to Xcode 4.5, there was no concept of base internationalization. Xcode replicates the whole set of storyboards for each localization. For example, let's say if your app is localized into 5 languages. Xcode generates 5 sets of storyboards for localization purpose. There is a major drawback of this design. When you need to add a new UI control in the storyboard, you'll need to add the same element in each localized storyboard. This is a tedious process, which was why Apple introduced base internationalization in Xcode 4.5.
With base internationalization, an Xcode project has only one set of storyboards that is set to the default language. This storyboard is known as the base for internationalization. Whenever the storyboard is localized into another language, Xcode only generates a .strings file (e.g. Main.strings (German)) containing all the translated text of the base storyboard. This efficiently separates the UI design from the translations.
Testing the Localized App
One way to test the localization is to change the language preference of the simulator and then run the localized app on it. Alternatively, you can utilize a preview feature of Xcode that lets you test your app in different languages and regions, both at runtime and in Interface Builder. I will go through them with you one by one.
Xcode supports preview at runtime. You can enable this feature by editing the scheme sheet and set your preferred language in the dialog box.
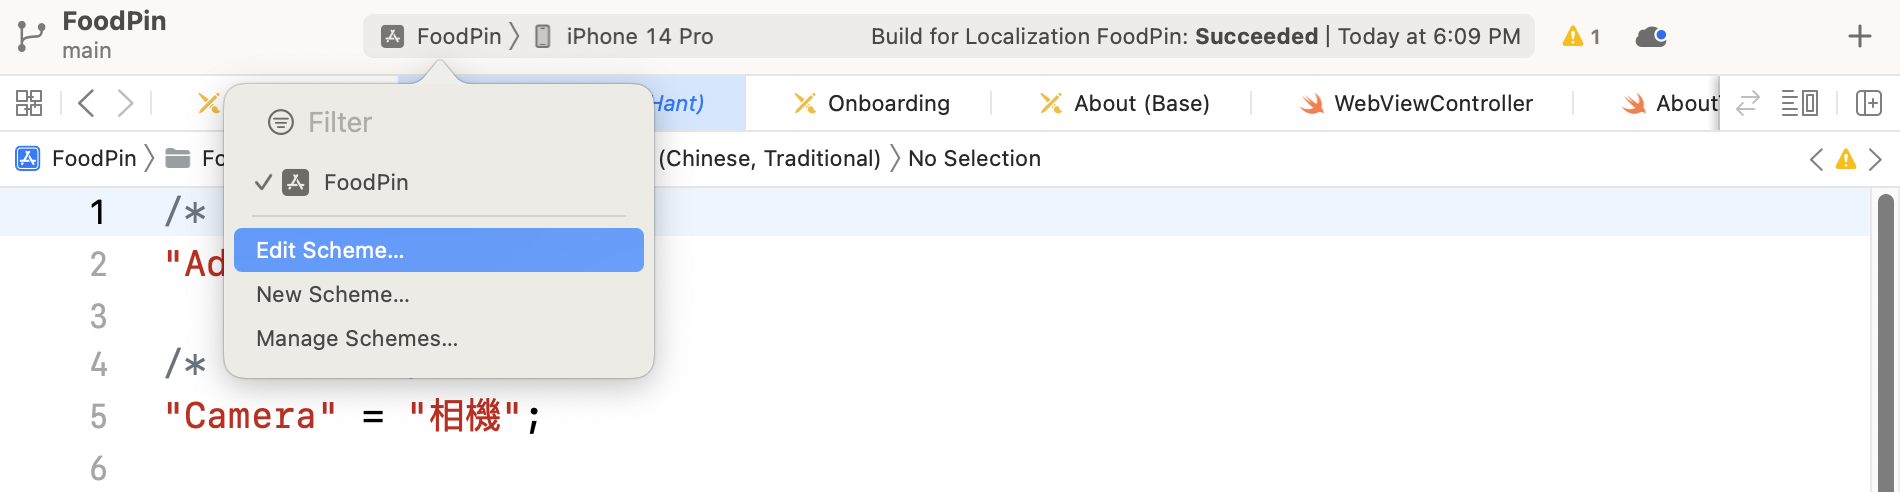
In the dialog box, select Run > Options and change the application language to your preferred language. For example, Chinese (Traditional). Click the Close button to save the setting.
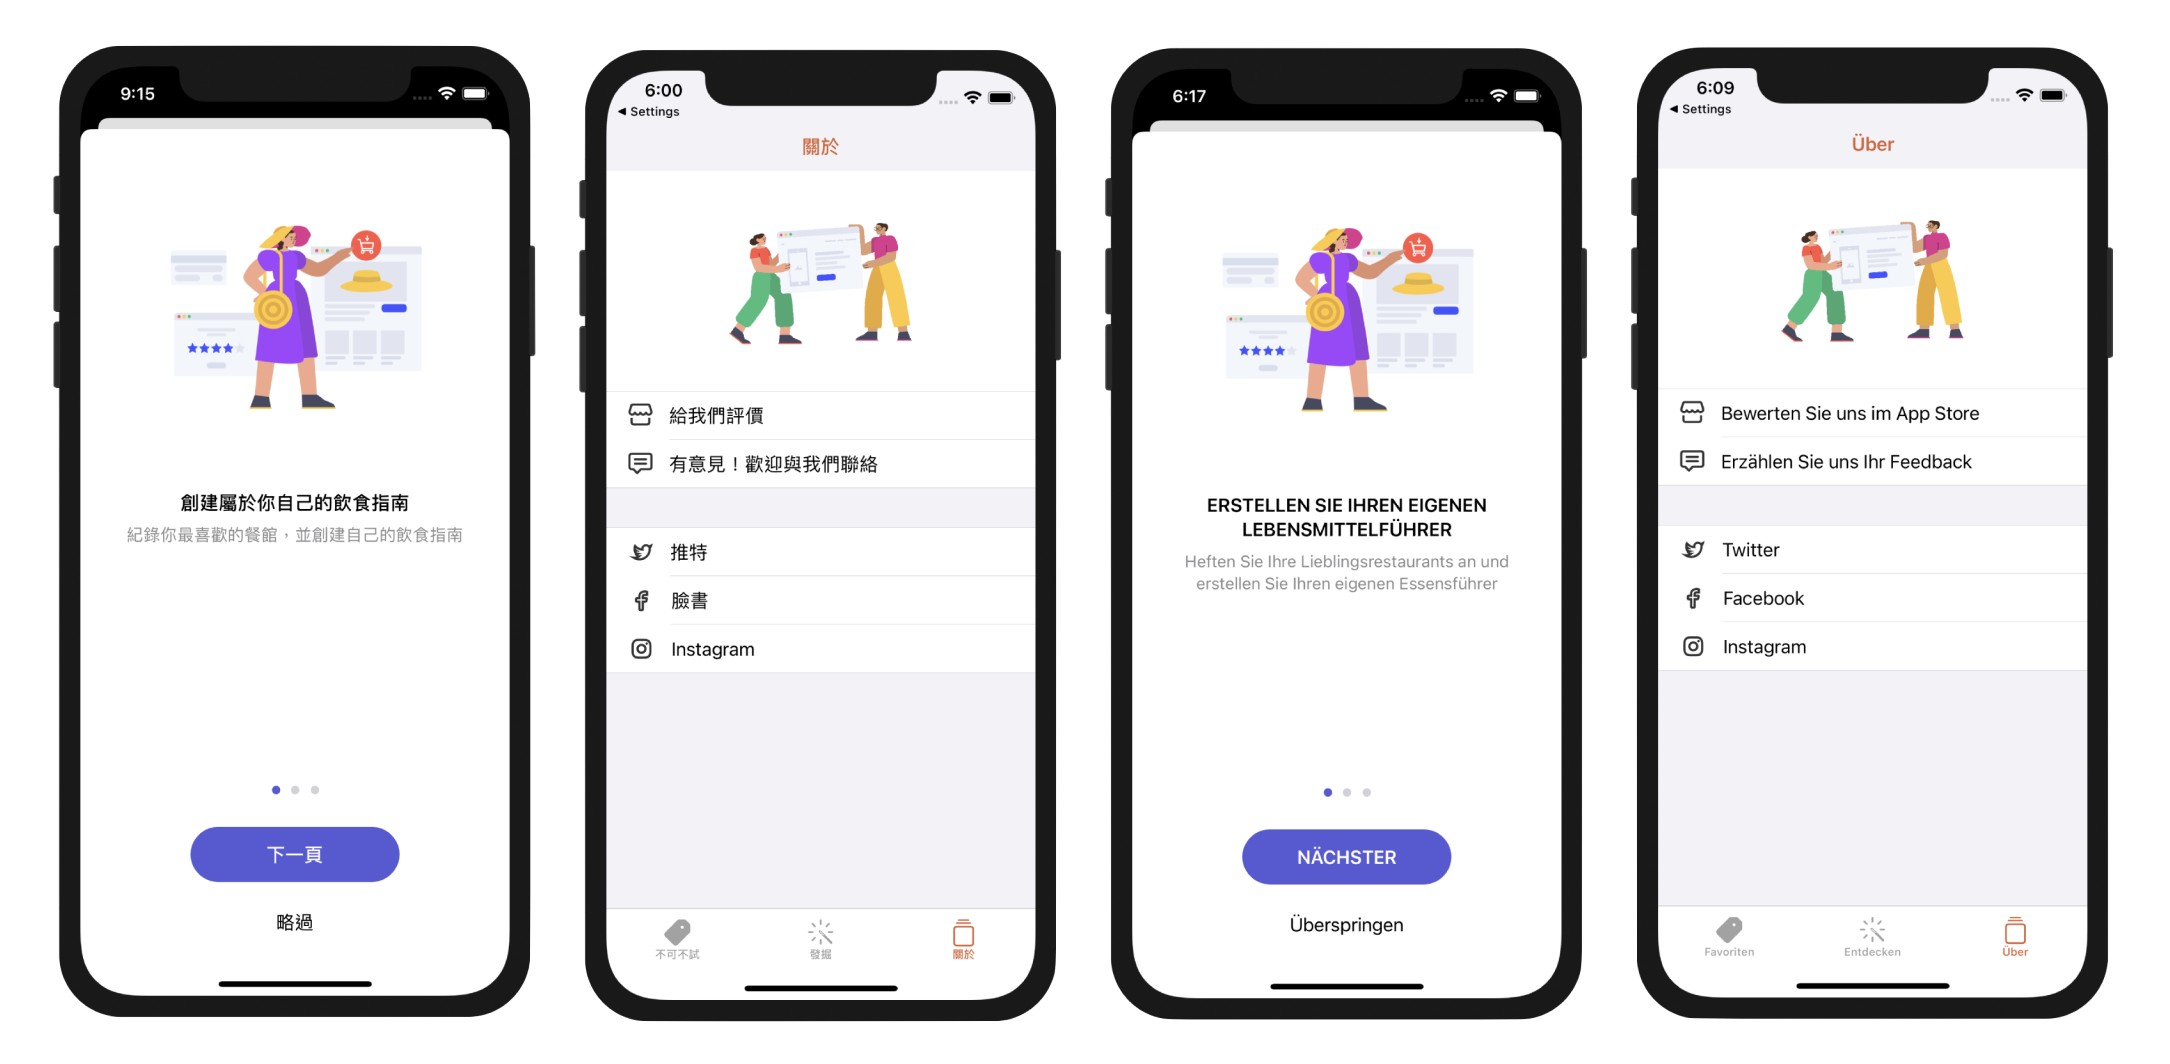
Now click the Run button to launch the app; the language of the simulator should set to your preferred language. If you've set it to Chinese/German, your app should look like the screenshot shown in figure 25-10.
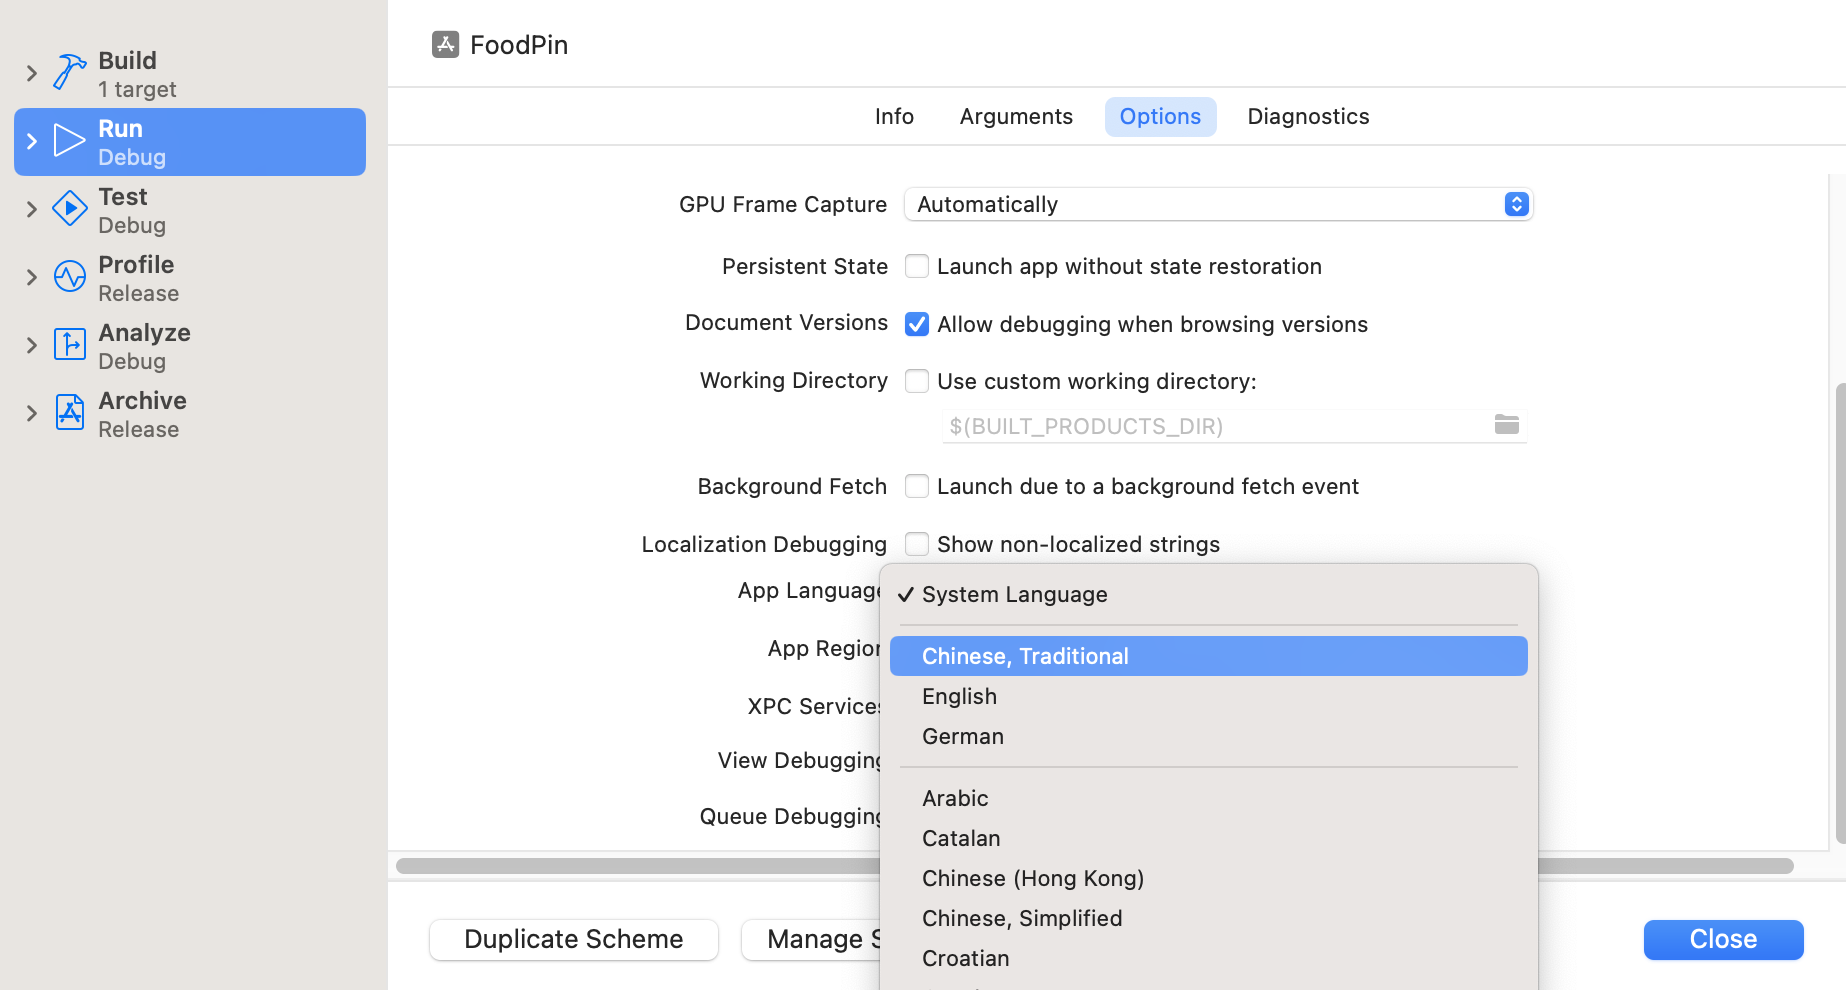
Enable Localization Manually
For some storyboards (e.g. Onboarding.storyboard), you will need to enable localization manually. Say, let's select the Onboarding.storyboard file and go to the File inspector. Scroll down to the Localization section and click the Localize button. Choose Base and click Localize to confirm the localization.
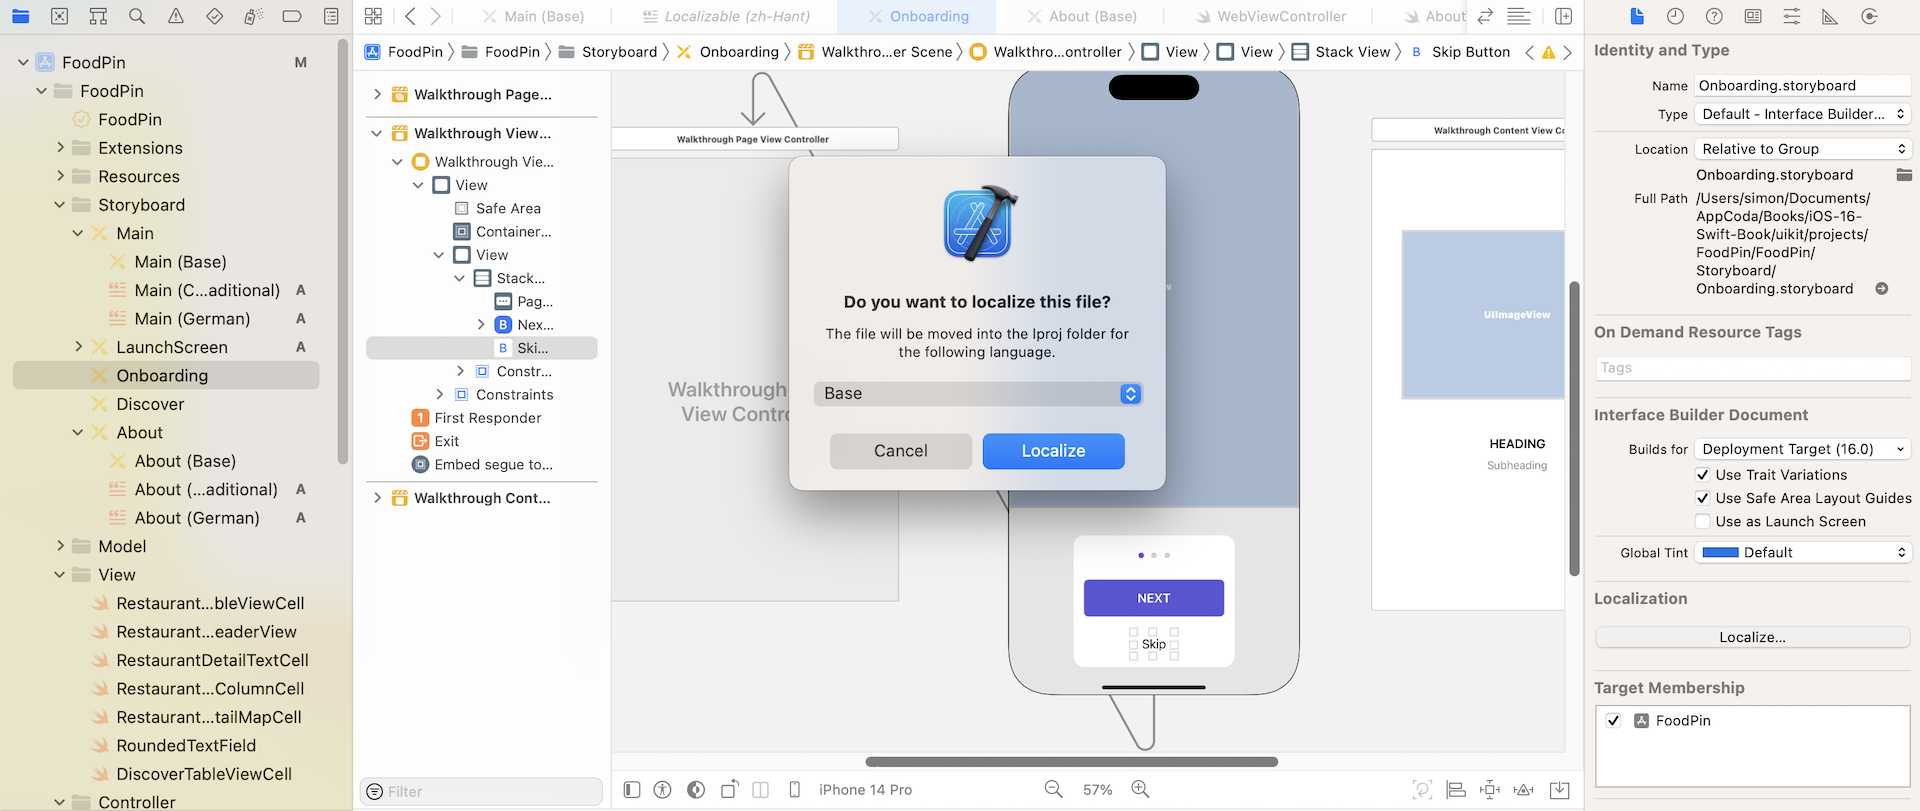
Once you confirm to localize the storyboard, you should find the available languages for localization. Here, tick both Chinese and German checkboxes.
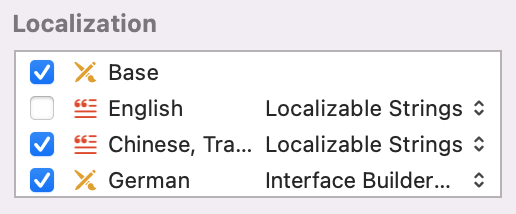
That's it. You should now find the localized string files of Onboarding.storyboard in the project navigator. Now export them and pass the file to your translators for translation.
Summary
In this chapter, I have walked you through the localization process in Xcode. By using the export feature, it is pretty easy to localize an iOS app.
You've learned how to localize text and images in storyboards using the built-in localization support of Xcode. You should also know how to localize strings using the NSLocalizedString macro. Remember that your apps are marketed to a global audience - users prefer to have an app UI in their own language. By localizing your app, you'll be able to provide a better user experience and attract more downloads.
For reference, you can download the complete Xcode project from http://www.appcoda.com/resources/swift57/FoodPinLocalization.zip.