- Made by AppCoda
- Contact us / Support
- Tweet this book
- Preface
- 1. The Development Tools, the Learning Approach, and the App Idea
- 2. Your First Taste of Swift with Playgrounds
- 3. Hello World! Build Your First App in Swift
- 4. Hello World App Explained
- 5. Introduction to Auto Layout
- 6. Designing UI Using Stack Views
- 7. Introduction to Prototyping
- 8. Creating a Simple Table-based App
- 9. Customize Table Views Using Prototype Cell, Diffable Data Source and Dark Mode
- 10. Displaying Alerts with UIAlertController and Handling Table View Selection
- 11. Object Oriented Programming, Project Organization and Code Documentation
- 12. Table Row Deletion, Custom Action Button and MVC
- 13. Introduction to Navigation Controller and Segue
- 14. Detail View Enhancement and Navigation Bar Customization
- 15. Navigation Bar Customization, Extensions and Dynamic Type
- 16. Working with Maps
- 17. Basic Animations, Visual Effects and Unwind Segues
- 18. Working with Static Table Views, Camera and NSLayoutConstraint
- 19. Working with Core Data
- 20. Search Bar and UISearchController
- 21. Building Walkthrough Screens with UIPageViewController and Container Views
- 22. Exploring Tab Bar Controller and Storyboard References
- 23. Getting Started with WKWebView and SFSafariViewController
- 24. Exploring CloudKit
- 25. Localizing Your App to Reach More Users
- 26. Deploying and Testing Your App on a Real iOS Device
- 27. Beta Testing with TestFlight and CloudKit Production Deployment
- 28. Submit Your App to App Store
- 29. Adopting 3D Touch, Haptic Touch and Context Menus
- 30. Developing User Notifications in iOS
- 31. Appendix - Swift Basics
- Published with GitBook
Chapter 8
Creating a Simple Table Based App

That's been one of my mantras - Focus and Simplicity. Simple can be harder than complex: You have to work hard to get your thinking clean to make it simple. But it's worth it in the end because once you get there, you can move mountains.
- Steve Jobs
Now that you have a basic understanding of prototyping and our demo app, we'll work on something more interesting and build a simple table-based app using UITableView in this chapter. Once you master the technique and the table view customization (to be discussed in the next chapter), we'll start to build the Food Pin app.
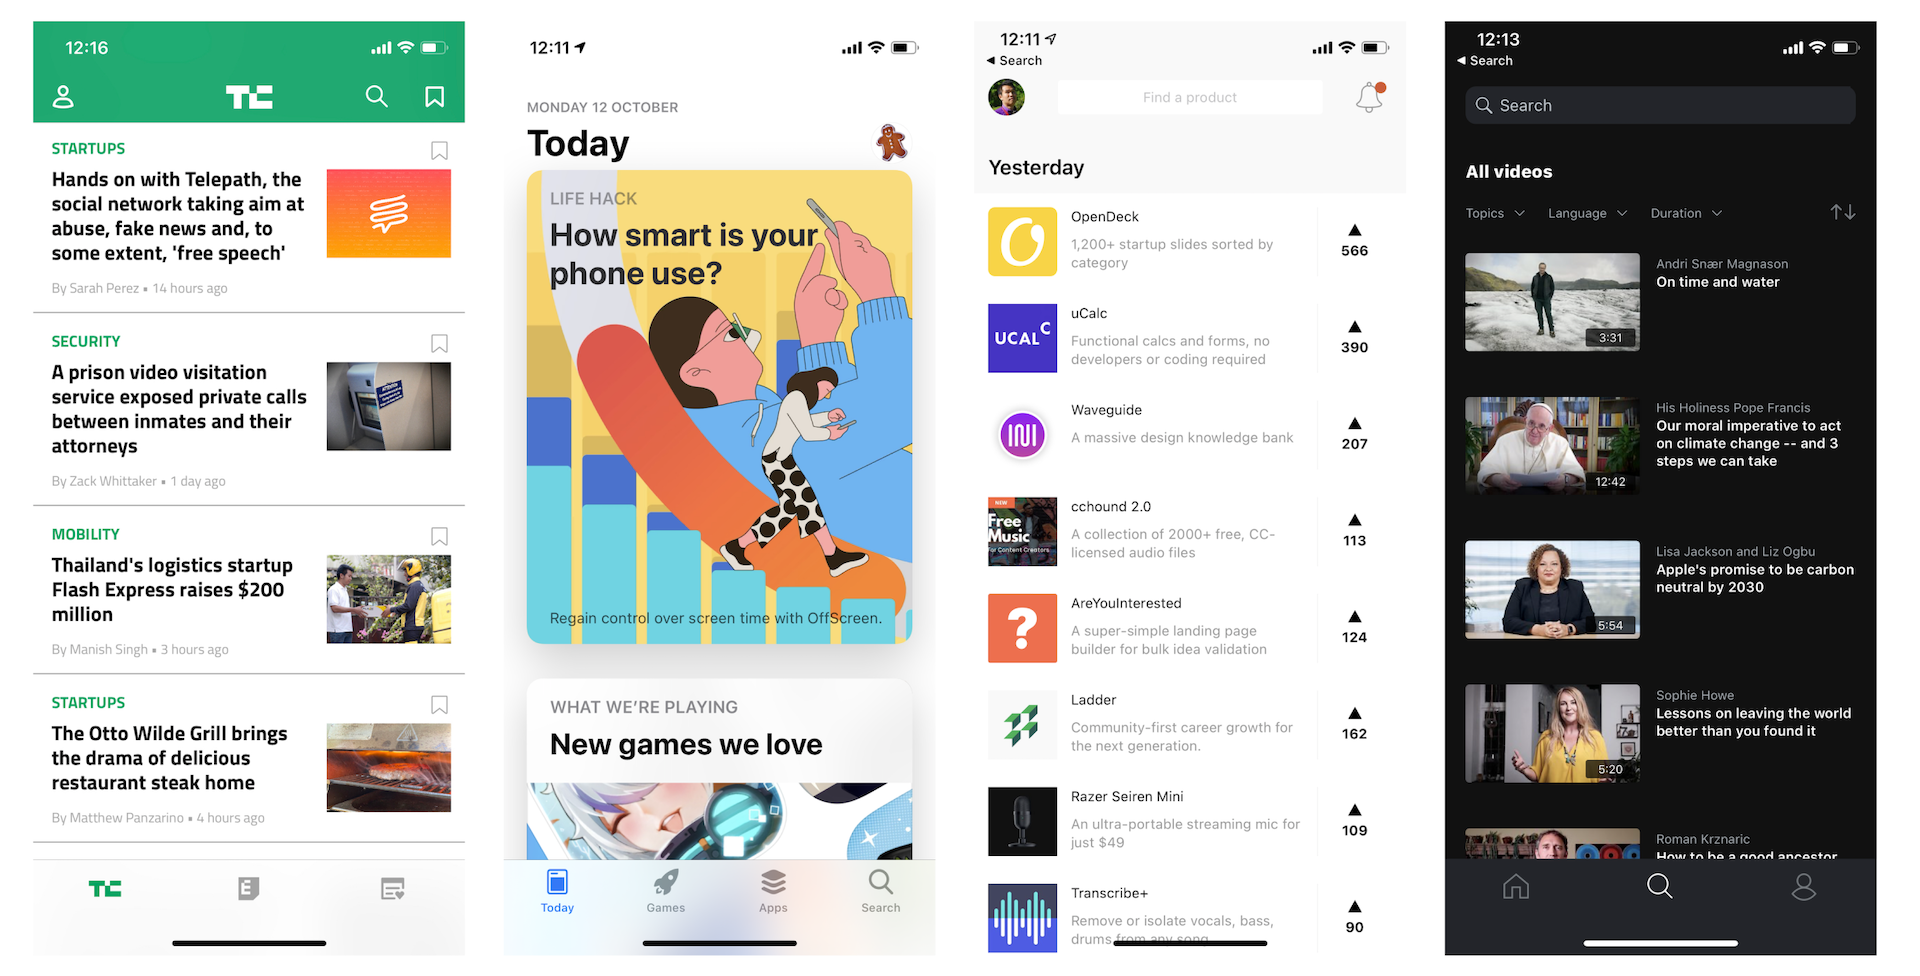
First of all, what exactly is a table view in an iPhone app? A table view is one of the most common UI elements in iOS apps. Most apps (except games), in some ways, make use of table view to display content. The best example is the built-in Phone app. Your contacts are displayed in a table view. Another example is the Mail app. It uses a table view to display your mail boxes and emails. Not only designed for listing textual data, table view allows you to present the data in the form of images. The TED, Google+ and Airbnb are also good examples. Figure 8-1 displays a few more sample table-based apps. Though they look different, all in some ways utilize a table view.
What we are going to do in this chapter is create a very simple table view and learn how to populate data (images and text) into it.
Creating a SimpleTable Project
Don’t just read the book. If you’re serious about learning iOS programming, stop reading. Open your Xcode and code! This is the best way to learn programming.
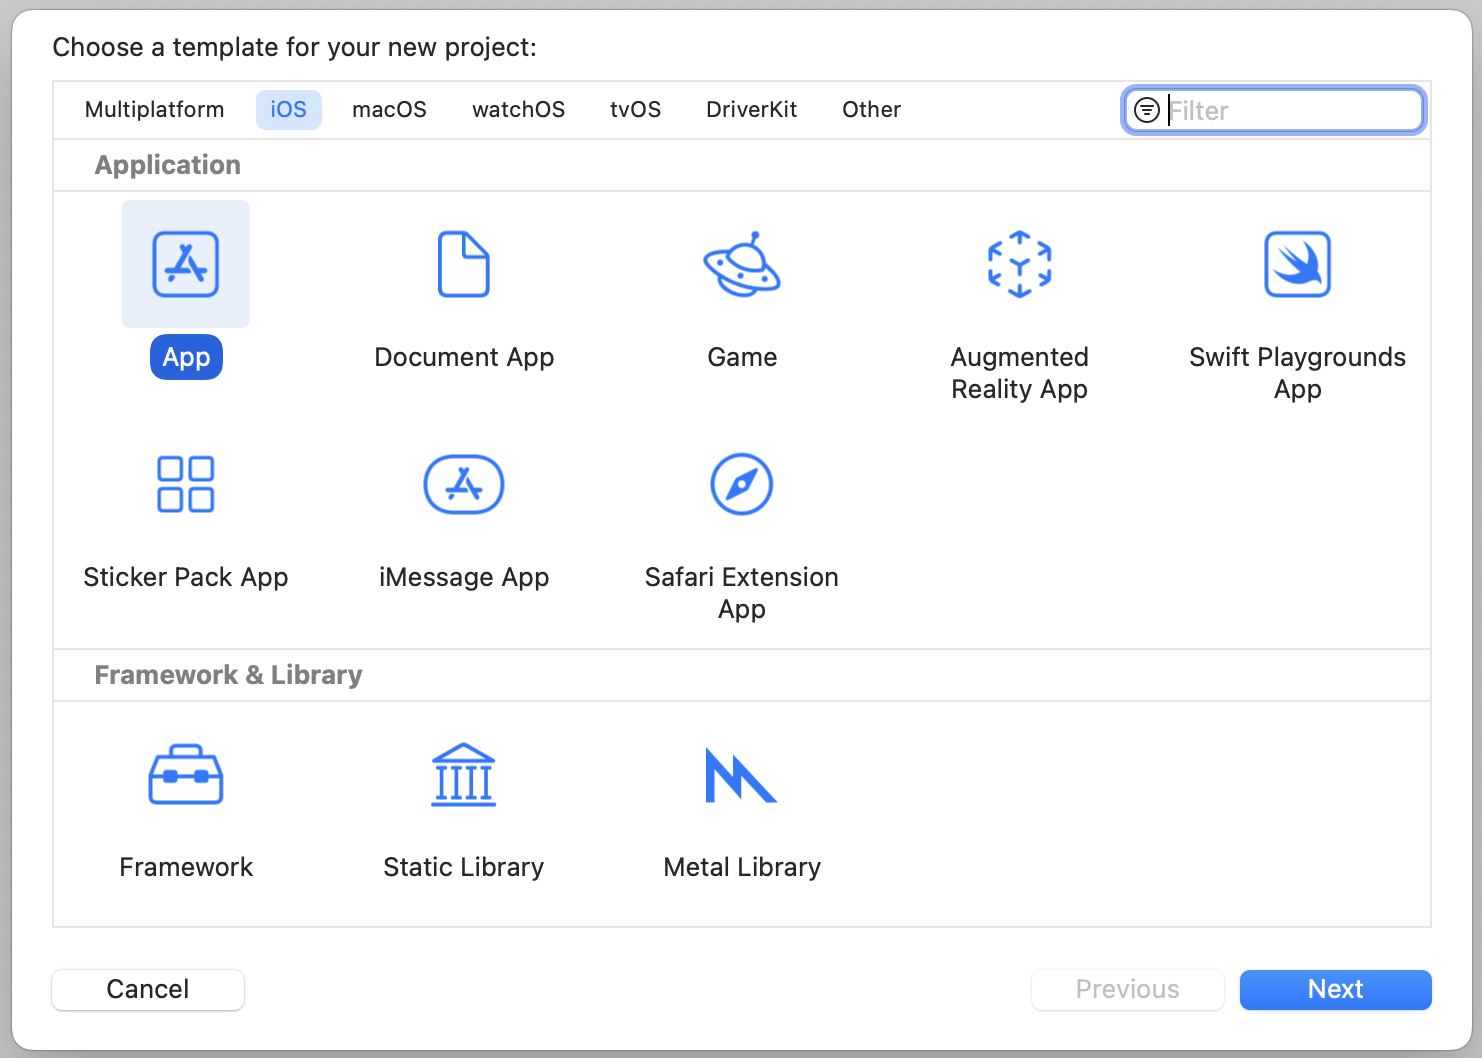
Let's get started and create a simple app. The app is really simple. We'll just display a list of restaurants in a plain table view. We'll polish it in the next chapter. If you haven't fired up Xcode, launch it, and create a new project using the App template under iOS.
Click "Next" to continue. Again, fill in all the required options for the Xcode project:
- Product Name: SimpleTable – This is the name of your app.
- Team: Just leave it as it is.
- Organization Name: AppCoda – It's the name of your organization.
- Organization Identifier: com.appcoda – It's actually the domain name written the other way round. If you have a domain, you can use your own domain name. Otherwise, you may use "com.
". - Bundle Identifier: com.appcoda.SimpleTable - This field should be automatically generated by Xcode.
- Interface: Storyboard - Xcode now supports two ways to build UI. In this book, we use Storyboard. If you want to learn SwiftUI, you can refer to the SwiftUI version of the book or the Mastering SwiftUI book (https://www.appcoda.com/swiftui).
- Language: Swift – Xcode supports both Objective-C and Swift for app development. As this book is about Swift, we'll use Swift to develop the project.
- Use Core Data: [unchecked] – Do not select this option. You do not need Core Data for this simple project. We'll explain Core Data in later chapters.
- Include Tests: [unchecked] – Do not select this option. You do not need unit tests for this simple project.
Click "Next" to continue. Xcode then asks you where to save the SimpleTable project. Pick a folder on your Mac. Click "Create" to continue.
Design the User Interface
To present data in a table in an iOS app, all you need to use is the table view object. First, select Main to switch to the Interface Builder editor. Again, I prefer to use iPhone 14 Pro to design the UI. Select the device button and change it to iPhone 14 Pro. Open the Object library, look for the Table View object and drag it into the view.
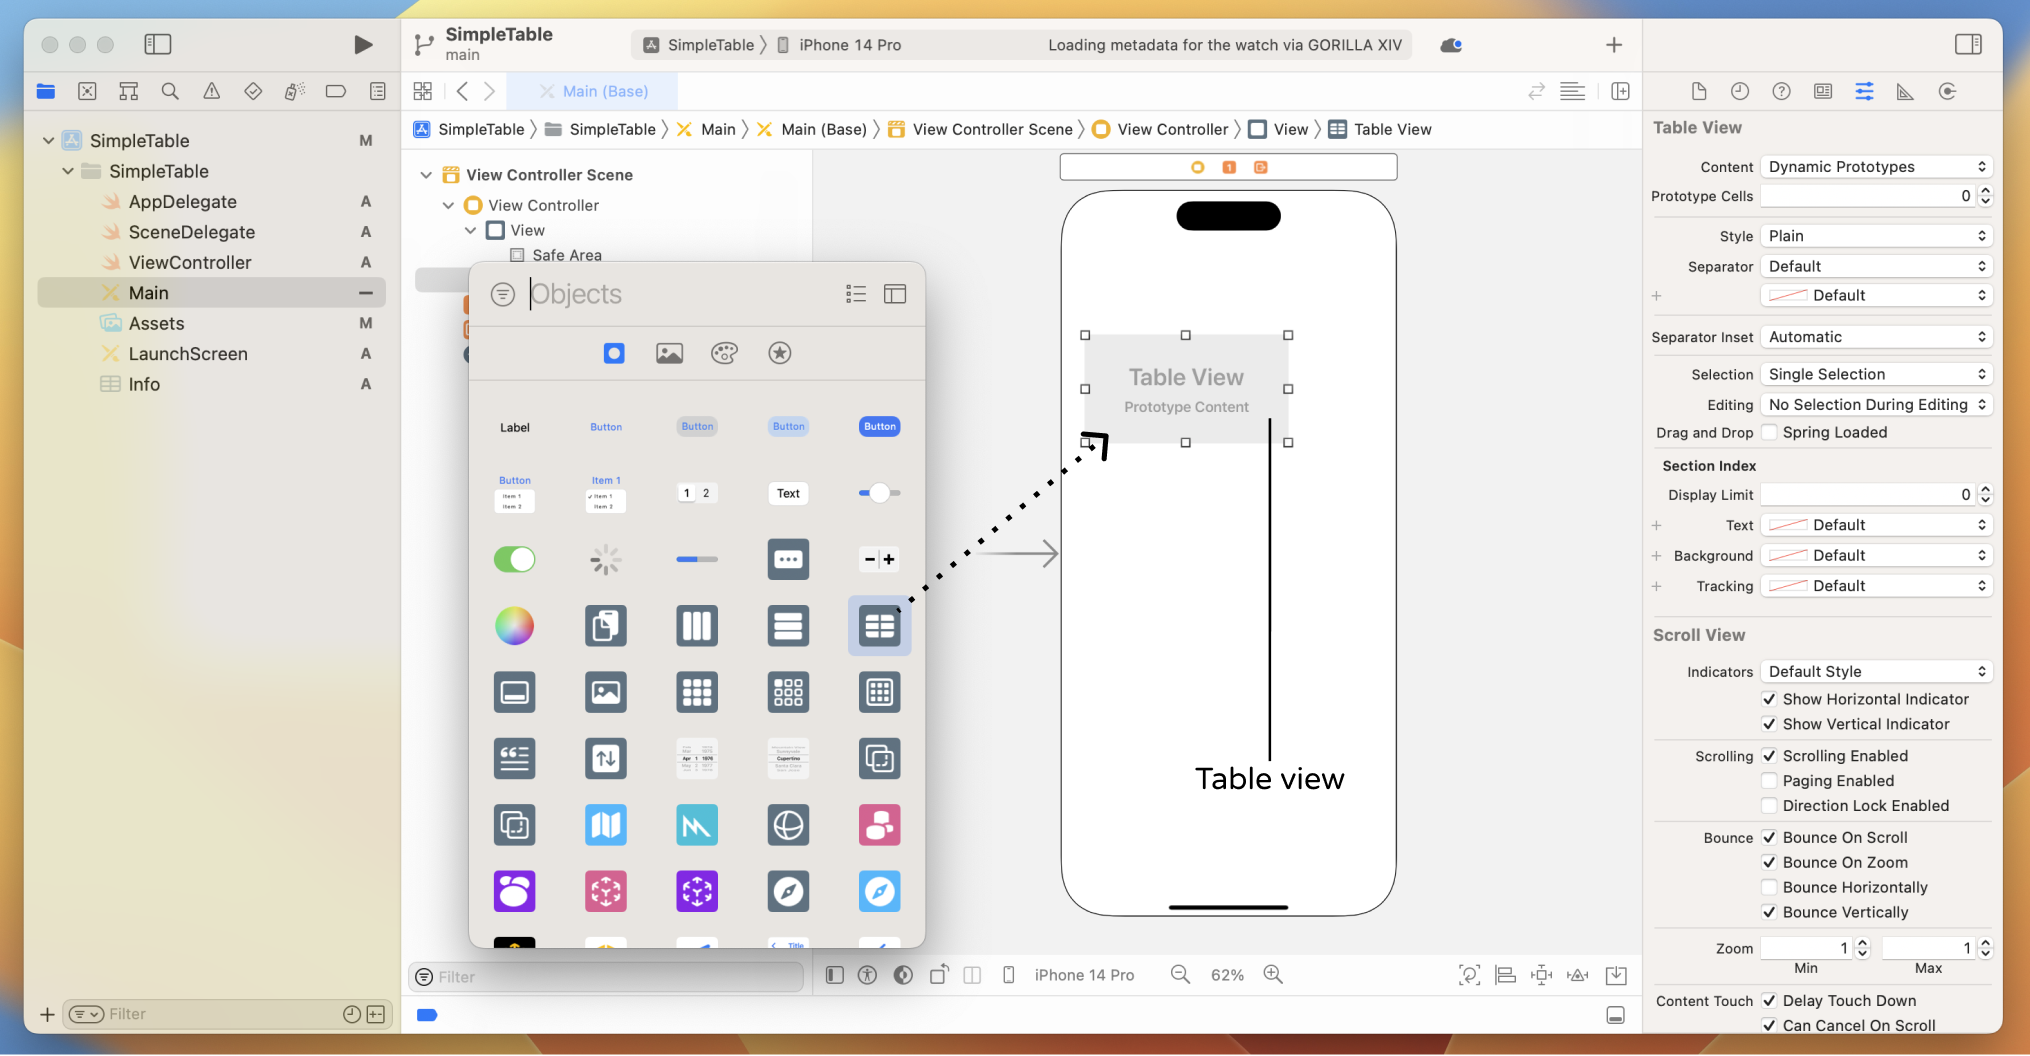
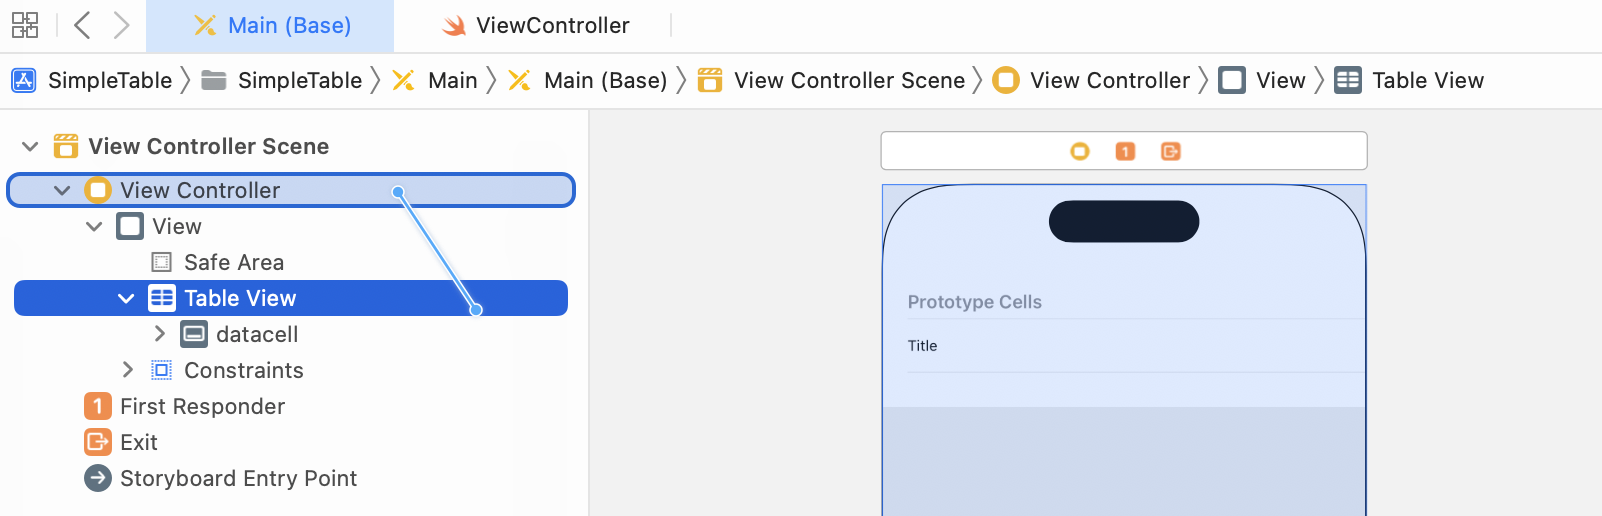
Resize the table view to fit the whole view. Next, go to the Attributes inspector (if it doesn't appear in your Xcode, choose View > Inspectors > Attributes), change the number of Prototype Cells from 0 to 1. A prototype cell will appear in the table view.
Prototype cells allow you to easily design the layout of your table view cell. You can think of it as a cell template such that you can reuse it in all the table cells.
By default, a prototype cell comes with several standard cell styles including basic, right detail, left detail and subtitle. You can create your cell design or simply choose from the default style. In this example, we will use the basic style. For cell customizations, I will leave it to the next chapter.
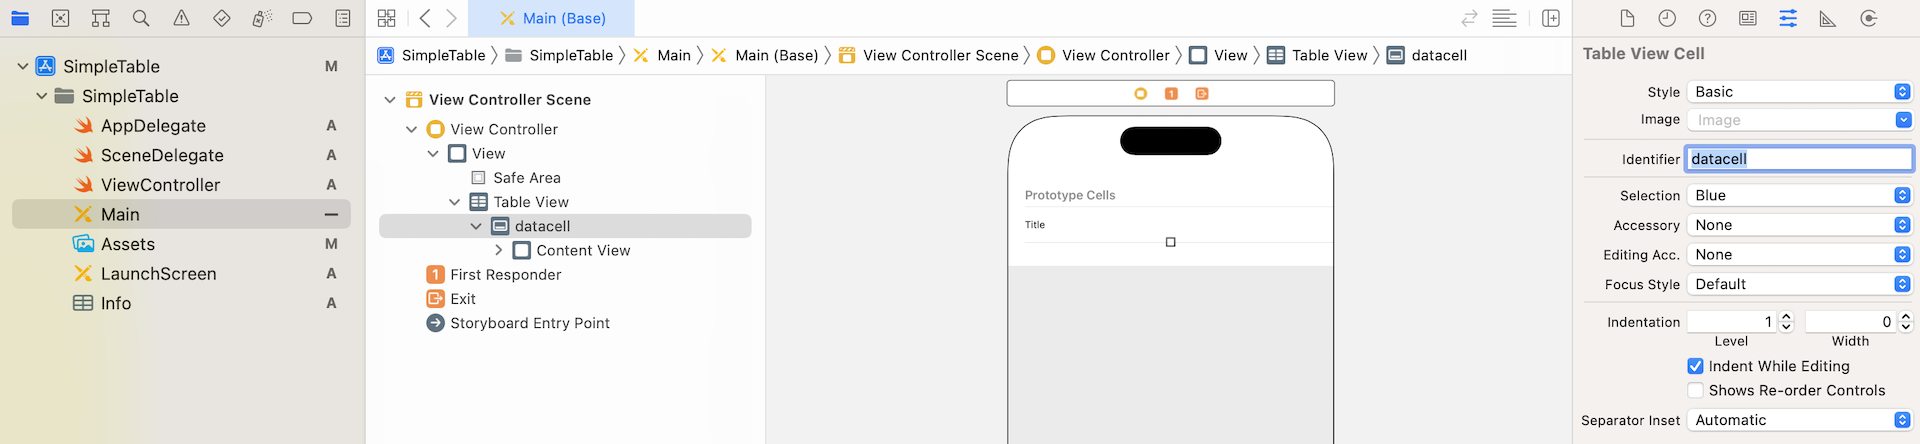
Select the cell and then open the Attributes inspector. Change the cell style to Basic. This style is good enough to display a cell with both text and image. Additionally, set the identifier to datacell. This is a unique key for identifying the prototype cell. We'll use it later when writing code.
Run Your App to Have a Quick Test
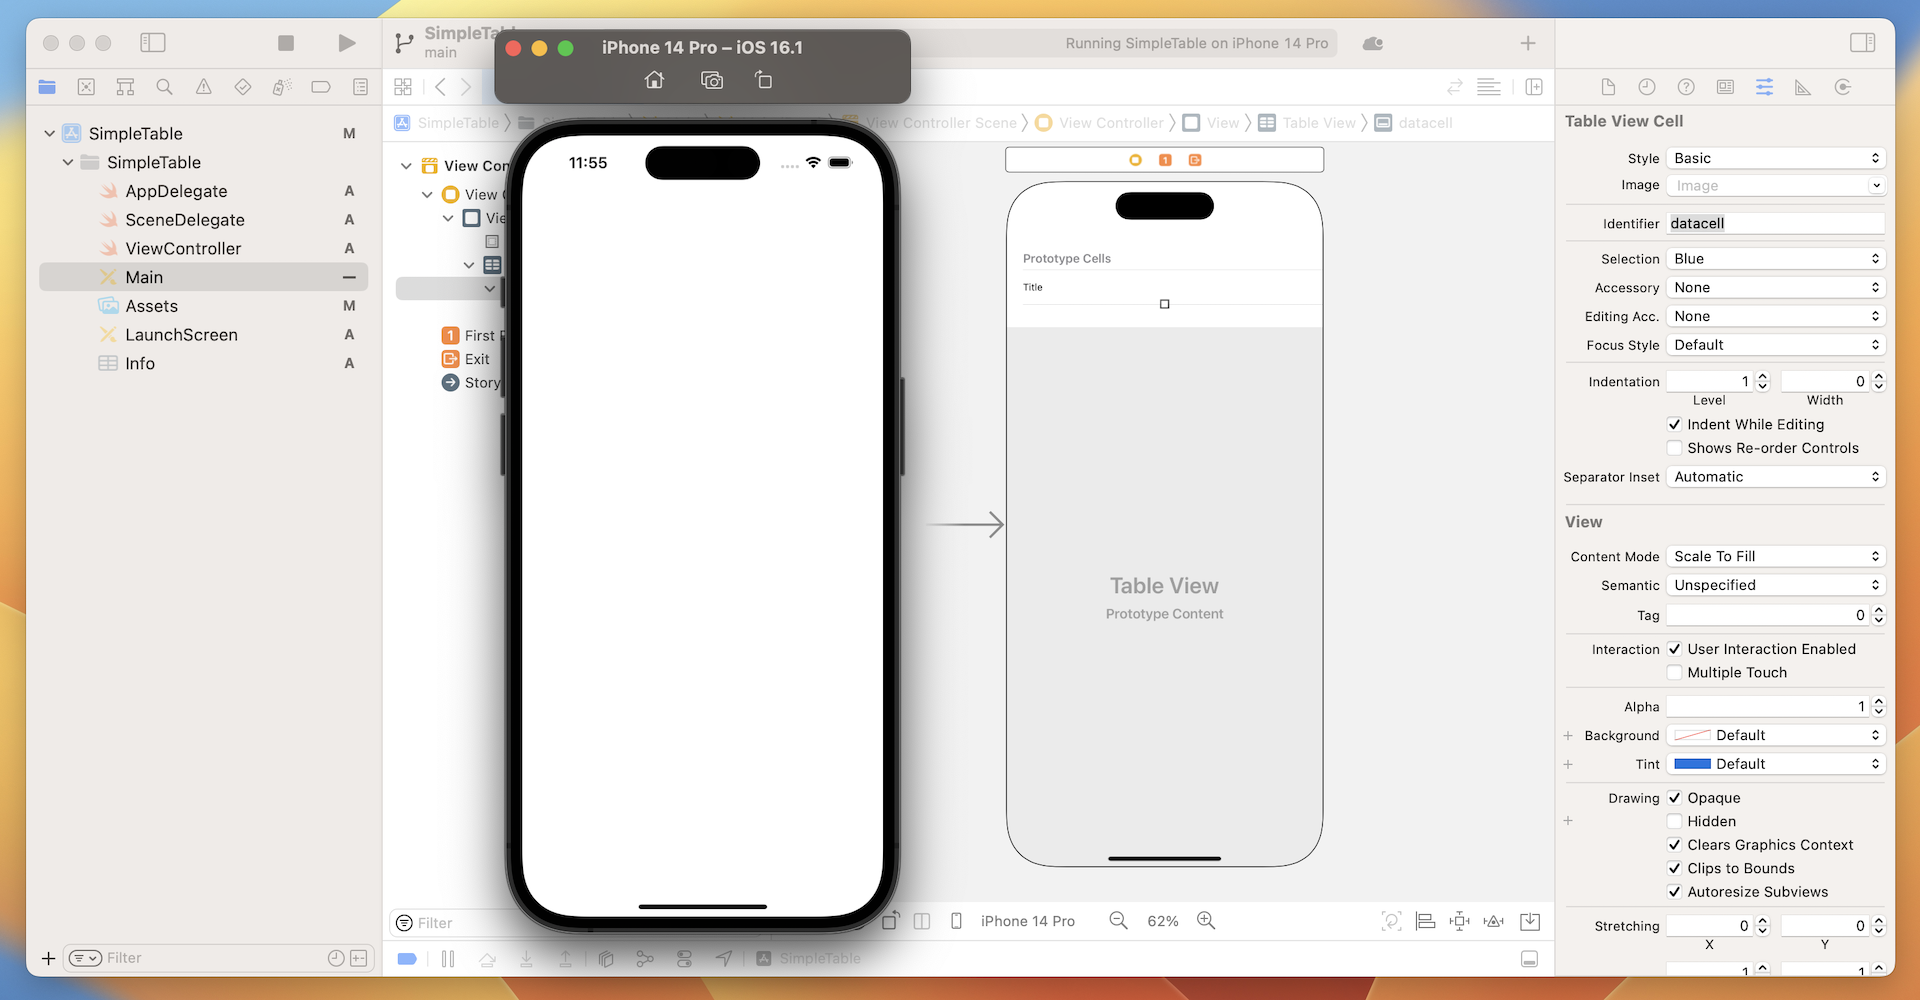
If you run the app to have a quick test, you should see a blank screen because we haven't filled the table view with data.
So far we haven't defined any layout constraints for the table view. To make the table view work for all different screen sizes, we need to add a few layout constraints. Now select the Table View in Interface Builder, click the Add new constraints button in the layout bar. Set the spacing of the top, left, right and bottom side to 0.
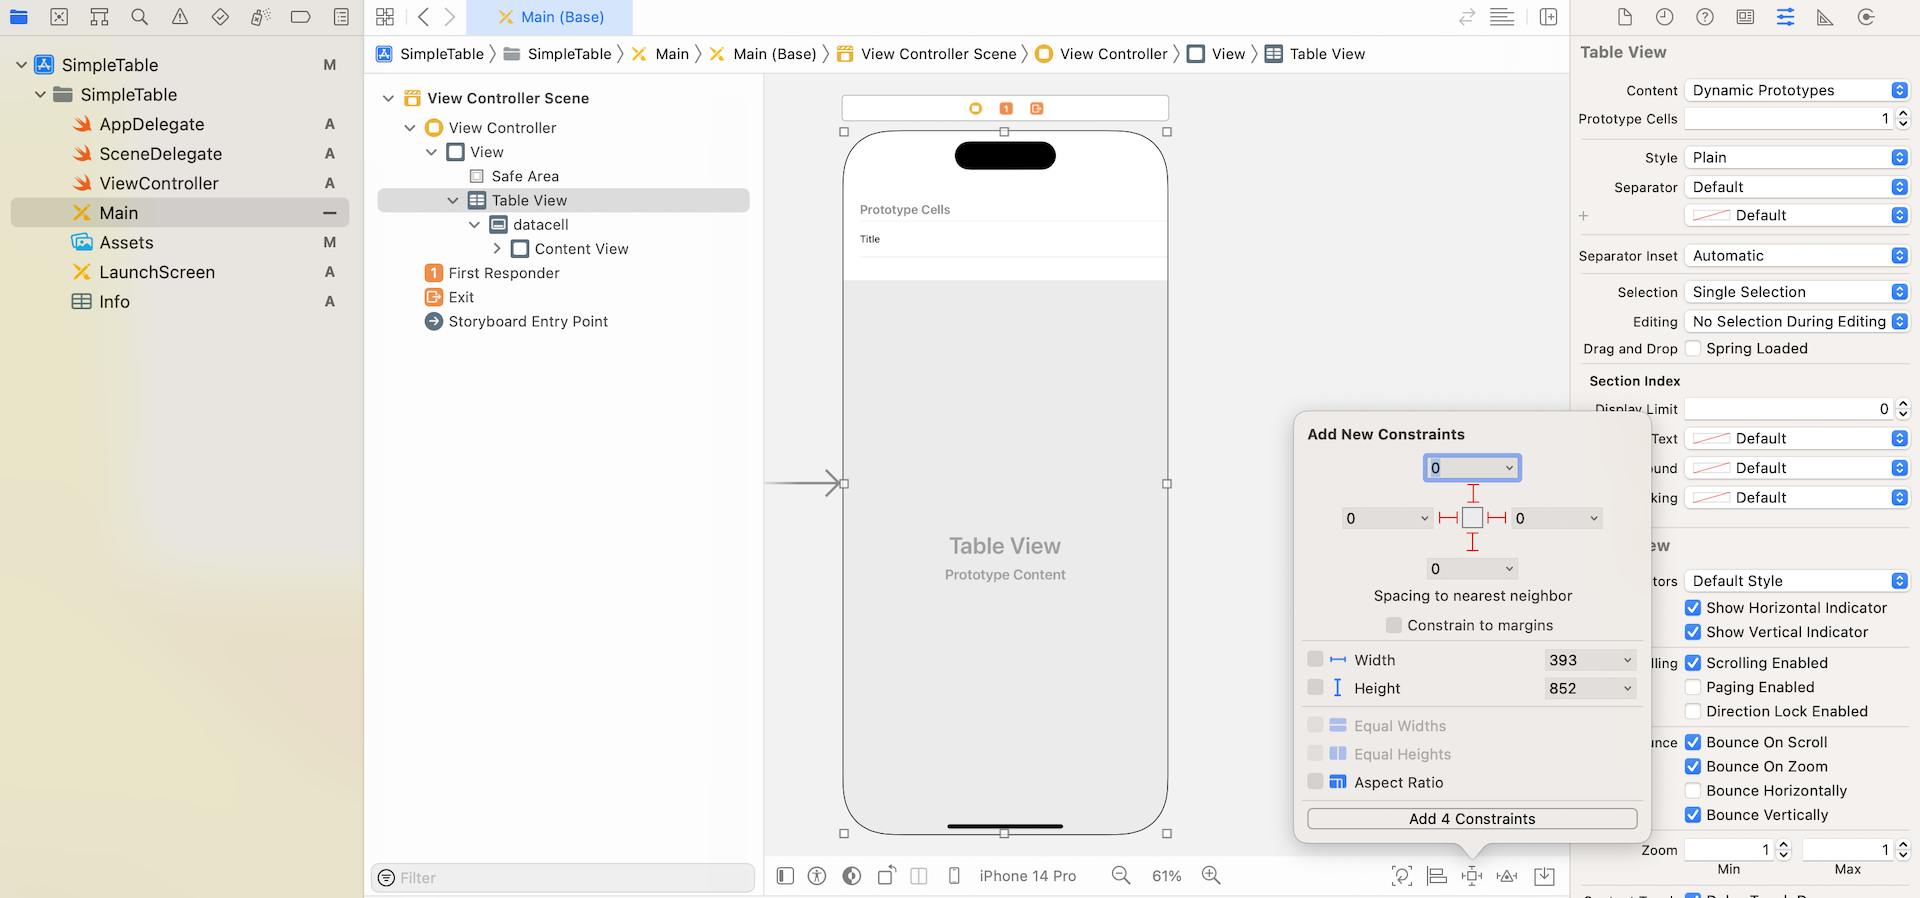
Make sure the bars are in solid red and the Constrain to margins option is unchecked. Then click the Add 4 Constraints button to add the constraints.
Here we define 4 spacing constraints for each side of the table view. The Constrain to margins option is unchecked. In this case, the spacing constraints will be relative to the edge of the view. This ensures that all sides of the table view will stretch to the edge of the view. In other words, your table view will automatically resize to fit all screen sizes.
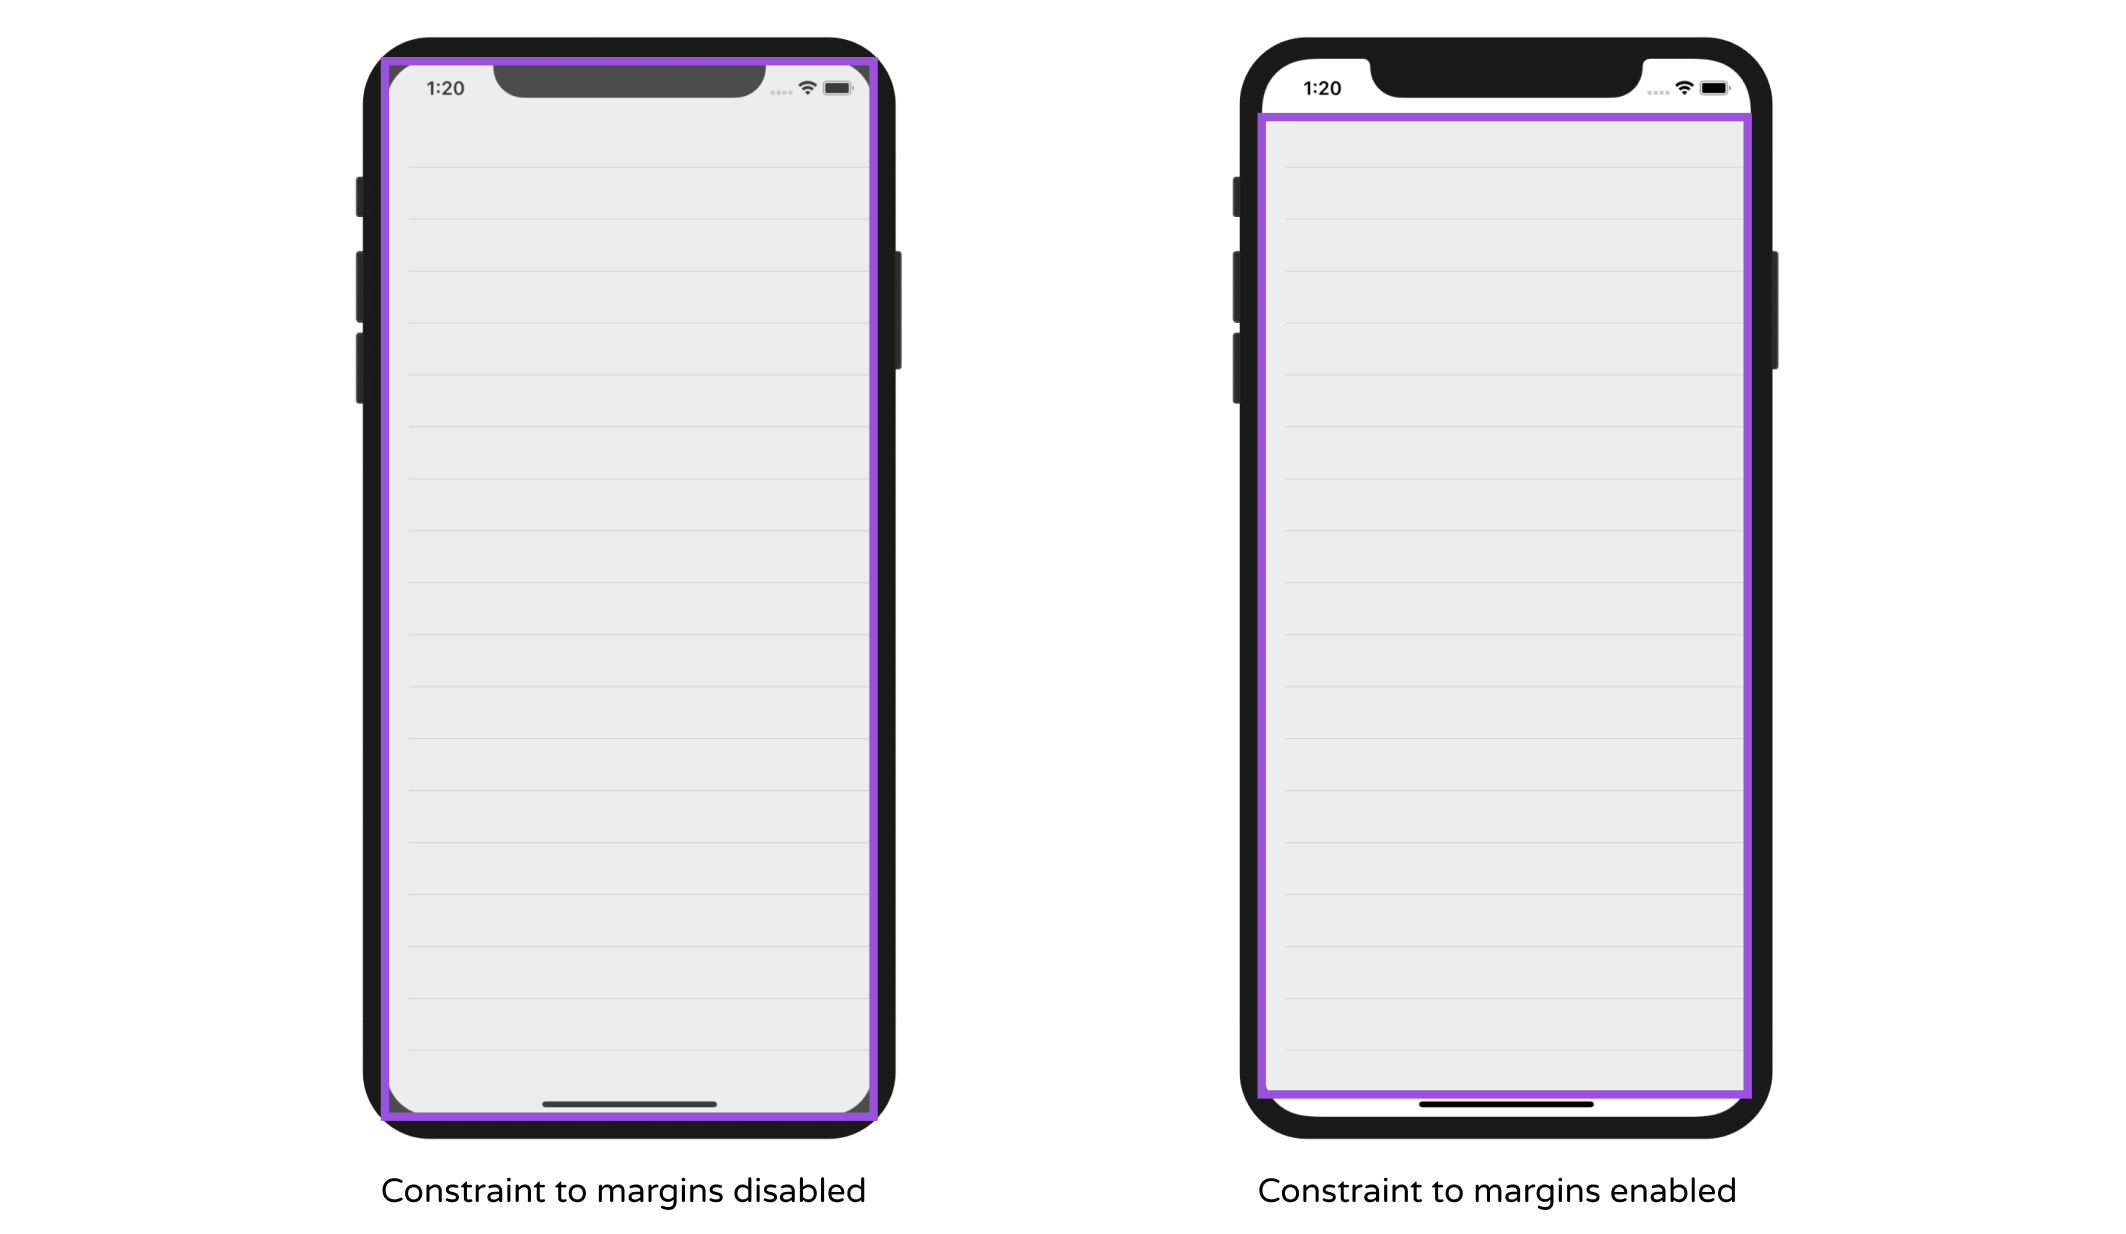
If you tick the Constrain to margins option, it will still work. Figure 8-7 shows you how the safe area is adjusted when the option is enabled or disabled.
With the UI design ready, let's move onto the core part and write some code to insert the table data.
UITableView and its Protocols
I mentioned at the very beginning of the book that other than Swift, you have to learn the APIs and foundation classes provided by the iOS SDK in order to build an app. These APIs and classes are organized into what-so-called frameworks. The UIKit framework is one of the most commonly used frameworks.
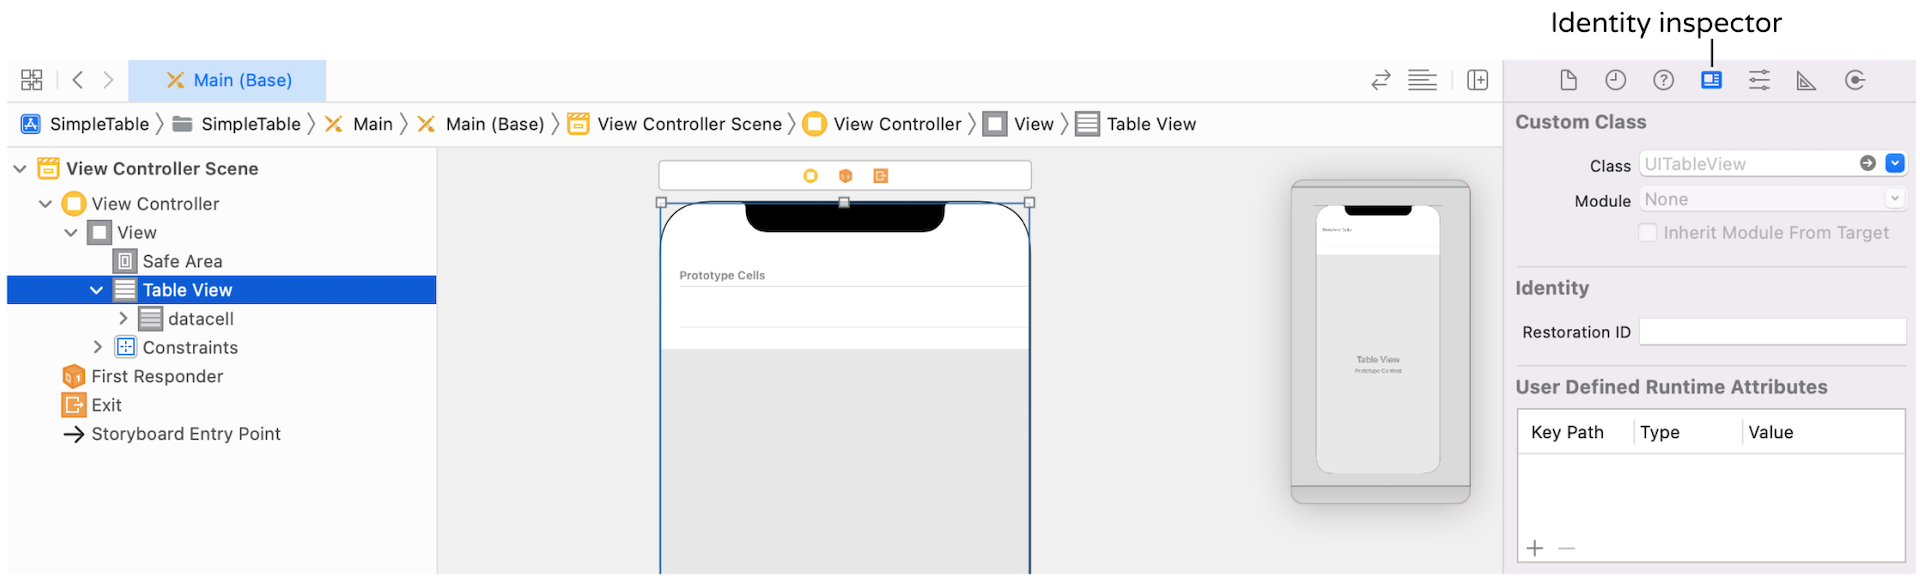
It provides classes to construct and manage your app's user interface. All objects listed in the Object library of Interface Builder are provided by the framework. The Button object you used in the HelloWorld app, and the Table View object we're working on right now are from the UIKit framework. While we use the term Table View, the actual class is UITableView. Simply put, every UI component in the Object library has a corresponding class. You can first select Table View, and then go to the Identity inspector to reveal the actual class name in the custom class section.
I intentionally leave out the discussion of classes and methods to later chapters. If you have no ideas what a class is, don't worry. Just think of it as a code template. I will explain it to you in later chapters.
Now that you have an idea about the relationship between Table View and UITableView. We'll write some code to insert the table data. Select ViewController.swift in the project navigator to open the file in the editor pane. Append , UITableViewDataSource, UITableViewDelegate after UIViewController to adopt the protocols.
As soon as you insert the code after UIViewController, Xcode detects an error. The red exclamation mark at the top-right corner of the code editor indicates that there is a problem. On top of that, Xcode highlights the line of code, and display a message telling you the details of the issue. The message is helpful for telling the cause of the problem and it also shows you the solution.
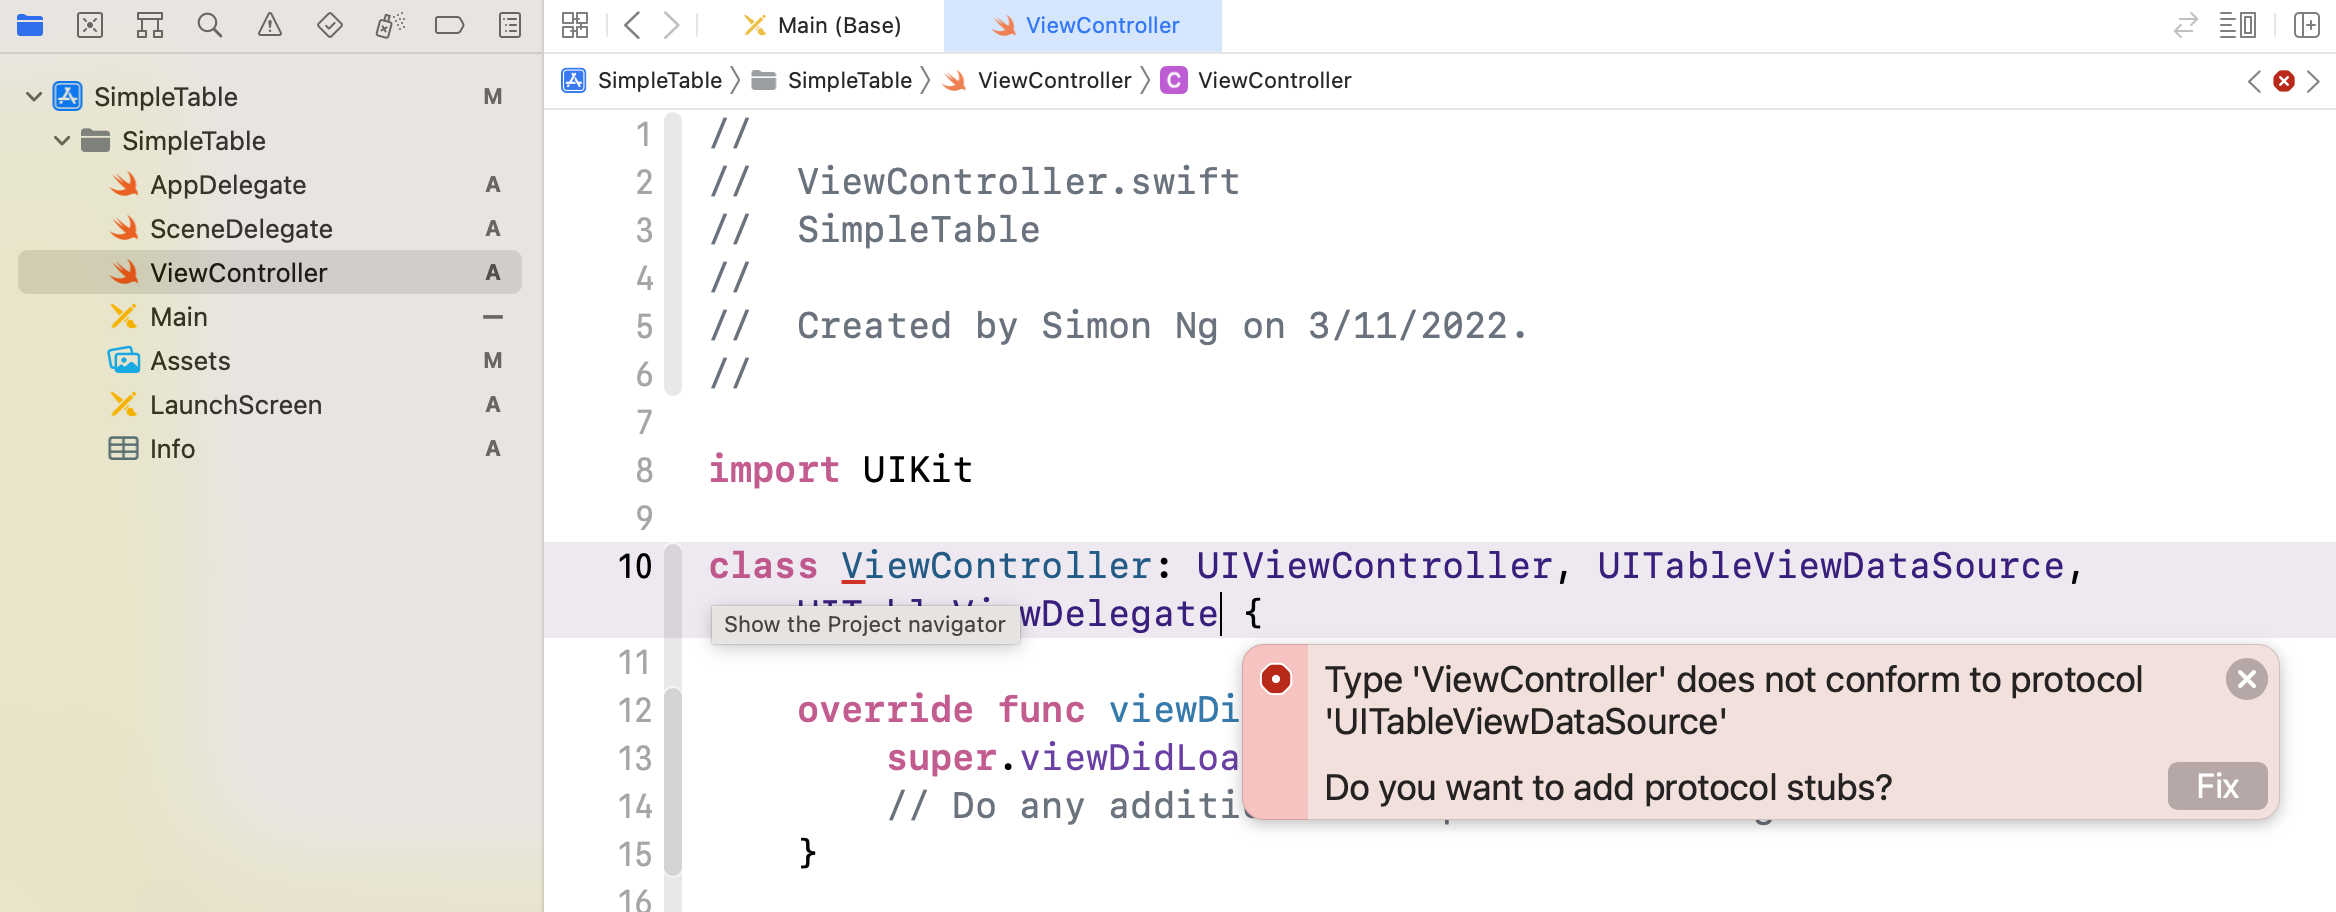
Wait. Don't click the Fix button yet. What does it mean by "Type ViewController does not conform to protocol UITableViewDataSource"?
The UITableViewDelegate and UITableViewDataSource are known as protocols in Swift. To display data in a table view, we have to conform to a set of requirements, defined in the protocols. Here, the ViewController class is the one that adopts the protocol, and implements all the mandatory methods.
It may be confusing. What are these protocols? Why protocols?
Well, let's say you're starting a new business. You hire a graphic designer to design your company logo. The designer is skilled and very capable of creating any kind of logo. But the designer can't start the logo design right away. In the least, you need to provide the designer with some requirements such as company name, color preference, business nature before he/she can create a logo. However, you're busy. You delegate the task to your personal assistant, and let the assistant deal with the designer directly, providing the designer with the logo requirements.
In iOS programming, the UITableView class is just like the graphic designer. It's flexible enough to display various kinds of data (e.g. image, text) in table form. You can use it to display a list of countries or contact names. Or in our project, we'll be presenting a list of restaurants with thumbnails.
But before UITableView can display the data for you, it requires someone to provide some basic information like:
- how many rows do you want to display in the table view?
- what is the table data? For example, what do you want to display for row 2? What do you want to display in row 5?
That "someone" is known as a delegate object. In the above analogy, the personal assistant is the delegate object. In iOS programming, it also applies the concept of delegation usually known as delegation pattern. An object relies on another object to perform a specific task. In our project, the ViewController is the delegate that provides the table data. Figure 8-10 illustrates the relationship of UITableView, the protocols and the delegate object.
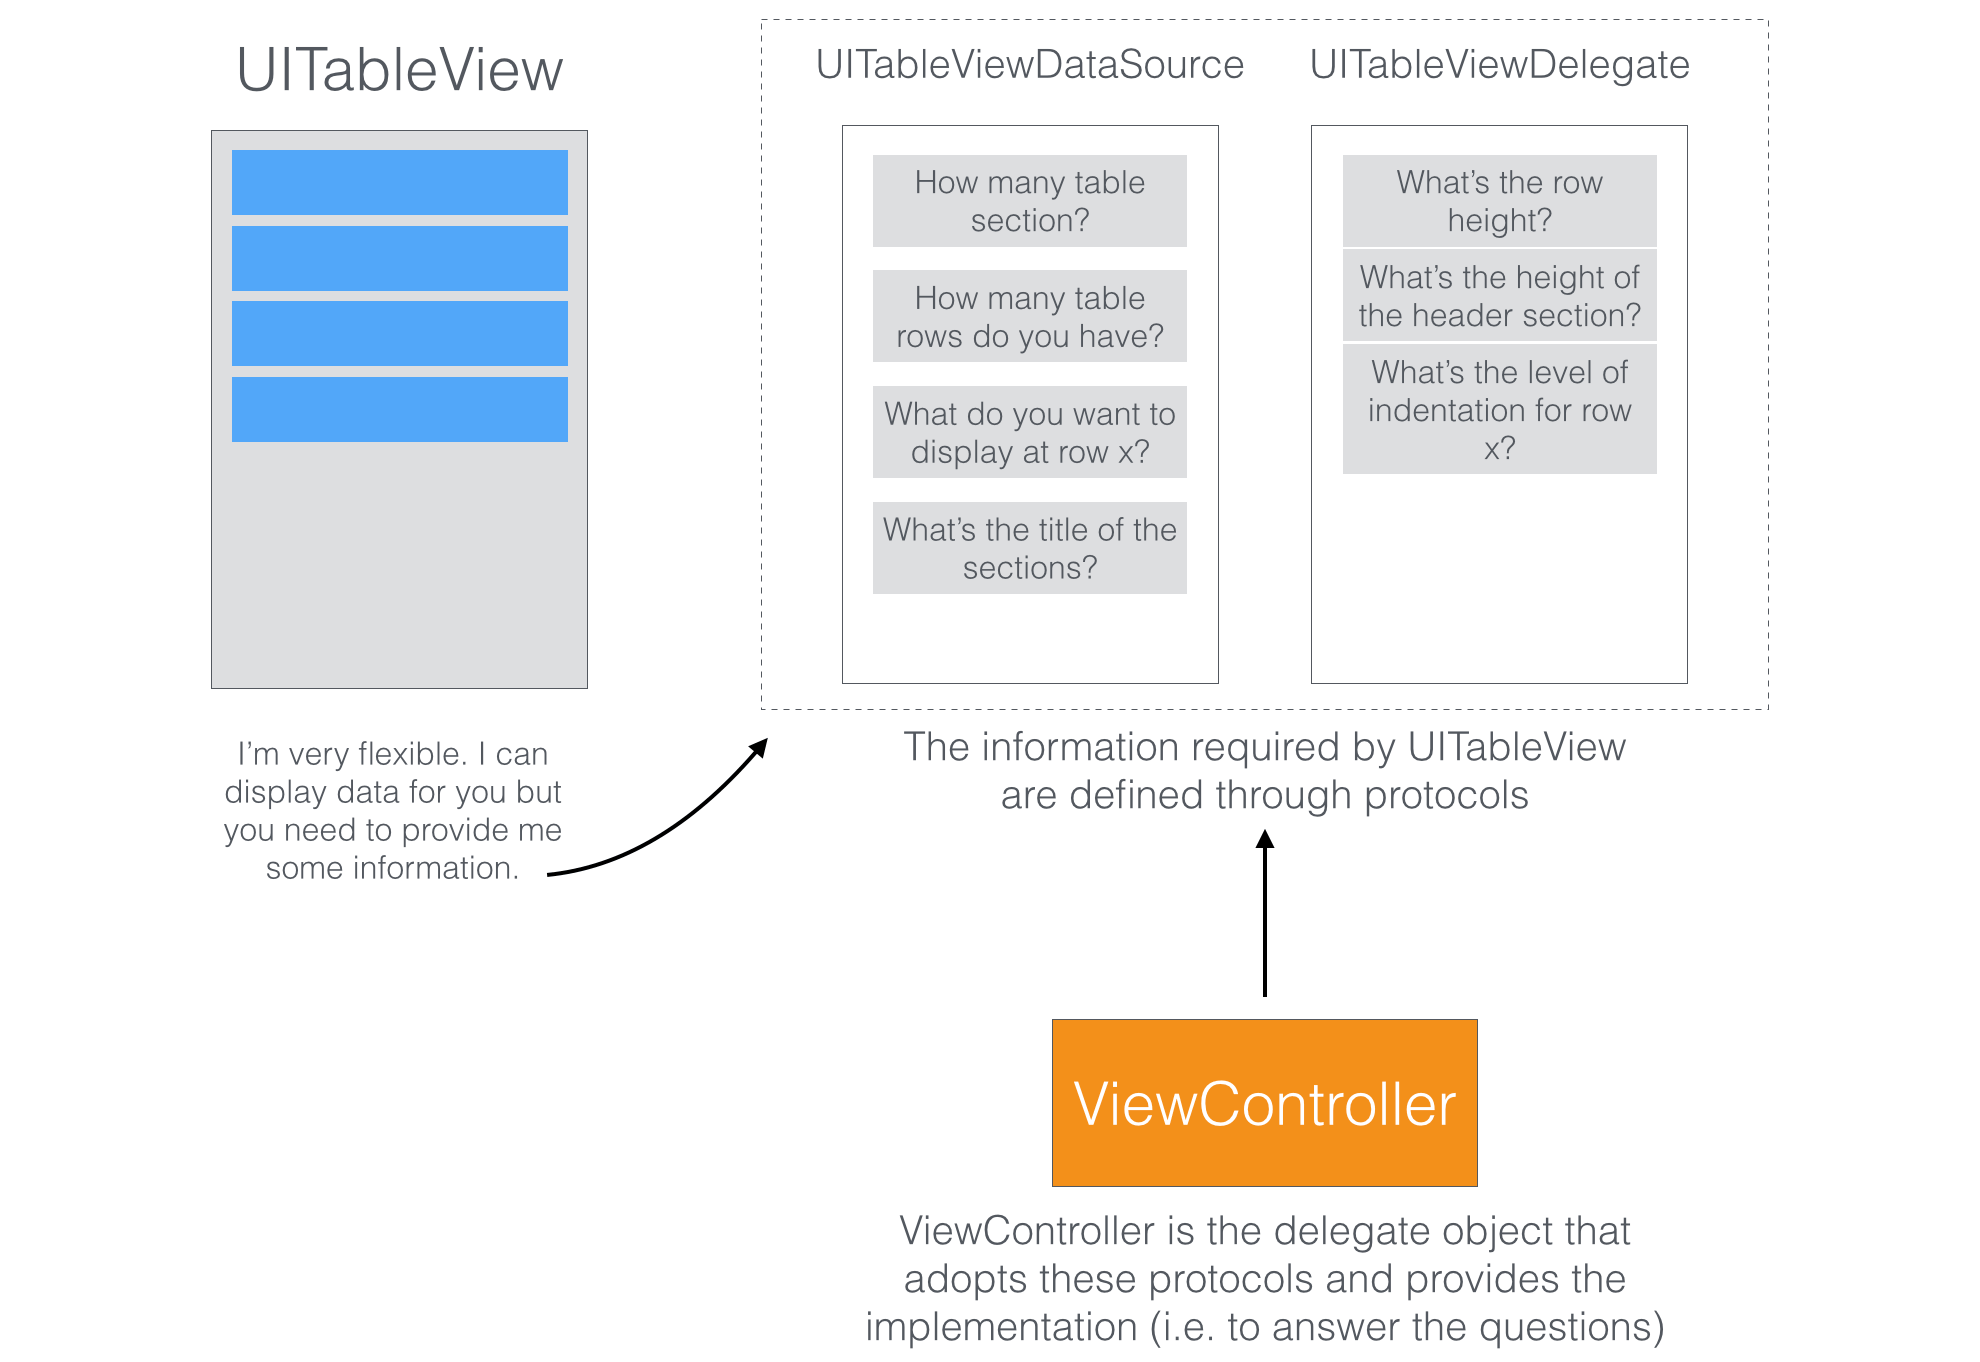
So how do you tell UITableView what data to display? The UITableViewDataSource protocol is the key. It's the link between your data and the table view. The protocol defines a list of methods that you have to adopt.
Okay, what methods should I adopt? Now you are ready to click the Fix button in the error prompt shown in figure 8-9. As soon as you click the button, Xcode adds the following methods:
func tableView(_ tableView: UITableView, numberOfRowsInSection section: Int) -> Int {

}

func tableView(_ tableView: UITableView, cellForRowAt indexPath: IndexPath) -> UITableViewCell {

}
These are the two required methods for the UITableViewDataSource protocol.
All you need is to provide the implementation so that UITableView knows the total number of rows to display and the data for each row. The protocol also defines some optional methods that we'll not discuss it here.
The UITableViewDelegate protocol, on the other hand, deals with the appearance of the UITableView. All methods defined in the protocols are optional. They let you manage the height of a table row, configure section headings and footers, re-order table cells, etc. We will not change any of these methods in this example. We will leave that for a later chapter.
With some basic knowledge of protocols, let's continue to code the app. Select ViewController.swift and declare a variable for holding the table data. Name the variable restaurantNames and insert the following line of code in the class:
var restaurantNames = ["Cafe Deadend", "Homei", "Teakha", "Cafe Loisl", "Petite Oyster", "For Kee Restaurant", "Po's Atelier", "Bourke Street Bakery", "Haigh's Chocolate", "Palomino Espresso", "Upstate", "Traif", "Graham Avenue Meats And Deli", "Waffle & Wolf", "Five Leaves", "Cafe Lore", "Confessional", "Barrafina", "Donostia", "Royal Oak", "CASK Pub and Kitchen"]
In this example, we use an array to store the table data. If you forgot the syntax of an array, refer to chapter 2. The values are separated by commas and surrounded by a pair of square brackets.
When I said "insert the code in the class", it means you have to declare the variable within the curly bracket of the class like this:
class ViewController: UIViewController, UITableViewDataSource, UITableViewDelegate {

    var restaurantNames = ["Cafe Deadend", "Homei", "Teakha", "Cafe Loisl", "Petite Oyster", "For Kee Restaurant", "Po's Atelier", "Bourke Street Bakery", "Haigh's Chocolate", "Palomino Espresso", "Upstate", "Traif", "Graham Avenue Meats And Deli", "Waffle & Wolf", "Five Leaves", "Cafe Lore", "Confessional", "Barrafina", "Donostia", "Royal Oak", "CASK Pub and Kitchen"]

    .
    .
    .

}
Arrays for Absolute Beginners
An array is a fundamental data structure in computer programming. You can think of an array as a collection of data elements. Consider the restaurantNames array in the above code, it represents a collection of String elements. You may visualize the array like this:

Each of the array elements is identified or accessed by an index. An array with 10 elements will have indices from 0 to 9. That means restaurantNames[0] returns the first item of the array.
Let's continue to code. We adopt the two required methods of the UITableViewDataSource protocol like this:
func tableView(_ tableView: UITableView, numberOfRowsInSection section: Int) -> Int {
    // Return the number of rows in the section.
    return restaurantNames.count
}

func tableView(_ tableView: UITableView, cellForRowAt indexPath: IndexPath) -> UITableViewCell {
    let cellIdentifier = "datacell"
    let cell = tableView.dequeueReusableCell(withIdentifier: cellIdentifier, for: indexPath)

    // Configure the cell...
    cell.textLabel?.text = restaurantNames[indexPath.row]

    return cell
}
The first method is used to inform the table view the total number of rows in a section. You can simply call the count method to get the number of items in the restaurantNames array.
Quick note: A table view can have multiple sections but there is only one by default.The second method will be called every time a table row is displayed. By using the
indexPath object, we can get the current row (indexPath.row). Here what we did is to retrieve the indexed item from the restaurantNames array, and assign it to the text label (cell.textLabel?.text) for display.
Note: You may wonder what the question mark (?), next to textLabel, is for. Do you still remember optionals we discussed in chapter 2? Here textLabel is an optional. To access the property of textLabel, we have to first verify if textLabel has a value. You can use if let to perform the verification. Alternatively, you can place a question mark (?) after textLabel.Okay, but what is
dequeueReusableCell in the second line of code?
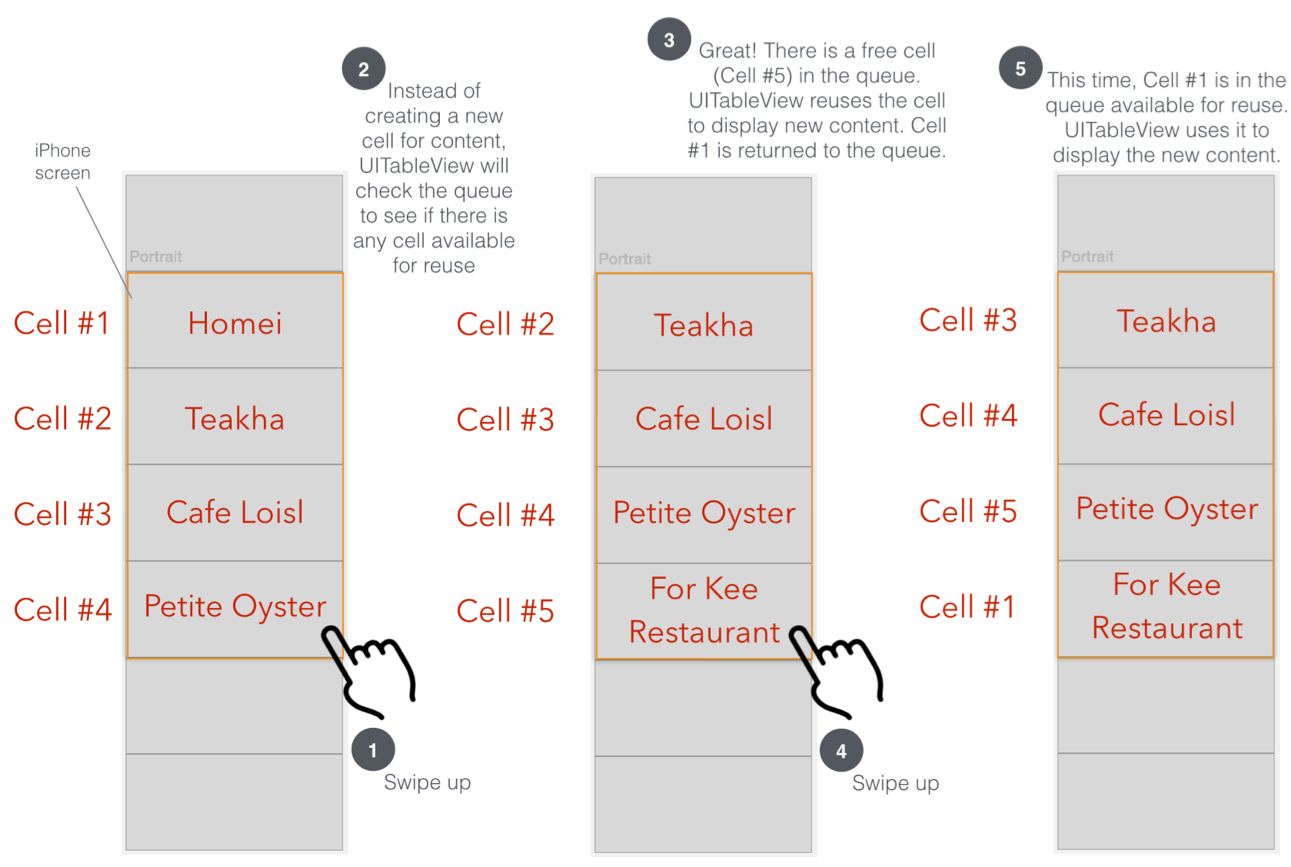
The dequeueReusableCell method is used for retrieving a reusable table cell from the queue with the specified cell identifier. The datacell identifier is the one we defined earlier in Interface Builder.
You want your table-based app to be fast and responsive even when handling thousands of rows of data. If you allocate a new cell for each row of data instead of reusing one, your app will use excess memory and may result in a sluggish performance when the user scrolls the table view. Remember every cell allocation has a performance cost, especially when the allocation happens over a short period of time.
The screen real estate of iPhone is limited. Even if your app needs to display 1,000 records, the screen may only be able to fit 10 table cells at most. Therefore, why on earth would the app allocate a thousand table view cells instead of creating 10 table cells and reuse them? This would save tons of memory and make table view work more efficiently. For performance reasons, you should reuse table view cells instead of creating new ones.
Now, let's hit the "Run" button and test your app. Oops! The app still displays a blank table view just like before.
Why is it the table view still not showing the content as expected? We've written the code for displaying table data and implemented all required methods. But why the table view didn't show the content as expected?
There is still one thing left.
Connecting the DataSource and Delegate
Even though the ViewController class has adopted the UITableViewDelegate and UITableViewDataSource protocols, the UITableView object in storyboard has no idea about it. We have to tell the UITableView object that ViewController is the delegate object for the data source.
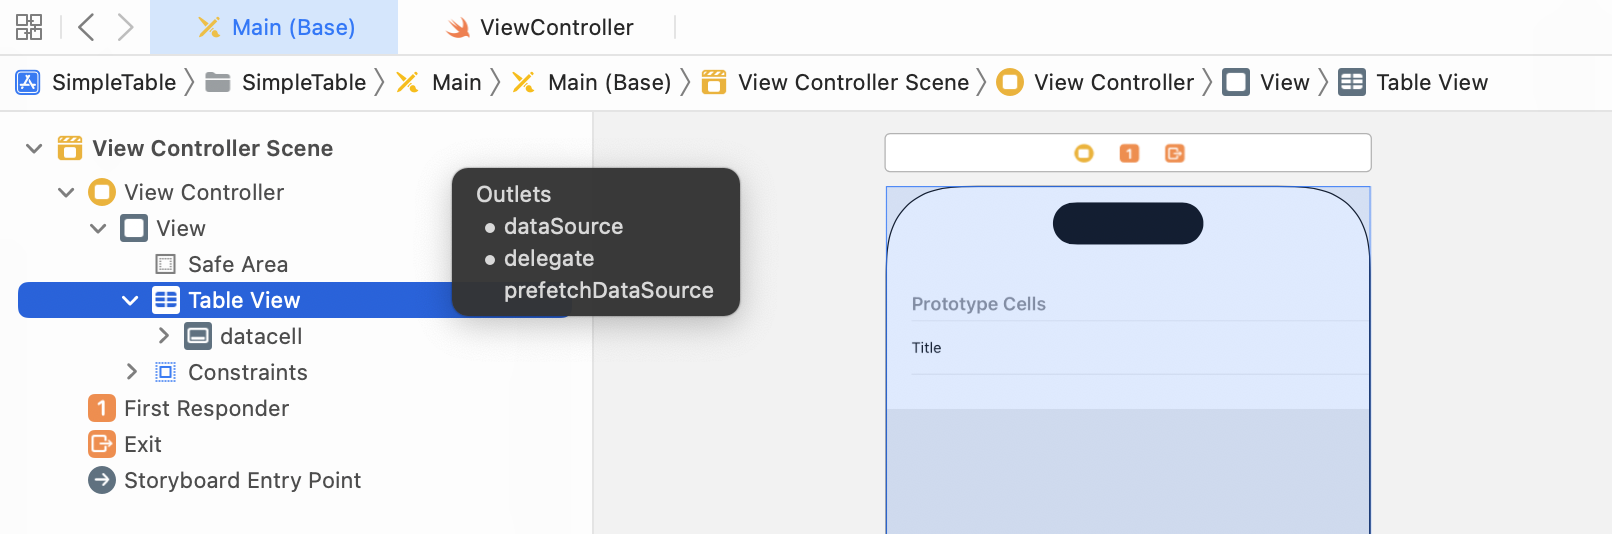
Go back to Main storyboard. Select the table view. Press and hold the control key, drag from the table view to the View Controller object in the document outline view.
Release both buttons. In the pop-over menu, select dataSource. Repeat the above steps and make a connection with delegate.
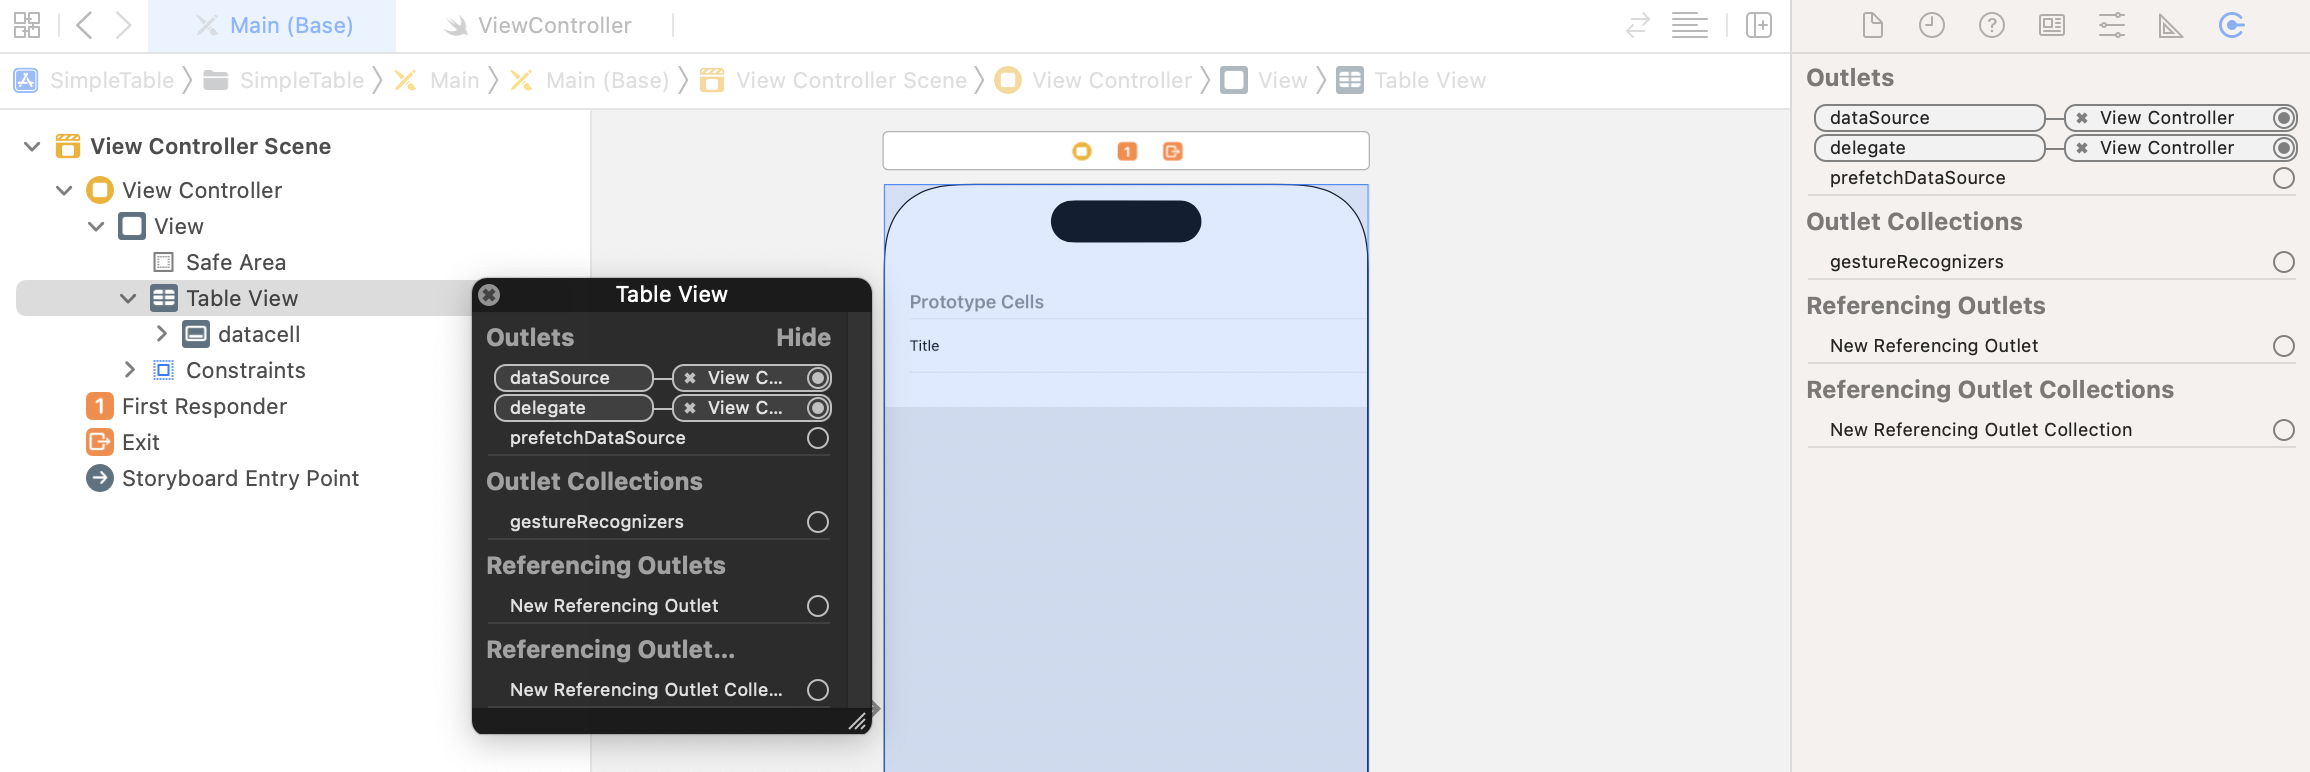
That's it. To ensure the connections are linked properly, you can select the table view again. Click the Connections Inspector icon in the Utility area to reveal the existing connections. Alternatively, you can right-click the table view to reveal the connections as well.
Test Your App
Finally, you're ready to test your app. Simply hit the Run button and load your app in the simulator. Your app should now show a list of restaurant names.
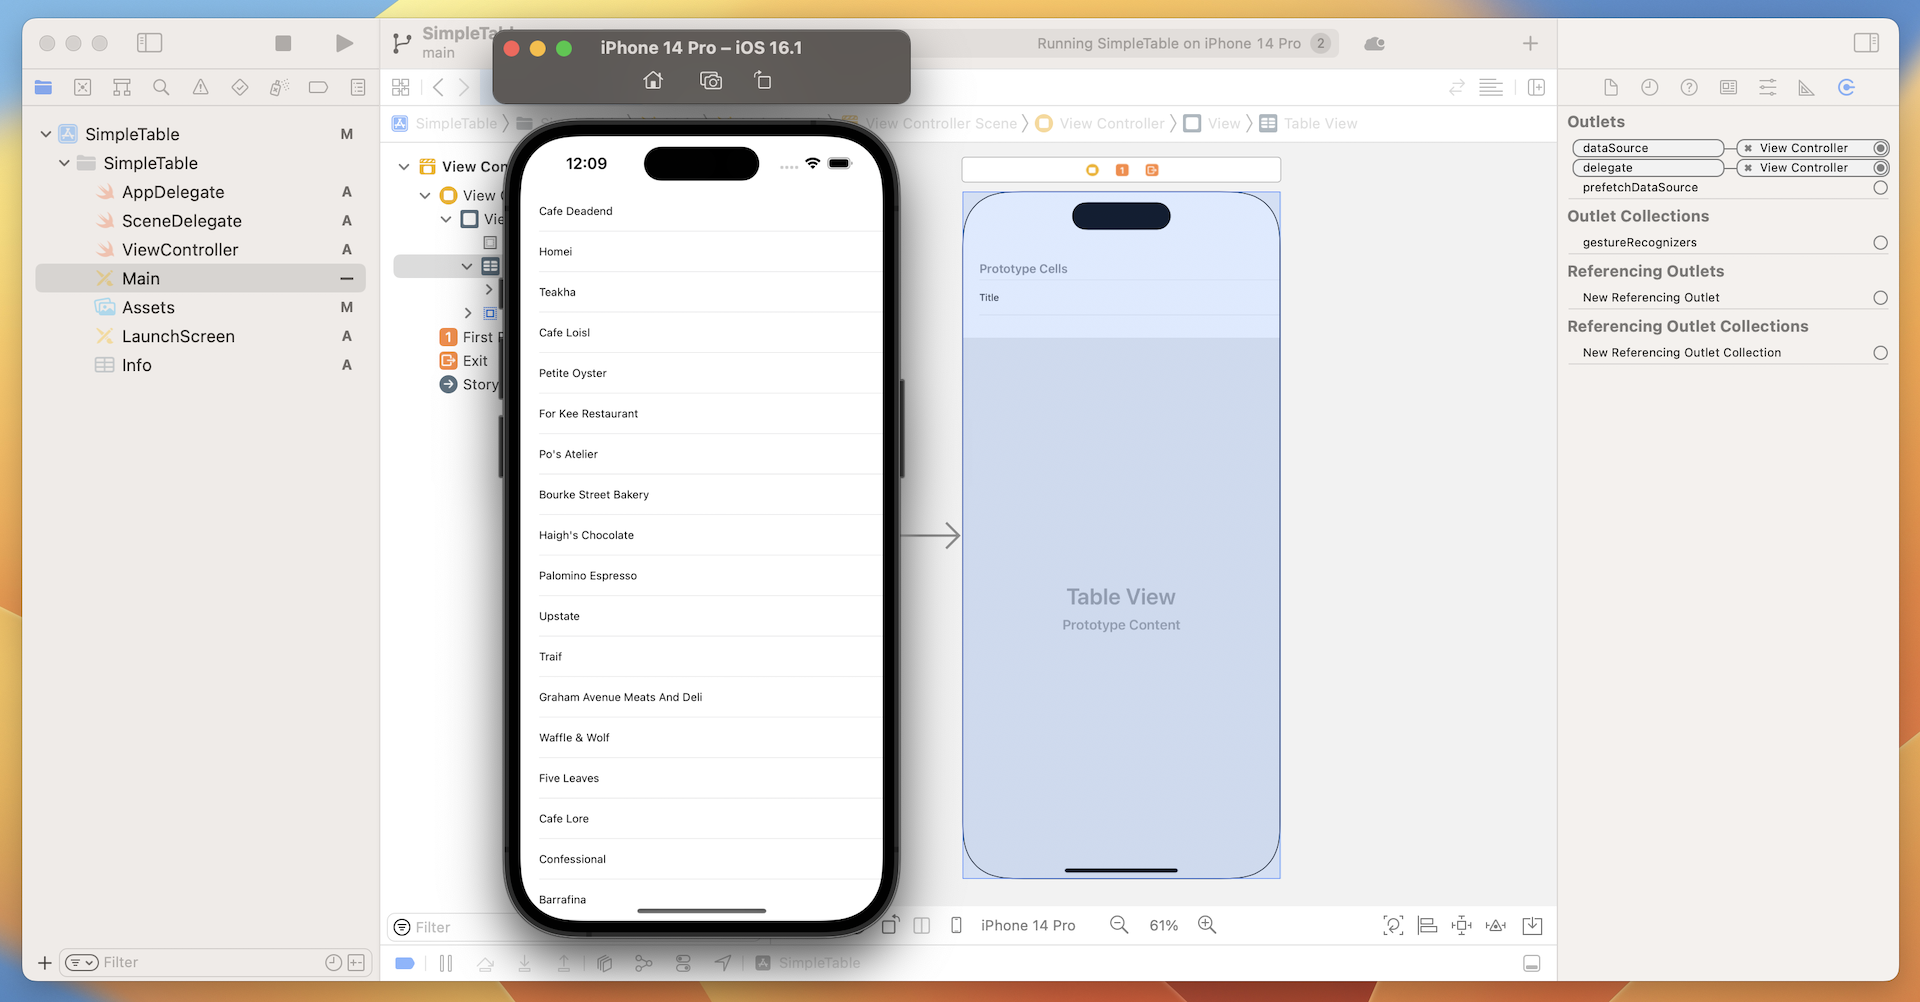
Quick tip: To scroll through the table in the iOS simulator, simply & hold on the table, drag it up and down to move it.
Add Thumbnail to Table View
Wouldn't it be great to add an image to each row? UITableView makes it extremely easy to do this. You just need to add a line of code to insert a thumbnail in each row.
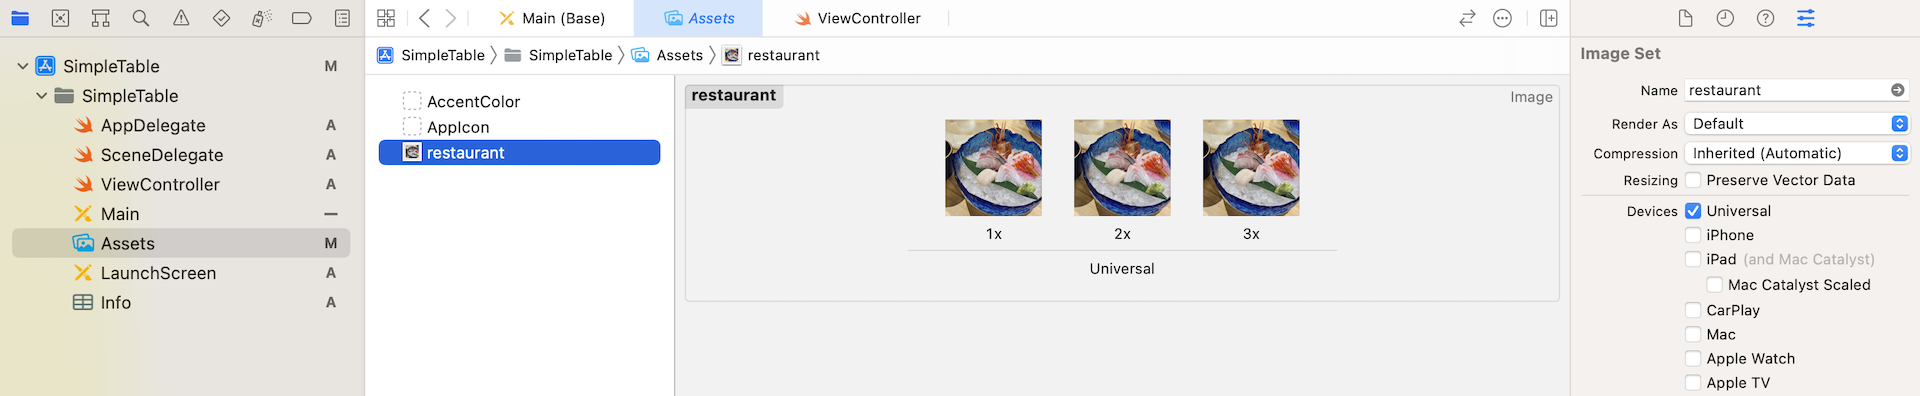
First, download the sample images from http://www.appcoda.com/resources/swift53/simpletable-images1.zip. The zipped archive contains three image files. Unzip the file, and drag the images from Finder to the asset catalog (Assets.xcassets).
Now edit ViewController.swift and add the following line of code in the tableView(_:cellForRowAtIndexPath:) method. Put it right before return cell:
cell.imageView?.image = UIImage(named: "restaurant")
After the changes, the method should look like this:
func tableView(_ tableView: UITableView, cellForRowAt indexPath: IndexPath) -> UITableViewCell {
    let cellIdentifier = "datacell"
    let cell = tableView.dequeueReusableCell(withIdentifier: cellIdentifier, for: indexPath)

    // Configure the cell...
    cell.textLabel?.text = restaurantNames[indexPath.row]
    cell.imageView?.image = UIImage(named: "restaurant")

    return cell
}
The UIImage class provided by the UIKit framework lets you create images from files. It supports various image formats such as PNG, PDF and JPEG. You can pass the name of the image (file extension is optional) and the class will load the image from the asset catalog.
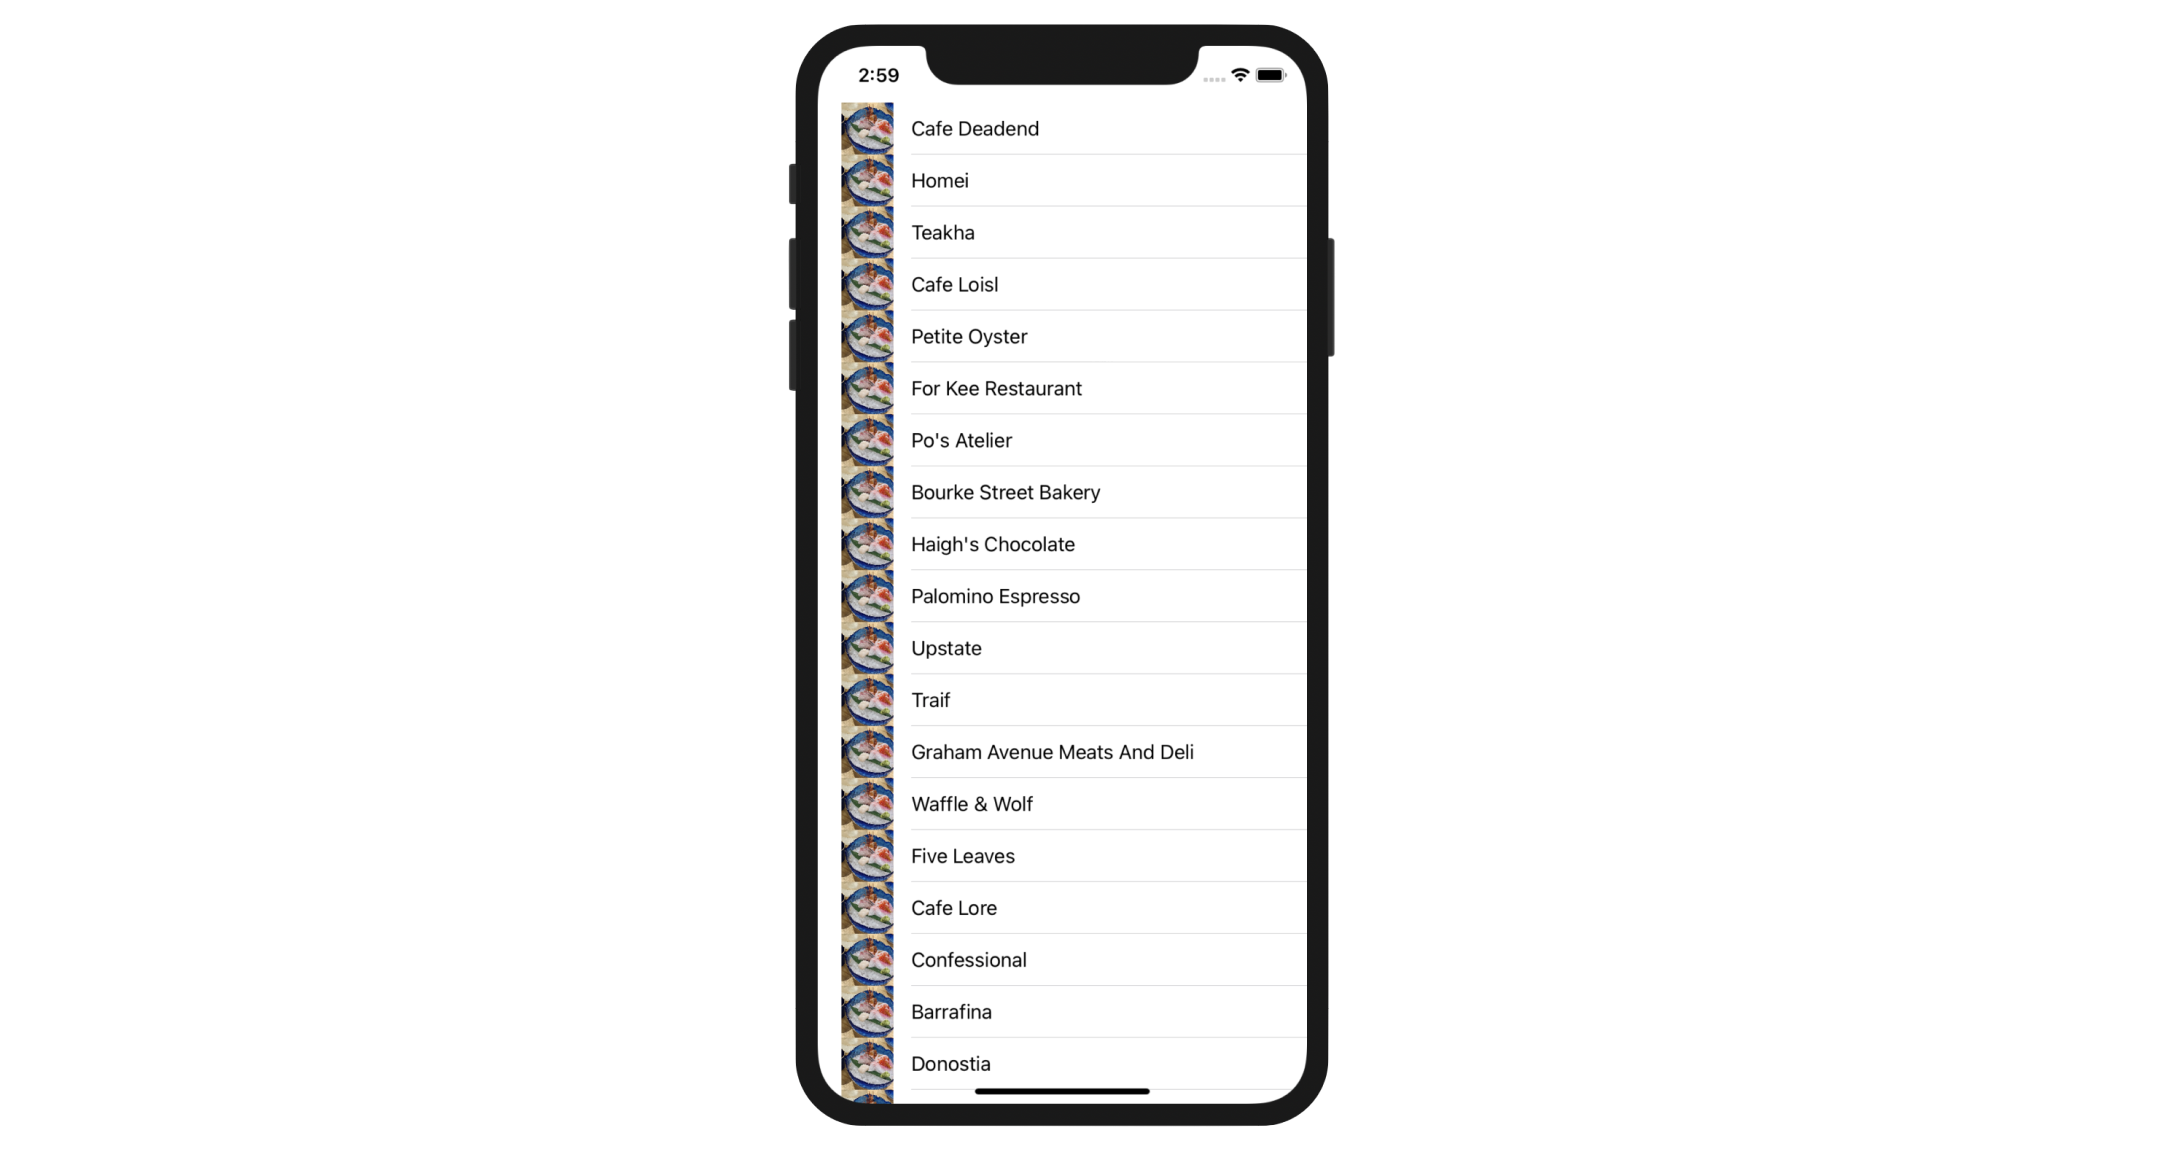
Earlier, we selected to use the Basic cell style for the table view cell. This type of cell style already comes with a default area for display images or thumbnails. This line of code instructs UITableView to load the image and display it in the image view of the table cell. Now, hit the "Run" button again and your SimpleTable app should display the image in each row.
Hide the Status Bar
The content of table view now overlaps with the status bar. This doesn't look good. An easy remedy is to hide the status bar. You can control the appearance of the status bar on a per view controller basis. If you don't want to show the status bar in a particular view controller, simply add the following lines of code before the last closing curly bracket (}):
override var prefersStatusBarHidden: Bool {
    return true
}
The prefersStatusBarHidden property indicates whether the view controller should hide the status bar. By default, the value is set to false. To hide the status, we have to override the default value and set it to true. Insert the code to the ViewController class and test the app again. You should have a full-screen table view without status bar.
Exercise #1
The demo app displays the same image for all table cells. Try to tweak the app such that it shows a different image in each cell (hint: Create another array for the images). You can download the image pack from http://www.appcoda.com/resources/swift4/simpletable-images-2.zip. Figure 8-19 shows the resulting screen.

Quick note: In case you do not know how to complete the exercise, no worries. I will go through it with you in the next chapter or you can download the solution at the end of the chapter.
Credit: The images used in this demo project are provided by unsplash.com.
Summary
Table view is one of the most commonly used elements in iOS programming. If you thoroughly understood the materials and built the app, you should have a good idea of how to create your own table view.
I tried to keep everything simple in the demo app. In a real world app, the table data is generally not 'hard-coded'. Usually, it's loaded from a file, database or somewhere else. We'll talk about that later. Meanwhile, make sure you thoroughly understand how the table view works. Otherwise, go back to the beginning and study the chapter again.
For reference, you can download the complete Xcode project from http://www.appcoda.com/resources/swift57/SimpleTable.zip.