- Made by AppCoda
- Contact us / Support
- Tweet this book
- Preface
- 1. The Development Tools, the Learning Approach, and the App Idea
- 2. Your First Taste of Swift with Playgrounds
- 3. Hello World! Build Your First App in Swift
- 4. Hello World App Explained
- 5. Introduction to Auto Layout
- 6. Designing UI Using Stack Views
- 7. Introduction to Prototyping
- 8. Creating a Simple Table-based App
- 9. Customize Table Views Using Prototype Cell, Diffable Data Source and Dark Mode
- 10. Displaying Alerts with UIAlertController and Handling Table View Selection
- 11. Object Oriented Programming, Project Organization and Code Documentation
- 12. Table Row Deletion, Custom Action Button and MVC
- 13. Introduction to Navigation Controller and Segue
- 14. Detail View Enhancement and Navigation Bar Customization
- 15. Navigation Bar Customization, Extensions and Dynamic Type
- 16. Working with Maps
- 17. Basic Animations, Visual Effects and Unwind Segues
- 18. Working with Static Table Views, Camera and NSLayoutConstraint
- 19. Working with Core Data
- 20. Search Bar and UISearchController
- 21. Building Walkthrough Screens with UIPageViewController and Container Views
- 22. Exploring Tab Bar Controller and Storyboard References
- 23. Getting Started with WKWebView and SFSafariViewController
- 24. Exploring CloudKit
- 25. Localizing Your App to Reach More Users
- 26. Deploying and Testing Your App on a Real iOS Device
- 27. Beta Testing with TestFlight and CloudKit Production Deployment
- 28. Submit Your App to App Store
- 29. Adopting 3D Touch, Haptic Touch and Context Menus
- 30. Developing User Notifications in iOS
- 31. Appendix - Swift Basics
- Published with GitBook
Chapter 19
Working with Core Data

Learn not to add too many features right away, and get the core idea built and tested.
– Leah Culver
Congratulations on making it this far! By now you've already built a simple app for users to list their favorite restaurants. If you've worked on the previous exercise, you should understand the fundamentals of how to add a restaurant; I've tried to keep things simple and focus on the basics of UITableView. Up to this point, all restaurants have been predefined in the source code and stored in an array. If you want to add a restaurant, the simplest way is to append the new restaurant to the existing restaurants array.
However, if you do it that way, you can't save the new restaurant permanently. Data stored in memory (e.g. array) is volatile. Once you quit the app, all the changes are gone. We need to find a way to save the data in a persistent manner.
To save the data permanently, we'll need to save in a persistent storage-like file or database. By saving the data to a database, for example, the data will be safe even if the app quits or crashes. Files are another way to save data, but they are more suitable for storing small amounts of data that do not require frequent changes. For instance, files are commonly used for storing application settings like the Info.plist file.
The FoodPin app may need to store thousands of restaurant records. Users may also add or remove the restaurant records quite frequently. In this case, a database is a suitable way to handle a large set of data. In this chapter, I will walk you through the Core Data framework and show you how to use it to manage data in the database. You will make a lot of changes to your existing FoodPin project, but after going through this chapter your app will allow users to save their favorite restaurants persistently.
If you haven't done the previous exercise, you can download this project's templates (http://www.appcoda.com/resources/swift57/FoodPinStaticTableView.zip) to start with.
What is Core Data?
When we talk about persistent data, you probably think of databases. If you are familiar with Oracle or MySQL, you know that a relational database stores data in the form of tables, rows, and columns; your app talks to the database by using a SQL (Structured Query Language) query. However, don't mix up Core Data with databases. Though the SQLite database is the default persistent store for Core Data on iOS, Core Data is not exactly a relational database - it is actually a framework that lets developers interact with databases (or other persistent storage) in an object-oriented way.
Note: If you have no idea of SQL and want to understand what it is, check out this simple tutorial (https://www.w3schools.com/sql/sql_intro.asp).
Take the FoodPin app as an example. If you want to save the data to a database, you are responsible for writing the code to connect to the database and retrieve or update the data using SQL. This would be a burden for developers, especially for those who do not know SQL.
Core Data provides a simpler way to save data to a persistent store of your choice. You can map the objects in your apps to the table in the database. Simply put, it allows you to manage records (select/insert/update/delete) in the database without even knowing any SQL.
Core Data Stack
Before we start working on the project, you need to first have a basic understanding of the Core Data Stack (see figure 19-1):
Managed Object Context – Think of it as a scratch pad or temporary memory area containing objects that interact with data in the persistent store. Its job is to manage objects created and returned using Core Data framework. Among the components in the Core Data stack, the managed object context, an instance of the
NSManagedObjectContextclass, is the one you'll work directly with most of the time. In general, whenever you need to fetch and save objects in the persistent store, the context is the first component you'll interact with.Managed Object Model – This describes the schema that you use in the app. If you have some background in databases, think of this as the database schema. However, the schema is represented by a collection of objects (also known as entities). For example, a collection of model objects can be used to represent the collection of restaurants in the FoodPin app. In Xcode, the managed object model is defined in a file with the extension
.xcdatamodeld. You can use the visual editor to define the entities and their attributes and relationships.Persistent Store Coordinator – As its name suggests, it is the coordinator of the Core Data stack. It sits between the managed object context and the persistent store. While the figure shows a single store, a Core Data application can have multiple stores. The persistent store coordinator, an instance of
NSPersistentStoreCoordinator, is the party responsible for managing different persistent object stores and saving the objects to the stores. You seldom interact with the persistent store coordinator directly when using Core Data.Persistent Store - This is the repository in which your data is actually stored. Usually, it's a database, and SQLite is the default database. But it can also be a binary or XML file.
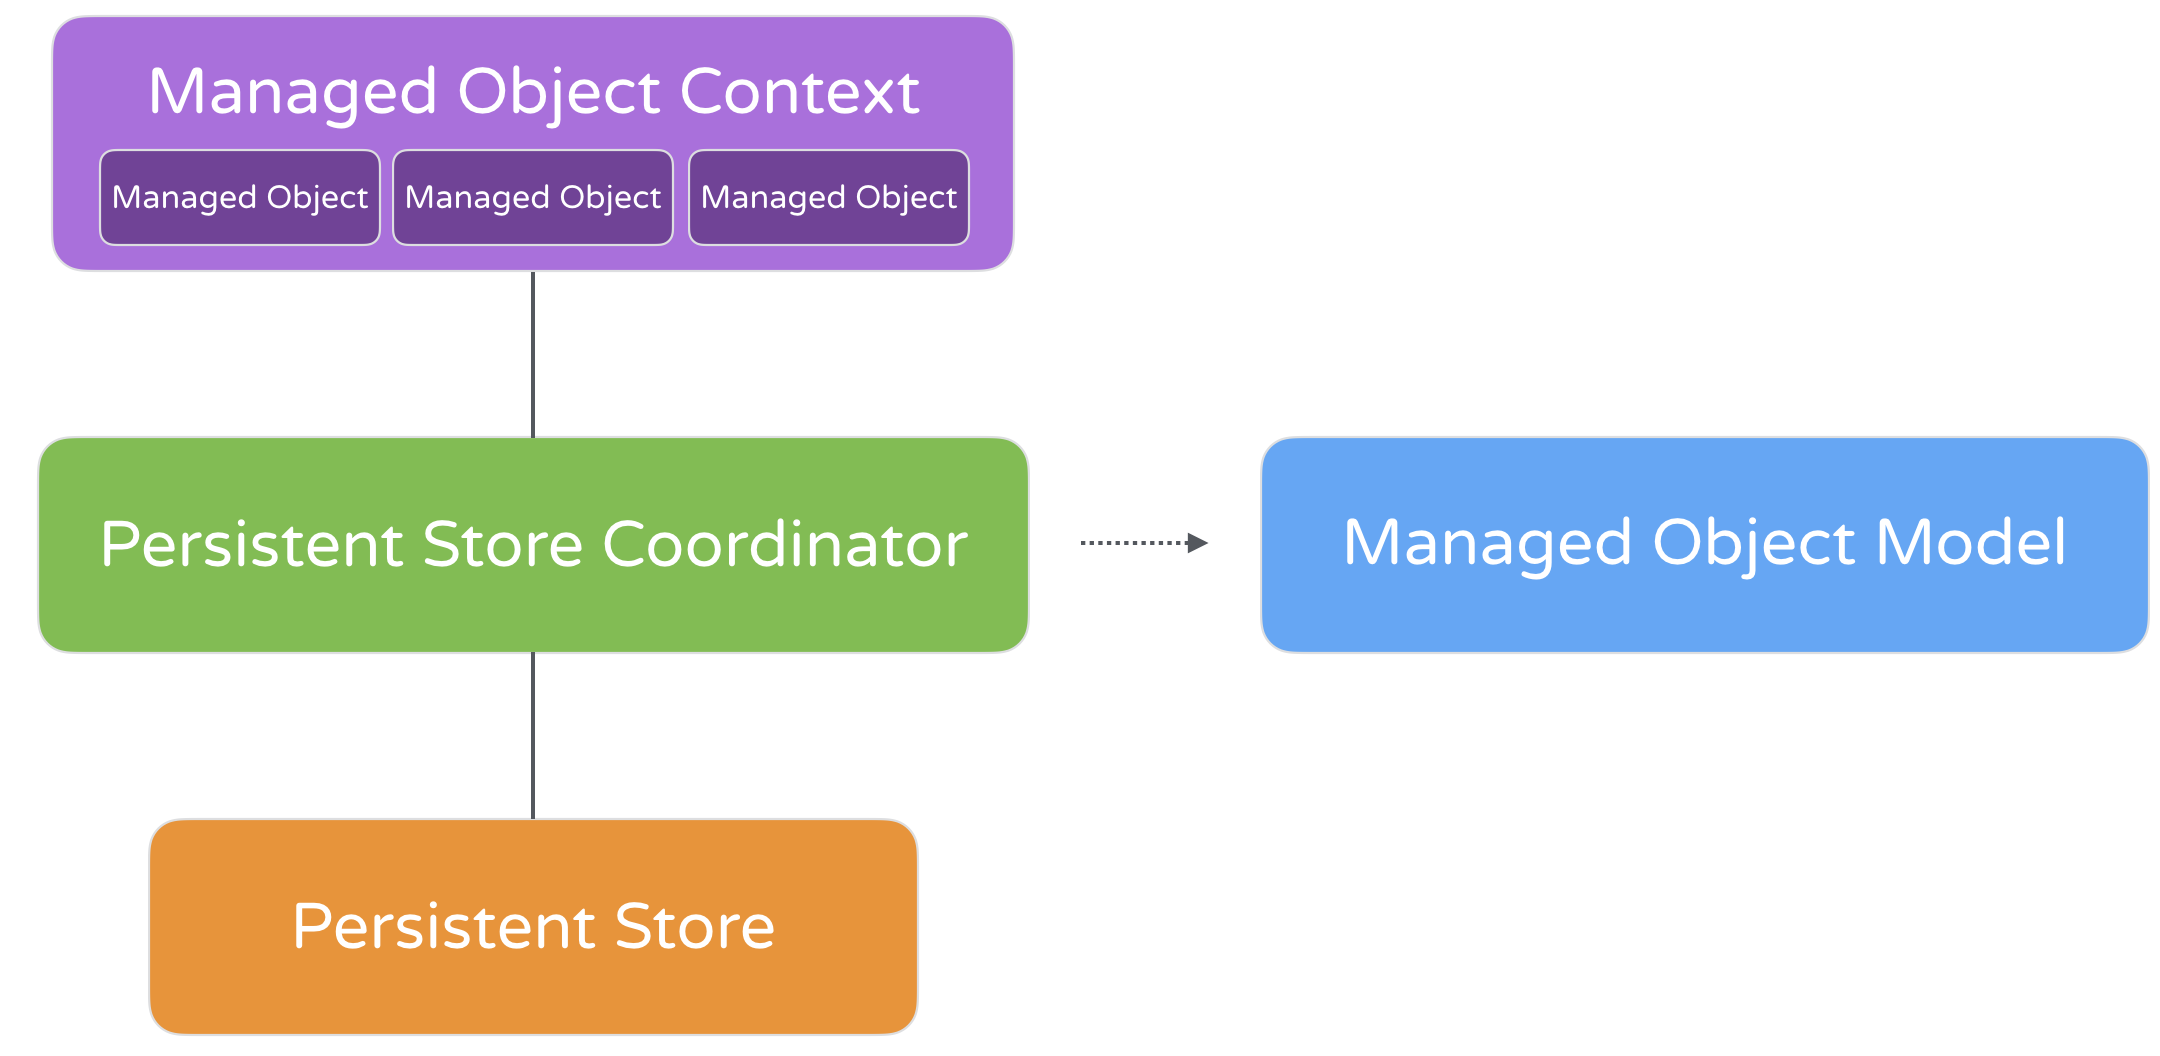
Figure 19-1. Core Data Stack
That looks complicated, right? Definitely. Apple's engineers were also aware of the issue. Starting from iOS 10, the team introduced a class called NSPersistentContainer to simplify the management of Core Data stack in your apps. NSPersistentContainer is the class you will deal with for saving and retrieving data.
Feeling confused? No worries. You will understand what I mean as we convert the FoodPin app from arrays to Core Data.
Using Core Data Template
The simplest way to use Core Data is to enable the Core Data option during project creation. Xcode will generate the required code in AppDelegate.swift and create the data model file for Core Data.
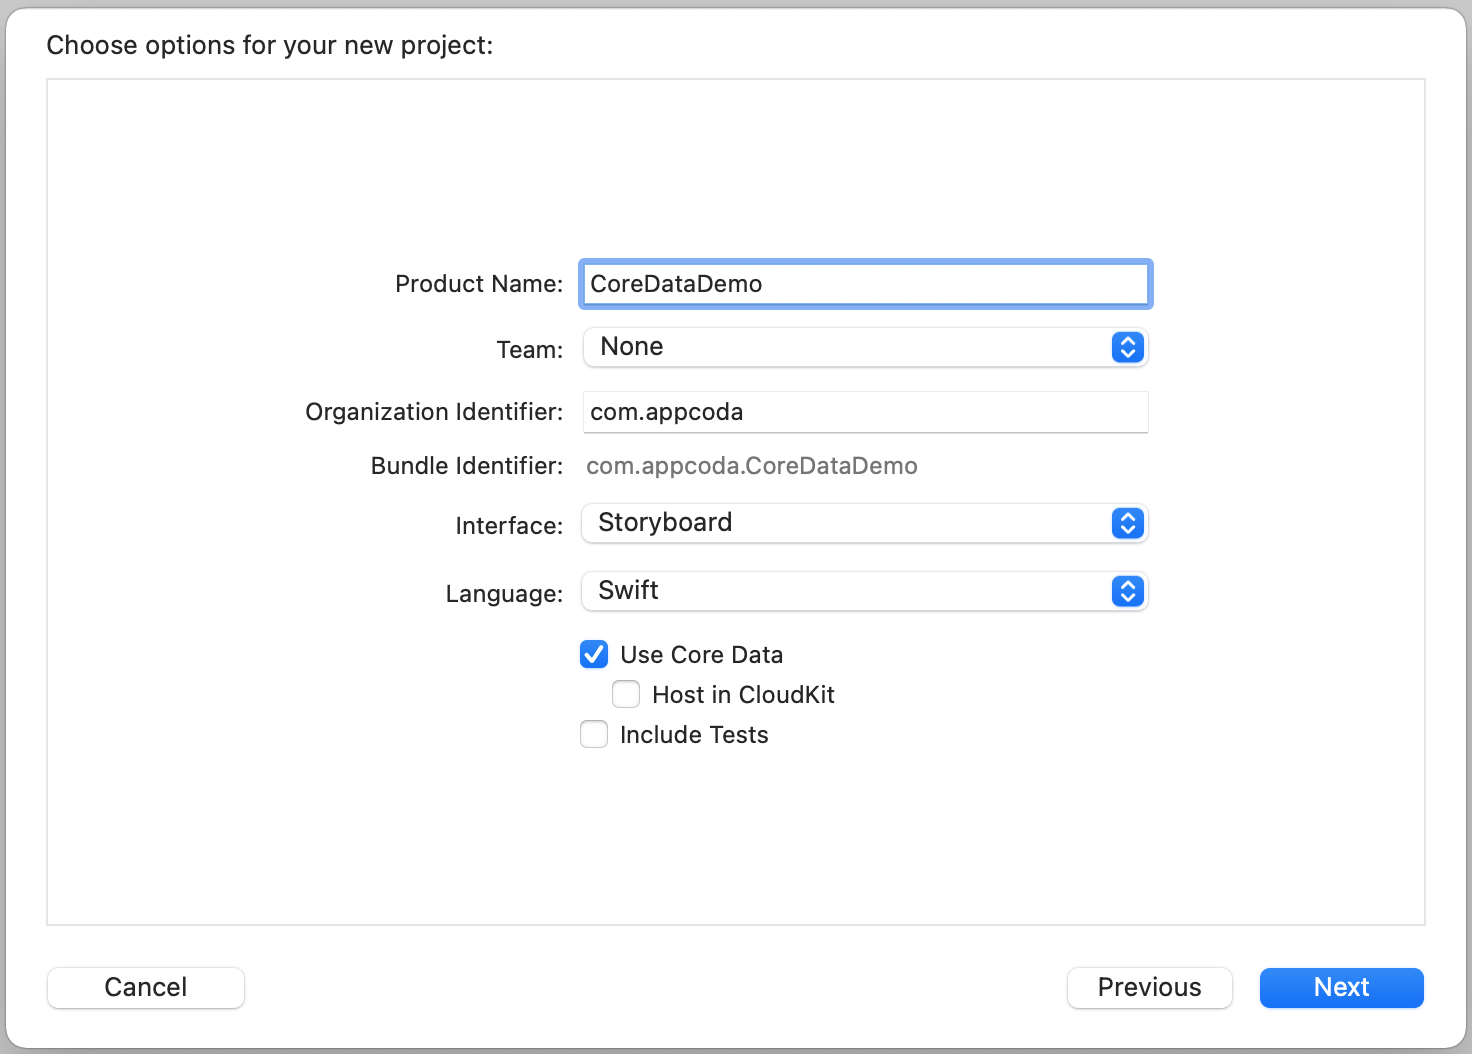
If you create a CoreDataDemo project with Core Data option enabled, you will see the following variables and method generated in the AppDelegate class:
// MARK: - Core Data stack

lazy var persistentContainer: NSPersistentContainer = {
    /*
     The persistent container for the application. This implementation
     creates and returns a container, having loaded the store for the
     application to it. This property is optional since there are legitimate
     error conditions that could cause the creation of the store to fail.
    */
    let container = NSPersistentContainer(name: "CoreDataDemo")
    container.loadPersistentStores(completionHandler: { (storeDescription, error) in
        if let error = error as NSError? {
            // Replace this implementation with code to handle the error appropriately.
            // fatalError() causes the application to generate a crash log and terminate. You should not use this function in a shipping application, although it may be useful during development.

            /*
             Typical reasons for an error here include:
             * The parent directory does not exist, cannot be created, or disallows writing.
             * The persistent store is not accessible, due to permissions or data protection when the device is locked.
             * The device is out of space.
             * The store could not be migrated to the current model version.
             Check the error message to determine what the actual problem was.
             */
            fatalError("Unresolved error \(error), \(error.userInfo)")
        }
    })
    return container
}()

// MARK: - Core Data Saving support

func saveContext () {
    let context = persistentContainer.viewContext
    if context.hasChanges {
        do {
            try context.save()
        } catch {
            // Replace this implementation with code to handle the error appropriately.
            // fatalError() causes the application to generate a crash log and terminate. You should not use this function in a shipping application, although it may be useful during development.
            let nserror = error as NSError
            fatalError("Unresolved error \(nserror), \(nserror.userInfo)")
        }
    }
}
The generated code provides a variable and a method:
- The variable
persistentContaineris an instance ofNSPersistentContainer, which was initialized with a persistent store named "CoreDataDemo". This container encapsulates the Core Data stack in your application. Before iOS 10, you will need to create and manage the creation of the managed object model (NSManagedObjectModel), persistent store coordinator (NSPersistentStoreCoordinator), and the managed object context (NSManagedObjectContext). The introduction ofNSPersistentContainersimplifies all that. Later, you just use this variable to interact with the Core Data stack. - The
saveContext()method is a helper that provides data saving. When you need to insert/update/delete data in the persistent store, you will call this method.
The question is how we can use this code template in our existing Xcode project. You can simply copy and paste the code into the AppDelegate.swift file of your Food Pin project, but you will need to make a minor change.
let container = NSPersistentContainer(name: "CoreDataDemo")
The original code template was generated for the CoreDataDemo project. Xcode names the SQLite and data model file using the project name. For the FoodPin project, we use the name FoodPin instead. So change the above line of code to the following:
let container = NSPersistentContainer(name: "FoodPin")
Finally, add the import statement at the beginning of the AppDelegate class to import the Core Data framework:
import CoreData
Quick note: For reference, you can also download this project template (http://www.appcoda.com/resources/swift57/FoodPinCoreDataStarter.zip)
Creating the Data Model
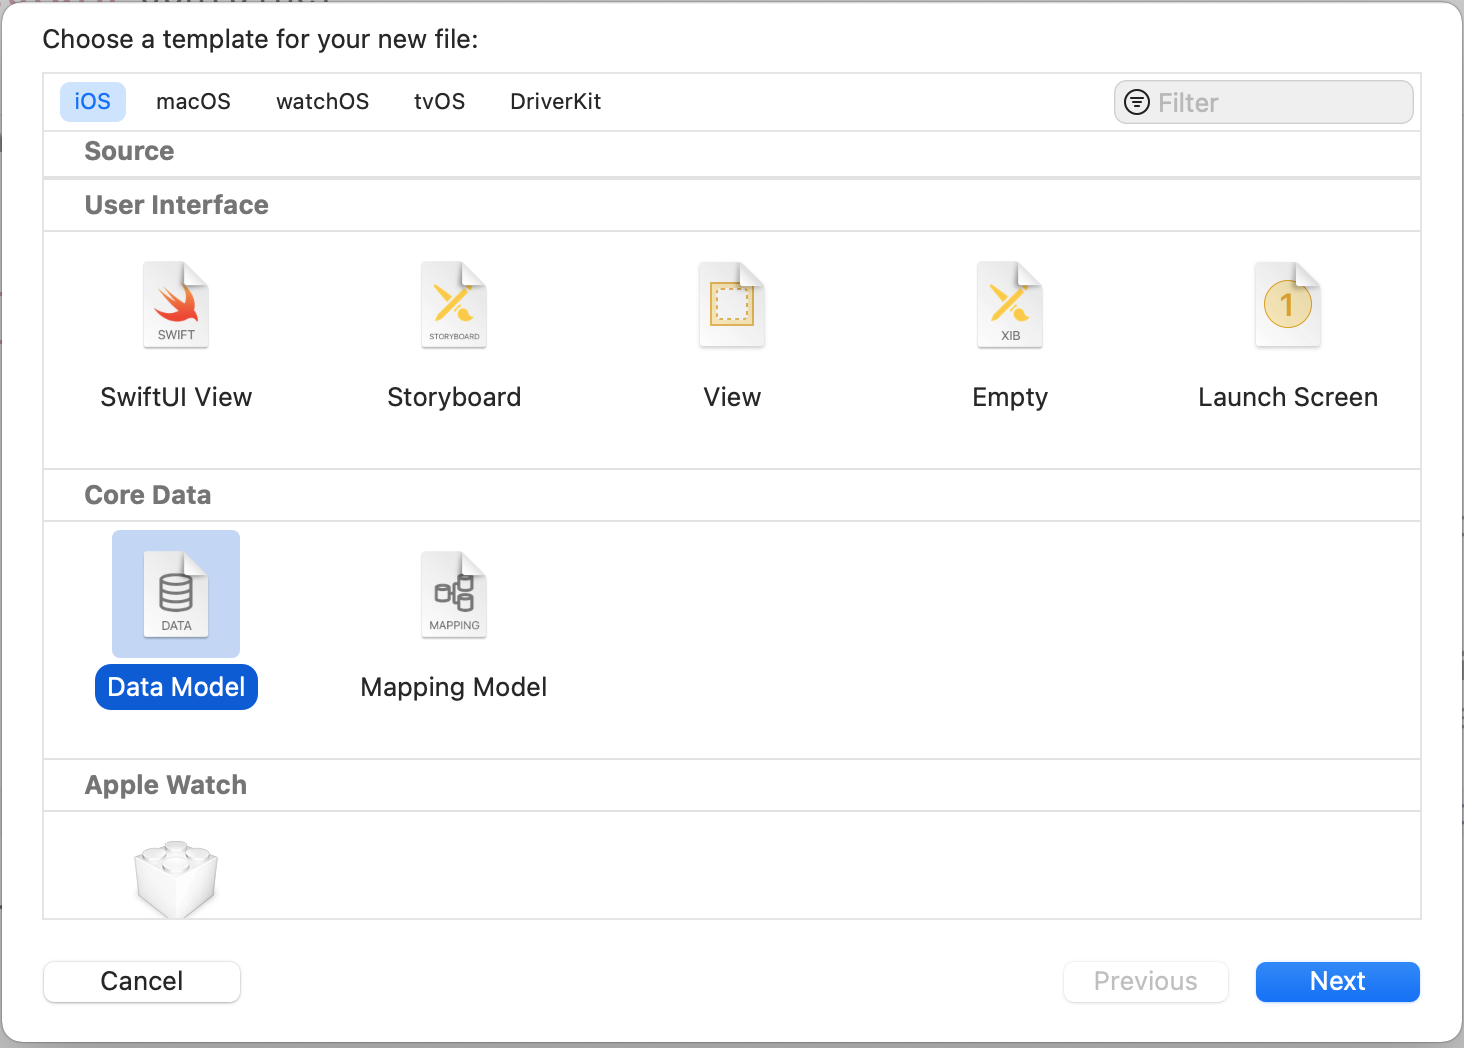
Now that you've prepared the code for accessing the Core Data stack, let's move on to the creation of the data model. Every Core Data application has a data model that describes the structure of the stored data. In the project navigator, right-click the FoodPin folder and select New File.... Scroll down to the Core Data section and select Data Model.
Name the model FoodPin and click Create to create the data model. Once created, you should find a file named FoodPin.xcdatamodeld in the project navigator. Select it to open the data model editor. From here, you can create entities for your data model.
Since we would like to store the Restaurant object in the database, we will create a Restaurant entity that matches the Restaurant struct in our code. To create an entity, click the Add Entity button at the bottom of the editor pane and name the entity Restaurant.
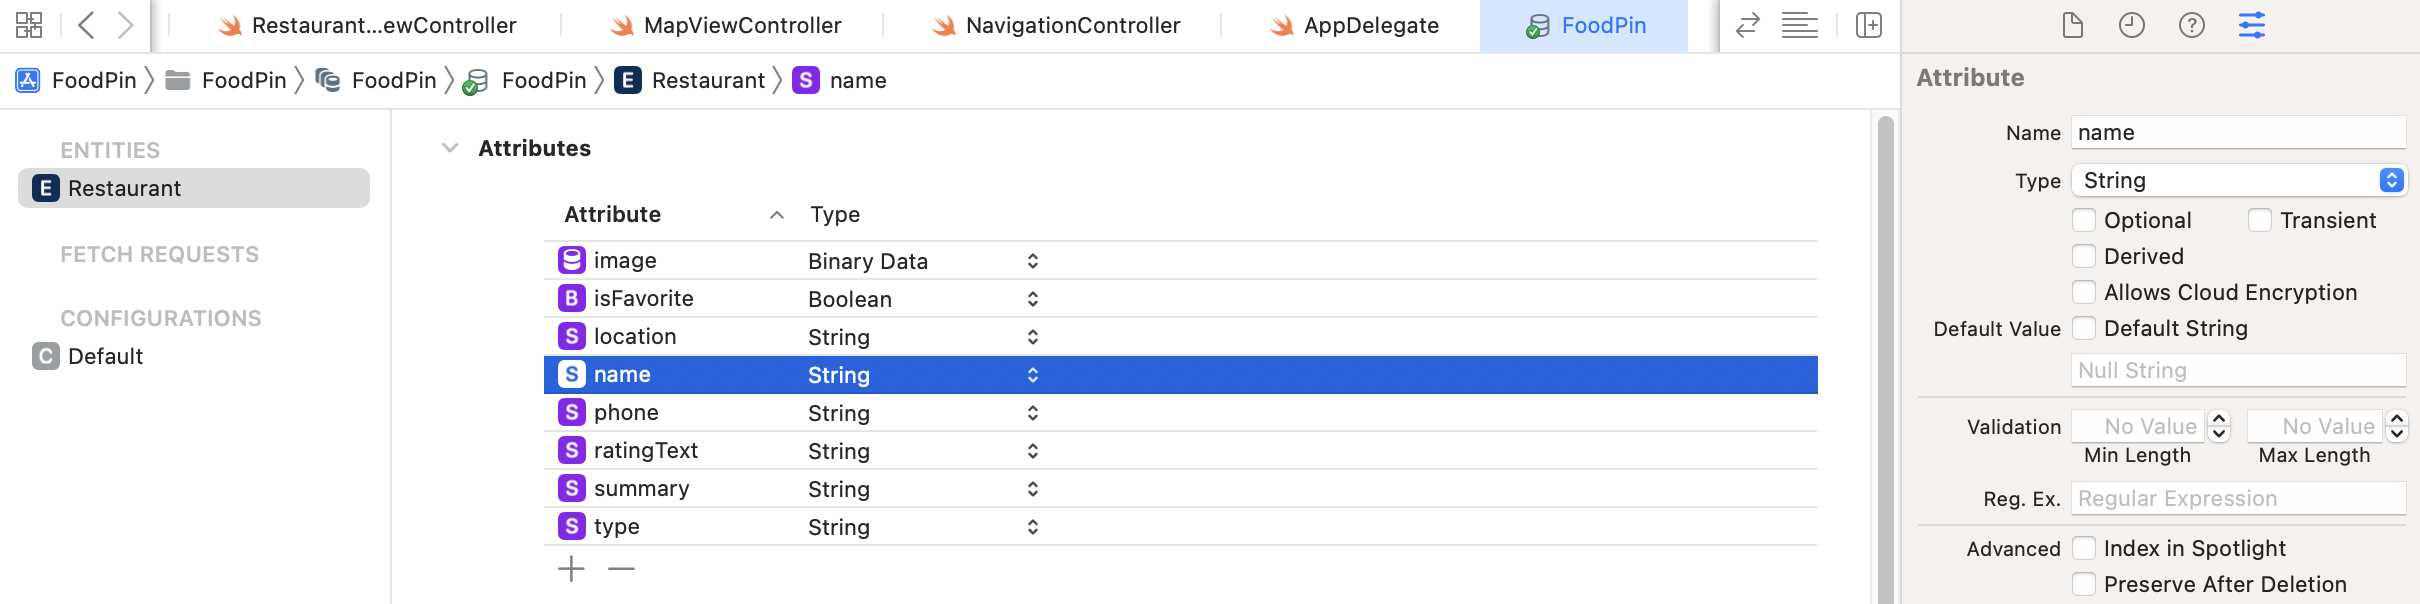
In order to save the data of the Restaurant object to the database, we have to add several attributes for the entity that align with the attributes of the object. Simply click the + button under the attributes section to create a new attribute. Add eight attributes for the Restaurant entity including name, type, location, phone, summary, image, isFavorite, and ratingText. Refer to figure 19-4 for details.
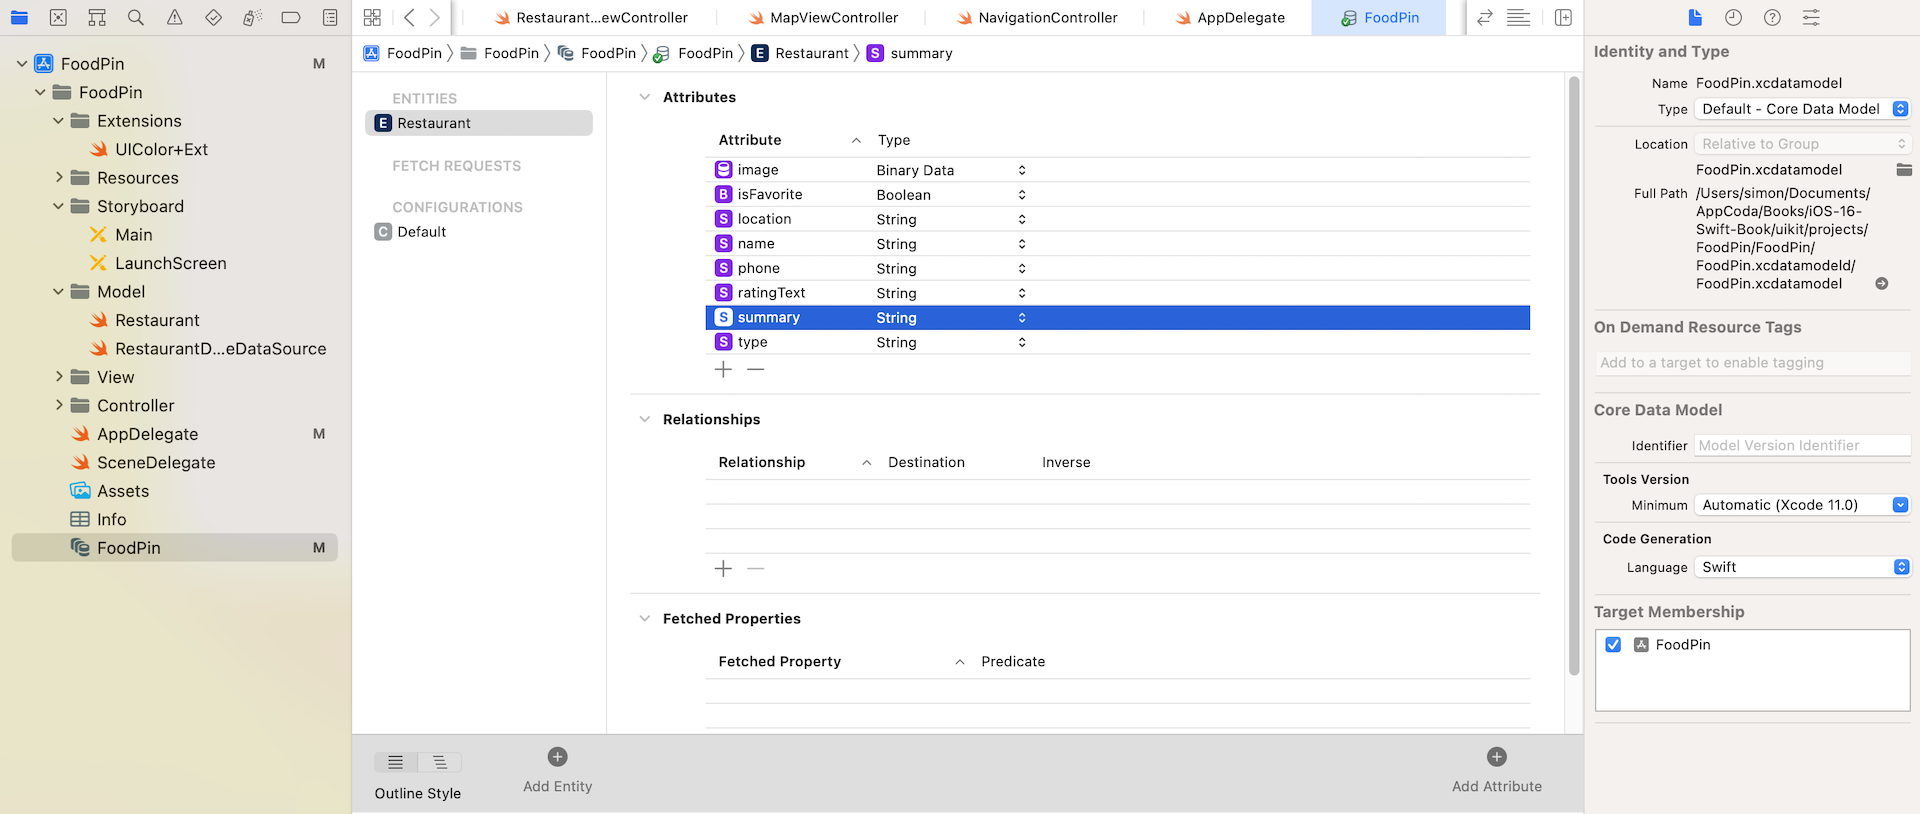
You may wonder why we use the attribute name summary instead of description. If you've tried to use the name description, you will encounter an error saying that the name description is reserved. This is why we couldn't use it and had to replace it with summary.
The attribute types of name, type, location, phone, isFavorite, summary, and ratingText are trivial, but why do we set the attribute type of image to Binary Data?
Presently, the restaurant images are bundled in the app and managed by the asset catalog. This is why we can load an image by passing UIImage with the image name. When a user creates a new restaurant, the image is loaded from an external source, whether it's from the built-in photo library or taken from a camera. In this case, we can't just store the file name. Instead, we save the actual data of the image into the database. Binary data type is used for this purpose.
You may have another question about the ratingText attribute. Why do we name it ratingText instead of rating? If you refer to the Restaurant.swift file again, the rating variable is of the type Rating, which is an enum. Each case has a default text value (e.g. awesome). This is why we name the attribute ratingText to store the text value.
If you select a particular attribute, you can further configure its properties in the Data Model inspector. For example, the name attribute is a required attribute. You can uncheck the Optional checkbox to make it mandatory. For the FoodPin project, you can configure all attributes (except rating) as required.
Creating Managed Objects
To use Core Data, the very first step is to create the data model, which you've already done. The next step is to create the managed objects. Model objects that tie into in the Core Data framework are known as managed objects, which are at the heart of any Core Data application.
For the FoodPin project, you can manually convert the Restaurant struct to a managed object class. From Xcode 8 and onwards, however, you can let the development tool do the work for you. By referencing the entity model, Xcode can automatically generate the managed object class for you.
Note: You're probably wondering why we have to create a managed object class. Do you remember the relationship between outlet variables and UI objects in Interface Builder? By updating the value of outlets, we can modify the content of UI objects. Here, the managed objects are very similar to outlet variables. You can modify the entity's content by updating the managed object.
Now select the Restaurant entity and go to the Data Model inspector. You should see the Class section. The default Codegen option is set to Class Definition. This means Xcode will generate the model class for you when you build the project. If you choose this option, you won't be able to find or modify the class file. It is suitable for simple projects that the class doesn't need further modifications
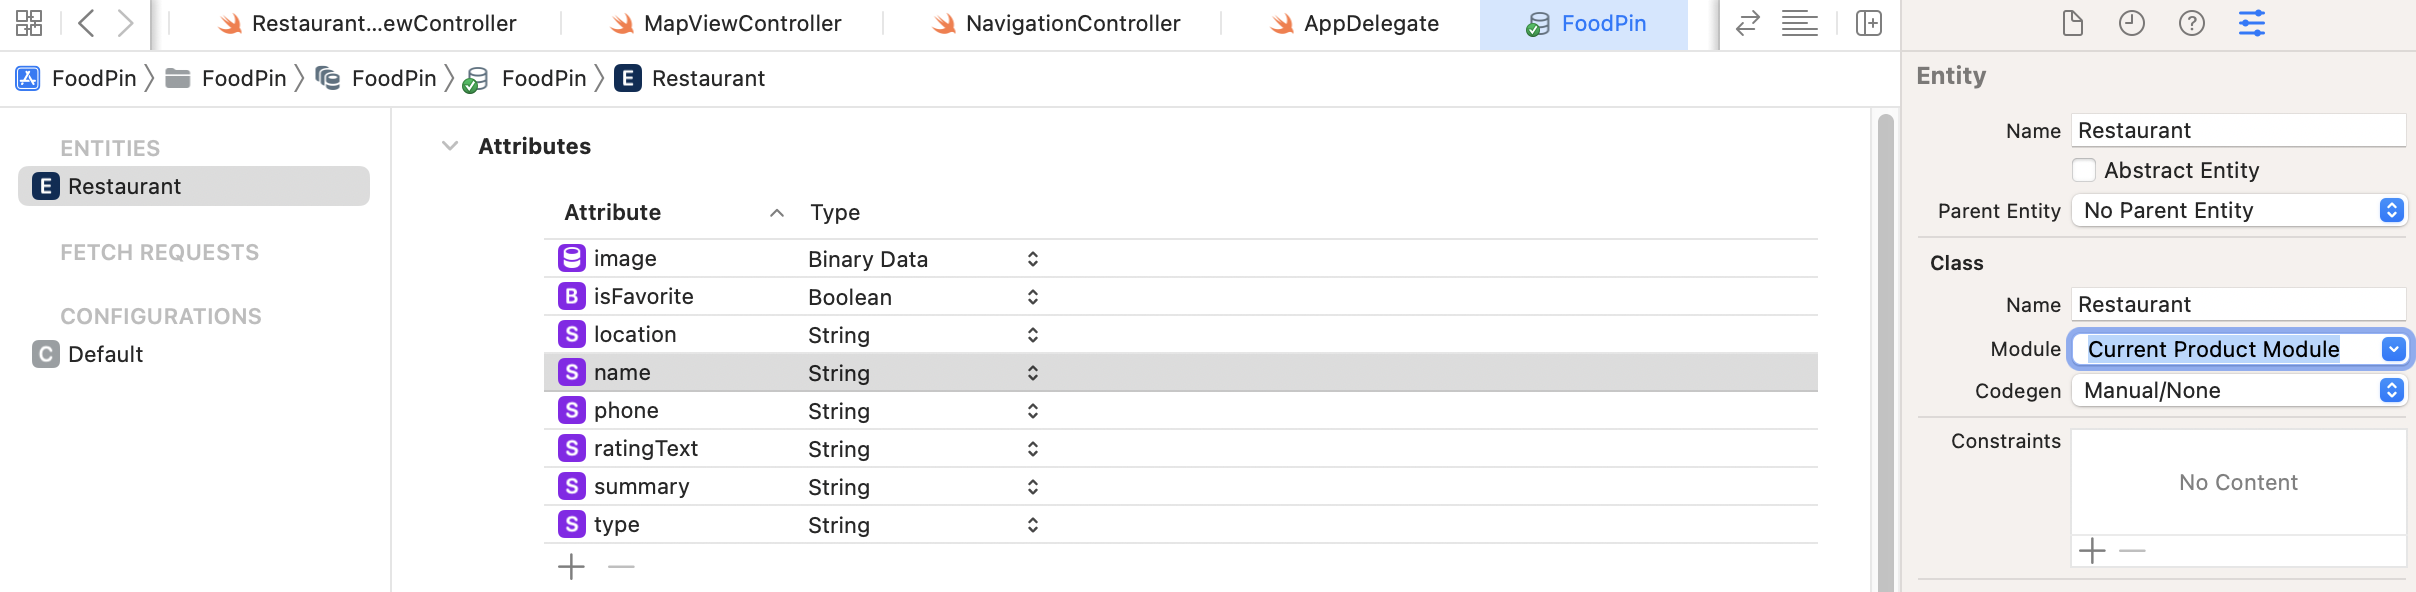
For this project, we will use the manual option because we need to customize the model class to handle the restaurant rating. In the Class section, set the class name to Restaurant, module to Current Product Module, and the Codegen option to Manual/None.
The name of the class is the same as the Restaurant struct. We will convert it to a model class for Core Data. Open Restaurant.swift and replace the file content like this:
import CoreData

public class Restaurant: NSManagedObject {
    @nonobjc public class func fetchRequest() -> NSFetchRequest<Restaurant> {
        return NSFetchRequest<Restaurant>(entityName: "Restaurant")
    }

    @NSManaged public var name: String
    @NSManaged public var type: String
    @NSManaged public var location: String
    @NSManaged public var phone: String
    @NSManaged public var summary: String
    @NSManaged public var image: Data
    @NSManaged public var ratingText: String?
    @NSManaged public var isFavorite: Bool

}
The model class of Core Data should be inherited from NSManagedObject. Each property is annotated with @NSManaged and corresponds to the attribute of the Core Data model we created earlier. By using @NSManaged, this tells the compiler that the property is taken care by Core Data. In the code, we also create a method called fetchRequest(). This will be used to retrieve the restaurant data from database.
If you used the Class Definition option of Codegen, this code above will be generated by Xcode. But it is not hard to create it manually.
We haven't finished the implementation yet. In the original Restaurant struct, it had a property called rating and an enum called Rating for holding the restaurant rating. The property should be migrated to the new Restaurant class. To do that, we will create an extension like this:
extension Restaurant {

    enum Rating: String {
        case awesome
        case good
        case okay
        case bad
        case terrible

        var image: String {
            switch self {
            case .awesome: return "love"
            case .good: return "cool"
            case .okay: return "happy"
            case .bad: return "sad"
            case .terrible: return "angry"
            }
        }
    }

    var rating: Rating? {
        get {
            guard let ratingText = ratingText else {
                return nil
            }

            return Rating(rawValue: ratingText)
        }

        set {
            self.ratingText = newValue?.rawValue
        }
    }
}
The Rating enum is exactly the same as before. For the rating property, it is now a computed property that handles the conversion of the rating text. Up till now, all our code uses the Rating enum to process the restaurant rating. Now, due to Core Data, we store the rating as text. We need to have a way to bridge between rating and ratingText. This is why we created the rating property as a computed property. For the getter, we convert the ratingText back to an enum. For the setter, we retrieve the raw value of the enum and assign it to ratingText.
Using the Managed Object
Now that we've prepared the data model and model class, let's start to convert the existing code to support Core Data. To begin, open the RestaurantTableViewController.swift file. We no longer need to initialize the restaurants array with default values as we will pull the data from the database. Therefore, declare the restaurants object like this:
var restaurants: [Restaurant] = []
Once you make the change, you will see quite a couple of errors in RestaurantTableViewController. You can review the issues of your project in the Issue navigator.
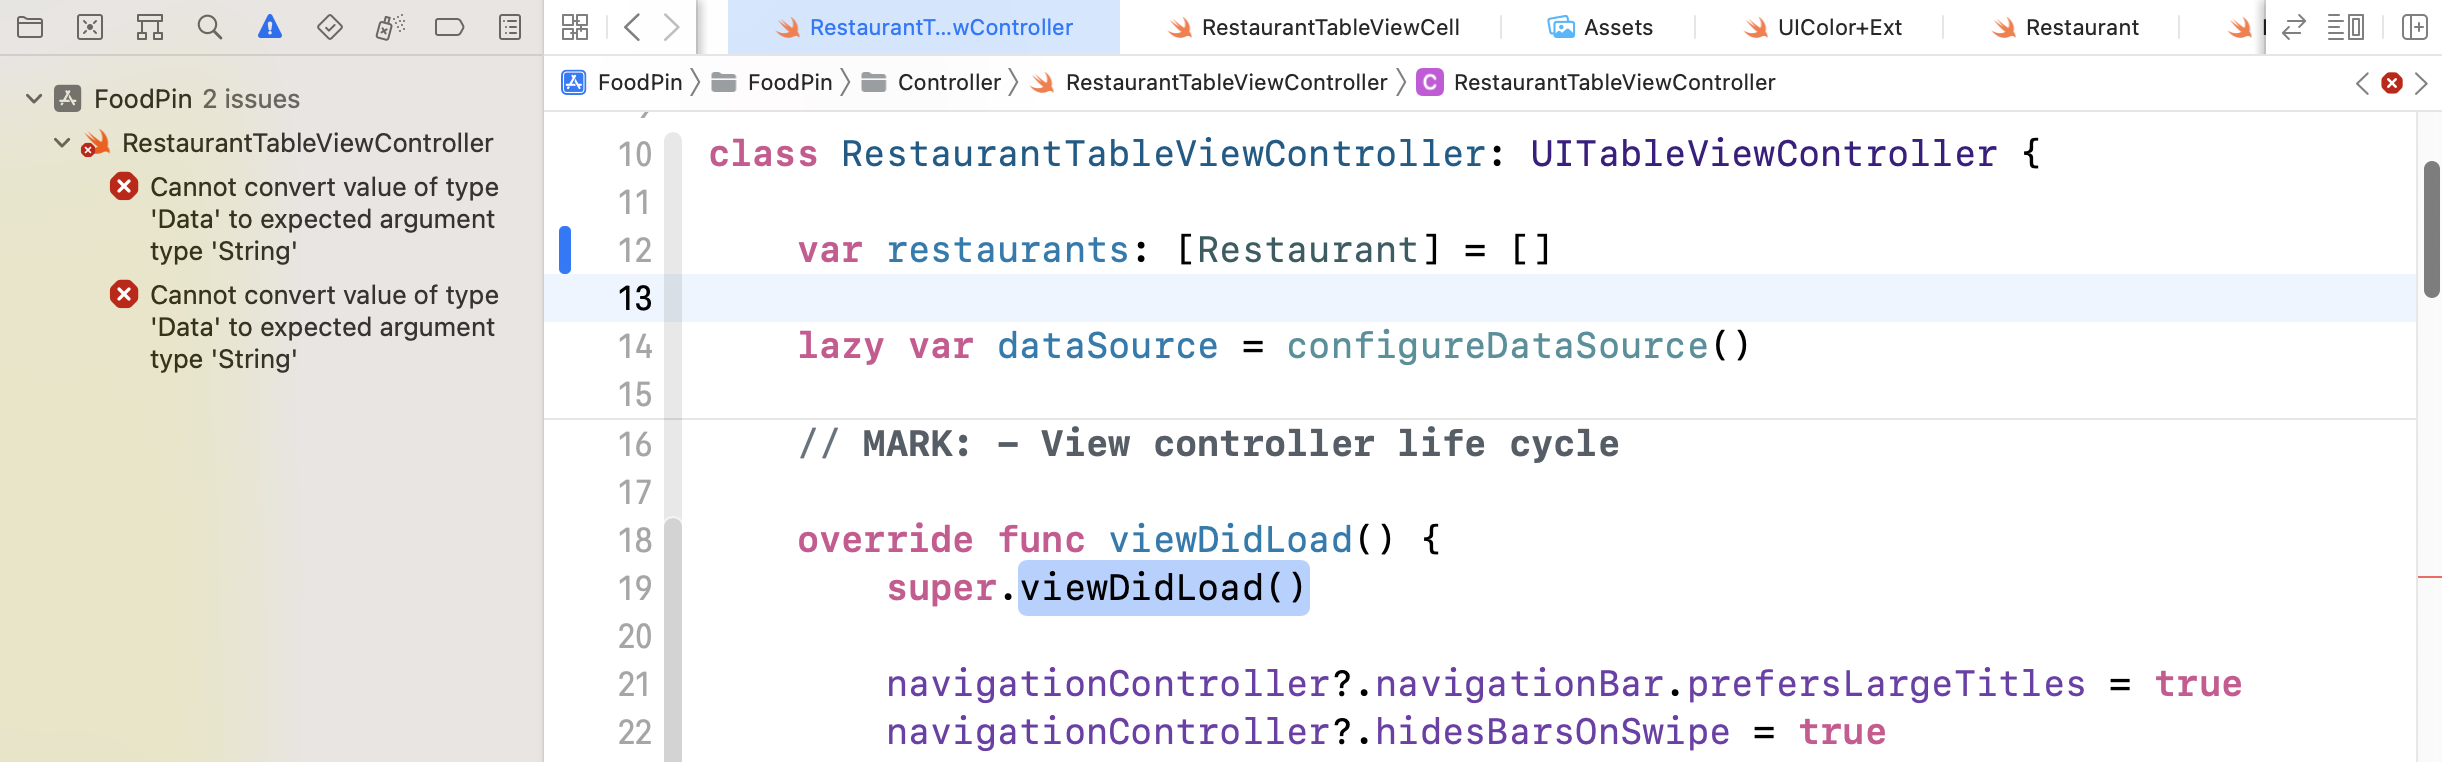
Basically, both errors are related to the image property of the Restaurant class. Before the change, the image property is of the type String. With Core Data, the image is now stored as a Data object. This is why Xcode issues those errors.
Let's fix them one by one. First, it is the configureDataSource method of RestaurantTableViewController. Xcode issues an error for the following line of code:
cell.thumbnailImageView.image = UIImage(named: restaurant.image)
To load the image, instead of passing the image through the named parameter, we now initialize the UIImage object using the data parameter. Replace the line of code with the following:
cell.thumbnailImageView.image = UIImage(data: restaurant.image)
This will fix the error. The same applies to imageToShare in tableView(_:trailingSwipeActionsConfigurationForRowAt:). Replace that line of code with the following:
if let imageToShare = UIImage(data: restaurant.image) {
Next, let's move onto RestaurantDetailViewController.swift. Similarly, you will see some errors related to the change of the image property of Restaurant. In the viewDidLoad() method, initialize the restaurant image using data instead of name:
headerView.headerImageView.image = UIImage(data: restaurant.image)
Next, it's the ReviewViewController class. In the viewDidLoad() method, change the UIImage initialization using data:
backgroundImageView.image = UIImage(data: restaurant.image)
After all the modifications, you should be able to run the app and see a blank table. I encourage you to fix the errors on your own. But for reference, you can download the Xcode project from http://www.appcoda.com/resources/swift57/FoodPinCoreDataStarter2.zip.
Handling Empty Table Views
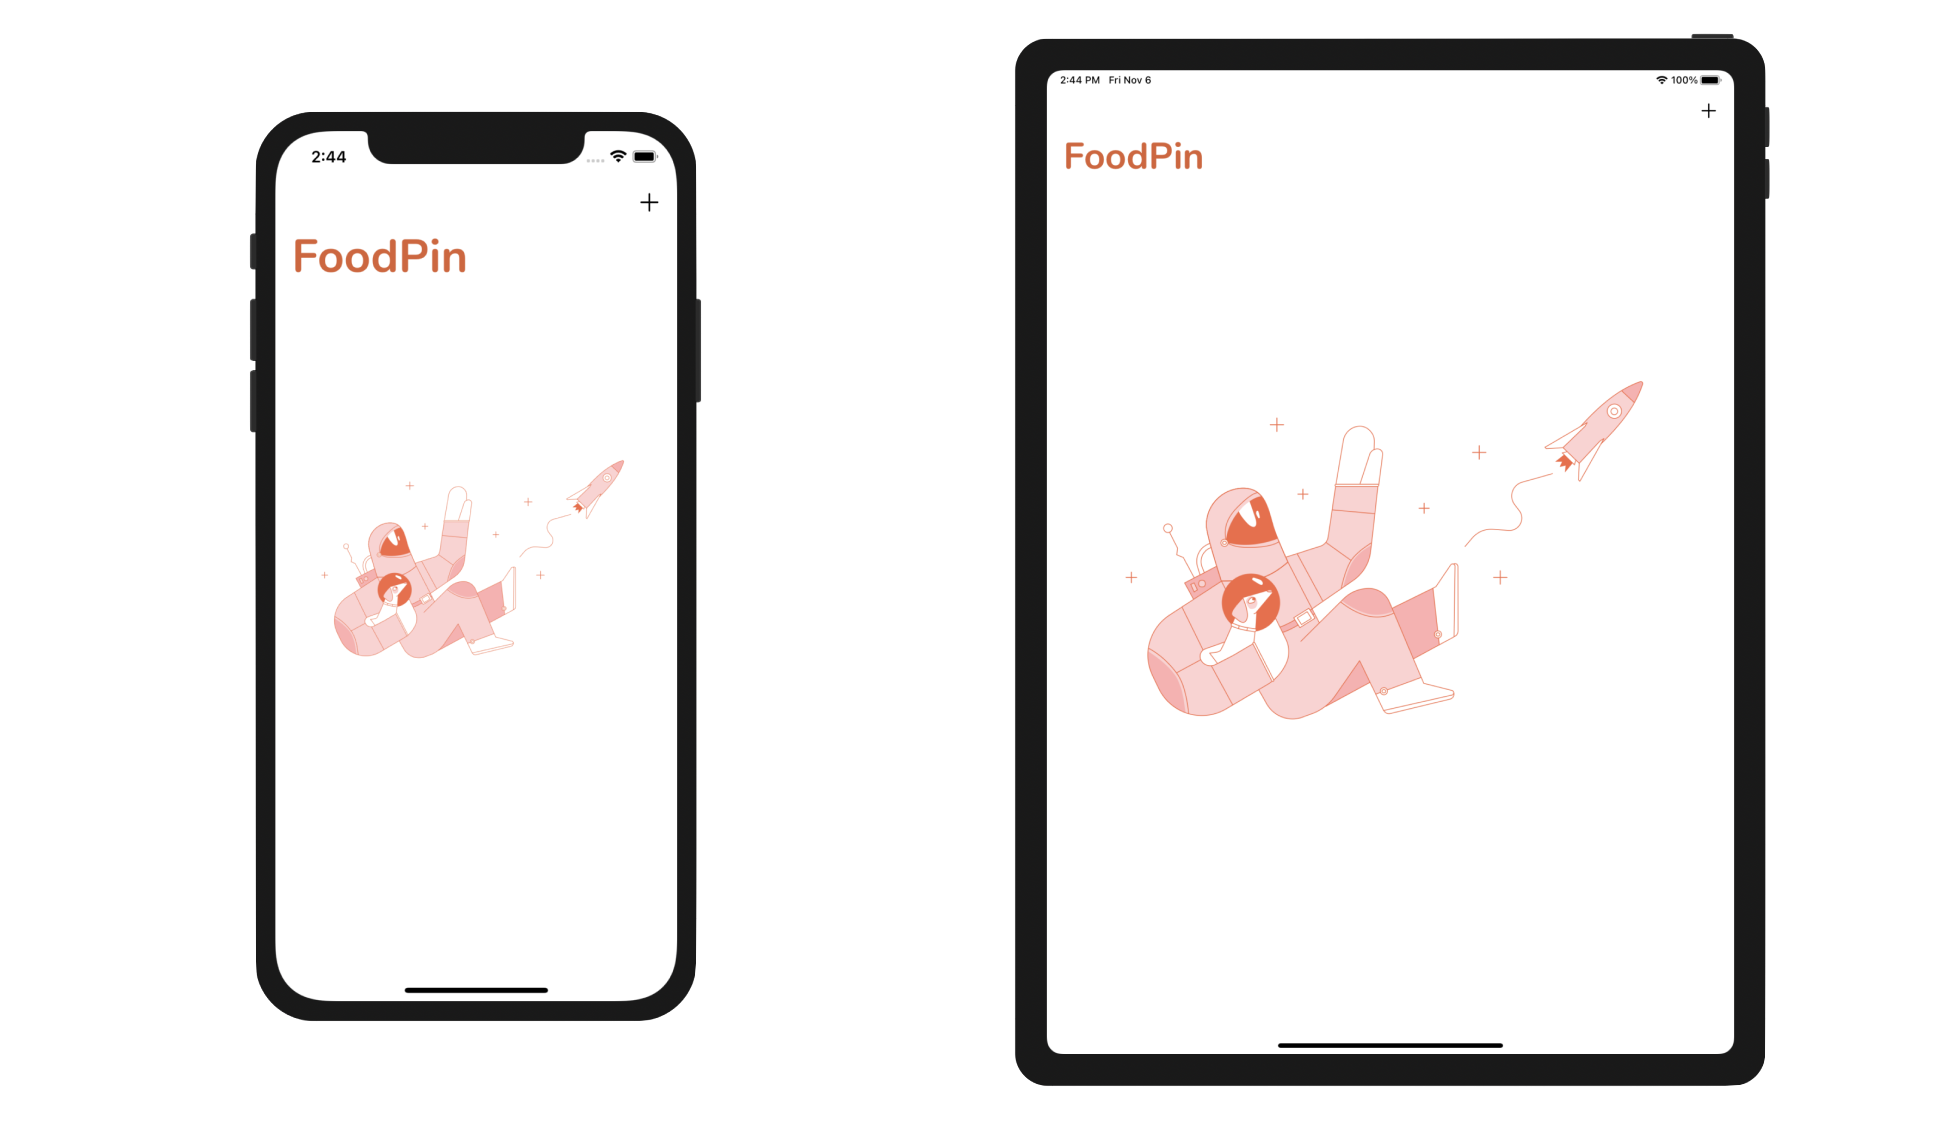
Before we continue to discuss how to work with Core Data, let me sidetrack a bit to talk about empty table views. Now that you should see a blank table when running the app, wouldn't it be great if it can show users some instructions like the screen shown in figure 19-9?
The general idea of an empty view is to provide users with more information so that they know where to begin. It is not very difficult to implement an empty view. UITableView has a backgroundView property that allows developers to assign a view to it. We will make use of the property to display our empty view. Of course, we need to perform some checking and display the empty view only if there is no restaurant data.
I have already designed an image for the empty view. You can download it from http://www.appcoda.com/resources/swift53/emptydata.zip. Unzip the file and add the image to the asset catalog (Assets.xcasset). Make sure you enable the Preserve Vector Data option for the image.
Now open the Main storyboard. Interface Builder has a feature that allows you to embed an extra view in the existing view controller. First, select the Restaurant Table View Controller to reveal the scene dock. Open the Object library, drag a View object to the scene dock, and put it right next to the exit icon.

Once you added the view, you will see a view right above the controller. You can now design the view just like any other views. Drag an image view to the view. In the Attributes inspector, set the Image option to emptydata.
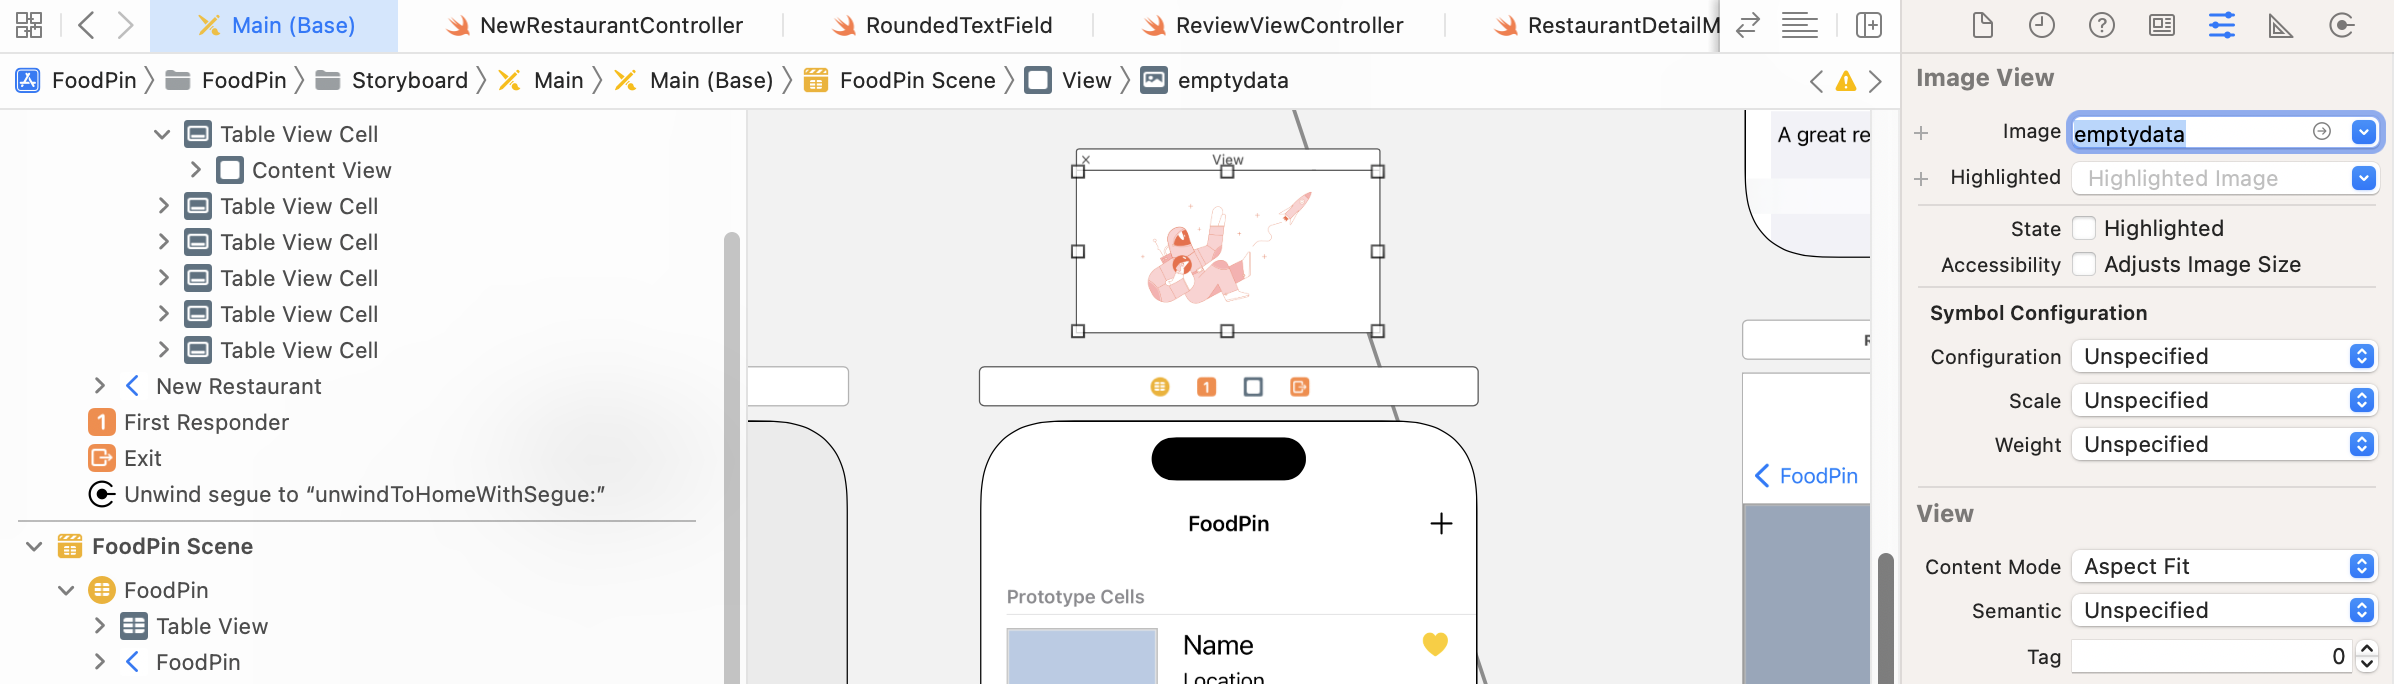
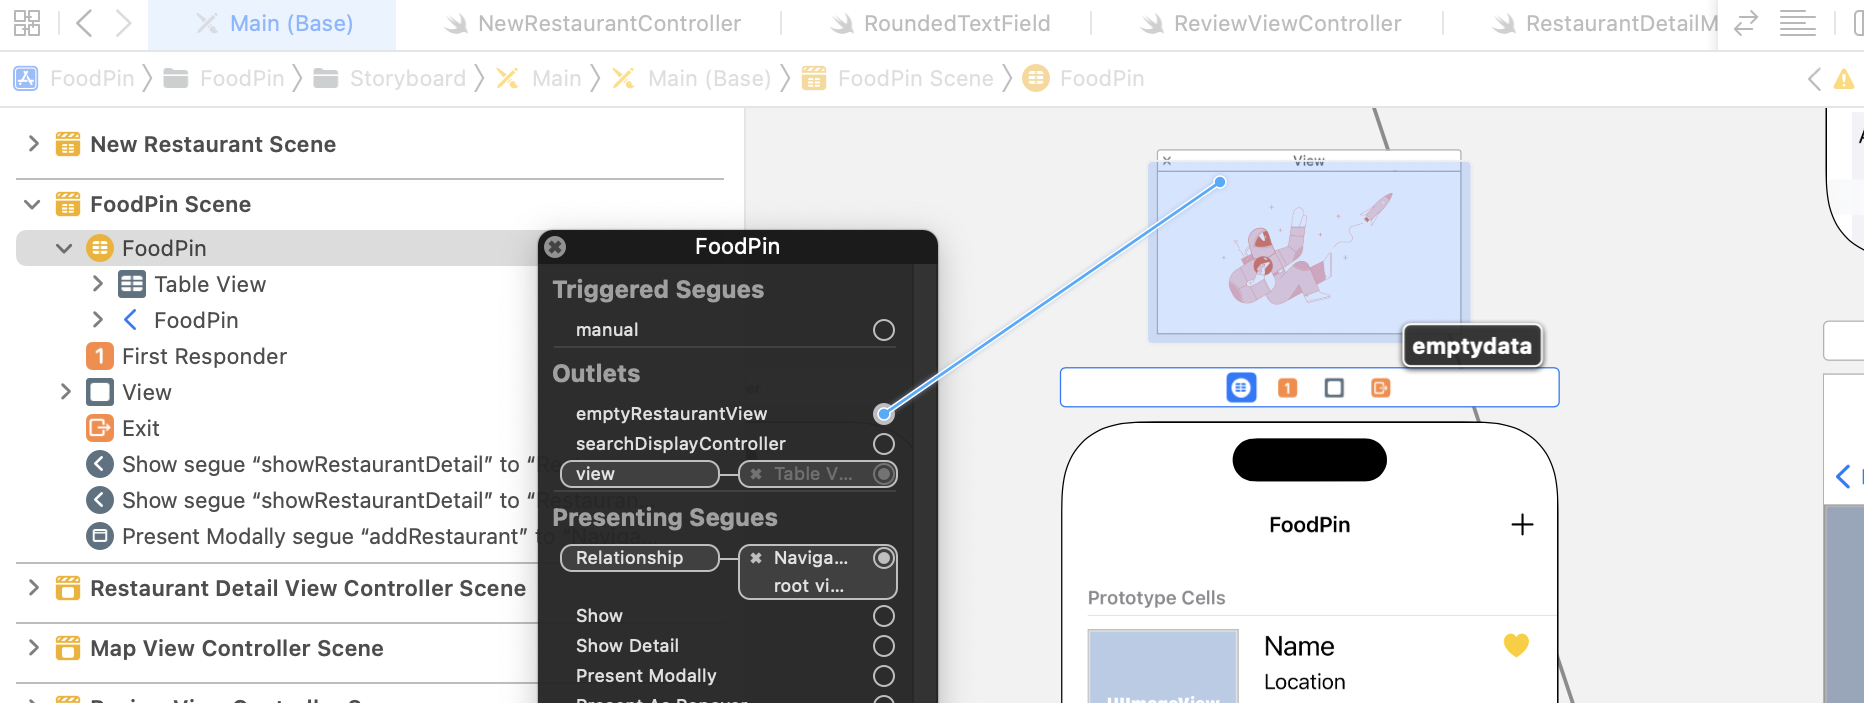
This view is an extra view of the table view controller. In order to access it from code, we have to define an outlet to connect with it. Go to RestaurantTableViewController.swift and declare an outlet called emptyRestaurantView in the class:
@IBOutlet var emptyRestaurantView: UIView!
Now go back to Main. Right-click the FoodPin controller and connect emptyRestaurantView with the extra view.
You've already prepared the design of the empty view. It is time to write some code to display it. Our implementation will be like this:
- Add the empty view to the background view of the table view.
- By default, we set to hide the background view.
- When the table view is about to display, we check to see if there are any restaurant records. If there is no record, we set to unhide the background view so as to display the empty view.
In the viewDidLoad() method of the RestaurantTableViewController class, insert the following code:
// Prepare the empty view
tableView.backgroundView = emptyRestaurantView
tableView.backgroundView?.isHidden = restaurants.count == 0 ? false : true
Now run the project again. Your app should look like the image shown in figure 19-9.
Working with Managed Objects
Now back to Core Data. Earlier, we converted our FoodPin project to use managed objects, the next question is how can we use the objects to save data into the database?
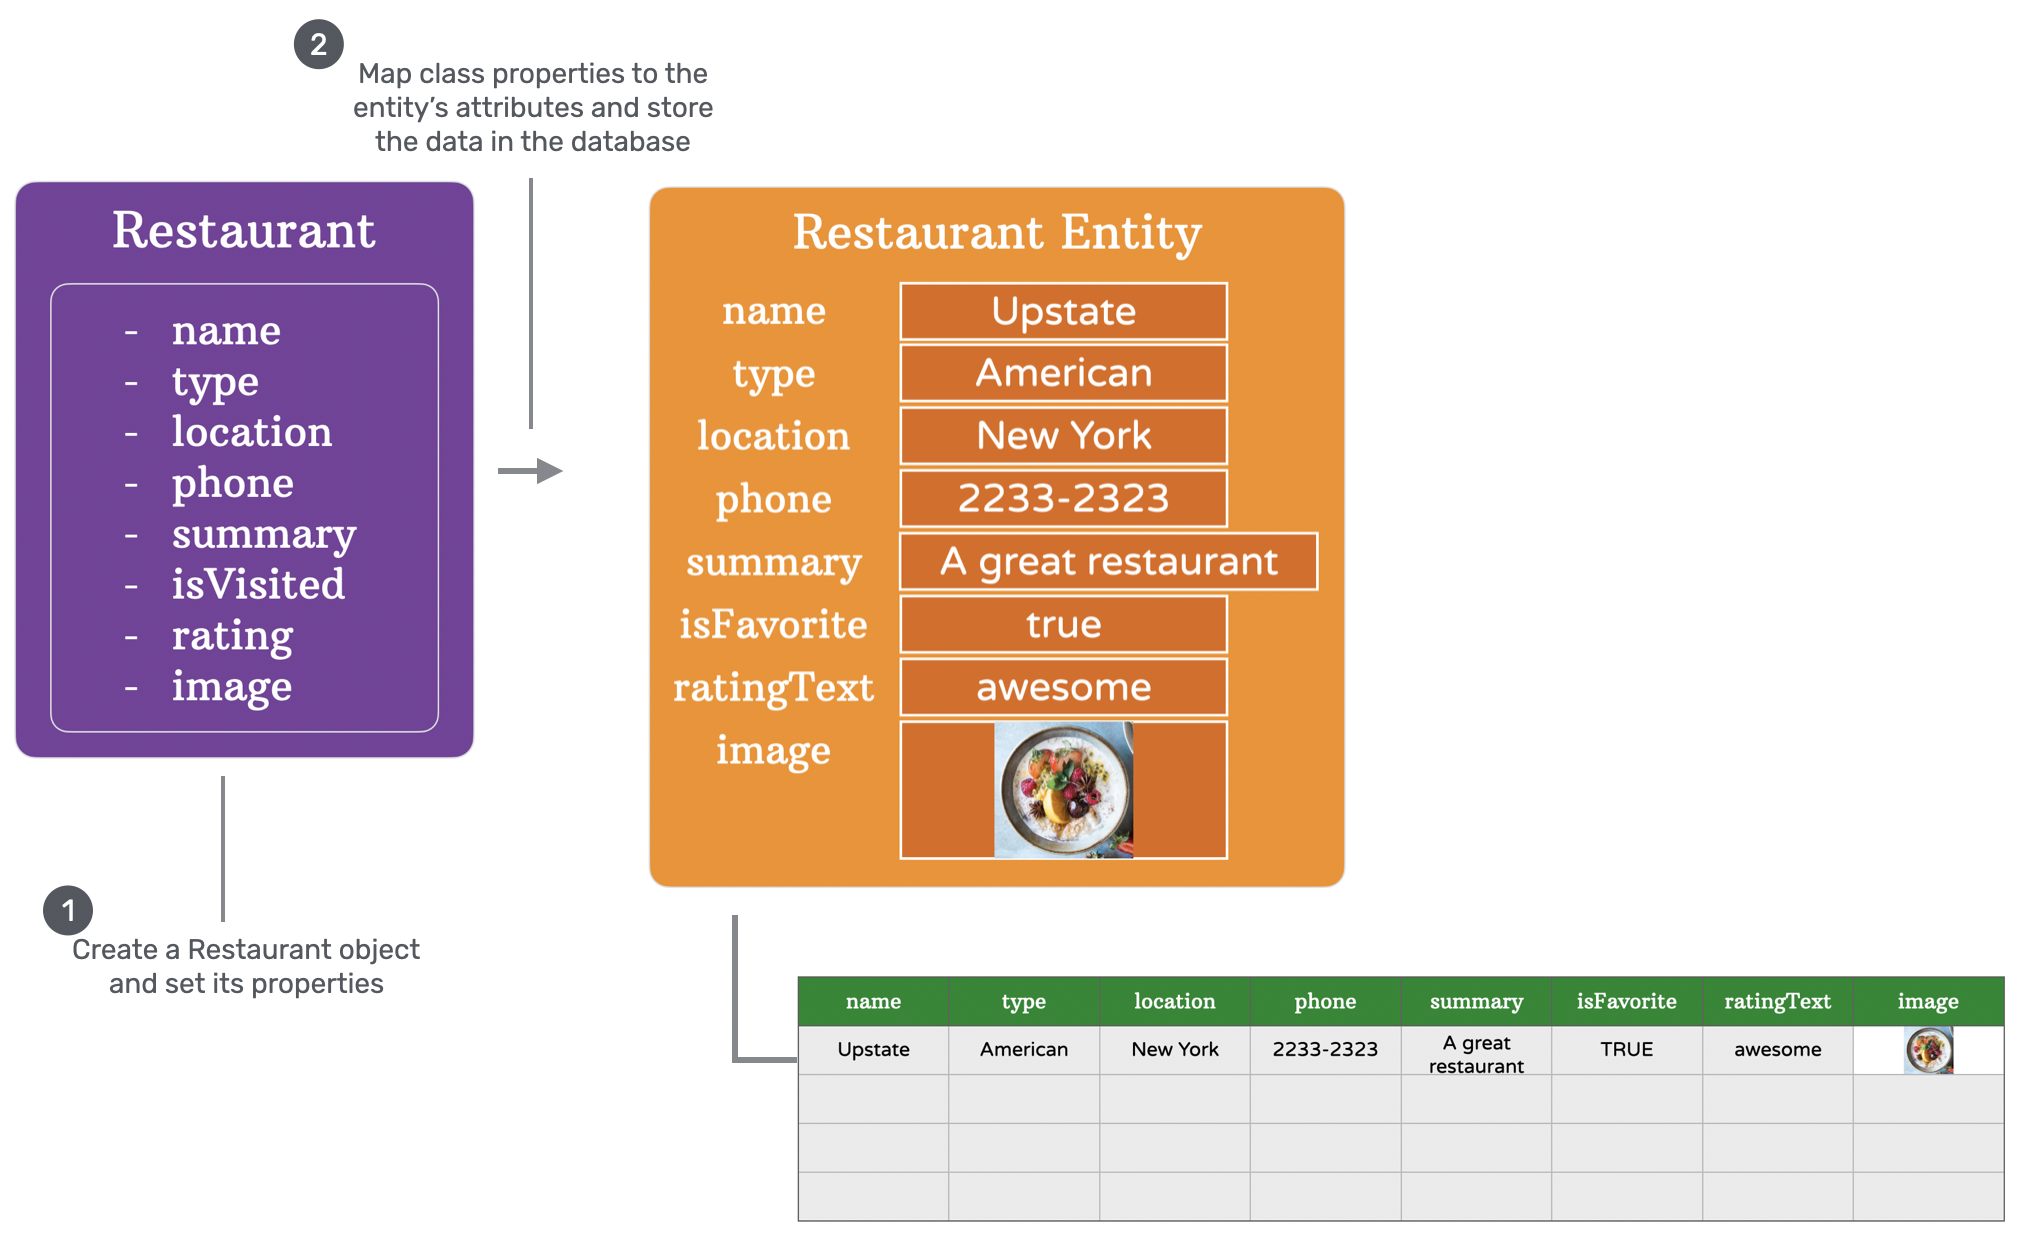
With the introduction of NSPersistentContainer, the complexity involved in setting up the Core Data stack had been dramatically reduced. Common operations, such as inserting a record to a database, are a lot simpler. To save a restaurant, you basically need to handle a couple of things:
Create a
Restaurantobject with the view context of the persistent container and then set its properties as usual.restaurant = Restaurant(context: appDelegate.persistentContainer.viewContext) restaurant.name = "Upstate" restaurant.type = "Cafe" restaurant.location = "New York"Next, you call the
saveContext()method inAppDelegateto save the data to the database:appDelegate.saveContext()
That's it. As you can see, Core Data shields you away from the underlying logic of database management. You do not need to understand how to insert a record into the database using SQL. All is done by using the Core Data APIs.
Saving a New Restaurant to the Database
With some basic understanding of managed objects, let's update the NewRestaurantController class to save a new restaurant to the database. First, add the following import statement at the very beginning of NewRestaurantController.swift so that the class can utilize the Core Data framework:
import CoreData
Declare a restaurant variable in the NewRestaurantController class:
var restaurant: Restaurant!
In the saveButtonTapped(sender: AnyObject) method, apply what you've just learned to save the restaurant object into the persistent store. Insert the following code before calling the dismiss method:
if let appDelegate = (UIApplication.shared.delegate as? AppDelegate) {
    restaurant = Restaurant(context: appDelegate.persistentContainer.viewContext)
    restaurant.name = nameTextField.text!
    restaurant.type = typeTextField.text!
    restaurant.location = addressTextField.text!
    restaurant.phone = phoneTextField.text!
    restaurant.summary = descriptionTextView.text
    restaurant.isFavorite = false

    if let imageData = photoImageView.image?.pngData() {
        restaurant.image = imageData
    }

    print("Saving data to context...")
    appDelegate.saveContext()
}
The code above is pretty much the same as what we discussed in the previous section. However, there are a few lines of code that are new to you. First, it's the following line of code:
if let appDelegate = (UIApplication.shared.delegate as? AppDelegate) {
The persistentContainer variable is declared in AppDelegate.swift. To access the variable, we have to first get a reference to AppDelegate. In iOS SDK, you can use UIApplication.shared.delegate as? AppDelegate to get the AppDelegate object.
Next, it's related to the image property.
if let imageData = photoImageView.image?.pngData() {
    restaurant.image = imageData
}
Recalled that the image type of the Restaurant Entity is set to Binary Data, in this case, the image property of the generated RestaurantMO has a type of Data.
Therefore, when we set the value of the image property, we have to retrieve the data of the selected image and convert it to a Data object. The UIKit framework provides a set of built-in functions for graphics operations. The pngData() function allows us to get the data of a specified image in PNG format. We then create the Data object using the image data.
This is the piece of code you need to add a new restaurant to the database. If you run the app now and save a new restaurant, the app should be able to save the record into the database without any errors. You should see the message "Saving data to context …" in the console. However, your app is not ready to display the restaurant just added. That's what we're going to do next.
Fetching Data Using Core Data
The Restaurant class has the fetchRequest() method. When called, it returns you an NSFetchRequest object that specifies the search criteria and which entity to search (here, it is the Restaurant entity). Together with another API called NSFetchedResultsController, you will be able to fetch records from the database efficiently.
NSFetchedResultsController is specially designed for managing the results returned from a Core Data fetch request and providing data for a table view. It monitors changes to objects in the managed object context and reports changes in the result set to its delegate.
Let's see how to use NSFetchedResultsController and the diffable data source to retrieve the restaurants and update the data in the table view.
In RestaurantTableViewController.swift, import the CoreData framework:
import CoreData
Next, declare an instance variable for the fetched results controller:
var fetchResultController: NSFetchedResultsController<Restaurant>!
To better organize our code, we will handle the retrieval of data item in a separate method. Create a new method called fetchRestaurantData() like this:
func fetchRestaurantData() {
    // Fetch data from data store
    let fetchRequest: NSFetchRequest<Restaurant> = Restaurant.fetchRequest()
    let sortDescriptor = NSSortDescriptor(key: "name", ascending: true)
    fetchRequest.sortDescriptors = [sortDescriptor]

    if let appDelegate = (UIApplication.shared.delegate as? AppDelegate) {
        let context = appDelegate.persistentContainer.viewContext
        fetchResultController = NSFetchedResultsController(fetchRequest: fetchRequest, managedObjectContext: context, sectionNameKeyPath: nil, cacheName: nil)
        fetchResultController.delegate = self

        do {
            try fetchResultController.performFetch()
            updateSnapshot()
        } catch {
            print(error)
        }
    }
}
We first get the NSFetchRequest object from Restaurant and specify the sort order using an NSSortDescriptor object. NSSortDescriptor lets you describe how the fetched objects are sorted. Here we specify that the Restaurant objects should be sorted in ascending order using the name key.
After creating the fetch request, we initialize fetchResultController and specify its delegate for monitoring data changes. Lastly, we call the performFetch() method to execute the fetch request. When complete, we call the updateSnapshot() method to update the restaurants in the table view.
We haven't created the updateSnapshot() method yet. Insert the following code to implement the method:
func updateSnapshot(animatingChange: Bool = false) {

    if let fetchedObjects = fetchResultController.fetchedObjects {
        restaurants = fetchedObjects
    }

    // Create a snapshot and populate the data
    var snapshot = NSDiffableDataSourceSnapshot<Section, Restaurant>()
    snapshot.appendSections([.all])
    snapshot.appendItems(restaurants, toSection: .all)

    dataSource.apply(snapshot, animatingDifferences: animatingChange)

    tableView.backgroundView?.isHidden = restaurants.count == 0 ? false : true
}
The method takes in a boolean parameter called animatingChanges. By default, its value is set to false. This parameter gives the caller a flexibilty to specify if it needs animations. If it's set to true, the diffable data source will animate the data update.
After executing the fetch request, all the fetched objects are stored in the fetchedObjects property of the fetch result controller. In the method, the very first thing we check is whether the controller contains any fetched objects. If the result is positive, we create a snapshot and update the UI accordingly. The code is exactly the same as we discussed before when implementing the table view.
The delegate of fetchResultController is set to self, that is RestaurantTableViewController. In this case, the class should adopt the NSFetchedResultsControllerDelegate protocol.
The protocol provides methods to notify its delegate whenever there is any change in the controller's fetch results. Later, we'll implement the methods. For now, simply create an extension to adopt the protocol like this:
extension RestaurantTableViewController: NSFetchedResultsControllerDelegate {

}
With the fetchRestaurantData() method ready, invoke it in the viewDidLoad() method:
fetchRestaurantData()
And, since we created the updateSnapshot() method, we can delete the following lines of code:
var snapshot = NSDiffableDataSourceSnapshot<Section, Restaurant>()
snapshot.appendSections([.all])
snapshot.appendItems(restaurants, toSection: .all)

dataSource.apply(snapshot, animatingDifferences: false)
If you compile and run the app now, it should display the restaurants that you previously added. However, if you try to add another new restaurant, the table does not refresh with the new record.
There is still something left.
When there is any content change due to add/remove/move/update, the following methods of the NSFetchedResultsControllerDelegate protocol will be called:
- controllerWillChangeContent(_:)
- controllerDidChangeContent(_:)
We will implement the controllerDidChangeContent(_:) method and refresh the UI accordingly. Update the extension like this:
extension RestaurantTableViewController: NSFetchedResultsControllerDelegate {

    func controllerDidChangeContent(_ controller: NSFetchedResultsController<NSFetchRequestResult>) {
        updateSnapshot()
    }

}
When there is any content change in the managed object context (e.g. a new restaurant is saved), the method is automatically called. Here we call the updateSnapshot() method to refresh the UI with the newly-added (or deleted) item.
That's it. Now run the app again and create a few restaurants. The app should respond to the change instantaneously.

Deleting Data Using Core Data
To delete a record from the persistent data store, you just need to call a method named delete with the managed object to delete. Then, you call the saveContext method to apply the changes. Here is a sample code snippet:
let context = appDelegate.persistentContainer.viewContext
context.delete(objectToDelete)
appDelegate.saveContext()
To remove the selected restaurant from database, you have to update the deleteAction variable in the tableView(_:trailingSwipeActionsConfigurationForRowAt:_) method like this:
let deleteAction = UIContextualAction(style: .destructive, title: "Delete") { (action, sourceView, completionHandler) in

    if let appDelegate = (UIApplication.shared.delegate as? AppDelegate) {
        let context = appDelegate.persistentContainer.viewContext

        // Delete the item
        context.delete(restaurant)
        appDelegate.saveContext()

        // Update the view
        self.updateSnapshot(animatingChange: true)
    }

    // Call completion handler to dismiss the action button
    completionHandler(true)
}
In the above code, we call the delete method to delete the item. Finally, we call the saveContext() method to apply the changes.
Now compile and run the app again. At this point, if you delete a record it should remove completely from the database.
Exercise #1
We haven't finished this chapter yet. But I have an exercise for you. Did you notice that there is a bug for the description field of the restaurant detail screen? It now shows a weird message.
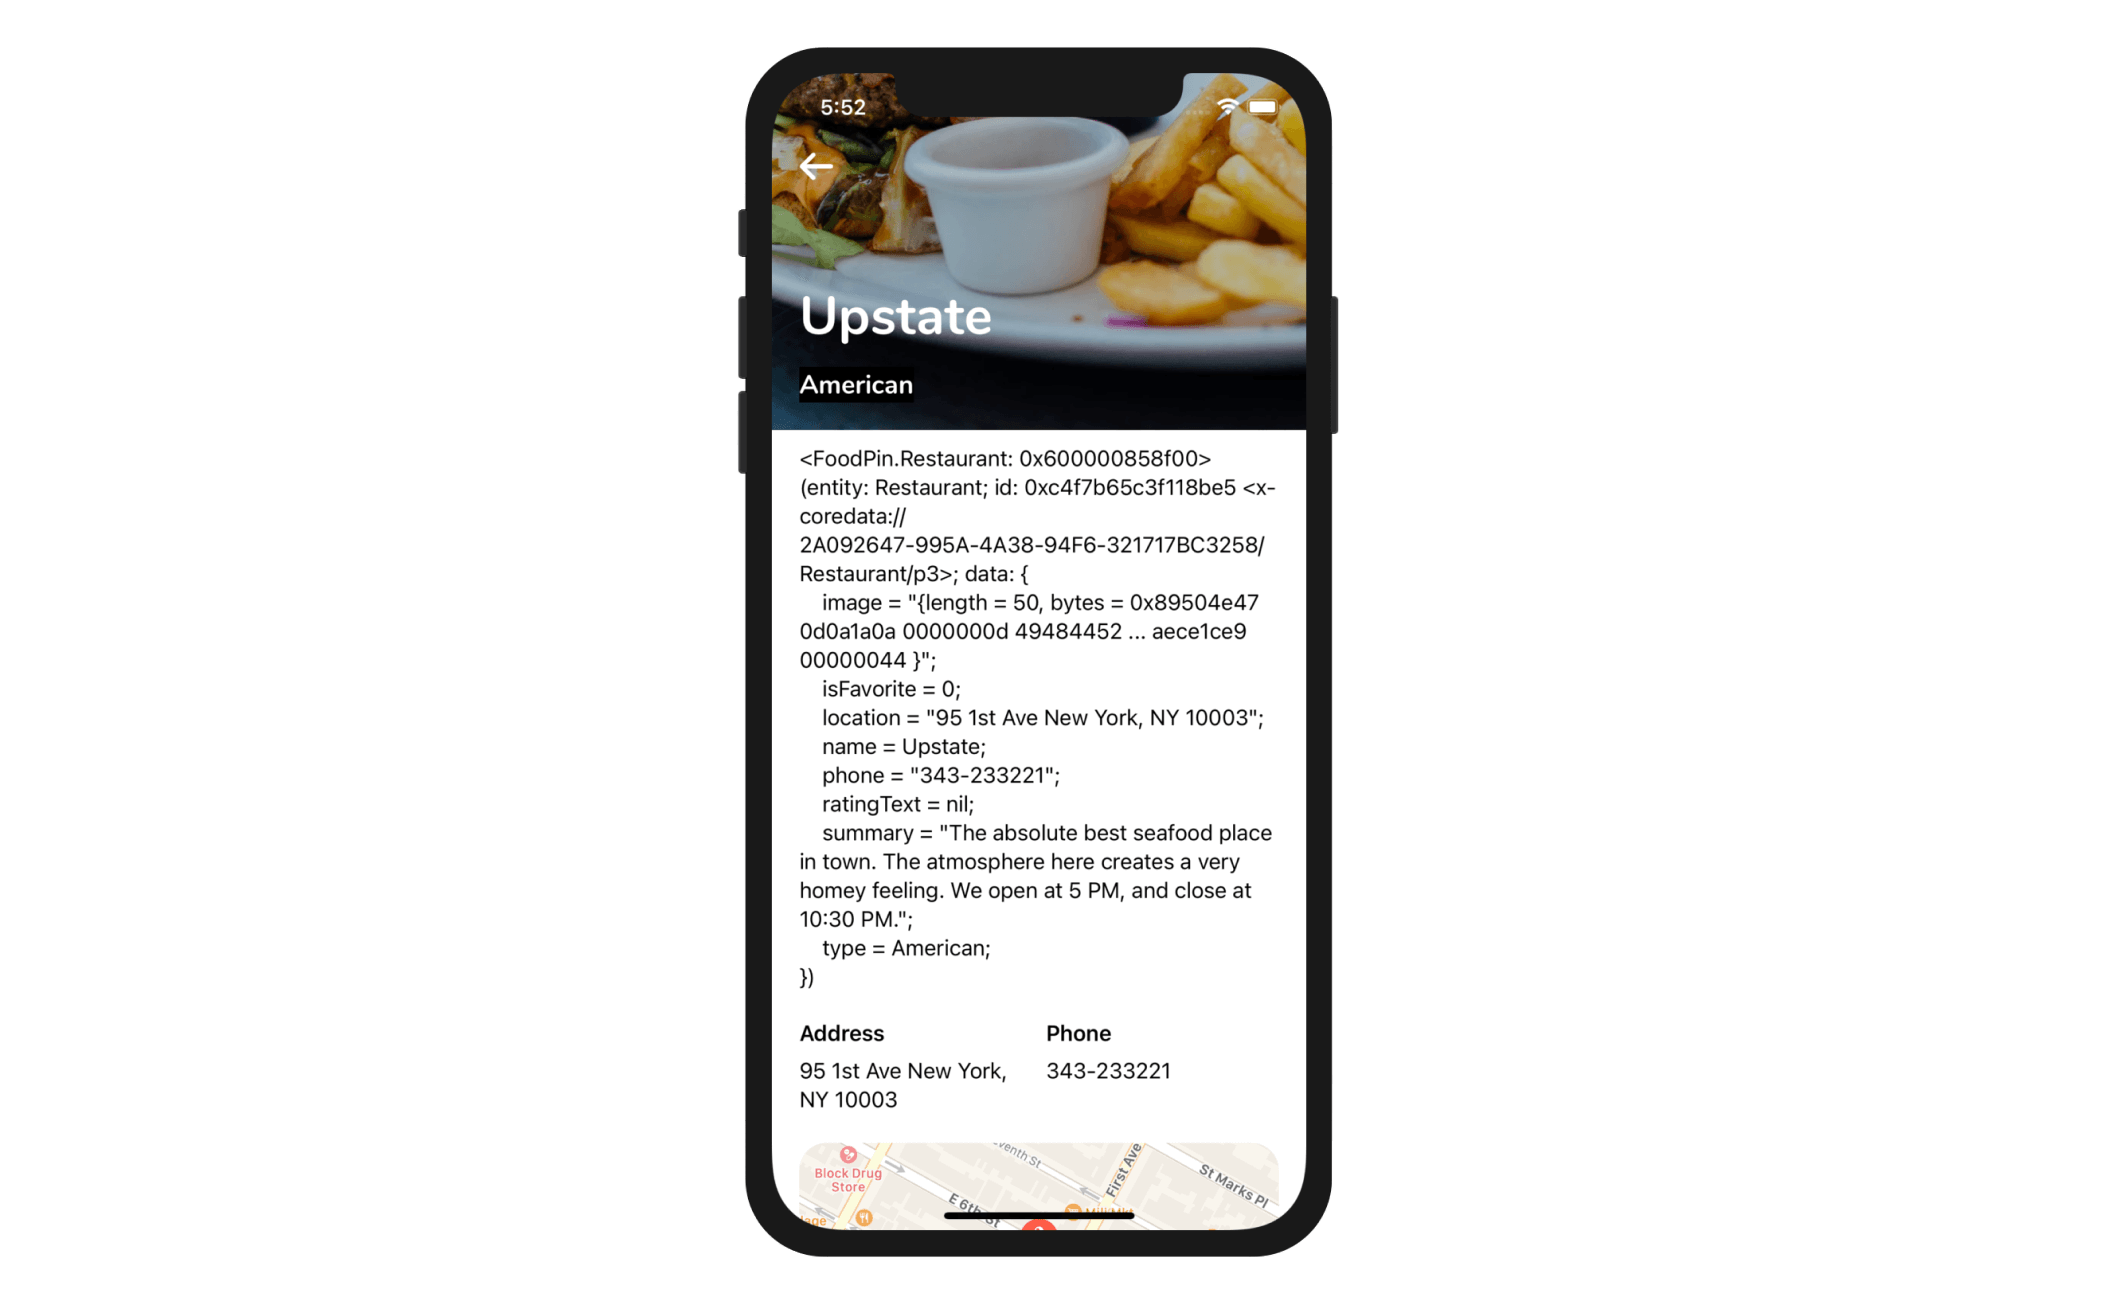
Try to find out the root cause and fix the error. I can give you a hint. Look into the RestaurantDetailViewController class.
Updating a Managed Object
What if we need to update the rating of an existing restaurant? How can we update the record in the database?
Similar to creating a new restaurant, you can update a restaurant record in the persistent store by updating the corresponding managed object and then call saveContext() to apply the changes.
For example, to save the rating of a restaurant, you can update the rateRestaurant method of the RestaurantDetailViewController class like this:
@IBAction func rateRestaurant(segue: UIStoryboardSegue) {
    guard let identifier = segue.identifier else {
        return
    }

    dismiss(animated: true, completion: {

        if let rating = Restaurant.Rating(rawValue: identifier) {
            self.restaurant.rating = rating
            self.headerView.ratingImageView.image = UIImage(named: rating.image)

            if let appDelegate = (UIApplication.shared.delegate as? AppDelegate) {
                appDelegate.saveContext()
            }
        }

        let scaleTransform = CGAffineTransform.init(scaleX: 0.1, y: 0.1)
        self.headerView.ratingImageView.transform = scaleTransform
        self.headerView.ratingImageView.alpha = 0

        UIView.animate(withDuration: 0.4, delay: 0, usingSpringWithDamping: 0.3, initialSpringVelocity: 0.7, options: [], animations: {
            self.headerView.ratingImageView.transform = .identity
            self.headerView.ratingImageView.alpha = 1
        }, completion: nil)

    })
}
The code is exactly the same as before, except that we add a couple lines of code to call up appDelegate.saveContext() to save the changes to the database.
The current version of restaurant detail view controller doesn't display the restaurant's rating when it is first loaded. Insert the following code in the viewDidLoad() method of RestaurantDetailViewController to fix that:
if let rating = restaurant.rating {
    headerView.ratingImageView.image = UIImage(named: rating.image)
}
Cool! You are now ready to test. Choose a restaurant and rate it. Now the rating is saved permanently in the database.
Exercise #2
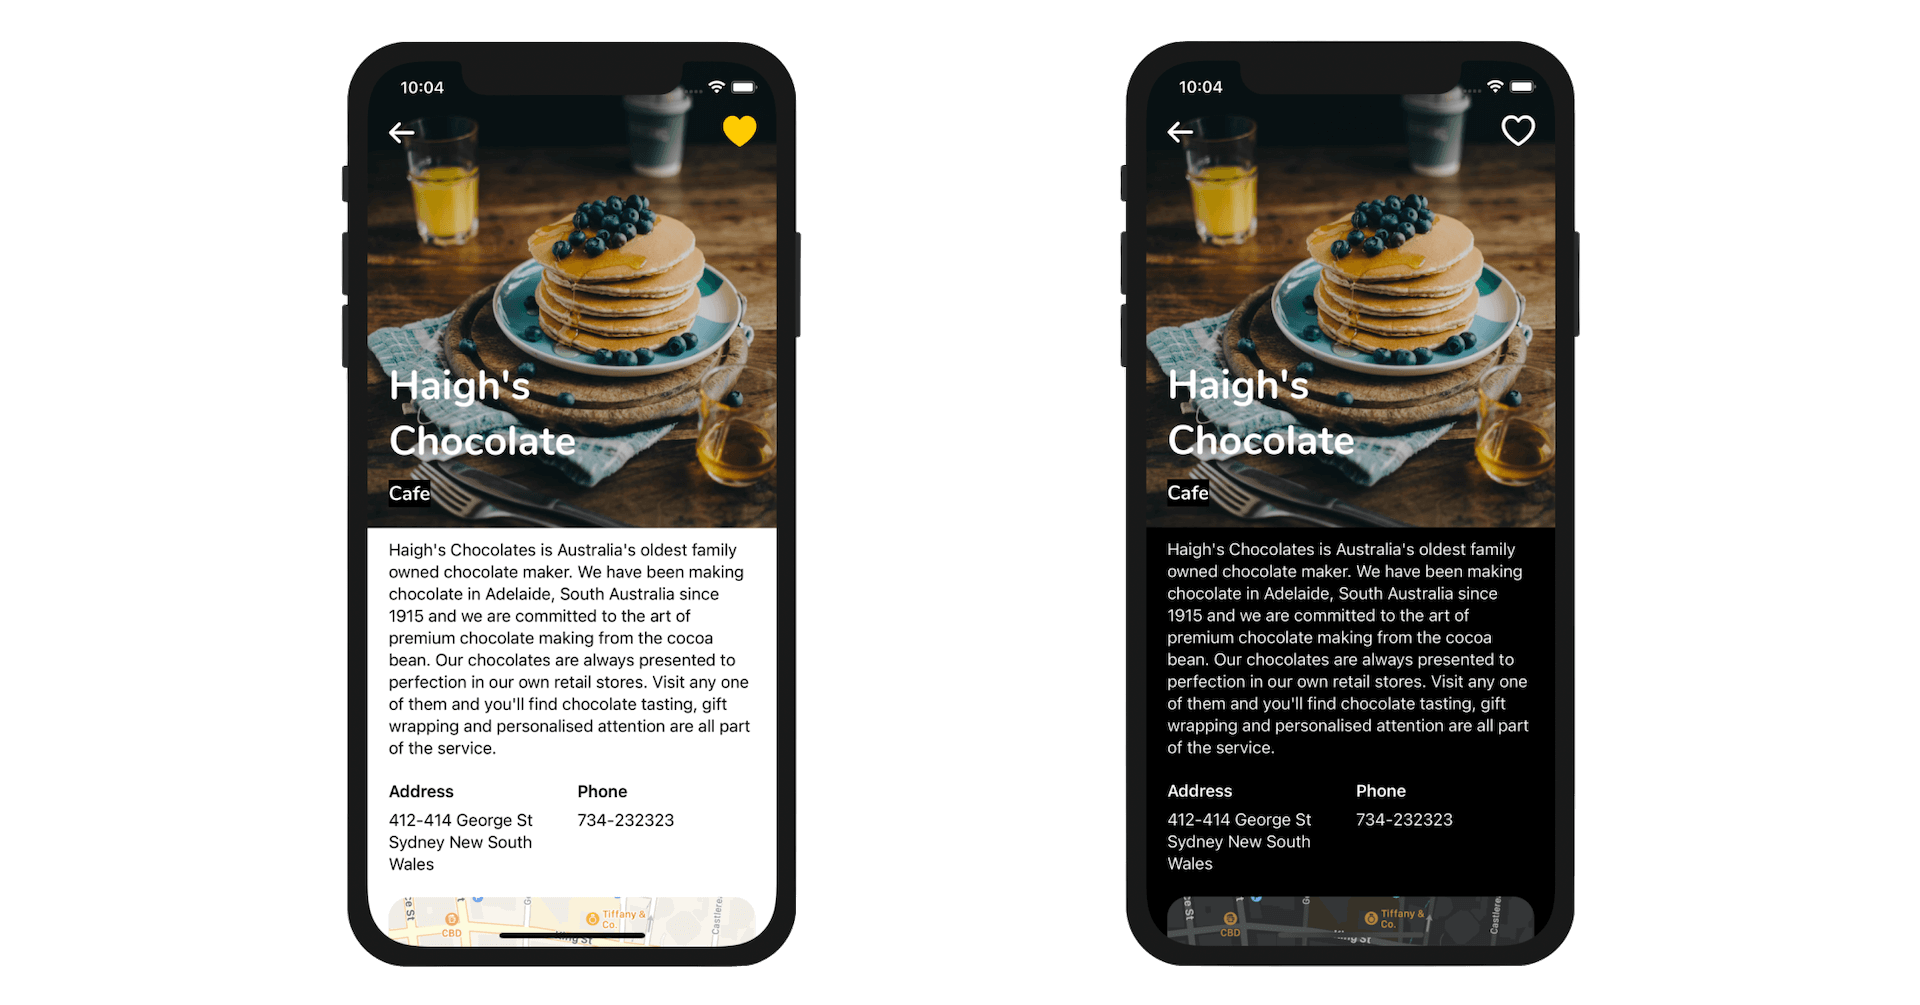
The "Save as favorite" button in the detailed view doesn't work yet. In this exercise, your task is to make it functional and save its state in the database using Core Data. On top of that, move the heart icon in the detailed view to the navigation bar. Figure 19-15 illustrates the layout changes.
Summary
Congratulate yourself on making an app using Core Data. At this point, you should know how to retrieve and manage data in a persistent data store. Core Data is a powerful framework for working with persistent data especially for those who do not have any database knowledge. The NSPersistentContainer class encapsulates the whole Core Data stack and makes working with Core Data a breeze, especially for beginners.
This chapter gives you a brief overview of Core Data. I hope you understand the basics of Core Data, and how to use it to store persistent data. Though we will not further discuss Core Data in this book, don't stop learning and exploring. You can check out Apple's official reference (https://developer.apple.com/library/content/documentation/Cocoa/Conceptual/CoreData/index.html) to learn more.
For reference, you can download the complete Xcode from http://www.appcoda.com/resources/swift57/FoodPinCoreDataFinal.zip.
Are you ready to further improve the app? I hope you're still with me. Let's move on and take a look at how to add a search bar.