- Made by AppCoda
- Contact us / Support
- Tweet this book
- Preface
- 1. The Development Tools, the Learning Approach, and the App Idea
- 2. Your First Taste of Swift with Playgrounds
- 3. Hello World! Build Your First App in Swift
- 4. Hello World App Explained
- 5. Introduction to Auto Layout
- 6. Designing UI Using Stack Views
- 7. Introduction to Prototyping
- 8. Creating a Simple Table-based App
- 9. Customize Table Views Using Prototype Cell, Diffable Data Source and Dark Mode
- 10. Displaying Alerts with UIAlertController and Handling Table View Selection
- 11. Object Oriented Programming, Project Organization and Code Documentation
- 12. Table Row Deletion, Custom Action Button and MVC
- 13. Introduction to Navigation Controller and Segue
- 14. Detail View Enhancement and Navigation Bar Customization
- 15. Navigation Bar Customization, Extensions and Dynamic Type
- 16. Working with Maps
- 17. Basic Animations, Visual Effects and Unwind Segues
- 18. Working with Static Table Views, Camera and NSLayoutConstraint
- 19. Working with Core Data
- 20. Search Bar and UISearchController
- 21. Building Walkthrough Screens with UIPageViewController and Container Views
- 22. Exploring Tab Bar Controller and Storyboard References
- 23. Getting Started with WKWebView and SFSafariViewController
- 24. Exploring CloudKit
- 25. Localizing Your App to Reach More Users
- 26. Deploying and Testing Your App on a Real iOS Device
- 27. Beta Testing with TestFlight and CloudKit Production Deployment
- 28. Submit Your App to App Store
- 29. Adopting 3D Touch, Haptic Touch and Context Menus
- 30. Developing User Notifications in iOS
- 31. Appendix - Swift Basics
- Published with GitBook
Chapter 21
Building Walkthrough Screens with UIPageViewController and Container Views

If you're interested in the living heart of what you do, focus on building things rather than talking about them.
- Ryan Freitas, About.me
For the very first time launching an app, you probably find a series of walkthrough (or tutorial) screens. It's a common practice for mobile apps to step users through a multi-screen tutorial where all the features are demonstrated. Some said your app design probably fails if your app needs walkthrough screens. Personally, I don't hate walkthrough screens and find most of them pretty useful. Just make sure you keep it short. Don't take it too far to include long and boring tutorials. Here, I'm not going to argue with you whether you should or should not include walkthrough screens in your app. I just want to show you how.
In this chapter, we'll discuss how to use UIPageViewController to create walkthrough screens and you will learn how to use a special type of view known as Container View.
One of the ways to implement this type of walkthrough screen is to utilize the UIPageViewController class. It lets developers build pages of content, for which each page is managed by its own view controller. The class has a built-in support for scrolling transition. With UIPageViewController, users can easily navigate between multiple pages through simple gestures. The page view controller is not limited to creating walkthrough screens. You can find examples of page view implementation in games like Angry Birds (the page that shows all available levels) or in book apps (the page that displays the table of contents).
The UIPageViewController class is a highly configurable class. You're allowed to define:
- the orientation of the page views – vertical or horizontal
- the transition style – page curl transition style or scrolling transition style
- the location of the spine – only applicable to page curl transition style
- the space between pages – only applicable to scrolling transition style to define the inter-page spacing
We will add a simple walkthrough for the FoodPin app. By implementing this new feature, you will learn how UIPageViewController works along the way. That said, we'll not demonstrate every option of UIPageViewController; we'll just use the scrolling transition style to display a series of walkthrough screens. With the basic understanding of the UIPageViewController, however, I believe you should be able to explore other features in the page view controller.
Let's get started.
A Quick Look at the Walkthrough Screens
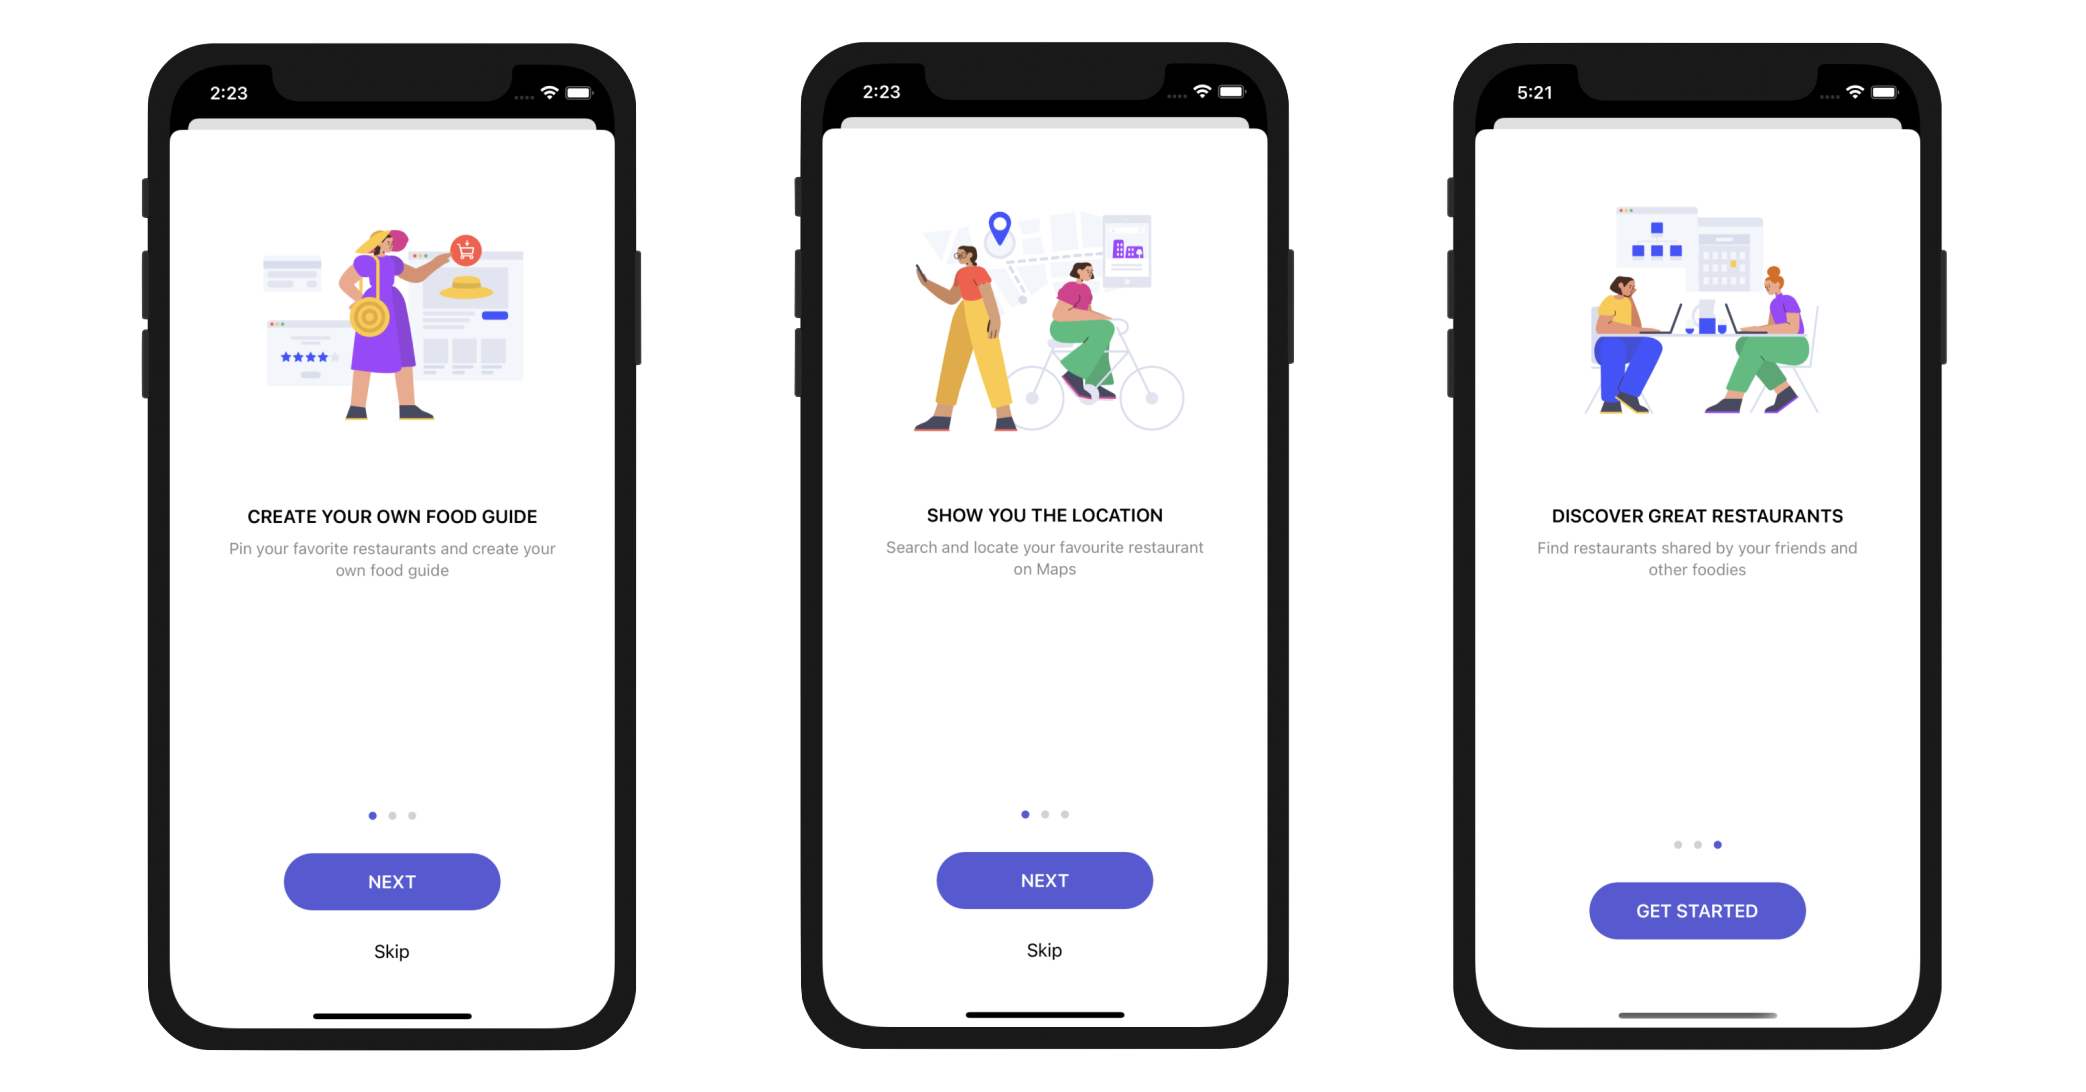
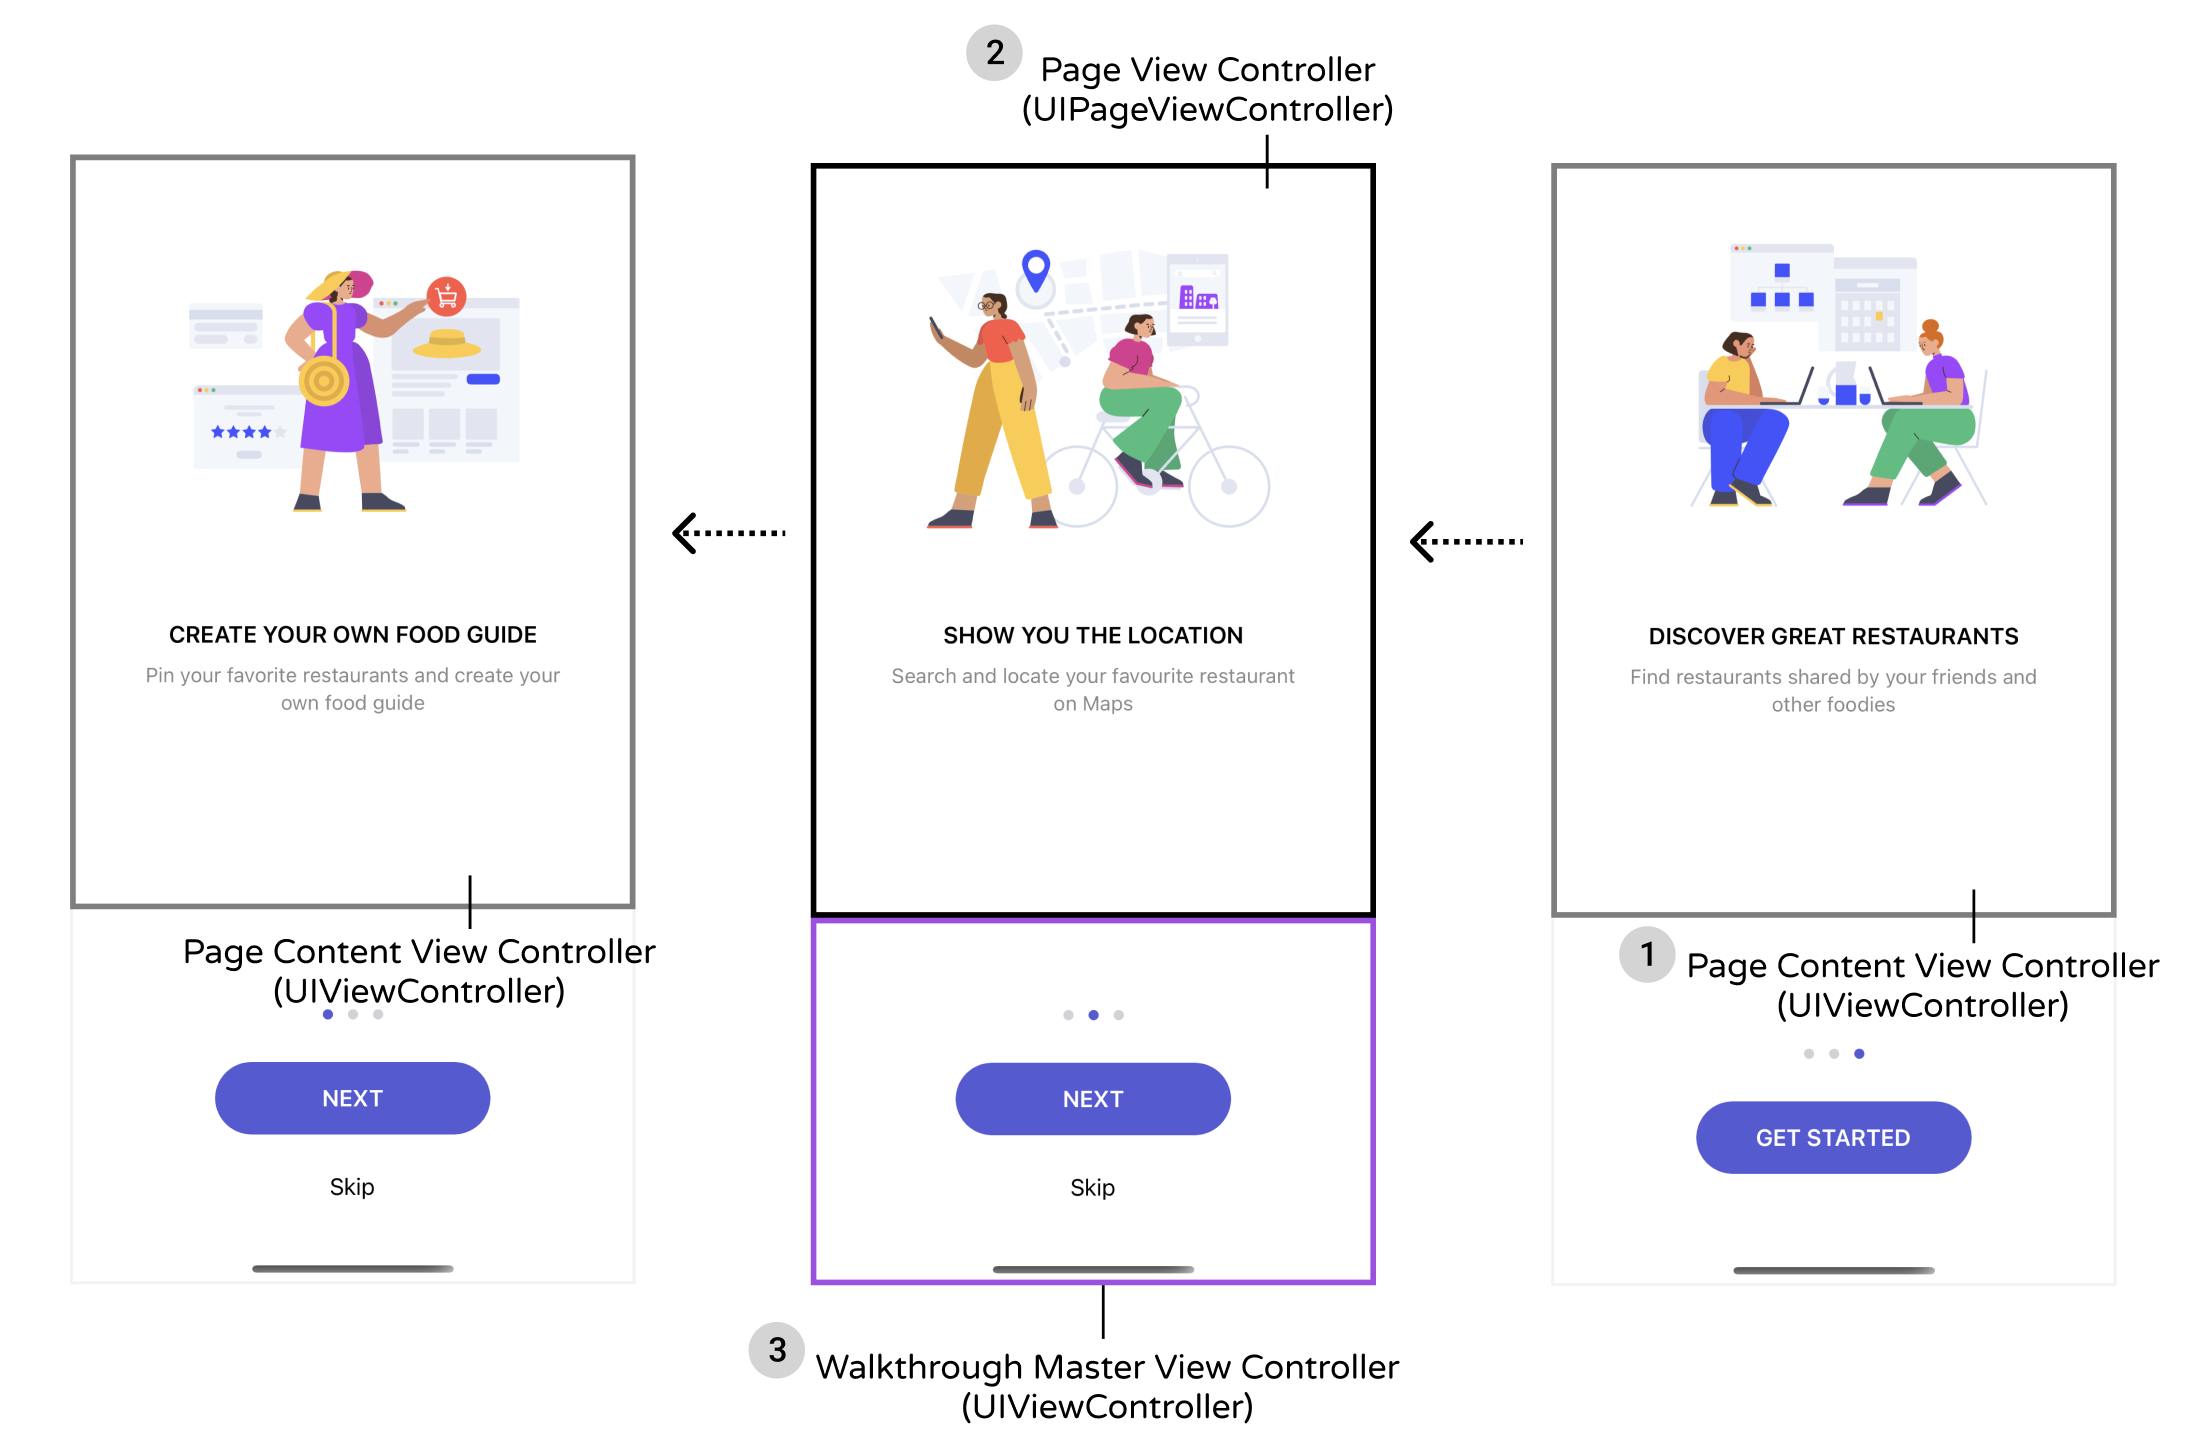
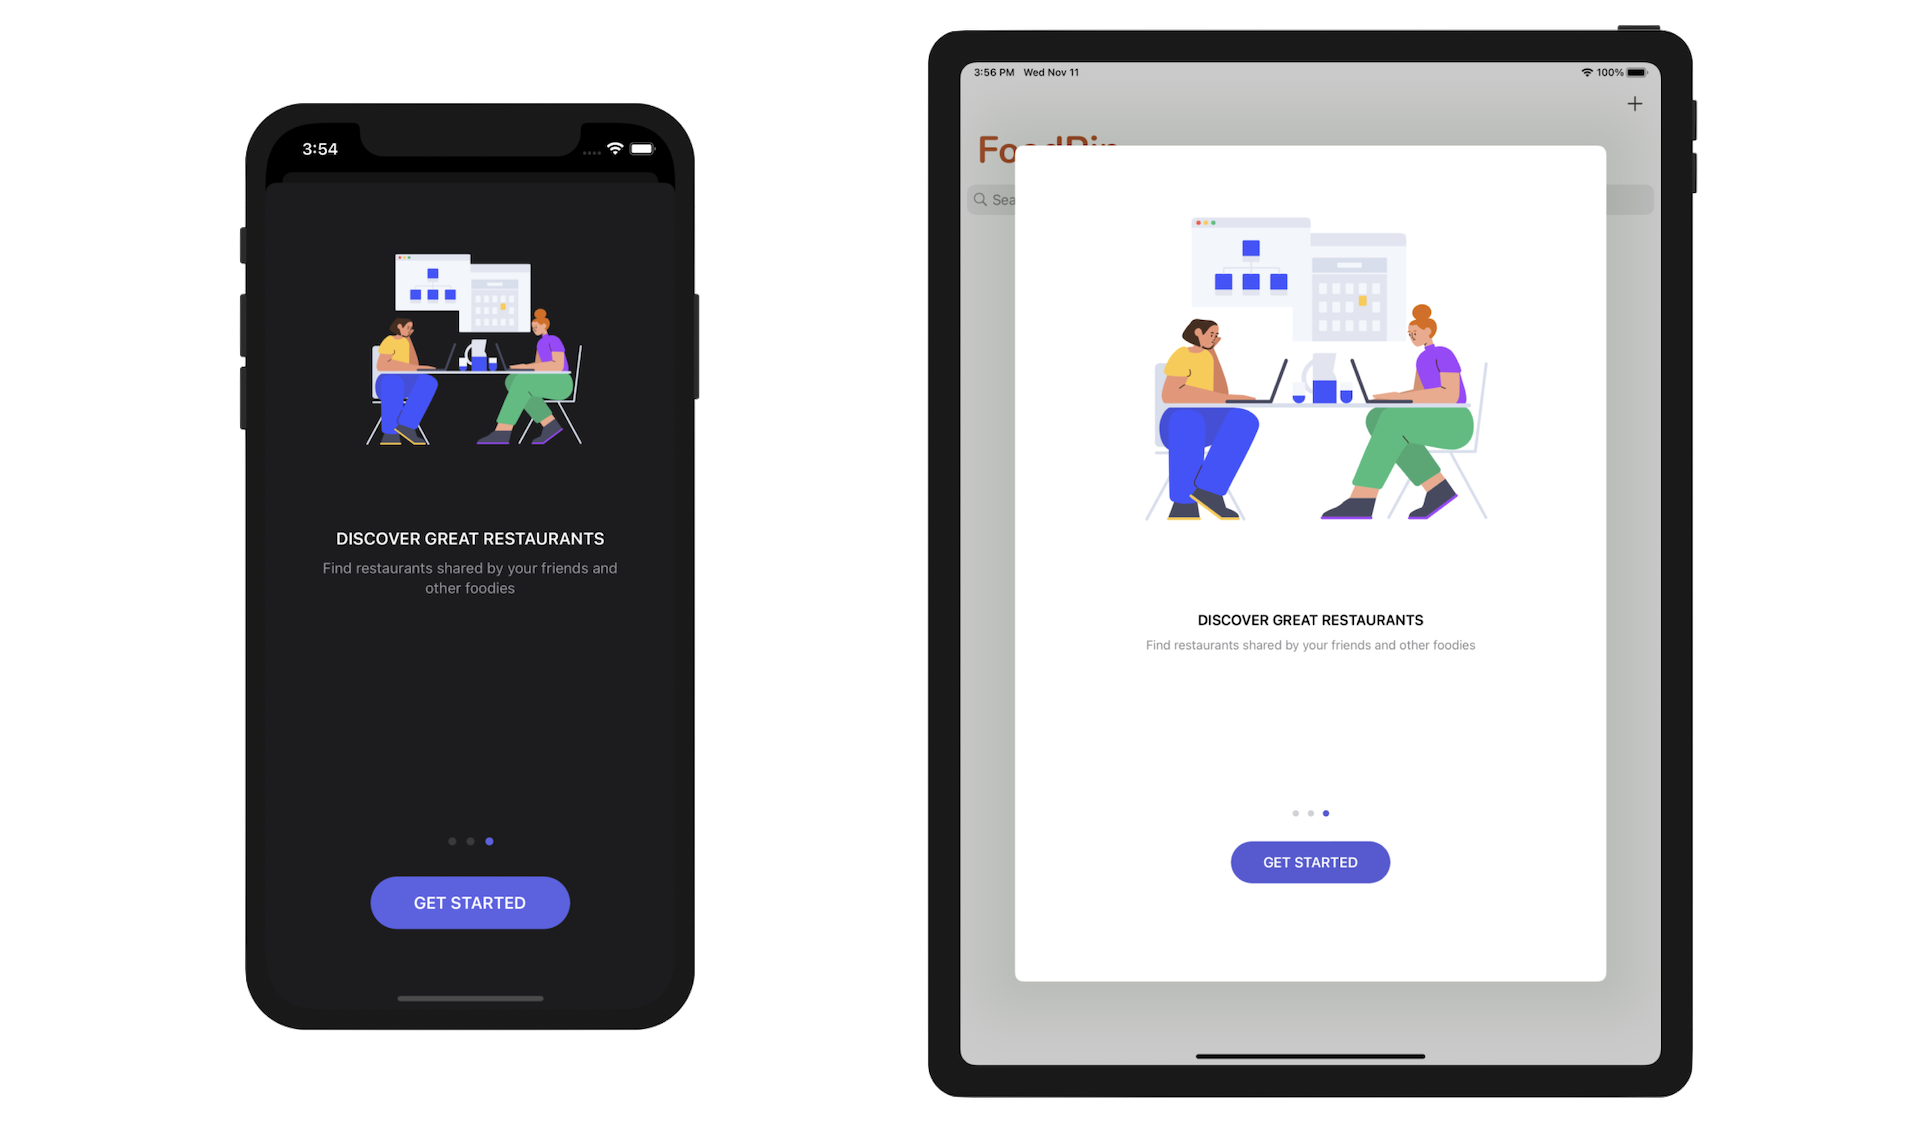
Let's have a quick look at the walkthrough screens. The app will display a total of three tutorial screens. The user will be able to navigate between pages by swiping through the screen or tapping the NEXT button.
In the last screen of the walkthrough, it displays a Get Started button. When the user taps the button, the walkthrough screen will be dismissed and never be shown again. At any time, the user can skip the walkthrough screens by tapping the Skip button. Figure 21-2 shows the screenshots of the walkthrough.
Creating a New Storyboard for UIPageViewController
So far we only use the Main storyboard to design the app UI. Xcode doesn't limit you to have a single storyboard. You are free to create separate storyboards to lay out your app components. As your app becomes more complex, chances are that you will create more than one storyboard to better organize your app UI.
If you haven't completed the previous exercise, you can download the current version of the FoodPin project from http://www.appcoda.com/resources/swift57/FoodPinSearch.zip.
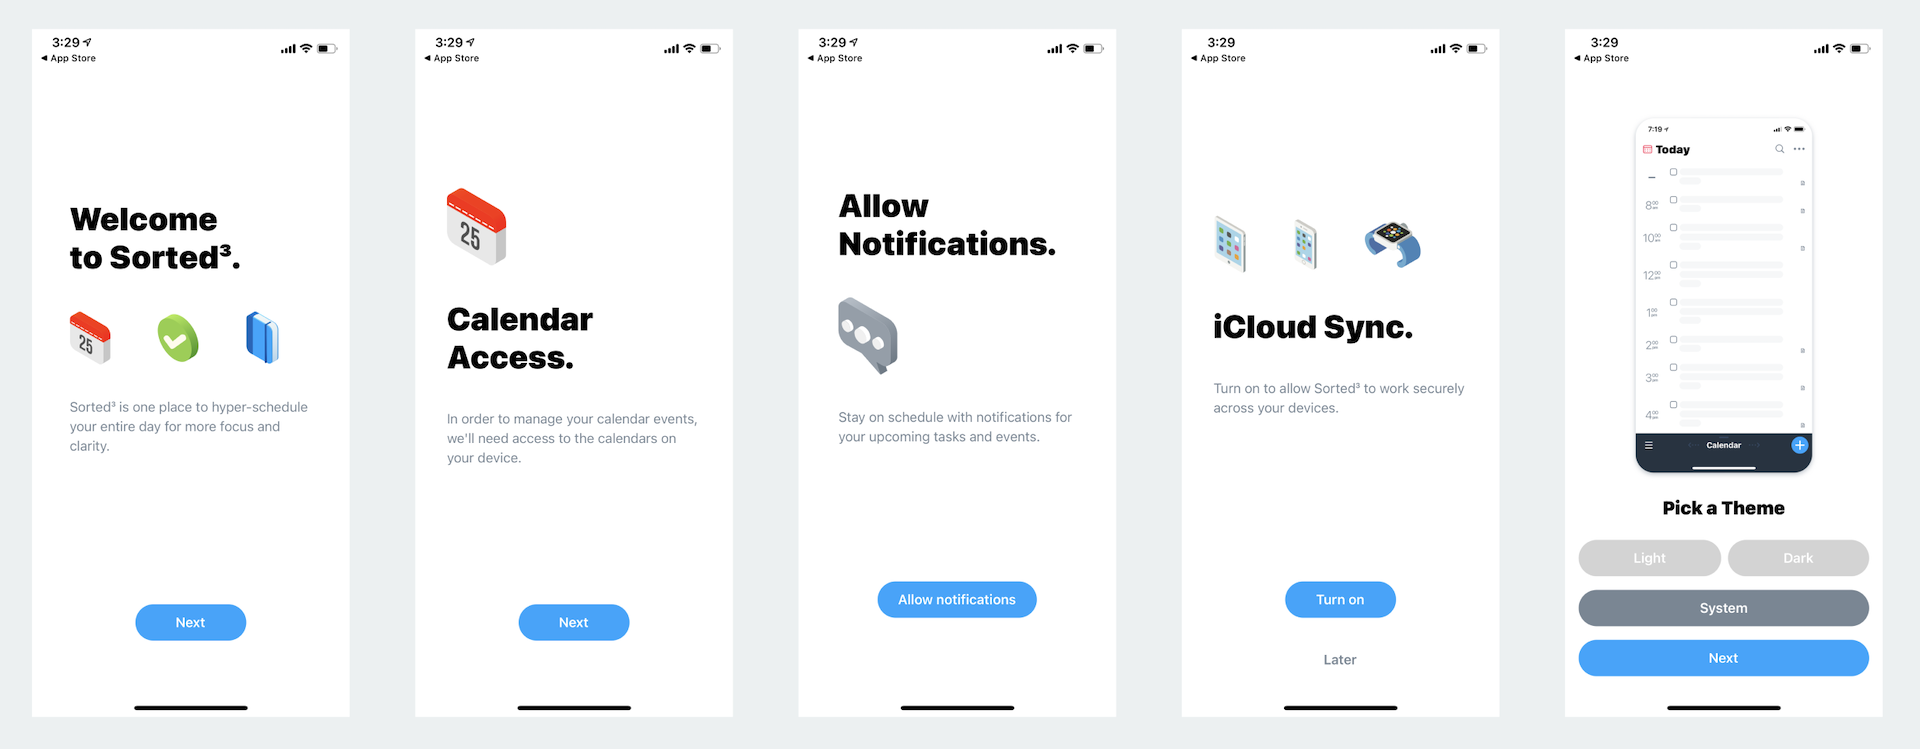
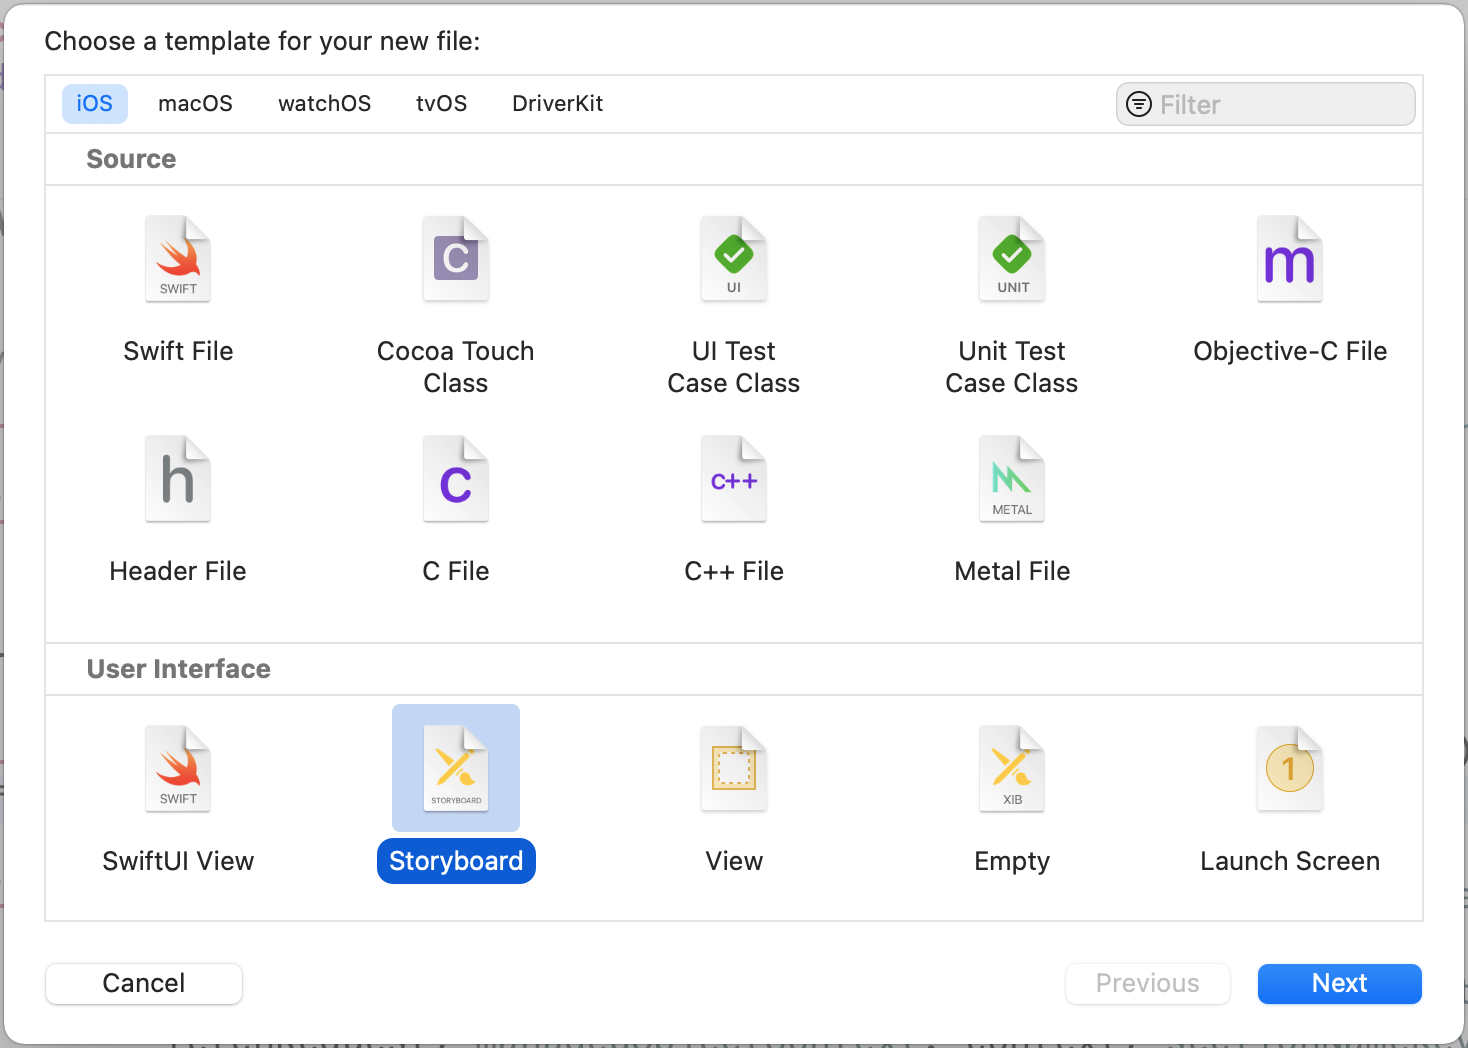
In the project navigator, right-click the Storyboard folder and choose New File…. Choose the Storyboard template and click Next. Name the file Onboarding.
Now jump to Onboarding storyboard and delete the original view controller. Open the Object library and drag a page view controller to the storyboard. There are multiple options for configuring the behavior of the controller in the Attributes inspector. You can customize the navigation style (horizontal/vertical), transition style, page spacing, and spine location.
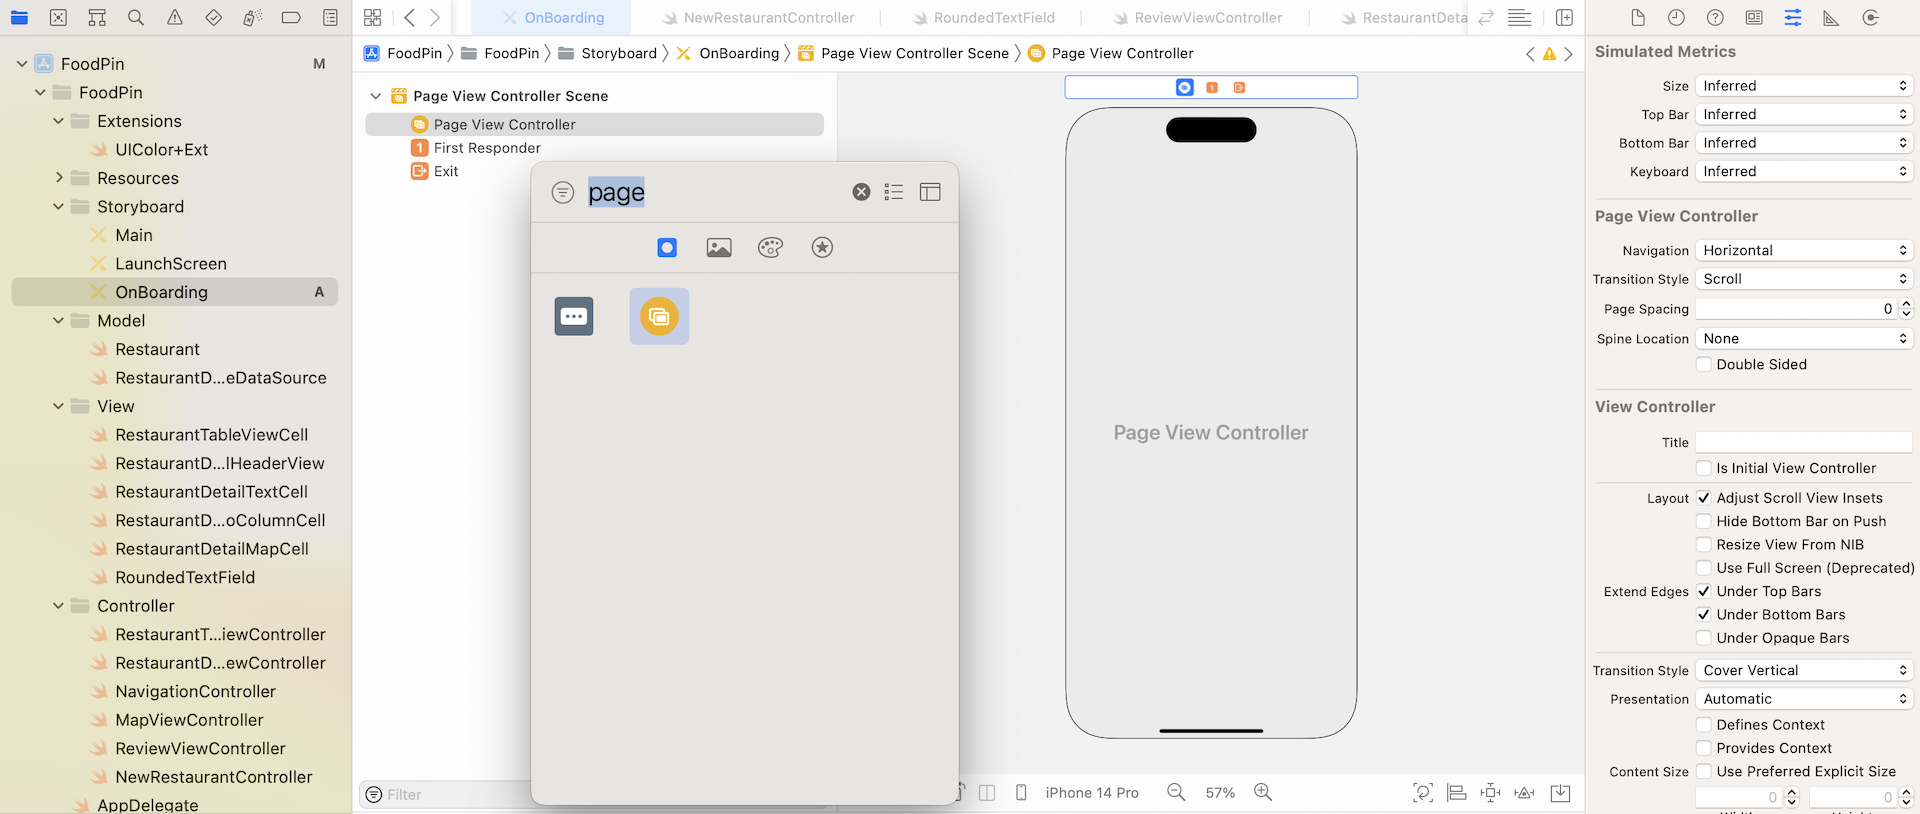
By default, the transition style of the page view controller is set as Scroll. This is perfect for building walkthrough screens. You can keep it intact. In future, if you want to develop a book app, you may want to change the style to Page Curl.
Next, assign a storyboard ID to the page view controller. In the Identity inspector, set the storyboard ID of the page view controller to WalkthroughController. Later, we will use the ID for creating the controller programmatically. This storyboard ID is optional. But if you need to use it in the code, you have to give the controller a storyboard ID.
Understanding Page View Controllers and Container Views
For now, you can't layout the walkthrough screens directly on the page view controller. Before I walk you through the procedures, let's see how the page view controller works and how we are going to implement the walkthrough screens.
If you refer to figure 21-2 again, you may find that the walkthrough screen can actually be broken down into two main parts. There are two ways to navigate through the tutorial screens. The user can either tap the Next button or swipe left the upper part of the screen. Say, you tap the Next button, what happens is that the current view of the upper part of the screen starts to move off the screen. At the same time, the next walkthrough screen comes in and eventually replaces the current view.
The lower part of the screen is almost static, that only changes its page indicator to reflect the current page number.
So how can we implement this type of walkthrough screens? Here is what we are going to do:
- We will have a page content view controller to hold the content of the walkthrough screens. It is a plain view controller that shows an image and a couple of the description labels. You may be curious why we just need a single view controller for three pages of content. Shouldn't we have three different view controllers? If you look into figure 21-5 carefully, you should find that all walkthrough screens look very similar. Therefore, instead of building a view controller for each screen, it's better to reuse the same view controller and fill in different content.
- Secondly, we will create a page view controller using the
UIPageViewControllerclass. This is the controller that handles the navigation of page content view controller I mentioned in point 1. Similar toUINavigationController, theUIPageViewControllerclass is classified as a container controller. The container controller is designed to hold and manage multiple view controllers shown in an app. It also controls how one view controller switches to another. Figure 21-5 depicts the relationship between the page view controller and the page content view controller. - Lastly, we need to master view controller to hold both the page view controller (i.e. the upper part of the screen) and the buttons (i.e. the lower part of the screen).
Feeling confused? This is not a problem. Just keep reading. You will better understand how UIPageViewController works after implementing the walkthrough screens.
Designing the Master View Controller
Let's work it backward and begin to design the master view controller first. The master view controller, as explained before, is used to hold the page view controller, the buttons, and the page indicator.
Now open the Onboarding storyboard and make sure you use iPhone 14 Pro to design the user interface. Drag a View Controller to the storyboard. The master view controller is simply a view controller, but in order to hold the page view controller, drag a Container View to the view controller. Set the size of the container view to 393x500 points.

A container view is a placeholder object that represents the contents of a child view controller. As soon as you add the container view to the view controller, the view is automatically associated with another view controller. If you resize the container view, the size of that view controller will be adjusted automatically.
Since the container view is designed to display the content of the page view controller, the view controller generated by Xcode is not appropriate in this case. Select the segue between the generated view controller and the container view. Click the Delete button to remove it.
Next, control-drag from the container view to the page view controller. Release the button and then choose the Embed option. The page view controller is now automatically resized and connected with the container view using an Embed segue.
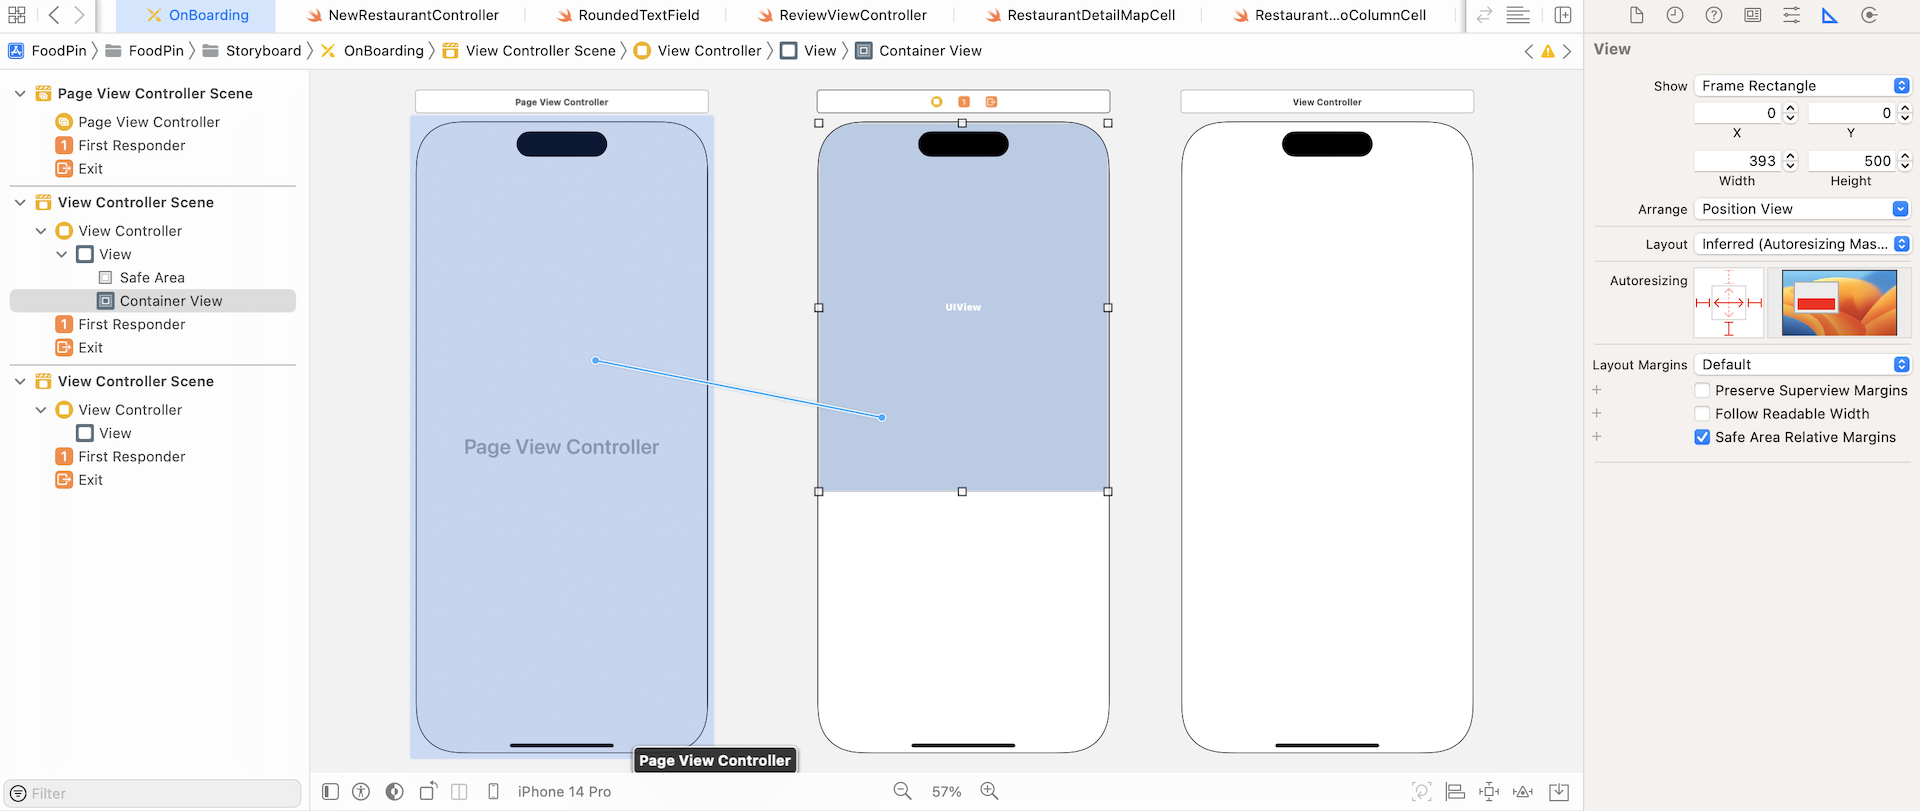
Select the container view and click the Add New Constraints button. Set the spacing value of the top, left and right sides to 0. Click Add 3 Constraints to confirm.

We are now going to design the lower part of the view. First, drag a View object to the view controller. In the Size inspector, set X to 0, Y to 500, width to 393, and height to 352. Again, we need to add a few layout constraints. Refer to figure 21-9 to add 4 spacing constraints.
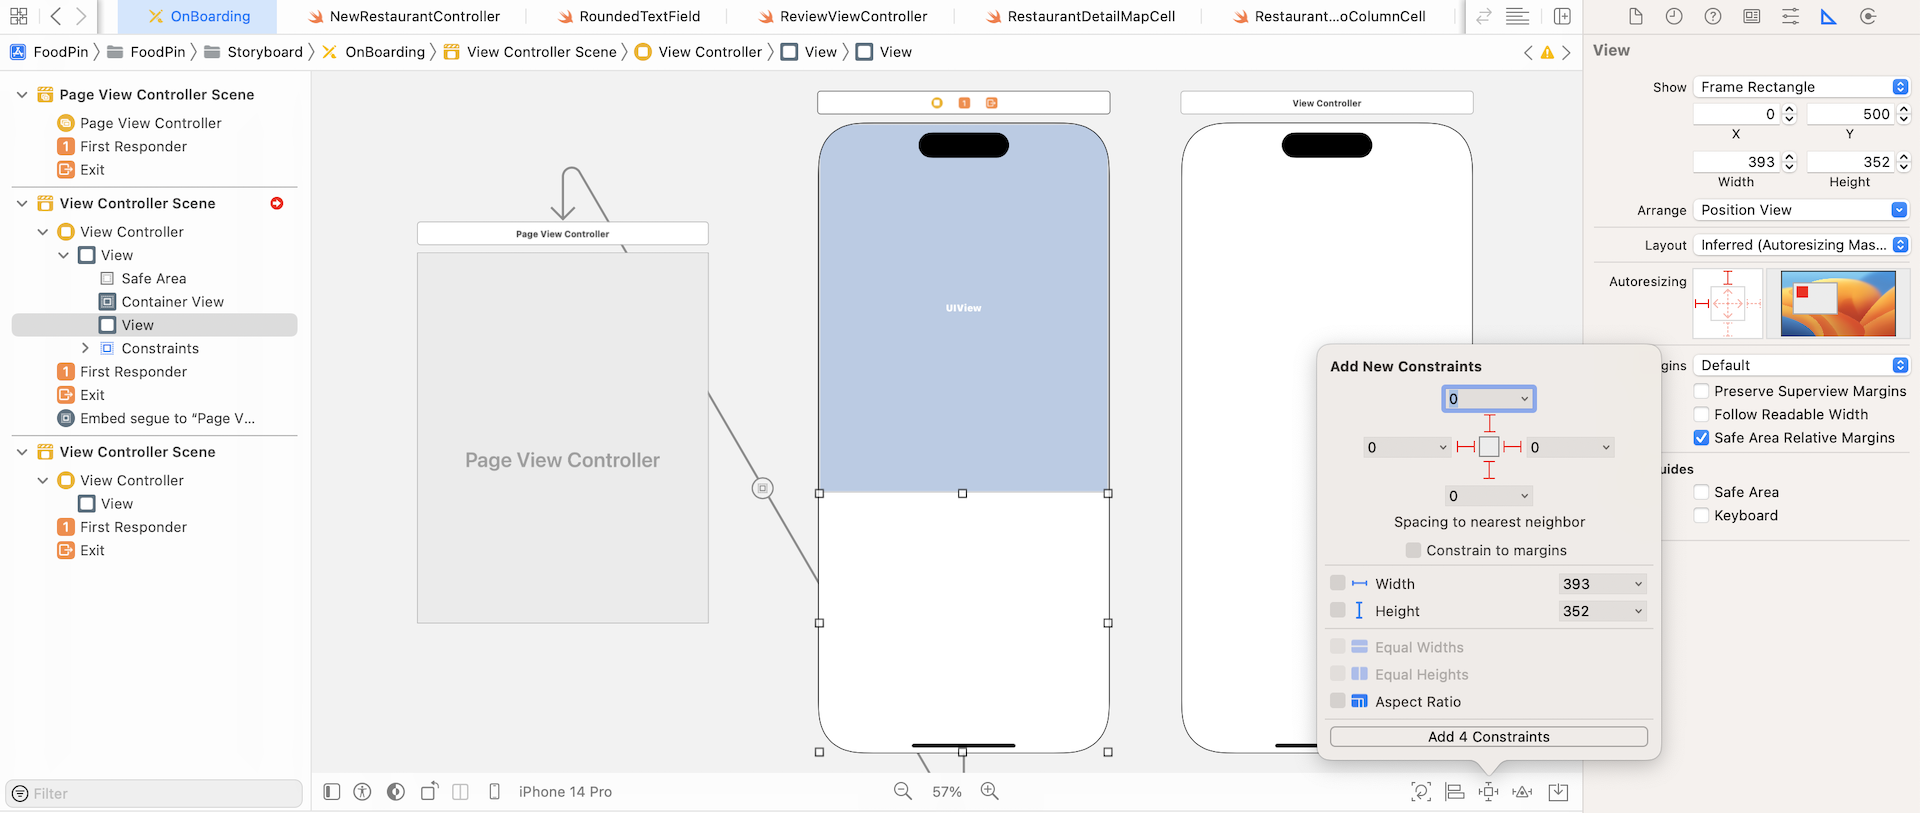
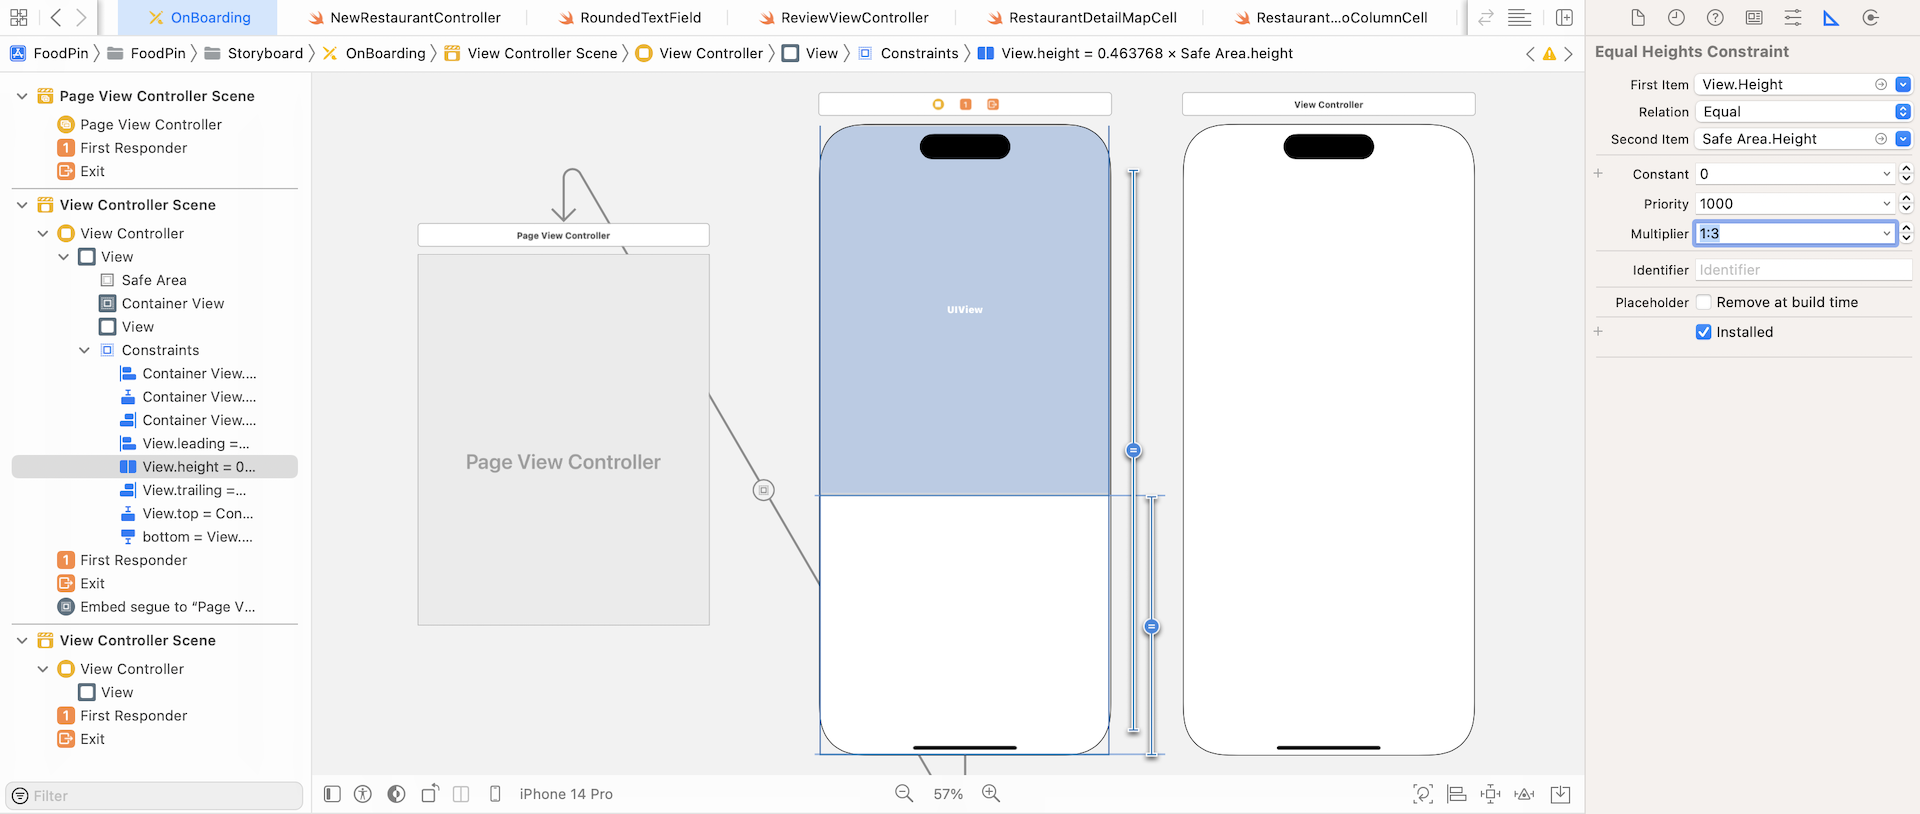
After defining the spacing constraints, Xcode still indicates that there are some layout errors. The reason is that we haven't defined a height constraint for the views. Here, I want the container view to take up two-thirds of the view controller. In other words, the empty view will take up one-third of the view.
How can we define a layout constraint for this requirement? Let me show you a very useful trick of auto layout.
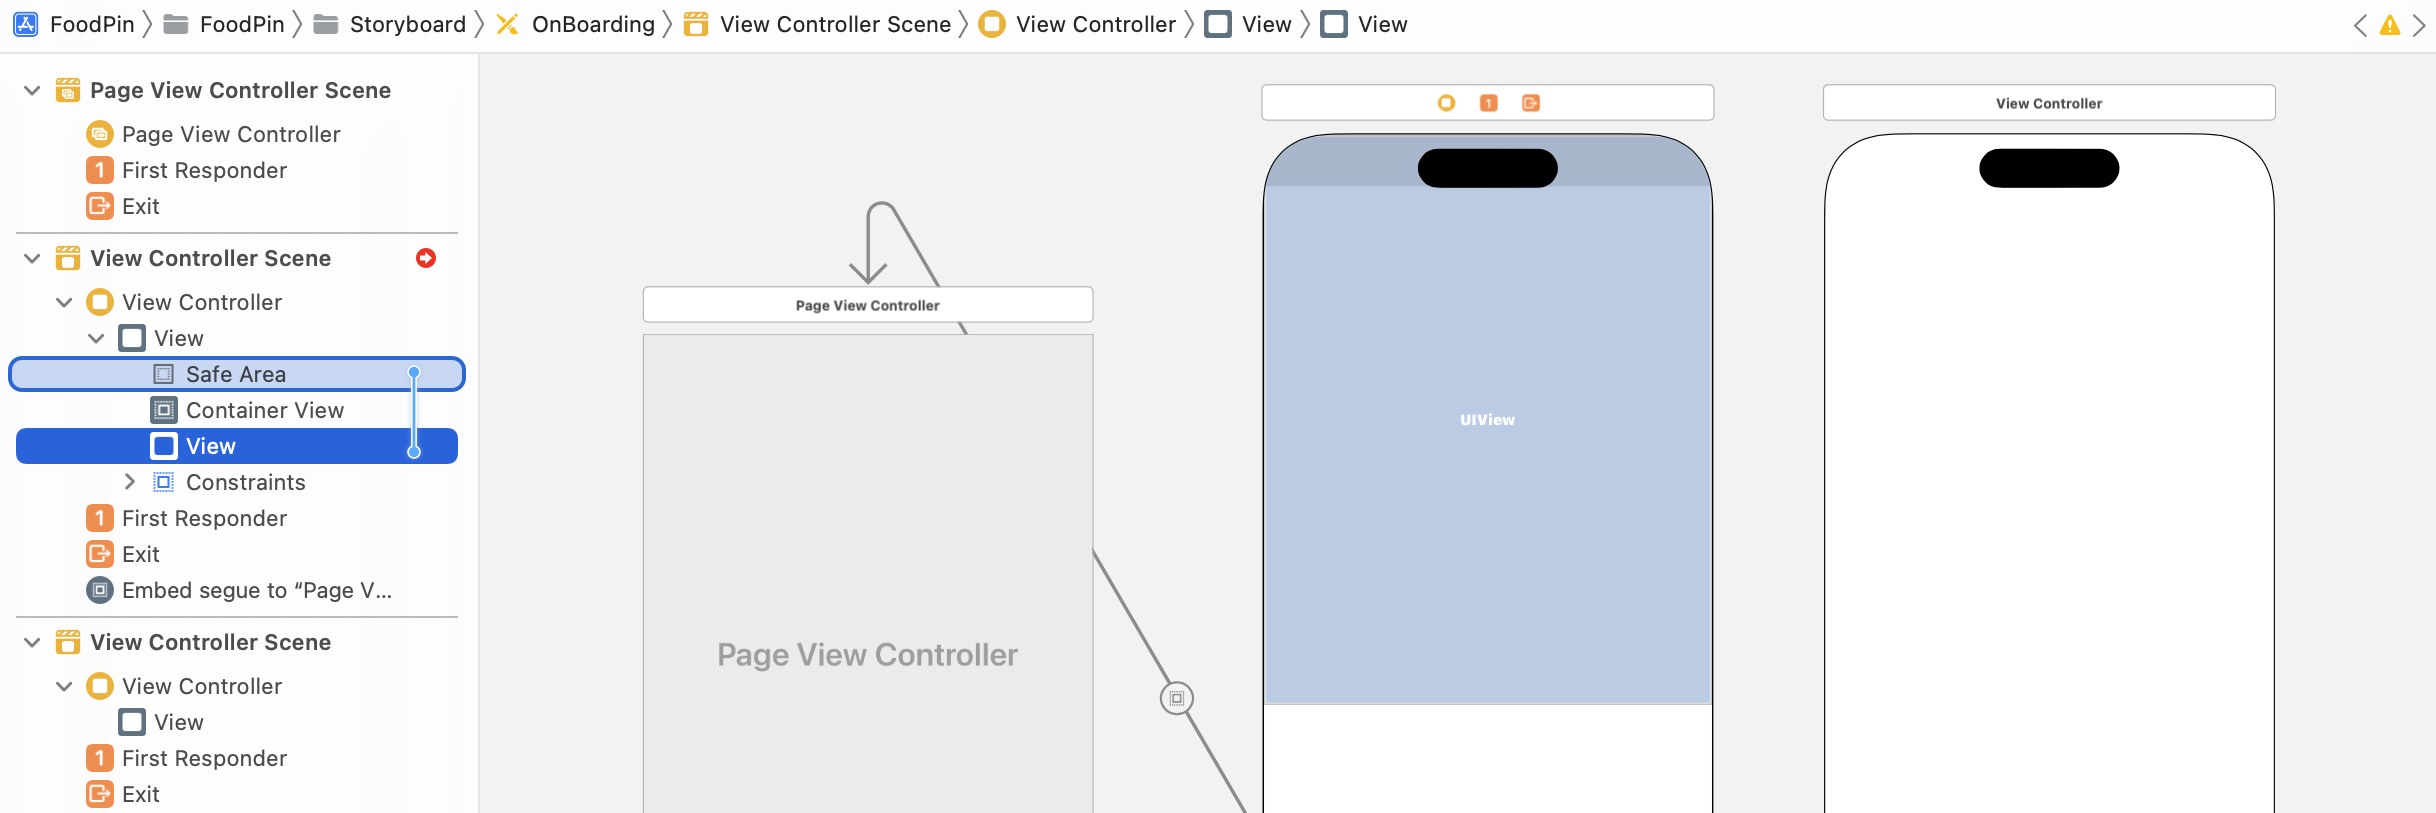
In the document outline, select the View object. Control-drag from it to Safe Area. When the popover appears, select Equal Heights. This defines a height constraint for the view, saying that its height should equal the height of the safe area.
Now the container view is squeezed into a little rectangle. This is not what we want. So select the height constraint we just defined. Go to the Size inspector and change its multiplier from 1 to 1:3. This specifies that the empty view takes up one-third of the safe area.
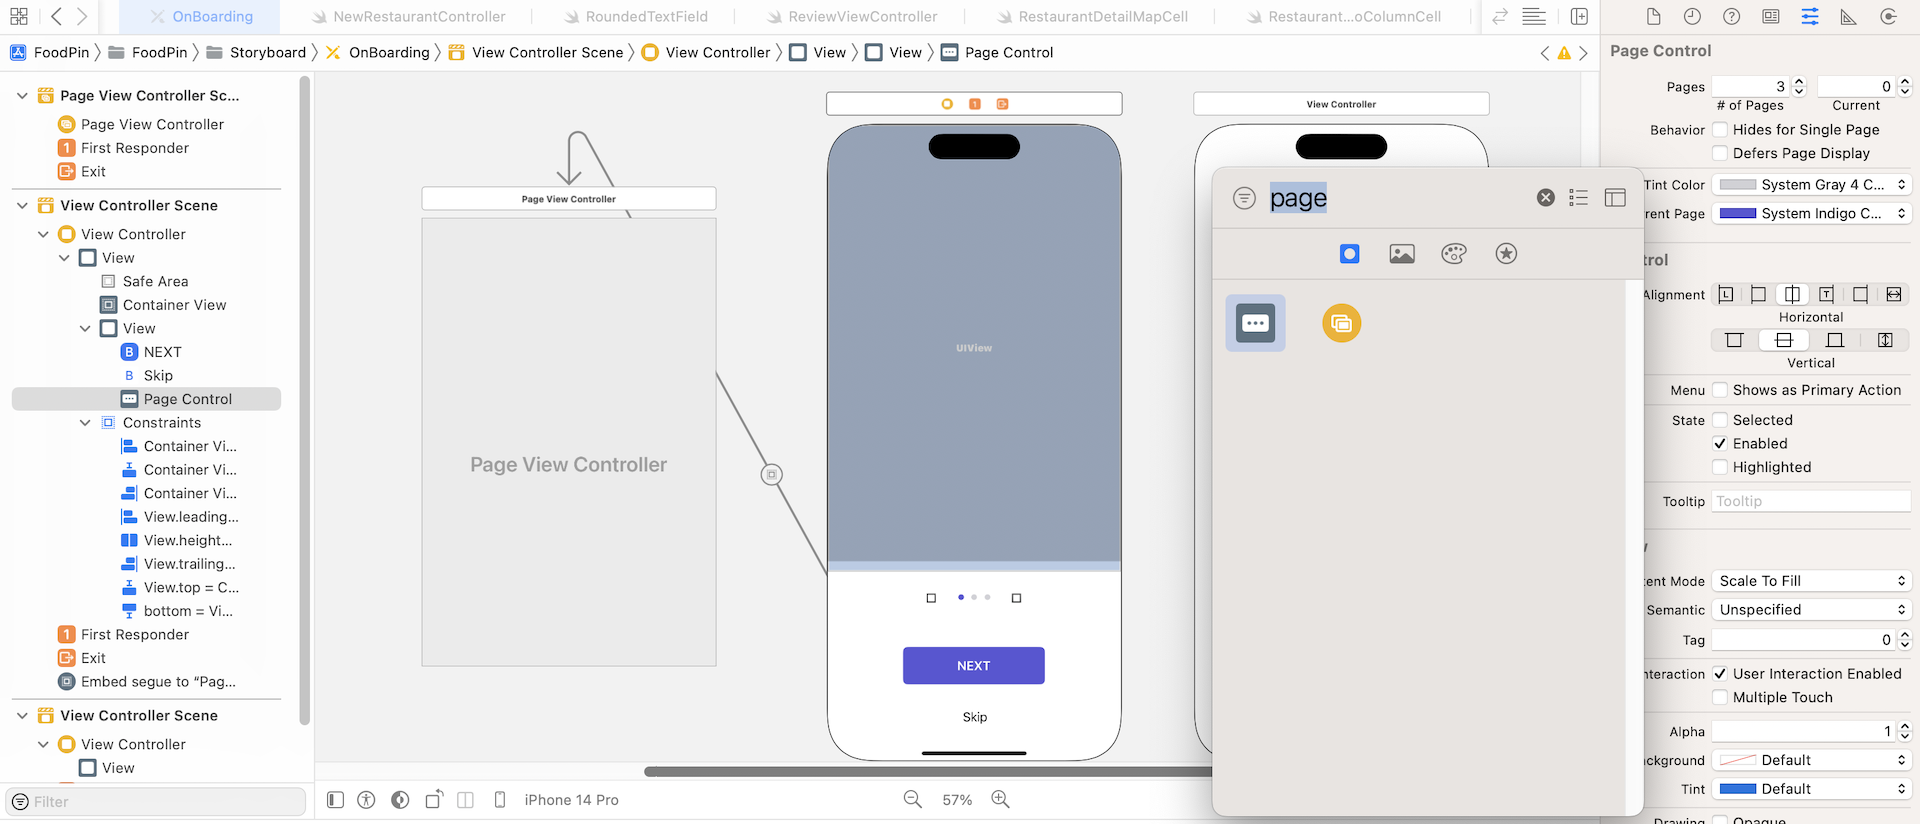
Next, we need to add the buttons and page indicator to the empty view. Drag a button from the object library to the empty view. In the Size inspector, set its width to 190 and height to 50. In the Attributes inspector, change the title to NEXT and set its font to Headline text style. Change the button's style to Filled. Also, change the tint color to System Indigo Color.
Drag another button and place it under the NEXT button. In the Attributes inspector, set the button's title to Skip. Change its font to Body text style and foreground color to Label Color.
In the object library, look up the page control object. Drag it to the empty view and place it right above the NEXT button. You can't see the dots because the color of the dot is set to transparent by default. Go to the Attributes inspector and change its tint color to System Gray 4 Color. Also, set its current page color to System Indigo Color.
We are almost done. Now it's time to define the layout constraint for the buttons and page control. Select the NEXT button and click the Add New Constraints button. Check both width and height checkboxes to limit its width to 190 and height to 50.
Now hold the command key and select the page control, the NEXT button and the Skip button. Click the Embed in button and then select Stack view to embed them in a vertical stack view. In the Attributes inspector, change the spacing to 20 to set the components apart. Lastly, click the Align button of the auto layout bar and add two constraints to center the stack view.

Designing the Page Content View Controller
Now that we've prepared the master view controller and the page view controller, let's move on to designing the page content view controller.
First, download the image pack from (http://www.appcoda.com/resources/swift53/onboarding.zip) and add the images into Assets.xcasset. Make sure you enable the Preserve Vector Data option.
Open the Onboarding storyboard. We are going to design the view controller. I suggest you change its simulated size such that its size is similar to that of the container view. It is not a must but it will help you design the page content view controller. In the Size inspector, set the size option to Freeform and change the height to 623.
Now follow these procedures to lay out the UI:
- Drag an image view to the view controller. Set its size to 333x229 points.
- Add a label object and name it
HEADING. Change to the font toHeadlinetext style. Also, set the alignment tocenter. You are free to choose your own font color. For me, I prefer Label Color. - Next, drag another label object to the view controller and name it
Subheading. Set its font toSubheadtext style. Change the alignment tocenter. Again, choose your preferred font color. I use Secondary Label Color in this case.
You'll end up with a screen similar to that shown in figure 21-14.

As usual, you have to define the layout constraints for the components. First, hold the command key and select both labels. Click Embed in and then select Stack view to embed them in a vertical stack view. Change the stack view's option in the Attributes inspector. Set the Alignment option to Center and the Spacing option to 10.
Next, select the stack view and the image view. Click Embed in and then select Stack view to embed both view objects in another stack view. In the Attributes inspector, set the Alignment option to Center and the Spacing option to 50.
Select the stack view you created in the previous step. Click the Add New Constraints button and set the value of top, left, bottom and right sides to 50, 24, 24, and 10.

Next, select the image view and click the Add New Constraints button. Tick the Aspect Ratio checkbox to add an aspect ratio constraint.
Finally, choose the bottom constraint and change its Relation option from Equal to Great than or Equal.

If you have any difficulties creating the UI, you can refer to this Xcode project template (http://www.appcoda.com/resources/swift57/FoodPinOnboarding1.zip).
Creating WalkthroughContentViewController Class
Okay, we have completed the UI design of the walkthrough views. The next step, as you should know, is to create the class to pair with the view controllers.
We will start with the page content view controller that we just created in the previous section. From now on, I will refer this controller to WalkthroughContentViewController.
Now go the project navigator and right-click the Controller folder. Select New file… and choose the Cocoa Touch Class template. Name the class WalkthroughContentViewController and set it as a subclass of UIViewController.
Once the file is created, declare the following outlets and instance variables in the class:
@IBOutlet var headingLabel: UILabel! {
    didSet {
        headingLabel.numberOfLines = 0
    }
}
@IBOutlet var subHeadingLabel: UILabel! {
    didSet {
        subHeadingLabel.numberOfLines = 0
    }
}
@IBOutlet var contentImageView: UIImageView!

var index = 0
var heading = ""
var subHeading = ""
var imageFile = ""
We will use this class to support multiple walkthrough screens. The index variable is used to store the current page index. For instance, the first walkthrough screen will have the index value of 0. The view controller is designed to display an image, heading, and subheading. So we create three variables for data passing.
For both the heading and subheading labels, I add a didSet observer to set the numberOfLines property to 0. This will allow the label to support multiple lines.
Next, change the viewDidLoad() method to the following:
override func viewDidLoad() {
    super.viewDidLoad()

    headingLabel.text = heading
    subHeadingLabel.text = subHeading
    contentImageView.image = UIImage(named: imageFile)
}
Here, we initialize the labels and image view. As you should know, the next thing we have to do is to establish a connection between the UI components and the outlet variables.
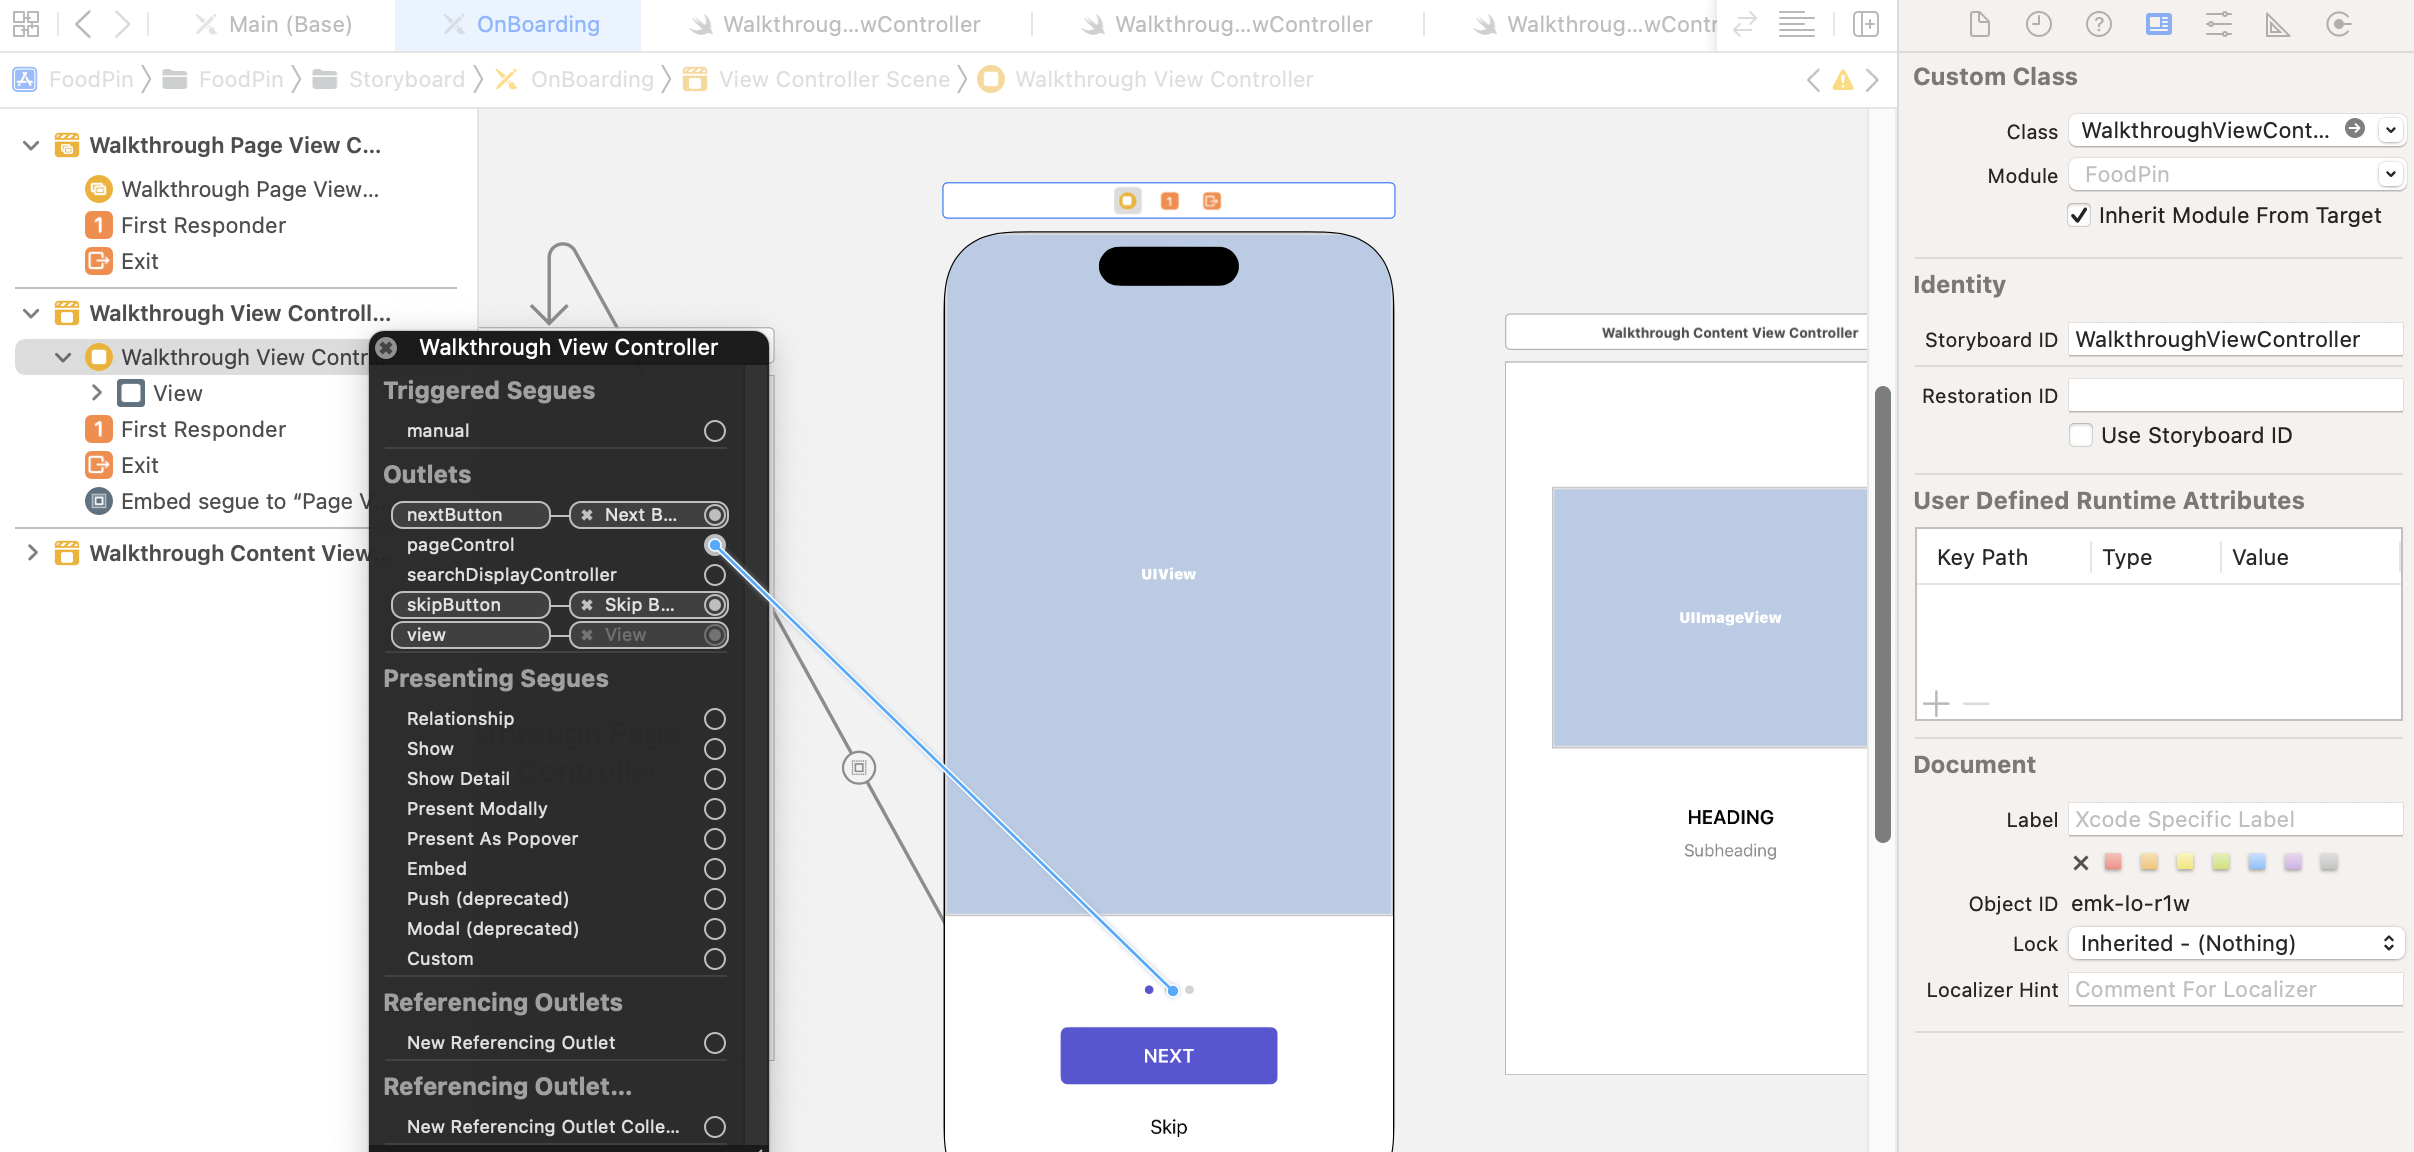
Go to Onboarding storyboard and select the page content view controller you've created. In the Identity inspector, set the custom class to WalkthroughContentViewController. Also, set the storyboard ID field to WalkthroughContentViewController. Later we use this storyboard ID to instantiate the view controller. I will further explain it in the next section.
Next, right-click the page content view controller in the document outline and establish the following connections:
Connect the
headingLabeloutlet with the HEADING label.Connect the
subHeadingLabeloutlet with the Subheading label.Connect the
contentImageViewoutlet with the Image View object.

Implementing the Page View Controller
Now that we've prepared the content view controller, the next step is to create each of the content view controller and add it into the page view controller (i.e. UIPageViewController) so that the user can navigate between them.
You have two ways to tell UIPageViewController what to display; you either provide the content view controllers one at a time or on-demand using a data source. If you just want to display a certain view controller in UIPageViewController, you can call setViewControllers(_:direction:animated:completion:) method with the view controller to be displayed.
As our app supports gesture-based navigation for the walkthrough, it's required to use the on-demand approach. For this approach, you assign a data source object serving as the provider of the content view controllers. Every time when a user navigates from one page to another, UIPageViewController asks its data source, "Hey, what content view controller should be displayed? Please pass it to me." The data source object then returns the corresponding content view controller.
The data source object should conform to the UIPageViewControllerDataSource protocol and implement the following required methods:
- pageViewController(_:viewControllerBefore:)
- pageViewController(_:viewControllerAfter:)
Does UIPageViewControllerDataSource sound familiar to you? It is very similar to UITableViewDataSource. You implement the required methods of UITableViewDataSource to provide the data of a table view. UIPageViewControllerDataSource requires you to implement the methods to provide the page content view controller.
Both methods may be called when a user navigates between pages. When called, the method is passed with a specific view controller. Your job is to determine and return a content view controller for display before/after the given controller. Let's say, if you have a content view controller with the index value of 1. The UIPageViewController object will ask:
- Hey, what is the next view controller? In this case, you should return a content view controller with index #2.
- Hey, what is the before view controller? In this case, you should return a content view controller with index #0.
Now that you have some ideas about how UIPageViewController works, let's proceed to create a new class for the page view controller. Right-click the Controller folder and select New file…. Choose the Cocoa Touch Class template. Name the class WalkthroughPageViewController and set it as a subclass of UIPageViewController.
Once created, open WalkthroughPageViewController.swift. Declare and initialize the heading, subheading, and image variables, which are used when creating the content view controllers in the class. Also, declare a currentIndex variable to store the current index of the page view:
var pageHeadings = ["CREATE YOUR OWN FOOD GUIDE", "SHOW YOU THE LOCATION", "DISCOVER GREAT RESTAURANTS"]
var pageImages = ["onboarding-1", "onboarding-2", "onboarding-3"]
var pageSubHeadings = ["Pin your favorite restaurants and create your own food guide",
                   "Search and locate your favourite restaurant on Maps",
                   "Find restaurants shared by your friends and other foodies"]

var currentIndex = 0
Next, create an extension and implement the two required methods of the UIPageViewControllerDataSource protocol:
extension WalkthroughPageViewController: UIPageViewControllerDataSource {

    func pageViewController(_ pageViewController: UIPageViewController, viewControllerBefore viewController: UIViewController) -> UIViewController? {

        var index = (viewController as! WalkthroughContentViewController).index
        index -= 1

        return contentViewController(at: index)
    }

    func pageViewController(_ pageViewController: UIPageViewController, viewControllerAfter viewController: UIViewController) -> UIViewController? {

        var index = (viewController as! WalkthroughContentViewController).index
        index += 1

        return contentViewController(at: index)
    }

}
The above methods are very straightforward. First, we get the current page index of the given view controller. Depending on the method, we simply increase/decrease the index number and return the view controller to display.
As you may notice, we haven't created the contentViewController(at:) method. This is a helper method that is designed to create the page content view controller on demand. It takes in the index parameter and creates the corresponding page content controller.
Now, add the helper method in the extension:
func contentViewController(at index: Int) -> WalkthroughContentViewController? {
    if index < 0 || index >= pageHeadings.count {
        return nil
    }

    // Create a new view controller and pass suitable data.
    let storyboard = UIStoryboard(name: "Onboarding", bundle: nil)
    if let pageContentViewController = storyboard.instantiateViewController(withIdentifier: "WalkthroughContentViewController") as? WalkthroughContentViewController {

        pageContentViewController.imageFile = pageImages[index]
        pageContentViewController.heading = pageHeadings[index]
        pageContentViewController.subHeading = pageSubHeadings[index]
        pageContentViewController.index = index

        return pageContentViewController
    }

    return nil
}
There is a lot going on here. Let's look into the method line by line.
This method is designed to accept a page index parameter. Say, a value of 0 is passed, this method will create the first walkthrough screen. At the beginning of the method, we perform some validation to make sure that the given index is valid.
Recalled that we have set a storyboard ID for the walkthrough content view controller in Interface Builder, the ID is used as a reference for creating the view controller instance. To instantiate a view controller in a storyboard, you first create an instance of the specific storyboard. Here, it is the Onboarding storyboard. Then you call the instantiateViewController(withIdentifier:) method with a specific storyboard ID. The method returns you a generic view controller. This is why we use as? to downcast the object to WalkthroughContentViewController.
Following the instantiation, we assign the content view controller with the specific image, heading, subheading, and index.
Lastly, update the viewDidLoad method to the following:
override func viewDidLoad() {
    super.viewDidLoad()

    // Set the data source to itself
    dataSource = self

    // Create the first walkthrough screen
    if let startingViewController = contentViewController(at: 0) {
        setViewControllers([startingViewController], direction: .forward, animated: true, completion: nil)
    }
}
In the code above, we set the data source of UIPageViewController to itself. We also create the first content view controller when the page view controller is first loaded.
With the class configured, go to storyboard and select the page view controller. In the Identity inspector, change the custom class from UIPageViewController to WalkthroughPageViewController. Also, set the storyboard ID to WalkthroughPageViewController.

Implementing the Walkthrough View Controller
Finally, let's create a class for the walkthrough view controller. In the project navigator, right-click the Controller folder and select New file…. Choose the Cocoa Touch Class template to proceed. Name the class WalkthroughViewController and set its subclass to UIViewController.
Once created, declare the outlet variables in the class:
@IBOutlet var pageControl: UIPageControl!
@IBOutlet var nextButton: UIButton! {
    didSet {
        nextButton.layer.cornerRadius = 25.0
        nextButton.layer.masksToBounds = true
    }
}
@IBOutlet var skipButton: UIButton!
Now switch over to the Onboarding storyboard. Select the walkthrough view controller, which is the master view that holds the page view controller. In the Identity inspector, set the custom class to WalkthroughViewController and the storyboard ID to WalkthroughViewController.
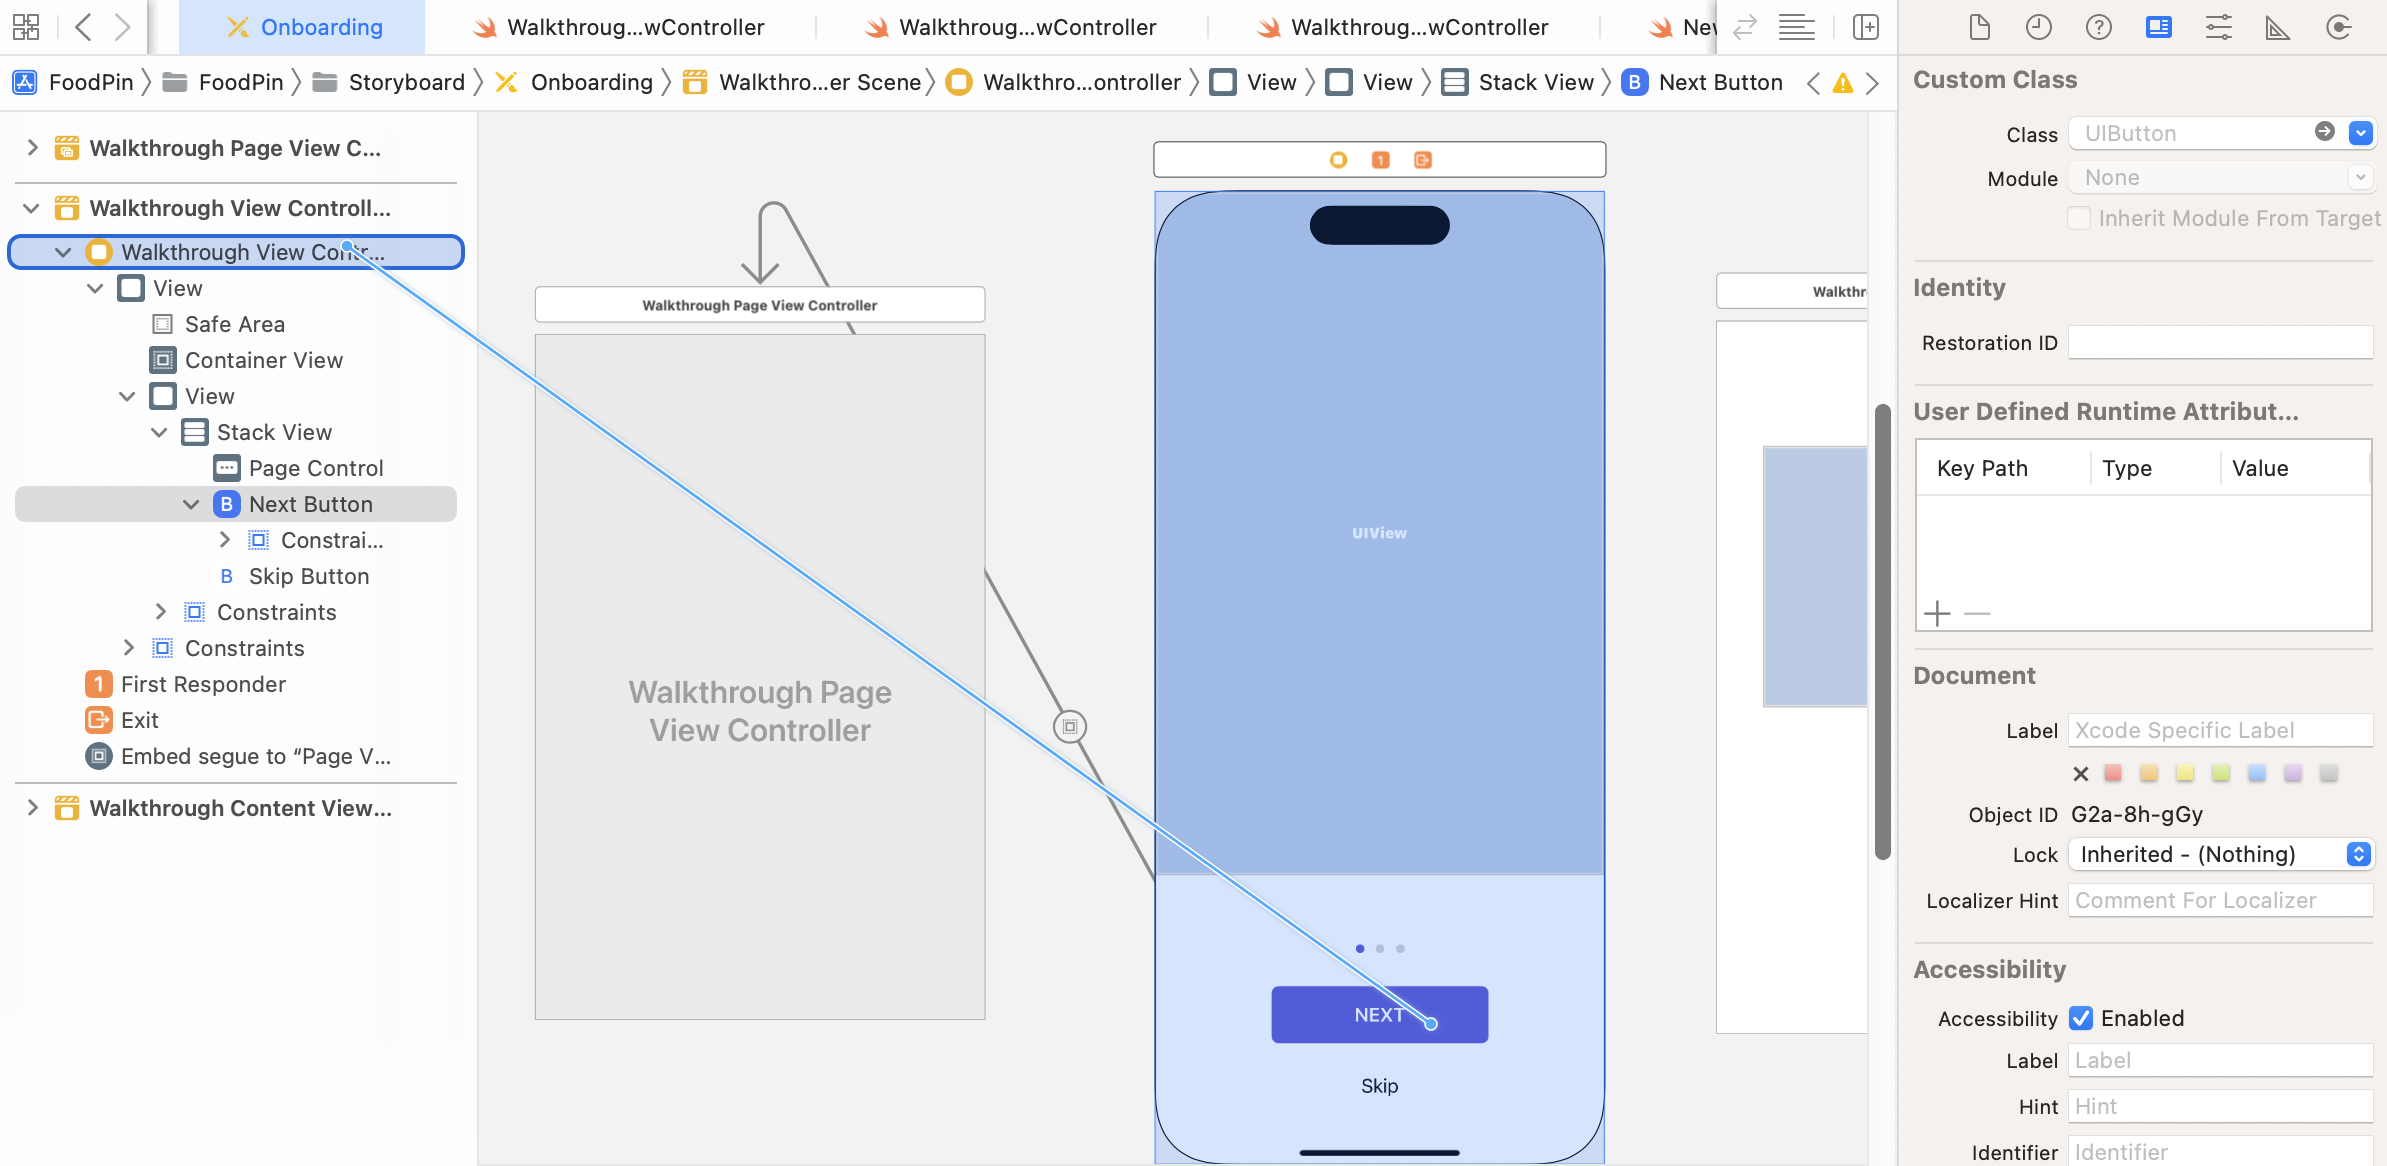
Next, connect the outlet variables with the UI component:
- Connect the
pageControloutlet to the page control - Connect the
nextButtonoutlet to the NEXT button - Connect the
skipButtonoutlet to the Skip button
Displaying the Walkthrough Screens
You're almost ready to test out the walkthrough screens. Because we want to bring up the walkthrough view controller when a user first launches the app. We instantiate the controller in the RestaurantTableViewController class. Insert the following method:
override func viewDidAppear(_ animated: Bool) {
    let storyboard = UIStoryboard(name: "Onboarding", bundle: nil)
    if let walkthroughViewController = storyboard.instantiateViewController(withIdentifier: "WalkthroughViewController") as? WalkthroughViewController {

        present(walkthroughViewController, animated: true, completion: nil)
    }
}
The viewDidAppear method will be automatically called by iOS. We make use of this method to bring up the walkthrough view controller. The code is self-readable. We just instantiate the WalkthroughViewController object and present it in a modal way.
Now you're ready to hit the Run button and test the app. As soon as you launch the app, it brings up the walkthrough screens and you can navigate through the screens using gestures. Swipe right the image will bring you the next screen.

Handling the Page Indicator and the Next/Skip Buttons
The walkthrough screens work great, right? However, you should find two problems:
- The next and skip buttons are not working yet. That is obvious because we haven't provided the implementation.
- In the last screen, the skip button should be hidden and the next button should be changed to GET STARTED button.
- The page indicator doesn't work yet. The red dot doesn't change its position to reflect the current index of the walkthrough screen.
Now let's tackle both issues. First, we are going to implement the methods for the Next and Skip button.
The function of the Skip button is simple. When the user taps the button, the app dismisses the walkthrough view controller. Therefore, create an action method in the WalkthroughViewController class:
@IBAction func skipButtonTapped(sender: UIButton) {
    dismiss(animated: true, completion: nil)
}
In the method, we just call the dismiss method to dismiss the view controller.
For the next button, it is more complicated. When a user taps the button, it automatically shows the next walkthrough screen. How can we programmatically show the next screen of the page view controller?
In the WalkthroughPageViewController class, insert a new method named forwardPage():
func forwardPage() {
    currentIndex += 1
    if let nextViewController = contentViewController(at: currentIndex) {
        setViewControllers([nextViewController], direction: .forward, animated: true, completion: nil)
    }
}
When the method is called, it automatically creates the next content view controller. If the controller can be created, we call the built-in setViewControllers method and navigate to the next view controller.
Now go back to WalkthroughViewController and add a property:
var walkthroughPageViewController: WalkthroughPageViewController?
This is the property that stores a reference to the WalkthroughPageViewController object. Later, we will use it to find out the current index of the walkthrough screen.
Recall that the container view connects with the Walkthrough Page View Controller through an embed segue (see figure 21-8), we can add the prepare method to get the reference of the Walkthrough Page View Controller. In the WalkthroughViewController class, insert the following method:
override func prepare(for segue: UIStoryboardSegue, sender: Any?) {
    let destination = segue.destination
    if let pageViewController = destination as? WalkthroughPageViewController {
        walkthroughPageViewController = pageViewController
    }
}
Now, it is time to create the nextButtonTapped action method in the WalkthroughViewController class. The method will be called when the next button is tapped:
@IBAction func nextButtonTapped(sender: UIButton) {

    if let index = walkthroughPageViewController?.currentIndex {
        switch index {
        case 0...1:
            walkthroughPageViewController?.forwardPage()

        case 2:
            dismiss(animated: true, completion: nil)

        default: break

        }
    }

    updateUI()
}
The code is self-explanatory. We perform a different action, depending on the current page index. For the first two pages, we call the forwardPage() method to display the next walkthrough screen. For the last walkthrough page, we call the dismiss method to dismiss the view controller.
Okay, we already implemented the action methods for both Next and Skip buttons. However, we still haven't managed the page control. This is one of the purposes of the updateUI method. In the code above, we call updateUI() at the end of the method. Add the following code to create the method:
func updateUI() {

    if let index = walkthroughPageViewController?.currentIndex {
        switch index {
        case 0...1:
            nextButton.setTitle("NEXT", for: .normal)
            skipButton.isHidden = false
        case 2:
            nextButton.setTitle("GET STARTED", for: .normal)
            skipButton.isHidden = true
        default: break
        }

        pageControl.currentPage = index
    }

}
The updateUI() method handles two things. First, it controls the title of the next button and determines whether the skip button should be hidden. Secondly, it changes the indicator of the page control by setting the currentPage property.
Now that we have prepared the action methods, let's switch over to Onboarding storyboard to connect the methods. Control-drag from the NEXT button to the Walkthrough View Controller. Select nextButtonTappedWithSender: when prompted.
Repeat the same procedures for the Skip button but choose skipButtonTappedWithSender: instead.
Now run the app to test it out! Tapping the next button will show the next walkthrough screen. Most importantly, the page indicator works as expected.
Updating the Page Indicator for Gesture-based Navigation
Do you find another issue with the page indicator?
The walkthrough view controller supports both gesture-based and button-based navigation. When you tap the NEXT button, it navigates to the next screen with an animated transition and the page indicator updates accordingly. That's perfect! However, if you navigate to the next screen using gestures, the page control doesn't update itself.
What's the problem here? When the user swipes the walkthrough screen, the page view controller didn't notify the walkthrough view controller to update the page indicator.

Okay, how can the page view controller inform the walkthrough view controller? In iOS programming, one common approach to performing this kind of notification is by using a delegate. The general idea is that the Walkthrough Page View Controller defines a delegate protocol with a required method.
For the Walkthrough View Controller (or any view controller) that wants to be informed, it has to adopt that delegate protocol and tell the Walkthrough Page View Controller who the delegate is. In this example, the delegate is the Walkthrough View Controller.
At an appropriate time, the Walkthrough Page View Controller will invoke that method to tell its delegate the current index. The delegate can then update the page indicator.
Okay, let's get to the implementation.
In the WalkthroughPageViewController.swift file, insert the following code and place it right below import UIKit:
protocol WalkthroughPageViewControllerDelegate: AnyObject {
    func didUpdatePageIndex(currentIndex: Int)
}
You have adopted some protocols before like UITableViewDelegate. But this is the very first time you define your own protocol. A protocol in Swift lets you define a blueprint of methods for a particular task. It starts with a protocol keyword followed by the protocol name. In the body, you declare the method definition. Here, we declare a didUpdatePageIndex method that tells its delegate the current page index.
In the WalkthroughPageViewController class, declare a walkthroughDelegate variable to hold the delegate:
weak var walkthroughDelegate: WalkthroughPageViewControllerDelegate?
In most cases, we use the weak keyword for delegate to prevent memory leak. I will not go into memory management in details here. To learn more about that, refer to the Automatic Reference Counting section of the Swift Programming Language guide (https://docs.swift.org/swift-book/LanguageGuide/AutomaticReferenceCounting.html).
Now that we have defined our protocol, the next question is when we should call the delegate's method?
Apparently, we should inform the delegate when the next walkthrough screen completely shows. There is a built-in protocol called UIPageViewControllerDelegate that comes with the following method:
optional func pageViewController(_ pageViewController: UIPageViewController, didFinishAnimating finished: Bool, previousViewControllers: [UIViewController], transitionCompleted completed: Bool)
If you adopt the UIPageViewControllerDelegate protocol and implement the method, the method will be automatically called after a gesture-driven transition completes. This is exactly what we are looking for.
Again, we will create an extension to adopt the UIPageViewControllerDelegate protocol and implement the method like this:
extension WalkthroughPageViewController: UIPageViewControllerDelegate {

    func pageViewController(_ pageViewController: UIPageViewController, didFinishAnimating finished: Bool, previousViewControllers: [UIViewController], transitionCompleted completed: Bool) {

        if completed {
            if let contentViewController = pageViewController.viewControllers?.first as? WalkthroughContentViewController {

                currentIndex = contentViewController.index

                walkthroughDelegate?.didUpdatePageIndex(currentIndex: contentViewController.index)
            }

        }
    }

}
We first check if the transition is completed and find out the current page index. Then we call the didUpdatePageIndex to inform the delegate.
Finally, insert the following line of code in the viewDidLoad() method to assign the delegate of the UIPageViewControllerDelegate protocol:
delegate = self
Okay, it's time to complete the puzzle. Now open the WalkthroughViewController.swift file and create an extension to adopt the WalkthroughPageViewControllerDelegate protocol:
extension WalkthroughViewController: WalkthroughPageViewControllerDelegate {

    func didUpdatePageIndex(currentIndex: Int) {
        updateUI()
    }

}
Then update the prepare method like this:
override func prepare(for segue: UIStoryboardSegue, sender: Any?) {
    let destination = segue.destination
    if let pageViewController = destination as? WalkthroughPageViewController {
        walkthroughPageViewController = pageViewController
        walkthroughPageViewController?.walkthroughDelegate = self
    }
}
The method is nearly the same as before, except that we assign a value for the walkthroughDelegate property.
Cool! We've made the change. Will it work? Just compile and run the project to test it out. If you got everything right, the page indicator should now work properly.
Wait! Another Bug!
Now the walkthrough is up and running. However, it's displayed over and over again, every time when you launch the app again or navigate back from the detailed view. The method viewDidAppear is called every time when the main screen appears. We haven't implemented any logic to control the reappearance of the walkthrough screens.
In general, walkthrough or tutorial screens are displayed only when a user launches the app for the very first time. In order to do so, we need to find a way to store a status that indicates whether the user has viewed the walkthrough.
Where should we keep the status?
You've learned Core Data, so you probably want to keep the status in the local database. While this is an option, there is a simpler way to store the application and user settings.
Introducing UserDefaults
The iOS SDK comes with the UserDefaults class for managing application and user-related settings. For example, you can save a status to indicate whether the user has gone through the walkthrough. Or if you've enhanced the app to display the average price of a basic meal and want to allow users to configure the default currency, you can also use UserDefaults to store the user's preference.
The UserDefaults class provides a programmatic interface for interacting with the defaults system. The defaults system is created automatically and available for all code across your app. Data stored in the defaults system is persistent. In other words, you can still access the data even if the user quits the app or the app crashes.
To use UserDefaults, all you need is to get the shared defaults object:
UserDefaults.standard
Depending on the type of objects to retrieve, you can use one of the following methods to retrieve the setting:
- array(forKey:)
- bool(forKey:)
- data(forKey:)
- dictionary(forKey:)
- float(forKey:)
- integer(forKey:)
- object(forKey:)
- stringArray(forKey:)
- string(forKey:)
- double(forKey:)
- url(forKey:)
To save a setting in the defaults system, you set the value with a specific key. Here is an example:
UserDefaults.standard.set(true, forKey: "hasViewedWalkthrough")
Working with UserDefaults
If you understand how UserDefaults works, you may know how to use it to save the walkthrough status. After a user taps the GET STARTED button, we store a status in the user defaults to indicate that the user has gone through the tutorial. Open WalkthroughViewController.swift and update the nextButtonTapped method to the following:
@IBAction func nextButtonTapped(sender: UIButton) {

    if let index = walkthroughPageViewController?.currentIndex {
        switch index {
        case 0...1:
            walkthroughPageViewController?.forwardPage()

        case 2:
            UserDefaults.standard.set(true, forKey: "hasViewedWalkthrough")
            dismiss(animated: true, completion: nil)

        default: break

        }
    }

    updateUI()
}
When the GET STARTED button is tapped, we add a hasViewedWalkthrough key to the user defaults and set it to true .
The same logic should be applied to skipButtonTapped:
@IBAction func skipButtonTapped(sender: UIButton) {
    UserDefaults.standard.set(true, forKey: "hasViewedWalkthrough")
    dismiss(animated: true, completion: nil)
}
Now open RestaurantTableViewController.swift and add a simple logic in the viewDidAppear method to determine if it should present the walkthrough view controller. Update the method like this:
override func viewDidAppear(_ animated: Bool) {

    if UserDefaults.standard.bool(forKey: "hasViewedWalkthrough") {
        return
    }

    let storyboard = UIStoryboard(name: "Onboarding", bundle: nil)
    if let walkthroughViewController = storyboard.instantiateViewController(withIdentifier: "WalkthroughViewController") as? WalkthroughViewController {

        present(walkthroughViewController, animated: true, completion: nil)
    }
}
The change should be very straightforward. We retrieve the hasViewedWalkthrough key from the user defaults and check its value. The walkthrough view controller will only be presented when the value is set to false.
That's it. Run the project to have a quick test. Now once you tap the GET STARTED button or the Skip button, the app will no longer display the walkthrough screens.
Summary
In this chapter, we covered the basics of UIPageViewController, container view, and UserDefaults. You should understand how to create walkthrough or tutorial screens when your users first use the app.
UIPageViewController is a very handy class for implementing walkthrough or tutorial screens. That said, the usage of UIPageViewController is unlimited. You can use it to display whatever information you like such as pages of web views.
So far we just use the scroll transition style. Don't you know that you can easily use UIPageViewController to build a simple book app? Simply change the transition style from scroll to page curl and see what you'll get.
For reference, you can download the complete Xcode project from http://www.appcoda.com/resources/swift57/FoodPinOnboarding.zip.