- Made by AppCoda
- Contact us / Support
- Tweet this book
- Preface
- 1. The Development Tools, the Learning Approach, and the App Idea
- 2. Your First Taste of Swift with Playgrounds
- 3. Hello World! Build Your First App in Swift
- 4. Hello World App Explained
- 5. Introduction to Auto Layout
- 6. Designing UI Using Stack Views
- 7. Introduction to Prototyping
- 8. Creating a Simple Table-based App
- 9. Customize Table Views Using Prototype Cell, Diffable Data Source and Dark Mode
- 10. Displaying Alerts with UIAlertController and Handling Table View Selection
- 11. Object Oriented Programming, Project Organization and Code Documentation
- 12. Table Row Deletion, Custom Action Button and MVC
- 13. Introduction to Navigation Controller and Segue
- 14. Detail View Enhancement and Navigation Bar Customization
- 15. Navigation Bar Customization, Extensions and Dynamic Type
- 16. Working with Maps
- 17. Basic Animations, Visual Effects and Unwind Segues
- 18. Working with Static Table Views, Camera and NSLayoutConstraint
- 19. Working with Core Data
- 20. Search Bar and UISearchController
- 21. Building Walkthrough Screens with UIPageViewController and Container Views
- 22. Exploring Tab Bar Controller and Storyboard References
- 23. Getting Started with WKWebView and SFSafariViewController
- 24. Exploring CloudKit
- 25. Localizing Your App to Reach More Users
- 26. Deploying and Testing Your App on a Real iOS Device
- 27. Beta Testing with TestFlight and CloudKit Production Deployment
- 28. Submit Your App to App Store
- 29. Adopting 3D Touch, Haptic Touch and Context Menus
- 30. Developing User Notifications in iOS
- 31. Appendix - Swift Basics
- Published with GitBook
Chapter 18
Working with Static Table Views, Camera and NSLayoutConstraint

My biggest motivation? Just to keep challenging myself. I see life almost like one long University education that I never had. Every day I'm learning something new.
- Richard Branson
Up till now, the FoodPin app is only capable of displaying content. We need to find a way for users to add a new restaurant. In this chapter, we will create a new screen that displays an input form for collecting restaurant information. In the form, it will let users pick a restaurant photo from the built-in photo library. You'll learn a number of techniques:
- How to create a form using a static table view
- How to use
UIImagePickerControllerto select a photo from the built-in photo library and take photos - How to define auto layout constraints programmatically using
NSLayoutAnchor
In the first few chapters of the book, we have gone through the basics of table views. The table views that I covered are dynamic in nature. Usually, you create a prototype cell and populate it with dynamic content. However, table views are not limited to present dynamic content. Sometimes, you may just want to use a table view to present a form or a setting screen. In this case, a static table view is what you need. Static table views are ideal for situations where there are a pre-defined number of data items to be displayed.
Xcode allows developers to create static table views with minimal code. To illustrate how easy you can use Interface Builder to implement a static table view, we will build a new screen for adding a new restaurant.
Designing the New Restaurant View Controller
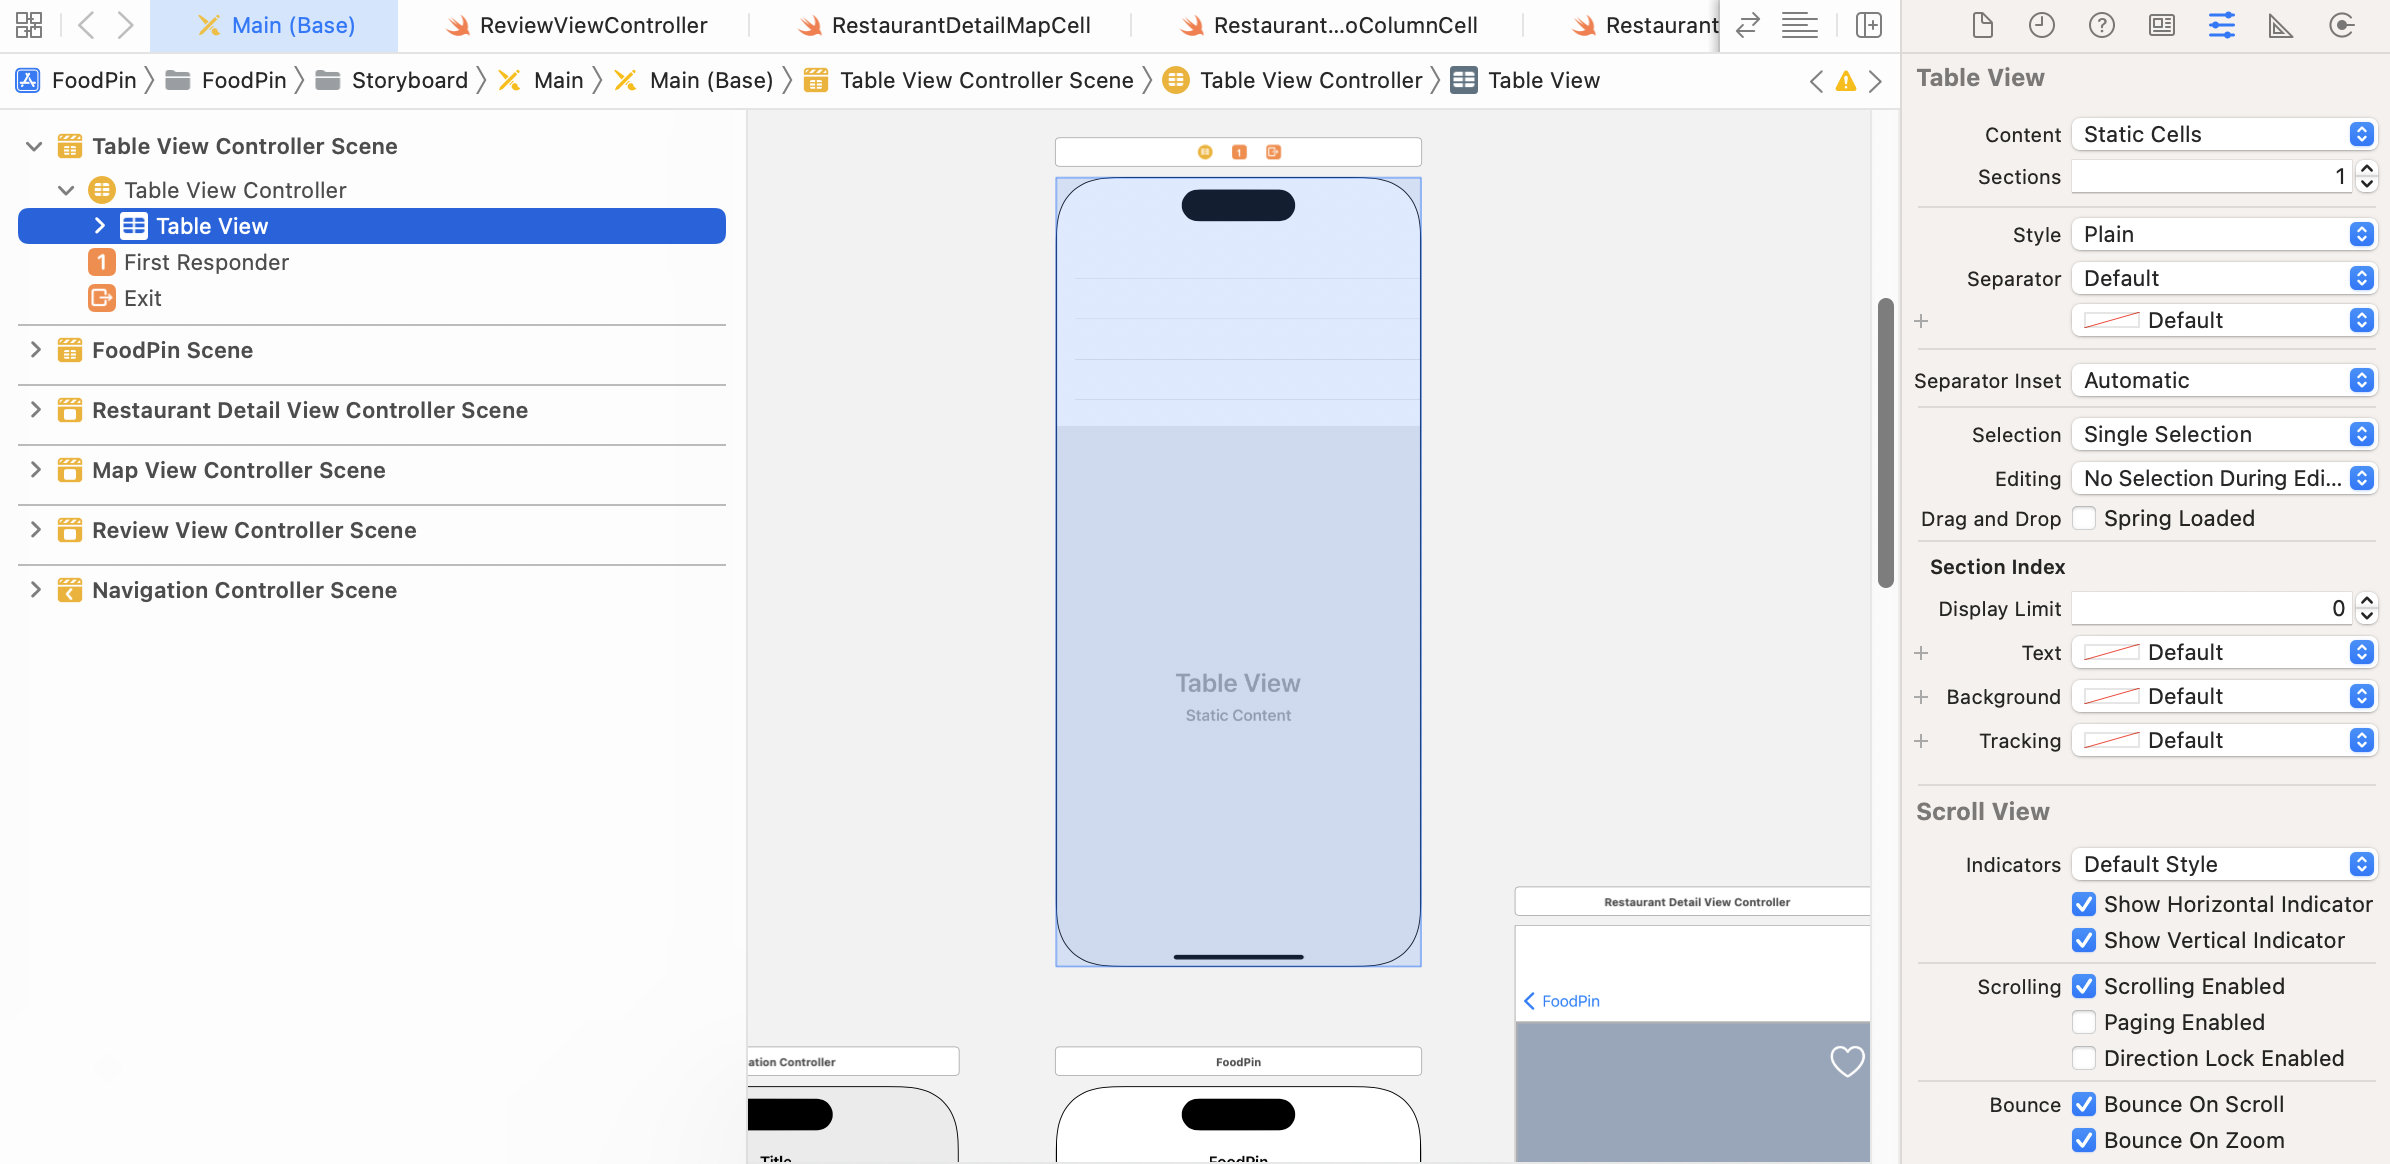
Before you begin, download this image file http://www.appcoda.com/resources/swift53/newphotoicon.zip and add it to the asset catalog. Next, go to the Main storyboard and drag a table view controller from the Object library to the storyboard. Select the table view in the document outline. In the Attribute inspector, change the Content option from Dynamic Prototypes to Static Cells. Once changed, you will have a table view with three empty static cells.
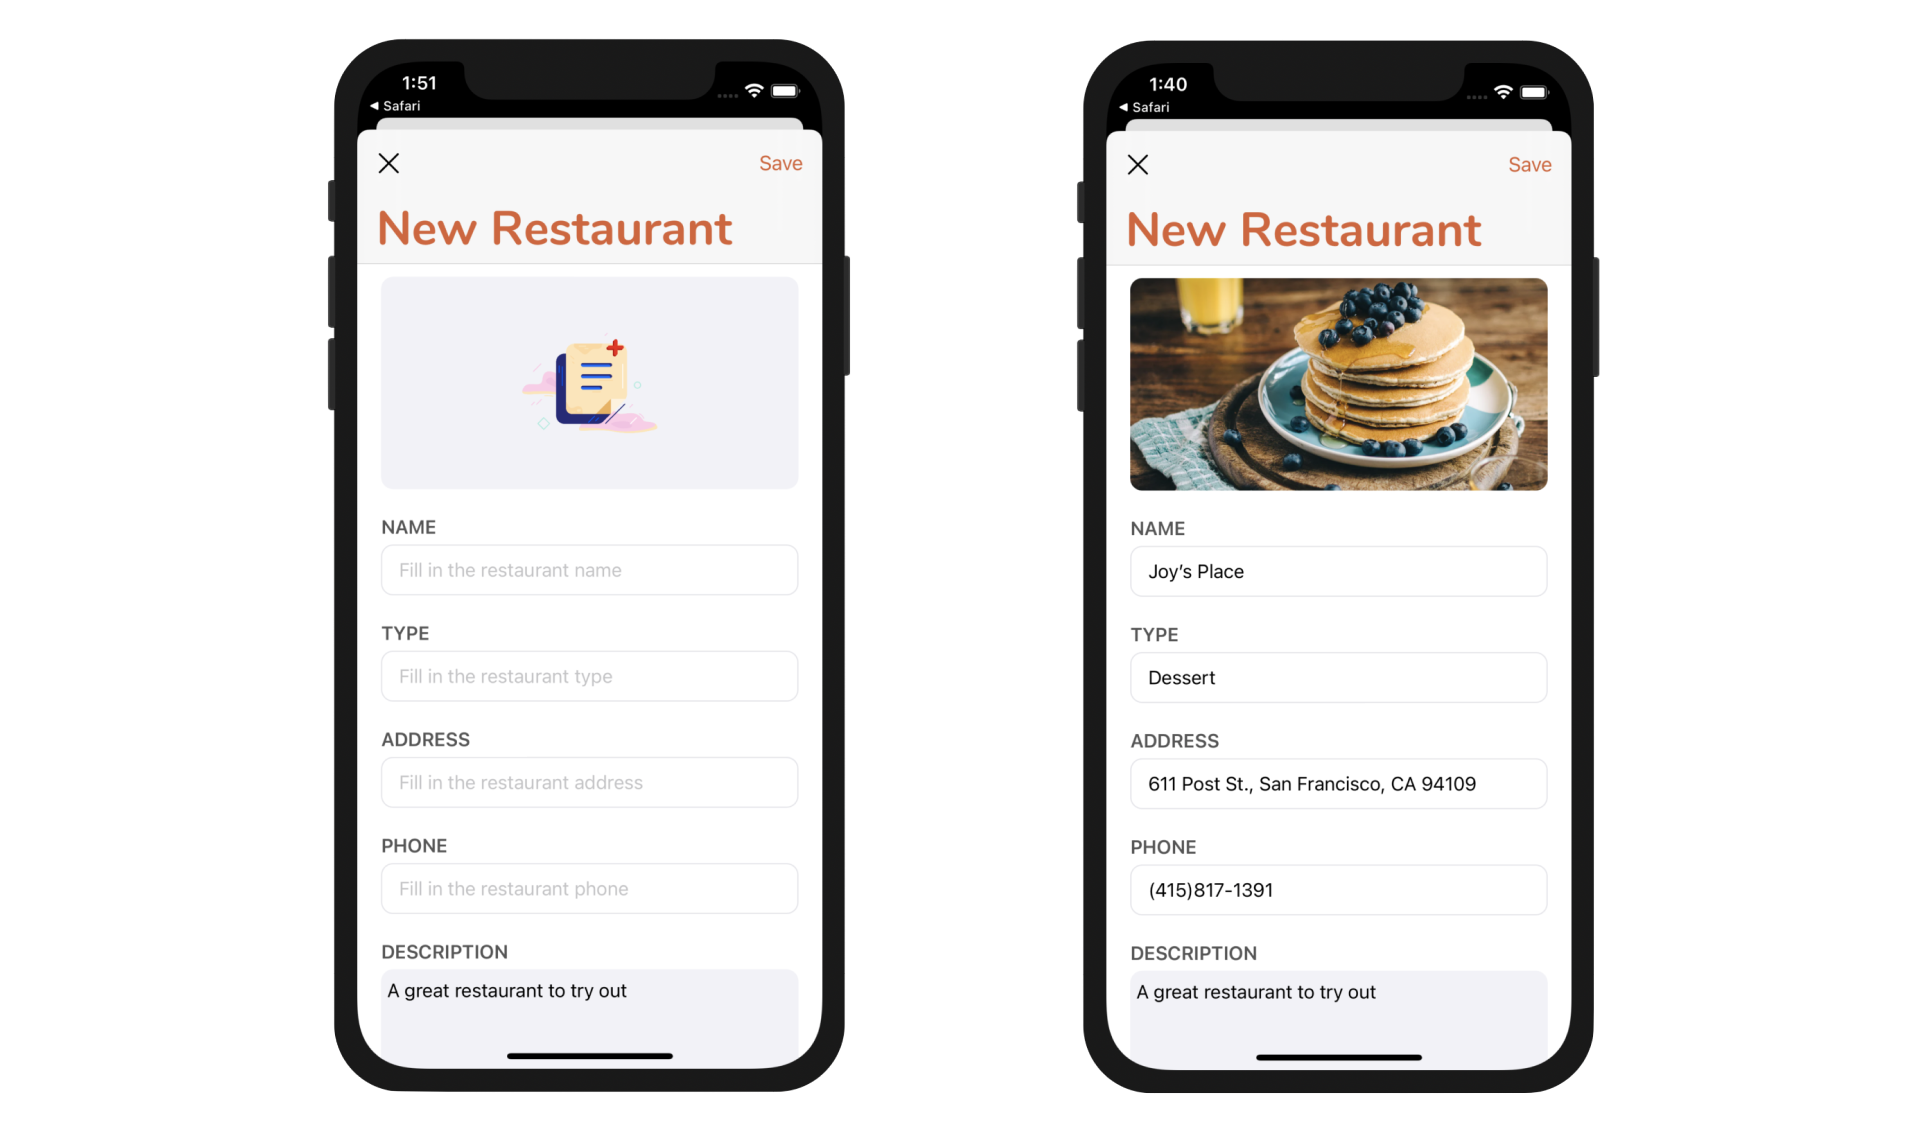
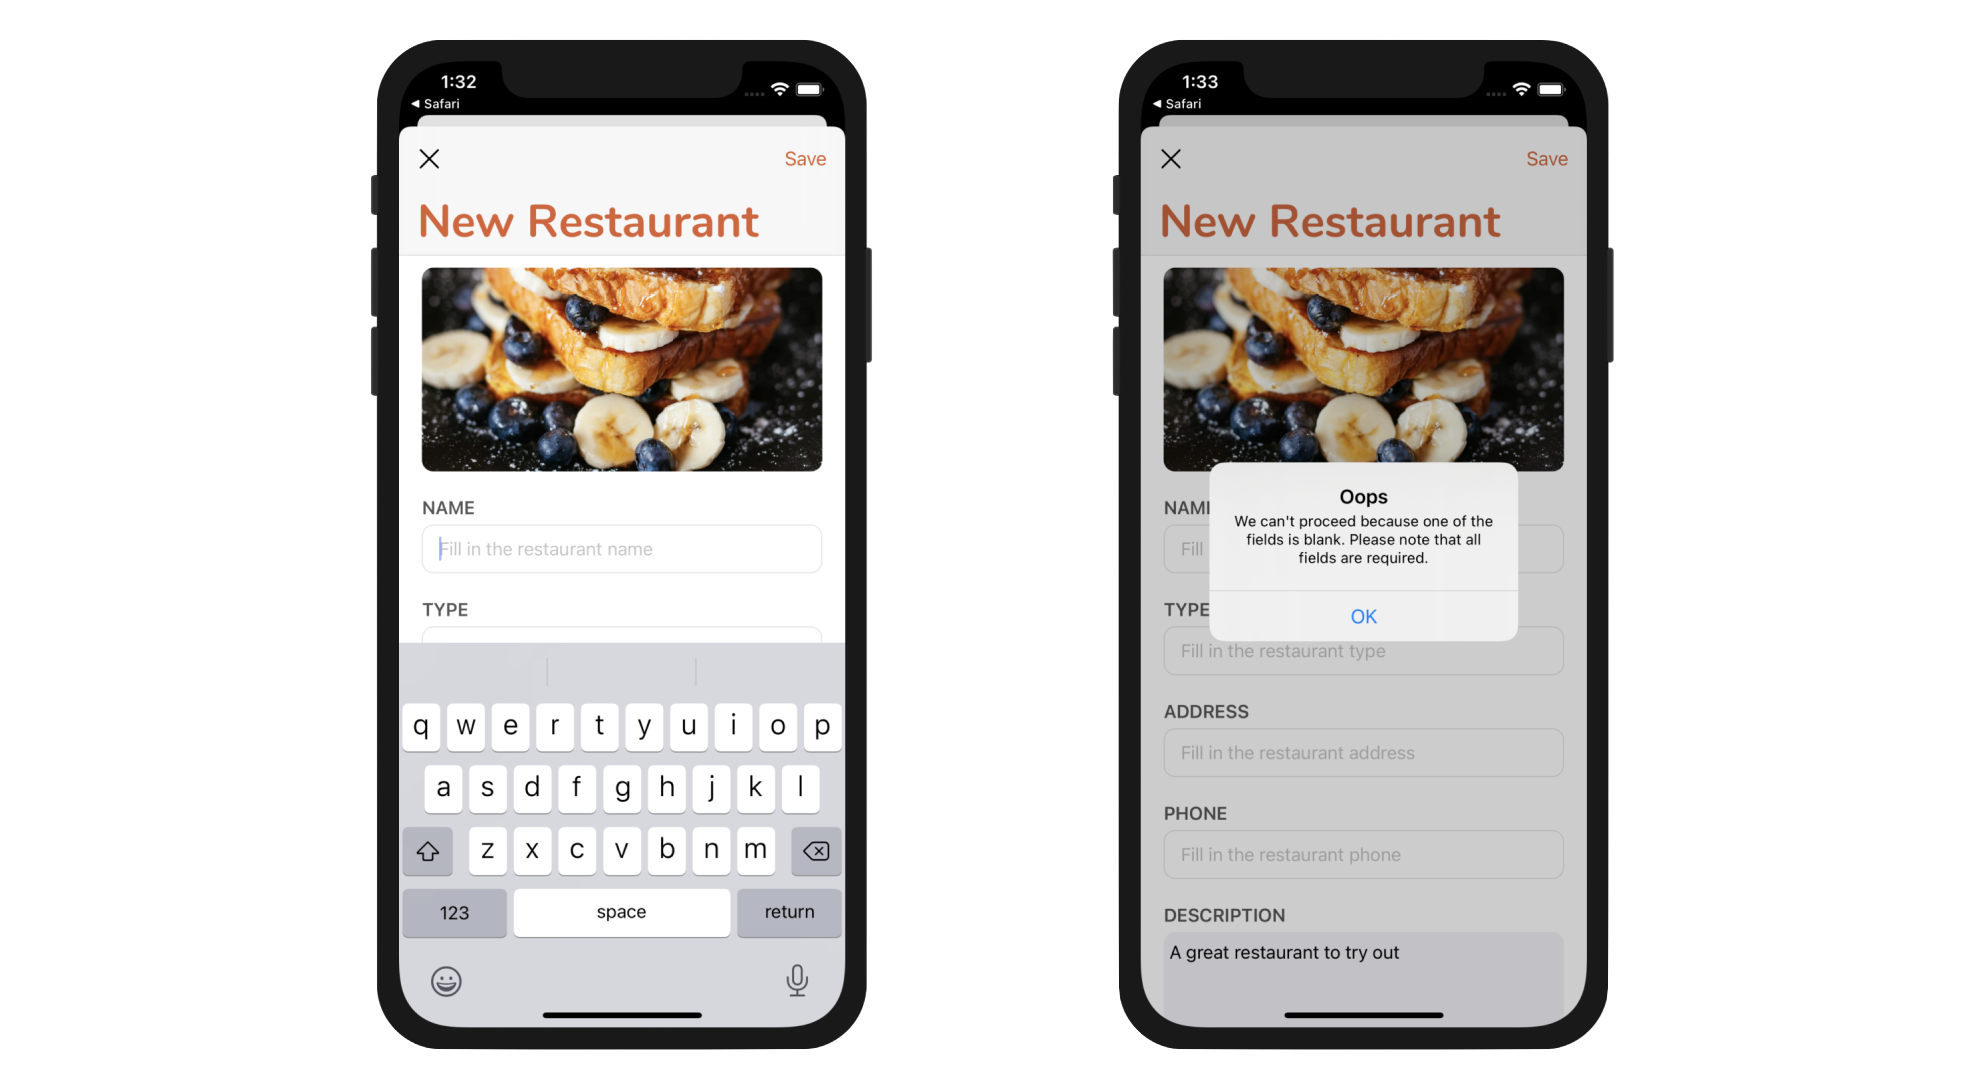
If you refer to figure 18-1, you will find that we need a total of 6 table view cells:
- Cell #1 - an image view for displaying the restaurant image
- Cell #2 - a Name label and a text field
- Cell #3 - a Type label and a text field
- Cell #4 - an Address label and a text field
- Cell #5 - a Phone label and a text field
- Cell #6 - a Description label and a multiline text field
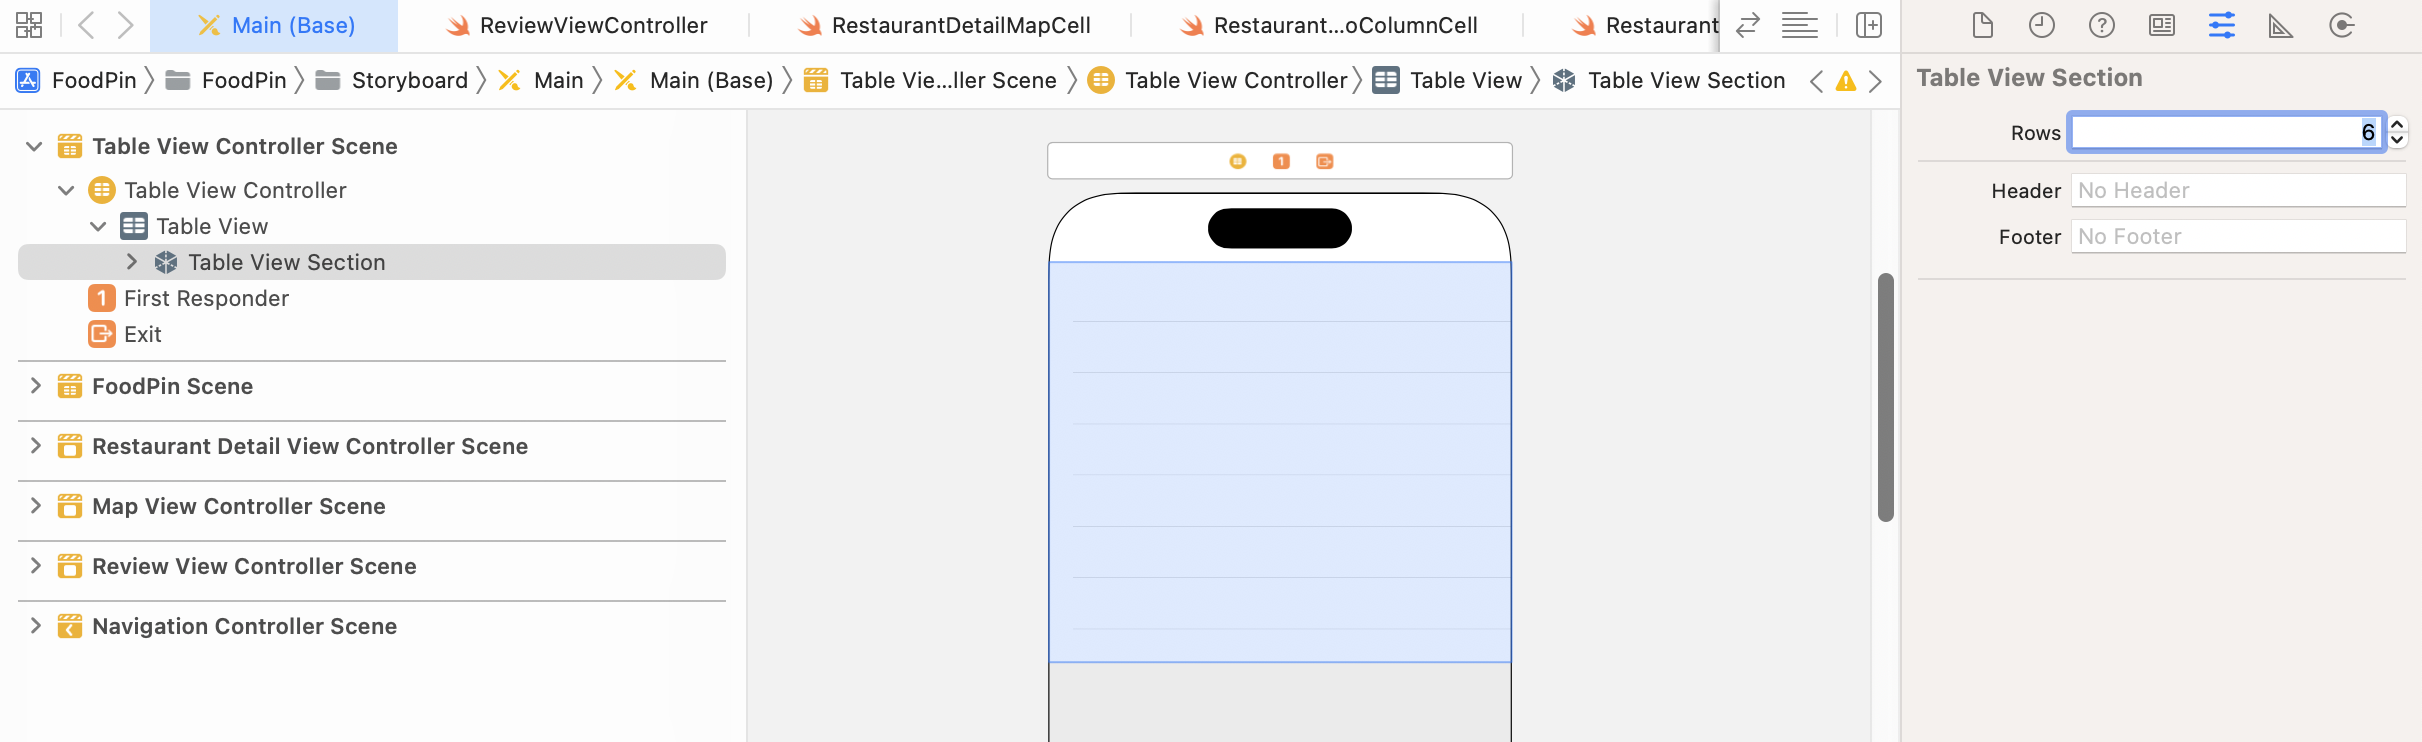
You can easily increase the number of cells by selecting the Table View Section in the document outline. In the Attribute inspector, you can change the Rows option from 3 to 6.
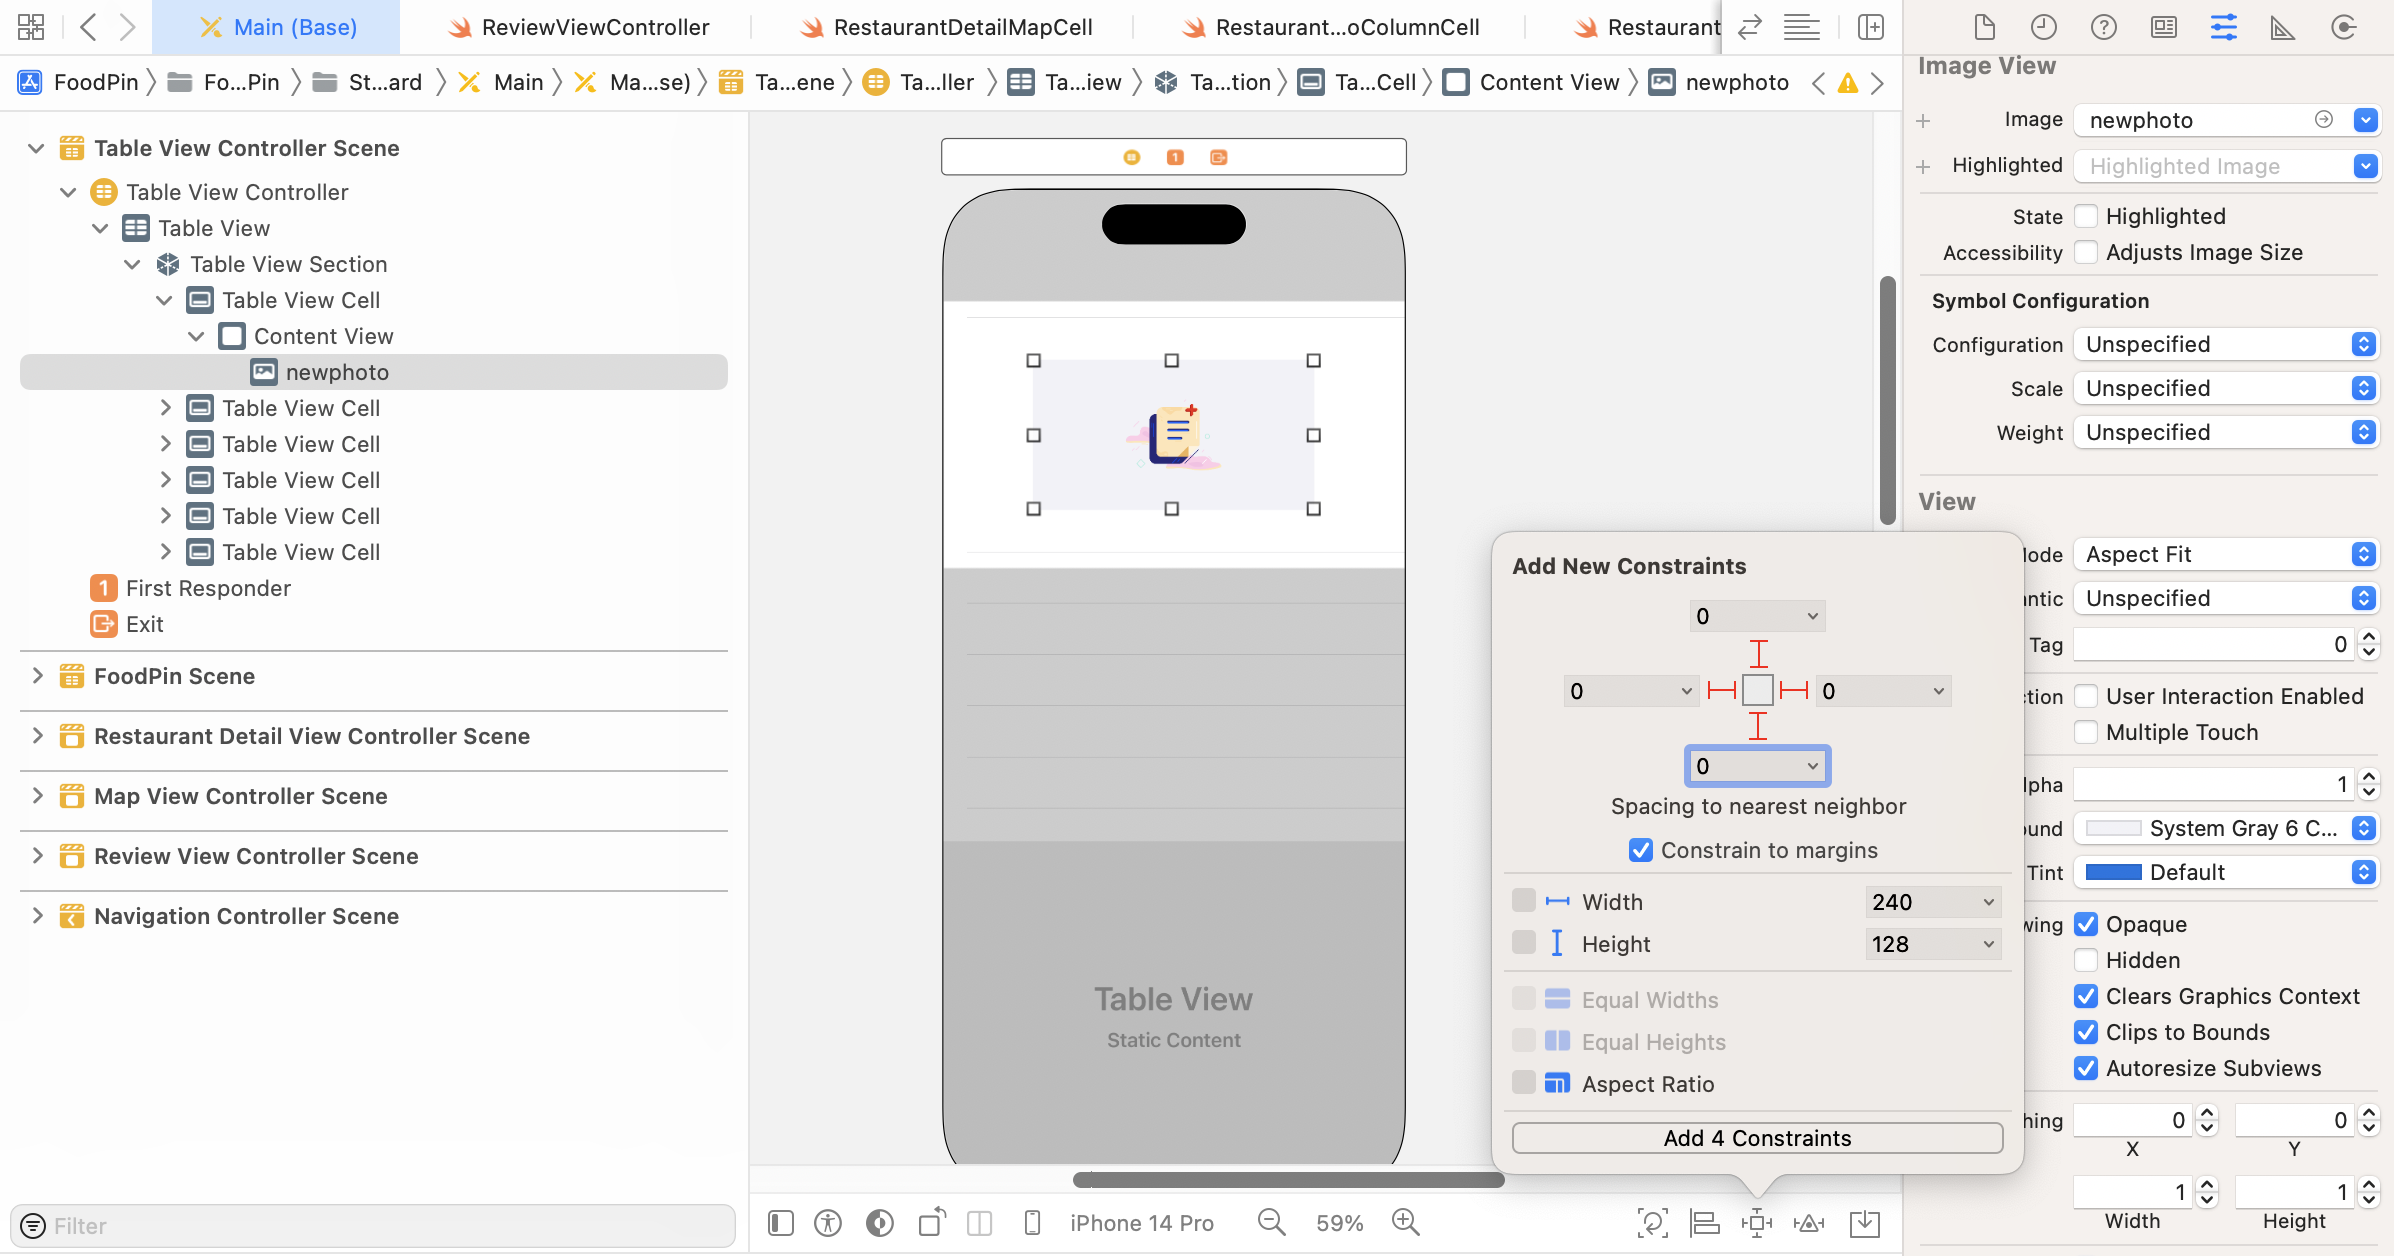
Now we'll layout each of the table view cells. For the first cell, change its height to 200 (or whatever value you prefer) in the Size inspector. And, set the Selection option to None in the Attributes inspector.
Open the Object library and drag an image view to the first cell. In the Attribute inspector, set the image to newphoto and change the background color to System Gray 6 Color. This is the image you imported to the asset catalog. If you don't like the image, please feel free to use other system images like photo. Next, set the content mode to Aspect Fill. Click Add new constraints to add a few spacing constraints. Check the Constrain to margin option and set the value of all sides to 0.
For the second cell, adjust its height to make a bit taller. You will find it hard to place both the label and the text field in the cell. In the Attributes inspector, set the Selection option to None. This ensures the cell doesn't change its color even if it is touched.
Open the Object library, drag a label to the cell and change its title to NAME. Optionally, change its font to Headline style and font color to dark gray. Then, drag a text field to the cell and place it under the name label. The text field is a control for capturing the user input and displaying the editable text. Typically you use it to gather small amounts of text from users. In the Attribute inspector, set the placeholder value to Fill in the restaurant name and change the font type to Body. A placeholder is displayed when there is no other text in the text field.
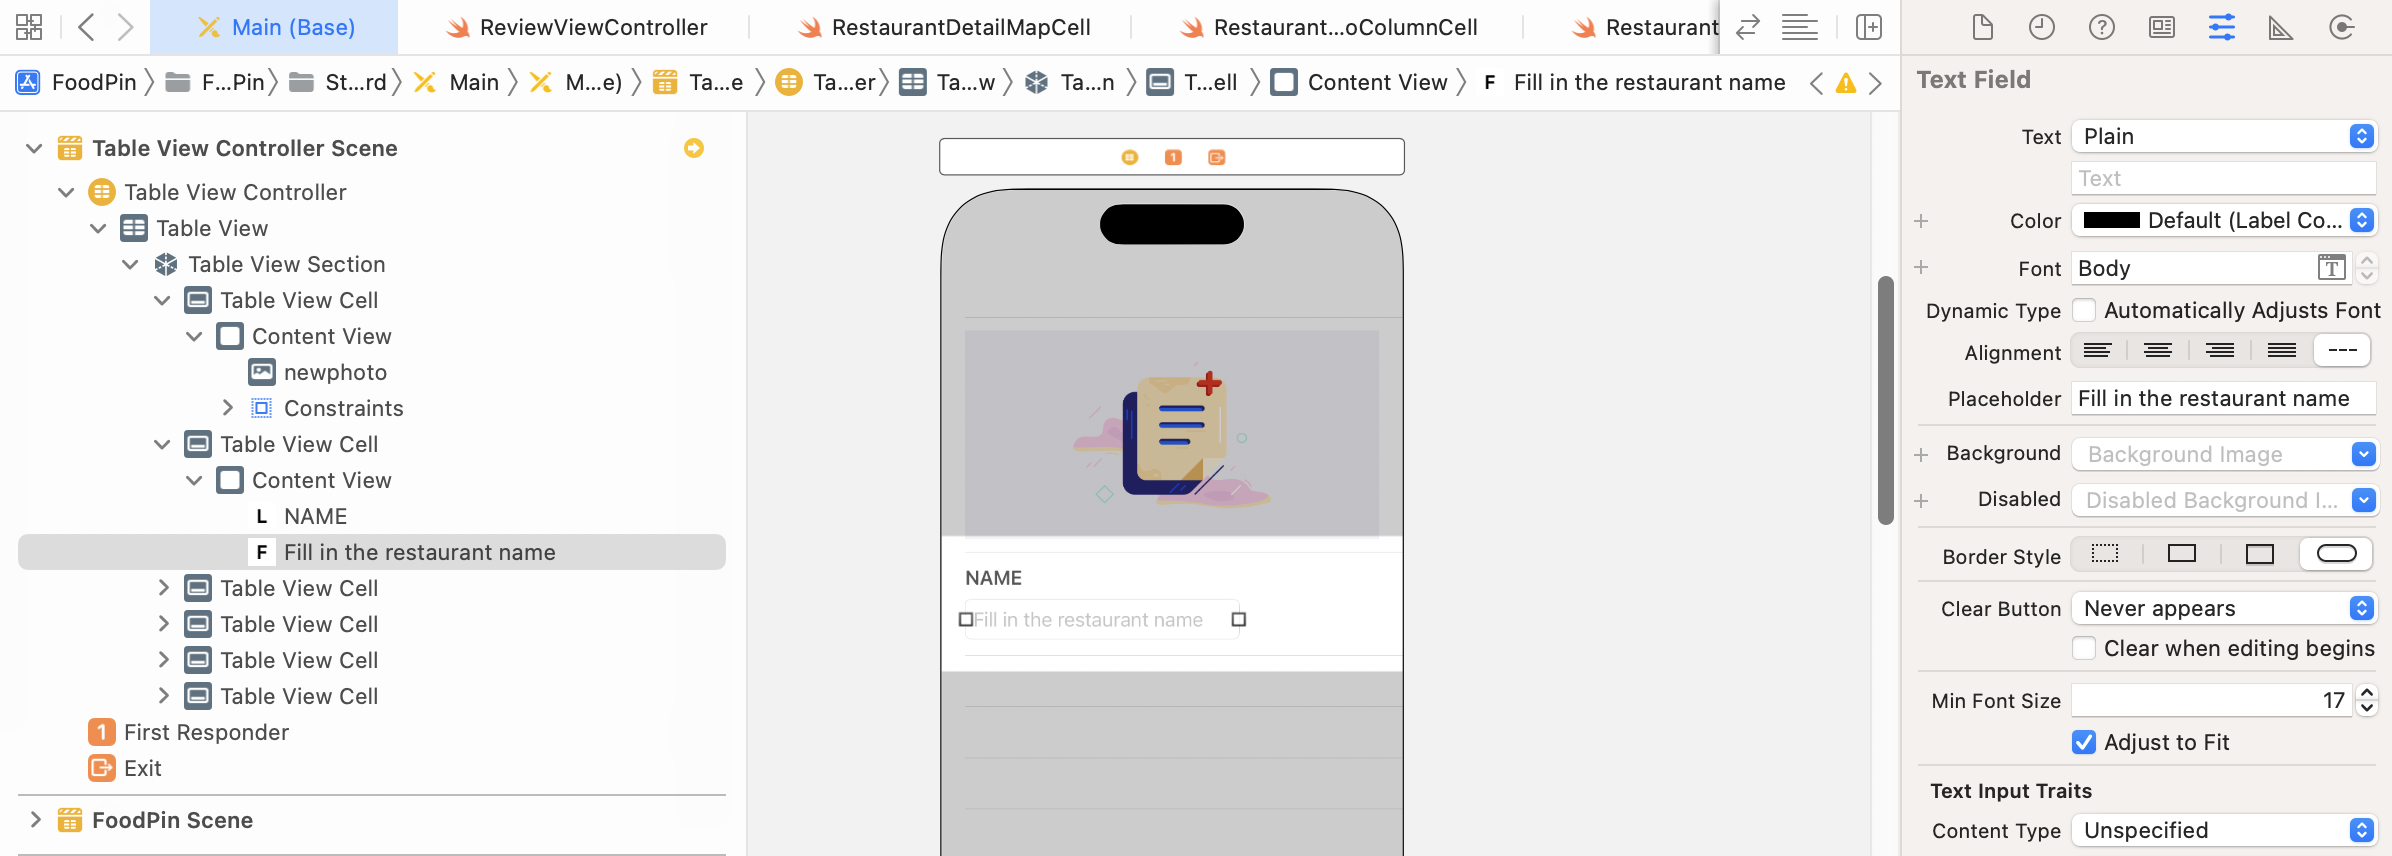
Next, select both name label and the text field. Click the Embed in button and then select Stack view to embed them in a stack view. Then click the Add new constraints button to add the spacing constraints for the top, left, bottom and right sides. Set the spacing values to 0 and check the Constrain to margins option.
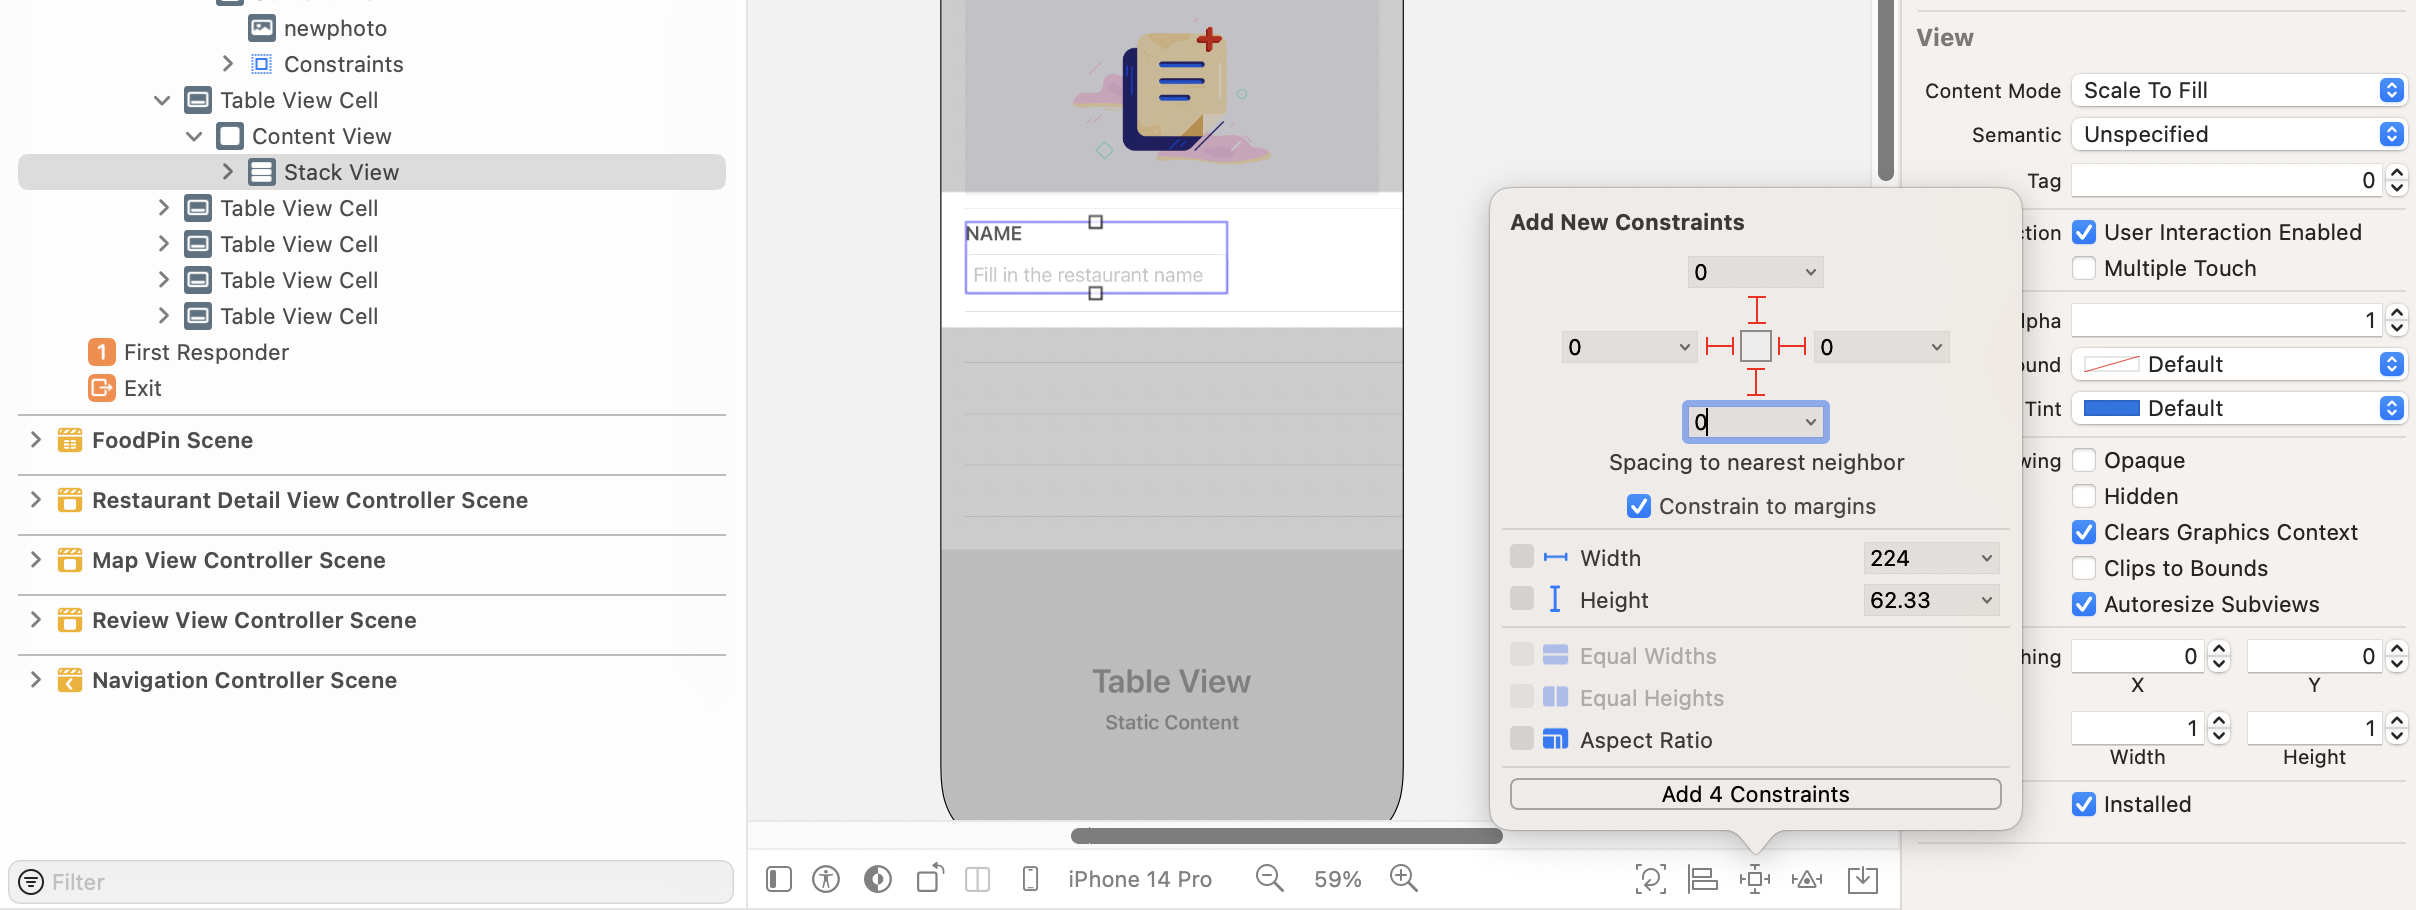
The text field doesn't look as expected. Make sure the stack view is selected. Go to the Attributes inspector and change the Alignment option from Leading to Fill. Also, change the spacing value to 5.
For the third, fourth, and fifth cells, repeat the same procedures. But set the label to TYPE, ADDRESS, and PHONE respectively.
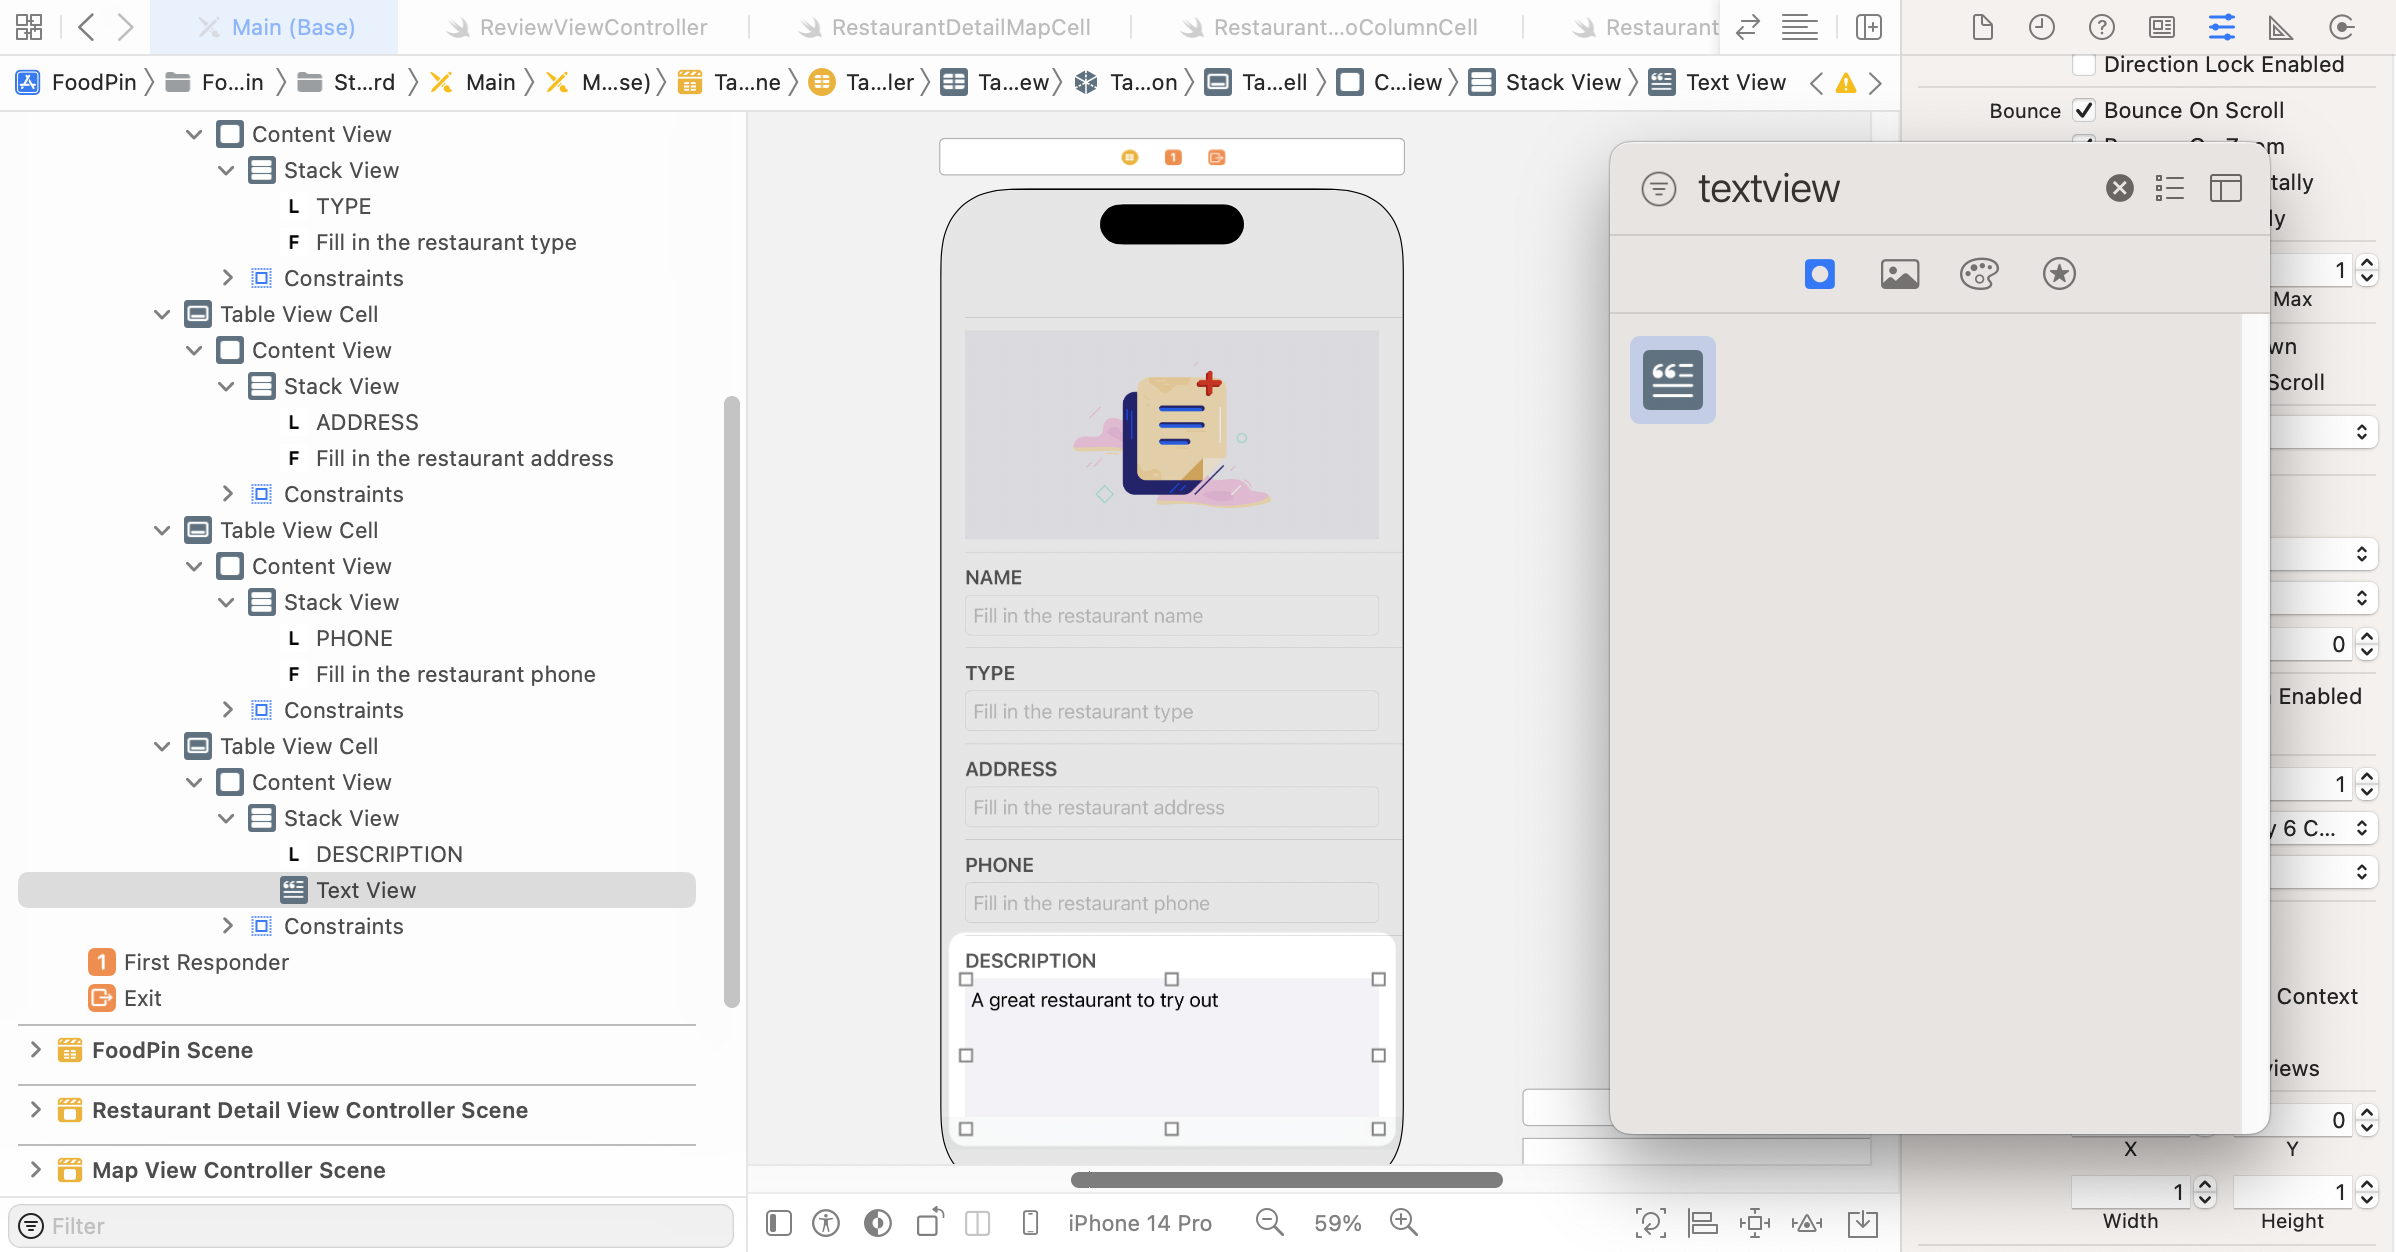
For the last cell, which is for users to input the restaurant description, it needs a bigger text area. Resize the cell to make it taller. Then drag a label to the cell and name it DESCRIPTION. Again, change its font to Headline and font color to dark gray.
Next, drag a Text View from the Object library to the cell. A text view is similar to a text field but allows you to enter multiple lines of text. In the Attributes inspector, replace the initial text with A great restaurant to try out. Also, change its background color to System Gray 6 Color. For the font, change it to Body text style.
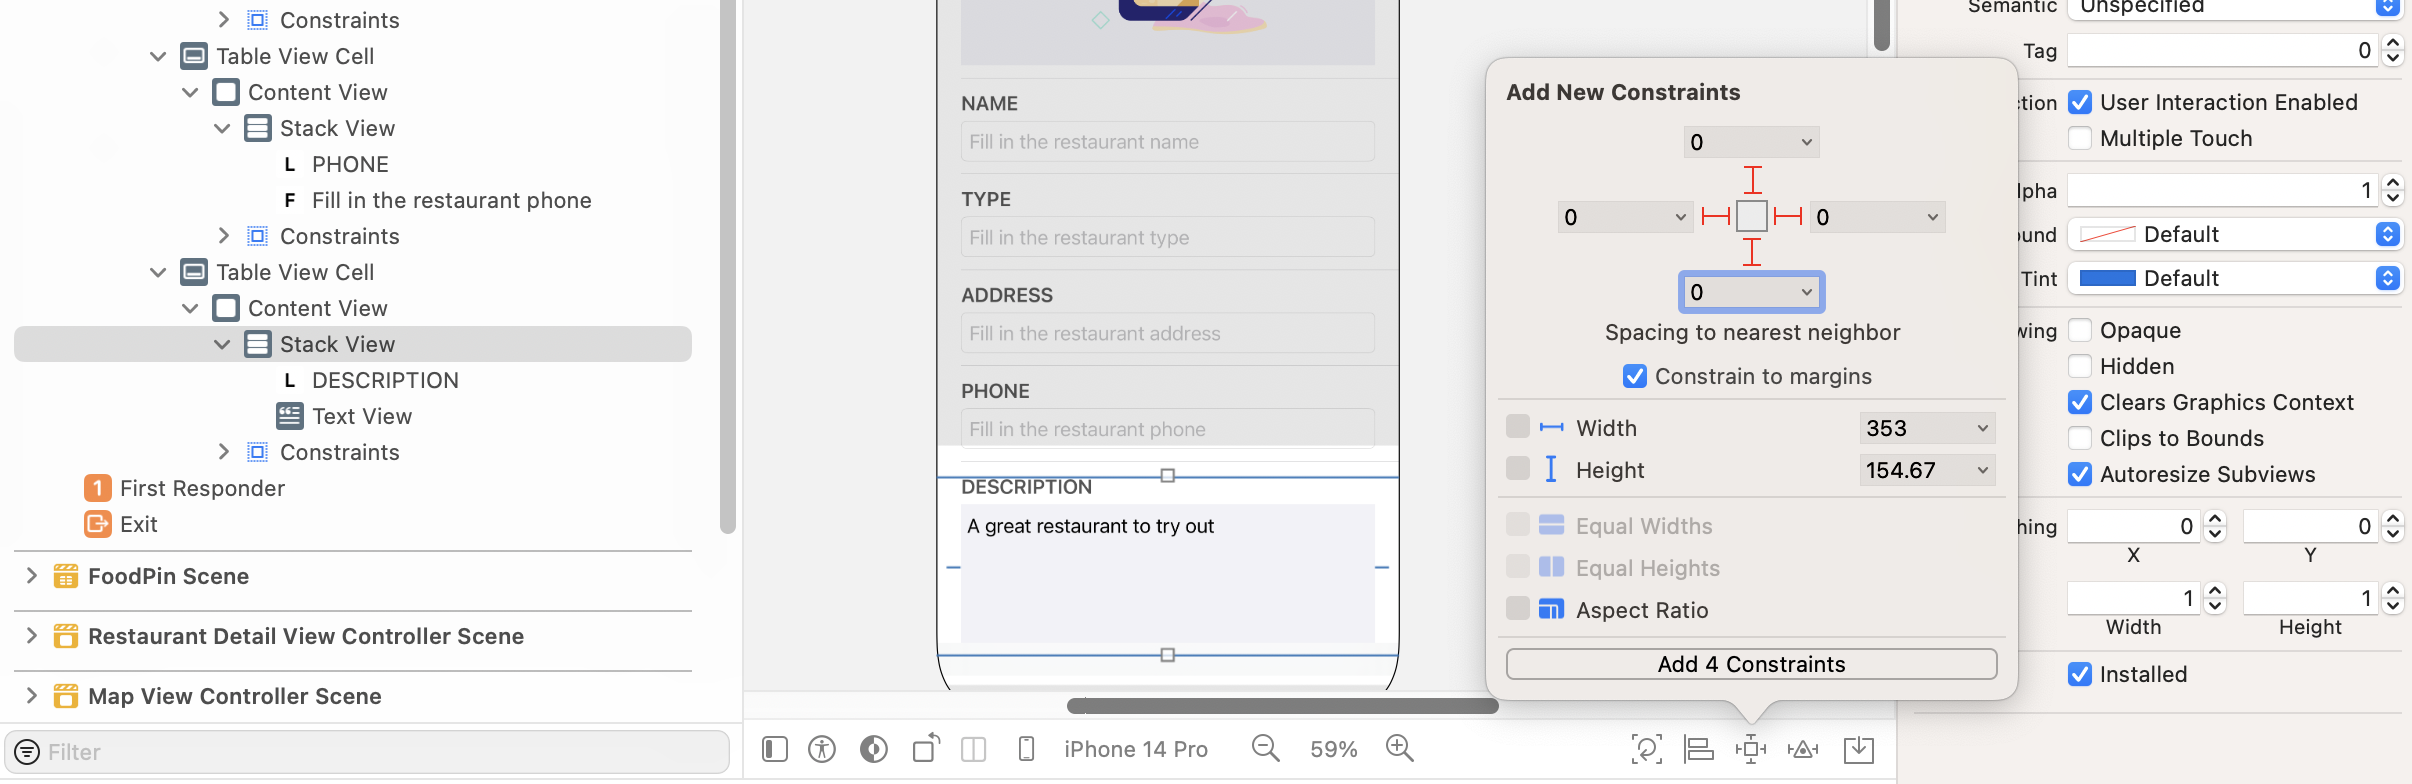
Embed both the label and the text view in a stack view. In the Attributes inspector, change the Alignment option to Fill and set the Spacing value to 5 points. Then add a number of spacing constraints for the stack view. Please refer to figure 18-8 for details.
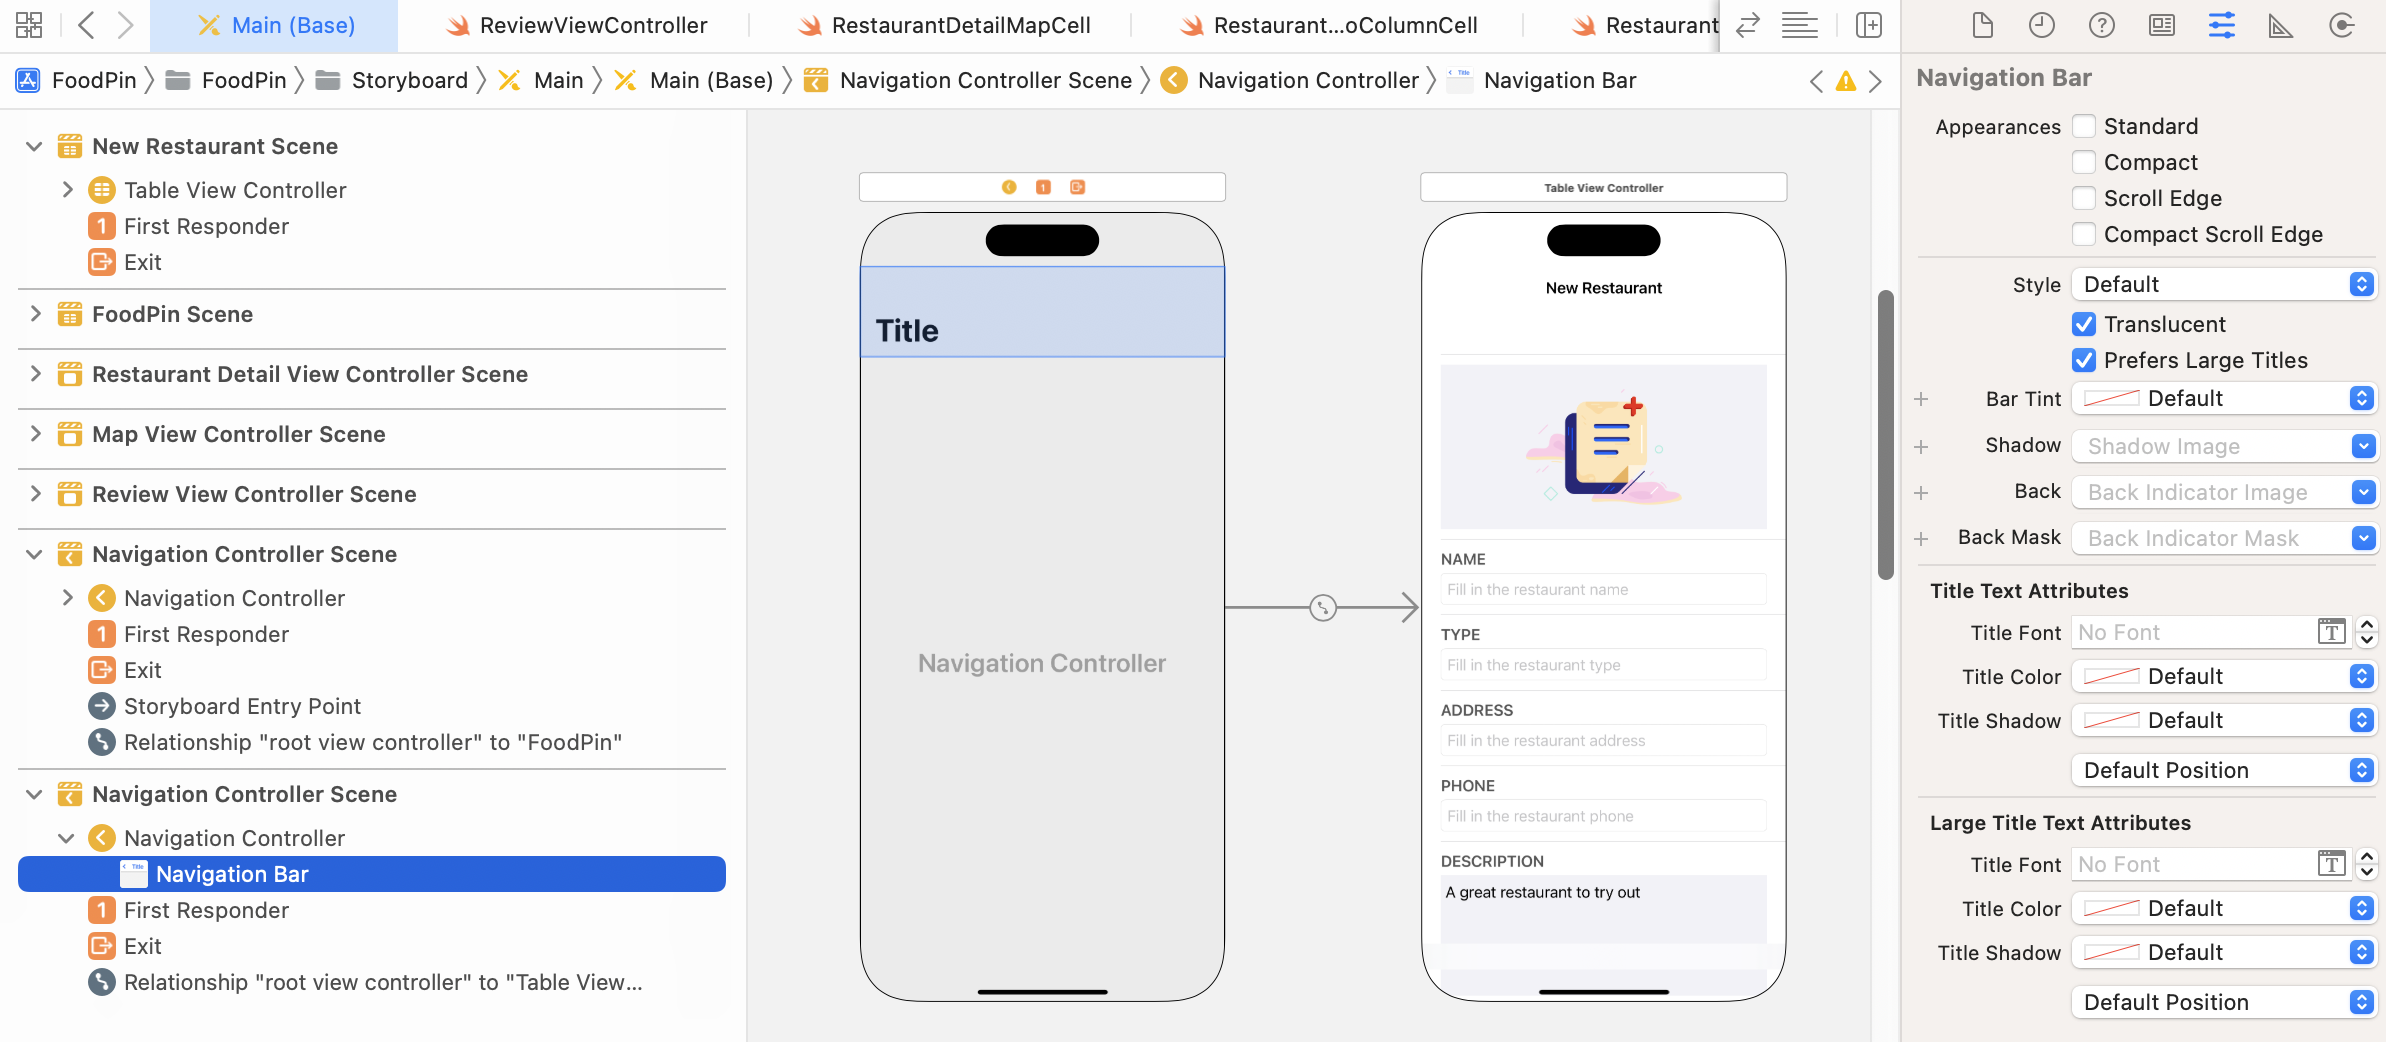
To complete the layout of the screen, embed the table view controller in a navigation controller. Select the table view controller and go up to the Xcode menu. Select Editor > Embed in > Navigation Controller. Set the title of the navigation bar to New Restaurant. I prefer to use large titles for the navigation bar. So, select the navigation bar of the navigation controller. In the Attributes inspector, tick the Prefers Large Titles option.
Without writing a single line of code, you create a form by using a static table view. You're not limited to create forms with static table views. You can apply the same technique to create other screens like Settings.
Note: If you find it hard to create the UI design, you can download the starter project from http://www.appcoda.com/resources/swift57/FoodPinStaticTableStarter.zip for reference.
Linking Up the New Restaurant Controller
So far we just created a standalone table view controller. We expect to bring up this controller when a user taps a + button in the top-right corner of the main controller (i.e. Restaurant Table View Controller). Obviously, we need to connect the button with the "New Restaurant" controller using a segue.
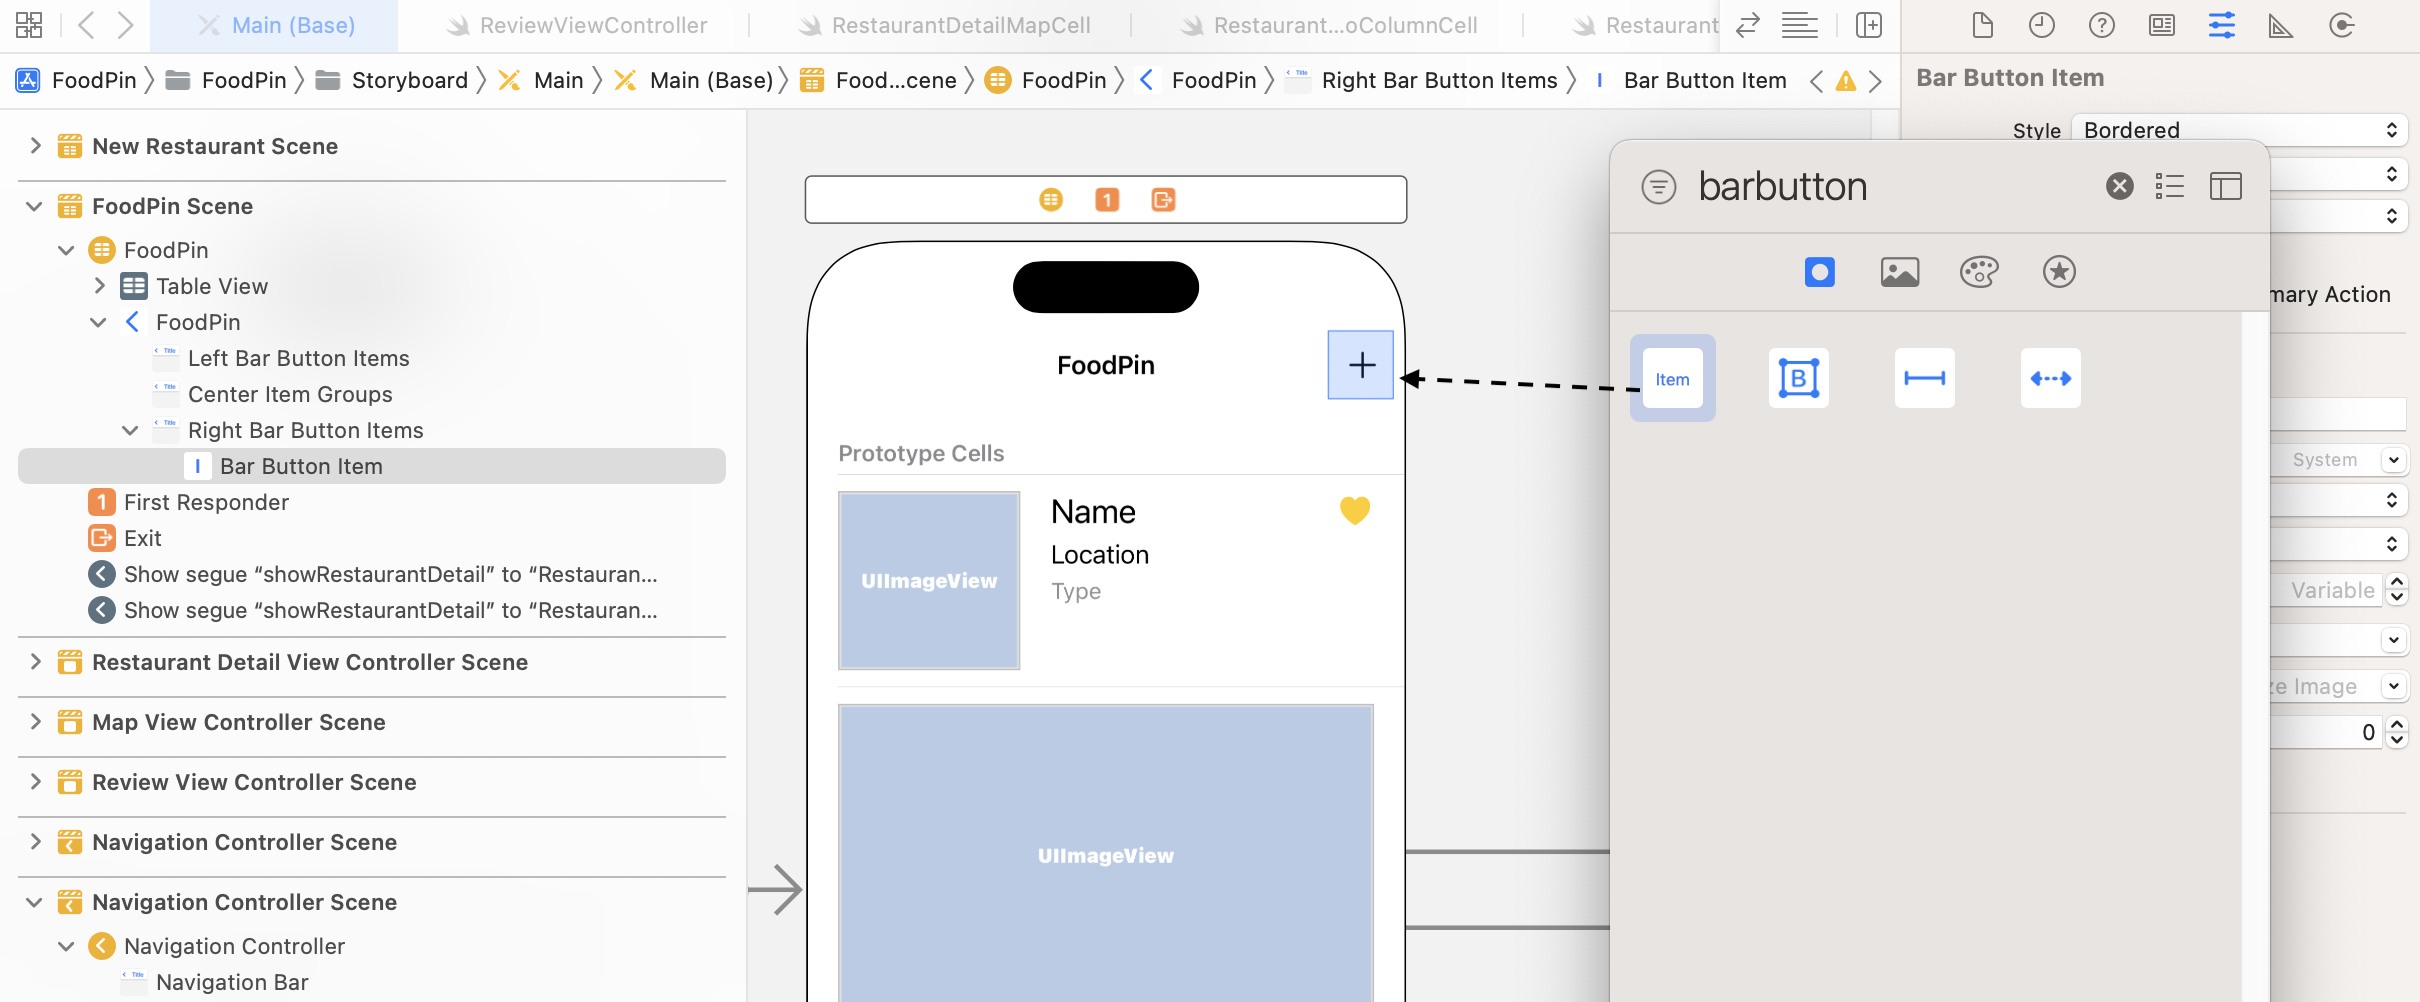
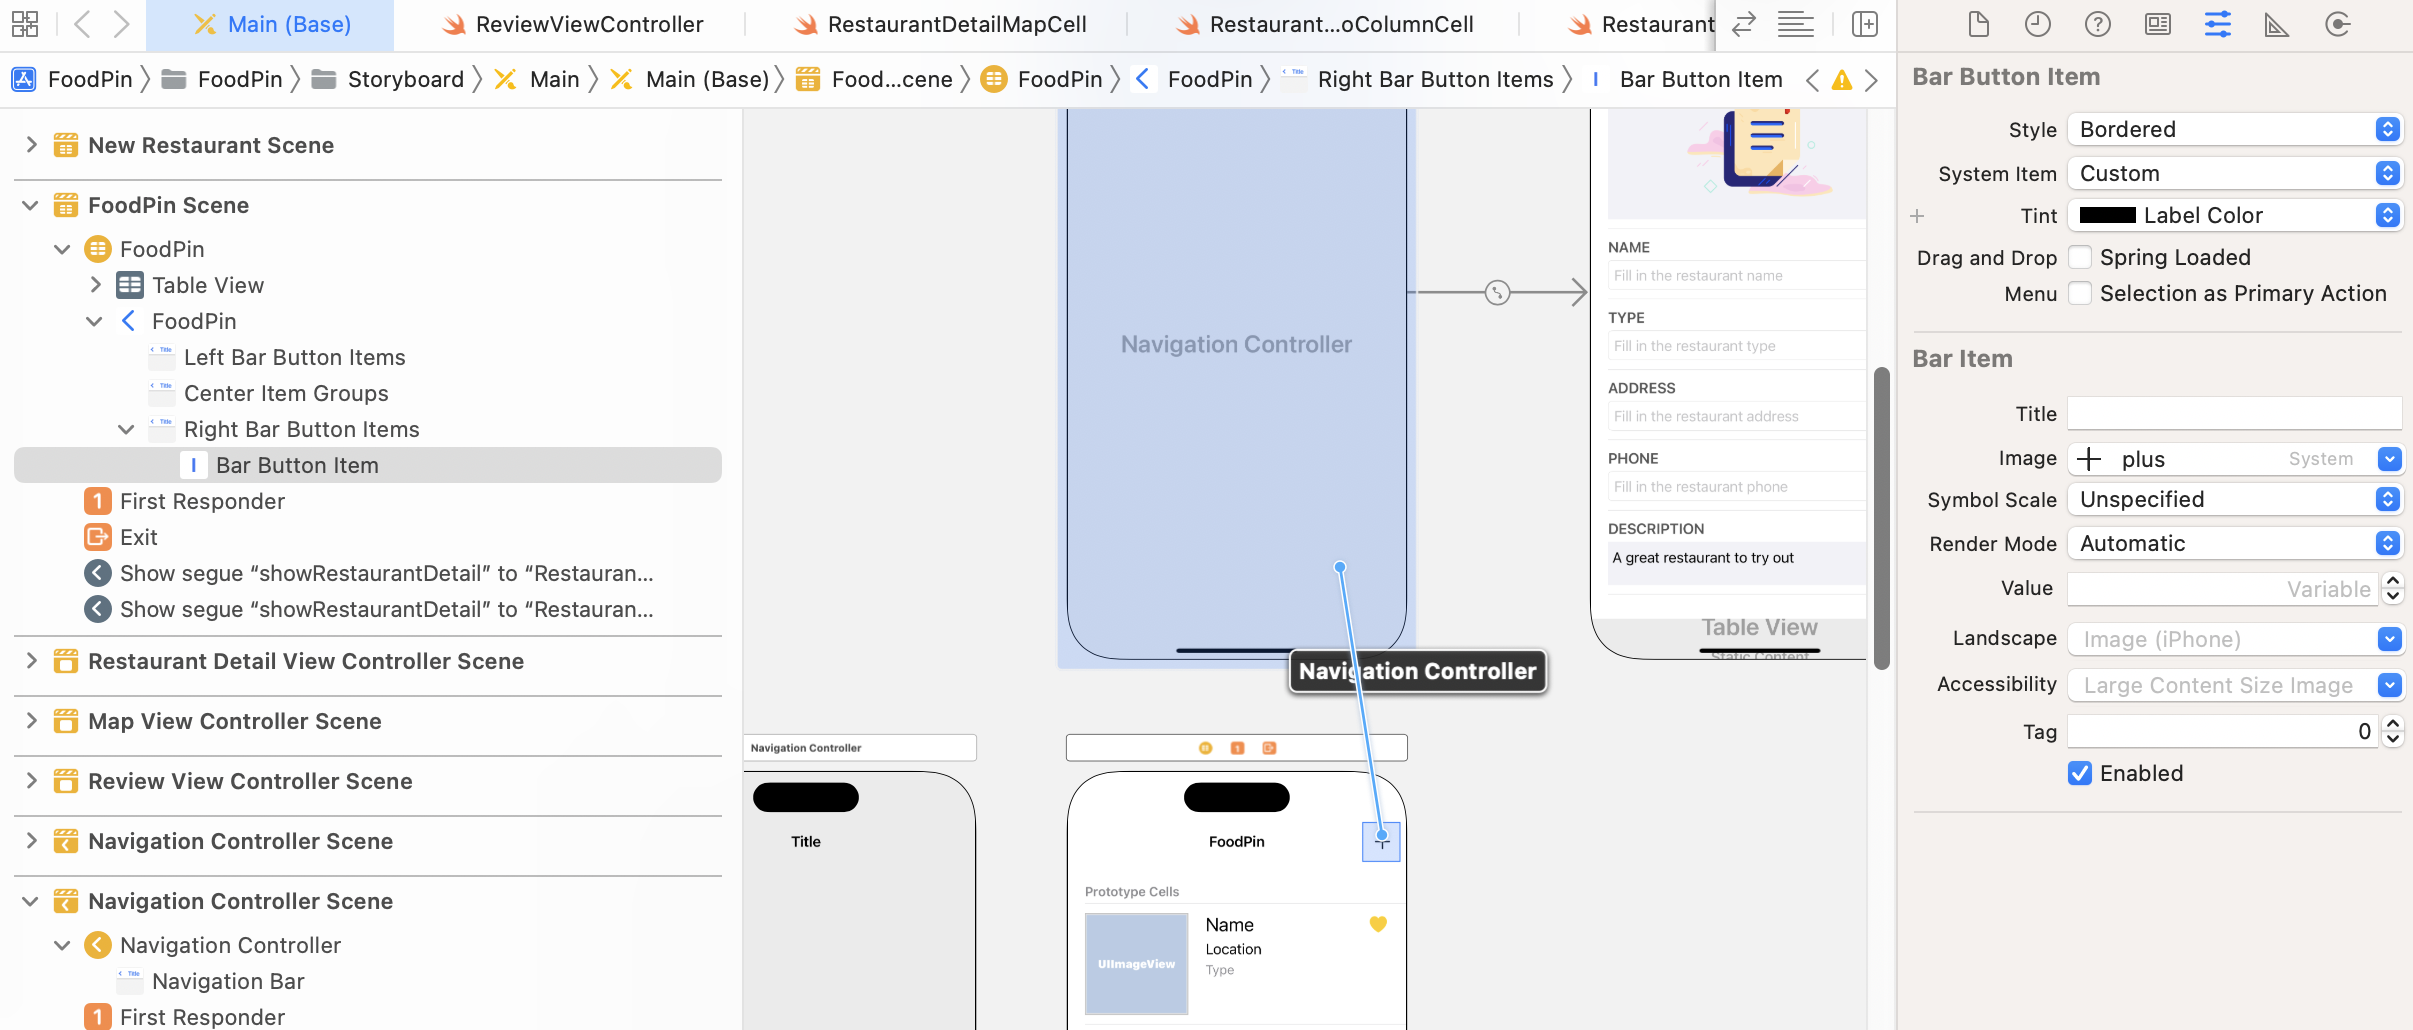
In the Interface Builder editor, first drag a bar button item from the Object library to the navigation bar of the Food Pin controller. In the Attribute inspector, change the Title option to blank, and set the Image option to plus. Also, change the tint to Label Color so that iOS will automatically change its color in dark mode.
Note: A bar button (UIBarButtonItem) is very similar to a standard button (UIButton). However, a bar button is specifically designed for navigation bars and toolbars.
Next, hold the control key, and drag the + icon to the navigation controller that embeds the New Restaurant view controller. Release the buttons and select present modally for the segue type. Set the identifier of the segue to addRestaurant in the Attribute inspector.
Quick tip: You can right-click any empty area on the storyboard, and select the zoom out option to have an overview of the storyboard.
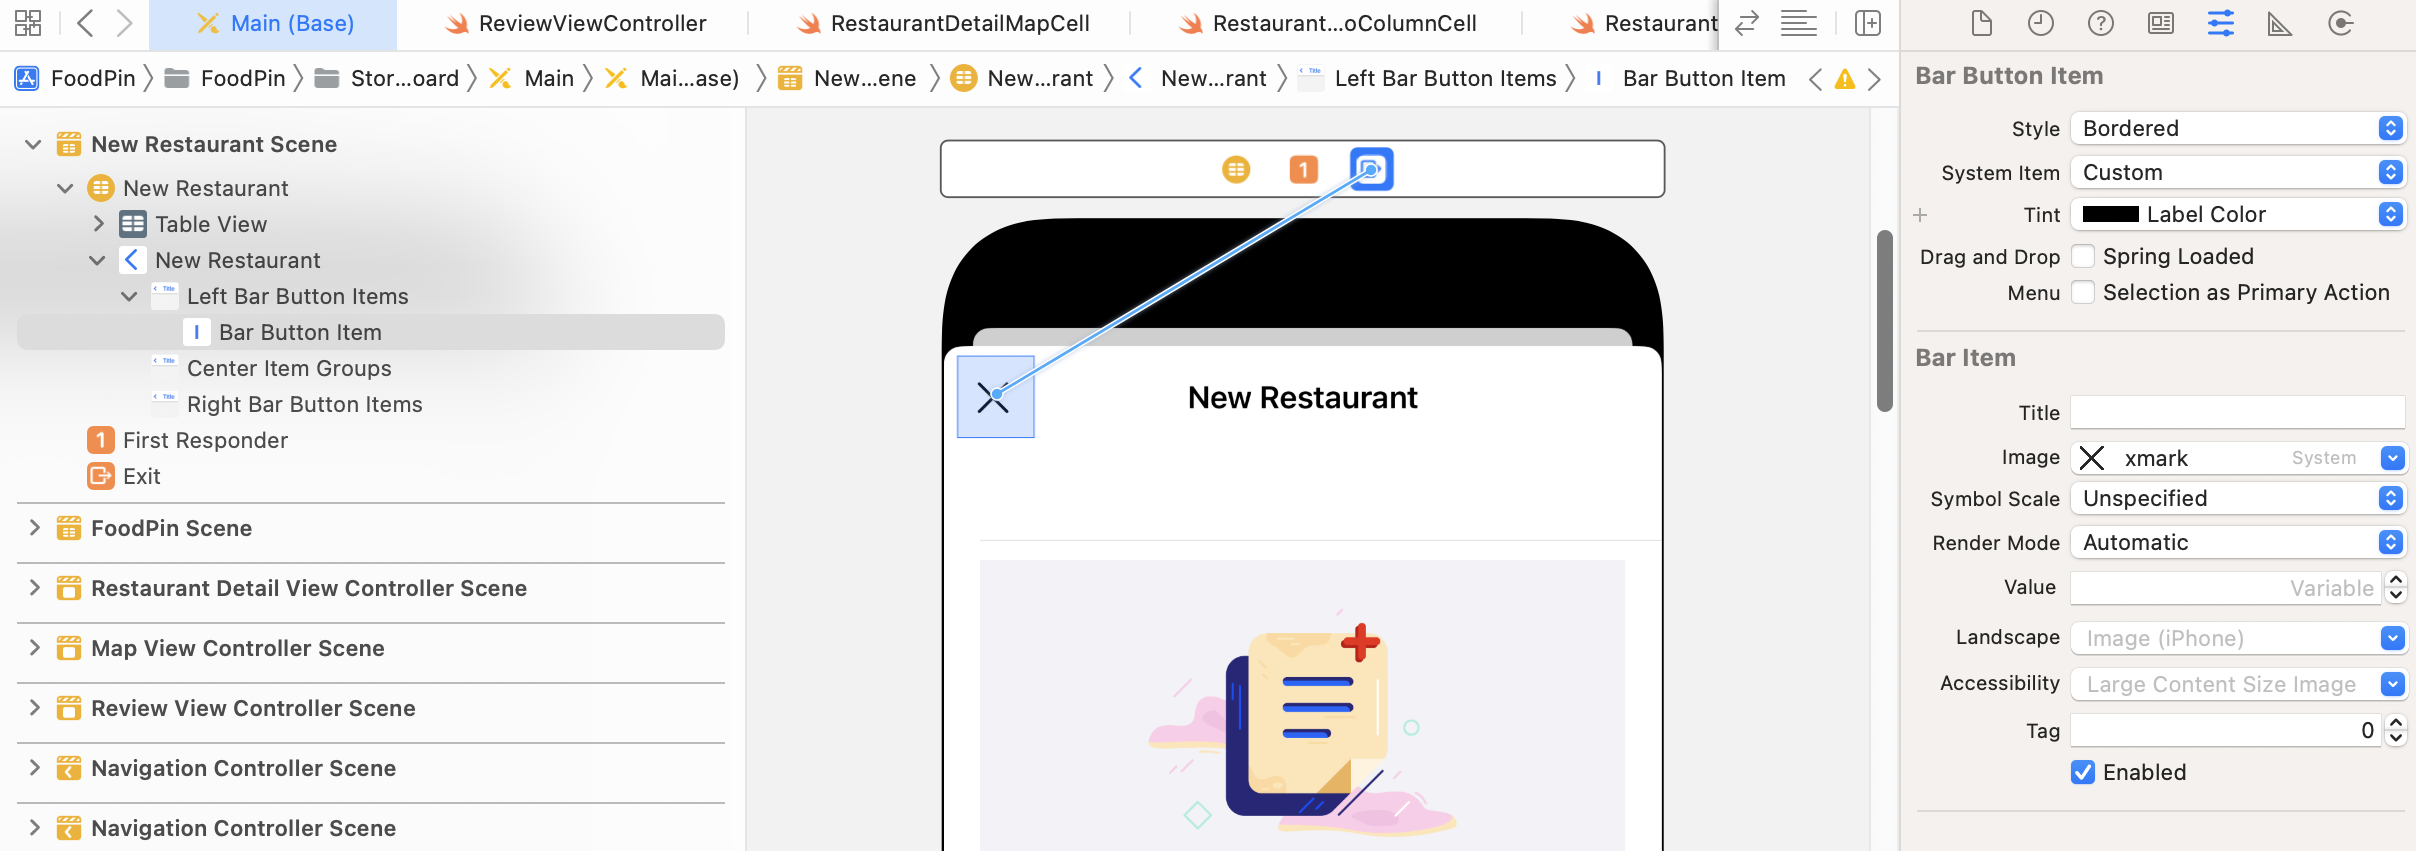
Similar to the modal view controller we built before, we need to provide a way for users to dismiss it. In the navigation bar of the New Restaurant view controller, add a bar button item to the top-left corner. In the Attribute inspector, set the title to blank and image to xmark. Again, change the tint to Label Color.
When a user taps the button, the modal view will be dismissed. In order to do that, we'll define an unwind segue. Select the RestaurantTableViewController.swift file and define the following unwind action:
@IBAction func unwindToHome(segue: UIStoryboardSegue) {
    dismiss(animated: true, completion: nil)
}
Once you add this method, Interface Builder can recognize the unwind action. Now, go back to Main.storyboard. Hold control key and drag from the Close button to the Exit icon of the scene dock (see figure 18-12). In the popover menu, select the unwindToHomeWithSegue: option for the action segue.
Now let's have a quick test. Compile and run the project. After launching the app, tap the + icon. You should see the New Restaurant screen. You can either tap the X button or simply swipe down the view to dismiss it.
Building a Rounded Corner Text Field
Do you aware that the text field of the app doesn't have rounded corners? Also, the text of the text fields shown in the final design (refer to figure 18-1) is indented. However, the ones we are now having are so close to the edge.
The default text field doesn't come with text indentation. It's our responsibility to build a custom text field with these features. To do that, we will create a custom version of UITextField.
In the project navigator, right-click the View folder and select New file…. Choose the Cocoa Touch Class template. In the next screen, name the class RoundedTextField and set its subclass to UITextField. Confirm and save the file.
Once the file is created, replace the content with the following code:
import UIKit
class RoundedTextField: UITextField {
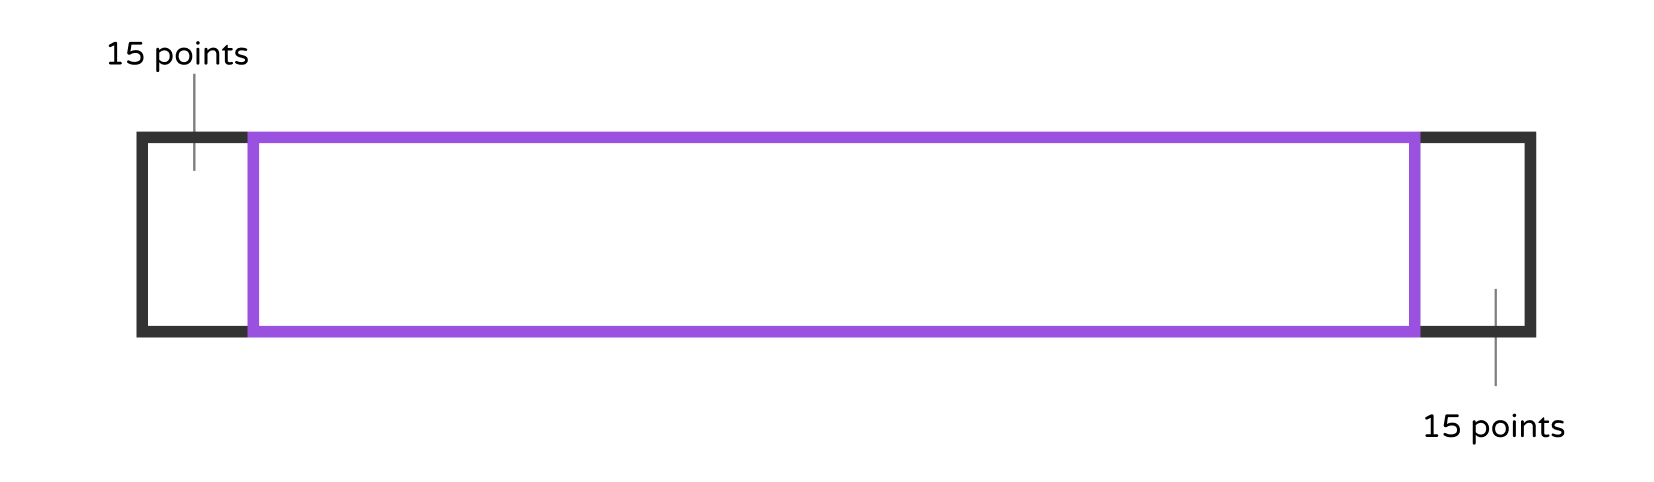
let padding = UIEdgeInsets(top: 0, left: 15, bottom: 0, right: 15)
override func textRect(forBounds bounds: CGRect) -> CGRect {
return bounds.inset(by: padding)
}
override func placeholderRect(forBounds bounds: CGRect) -> CGRect {
return bounds.inset(by: padding)
}
override func editingRect(forBounds bounds: CGRect) -> CGRect {
return bounds.inset(by: padding)
}
override func layoutSubviews() {
super.layoutSubviews()
self.layer.borderWidth = 1.0
self.layer.borderColor = UIColor.systemGray5.cgColor
self.layer.cornerRadius = 10.0
self.layer.masksToBounds = true
}
}
The first three methods are for text indentation, while the last method is for creating the rounded corners. Let me first explain how text indentation is done. Each of the three methods is designed for drawing the rectangle for the text field:
textRect(forBounds:)- this method returns the drawing rectangle for the text field’s text.placeholderRect(forBounds:)- this method returns the drawing rectangle for the text field’s placeholder text.editingRect(forBounds:)- this method returns the rectangle in which editable text can be displayed.
By default, these three methods return a rectangle without indentation. In our case, we want to indent the text in the text field. Therefore, we override these methods and return a rectangle with indentation. We use UIEdgeInsets to create a padding area for both left and right side of the text field. And then we call bounds.inset(by: padding) to apply that edge insets to shrink the rectangle.
The default style of the text field does have rounded corners. But I want to change the corner radius to make the corners more rounded. You should know how to create rounded corners for a text field, as we have discussed the technique in earlier chapters. What you need to do is to assign a value (greater than zero) to the cornerRadius property. Here we set it to 10 points. On top of that, we change the border's width and color.
So, what the heck is layoutSubviews()? It is called every time when the text field is laid out. Thus, we put these lines of code in the method:
self.layer.borderWidth = 1.0
self.layer.borderColor = UIColor.systemGray5.cgColor
self.layer.cornerRadius = 10.0
self.layer.masksToBounds = true
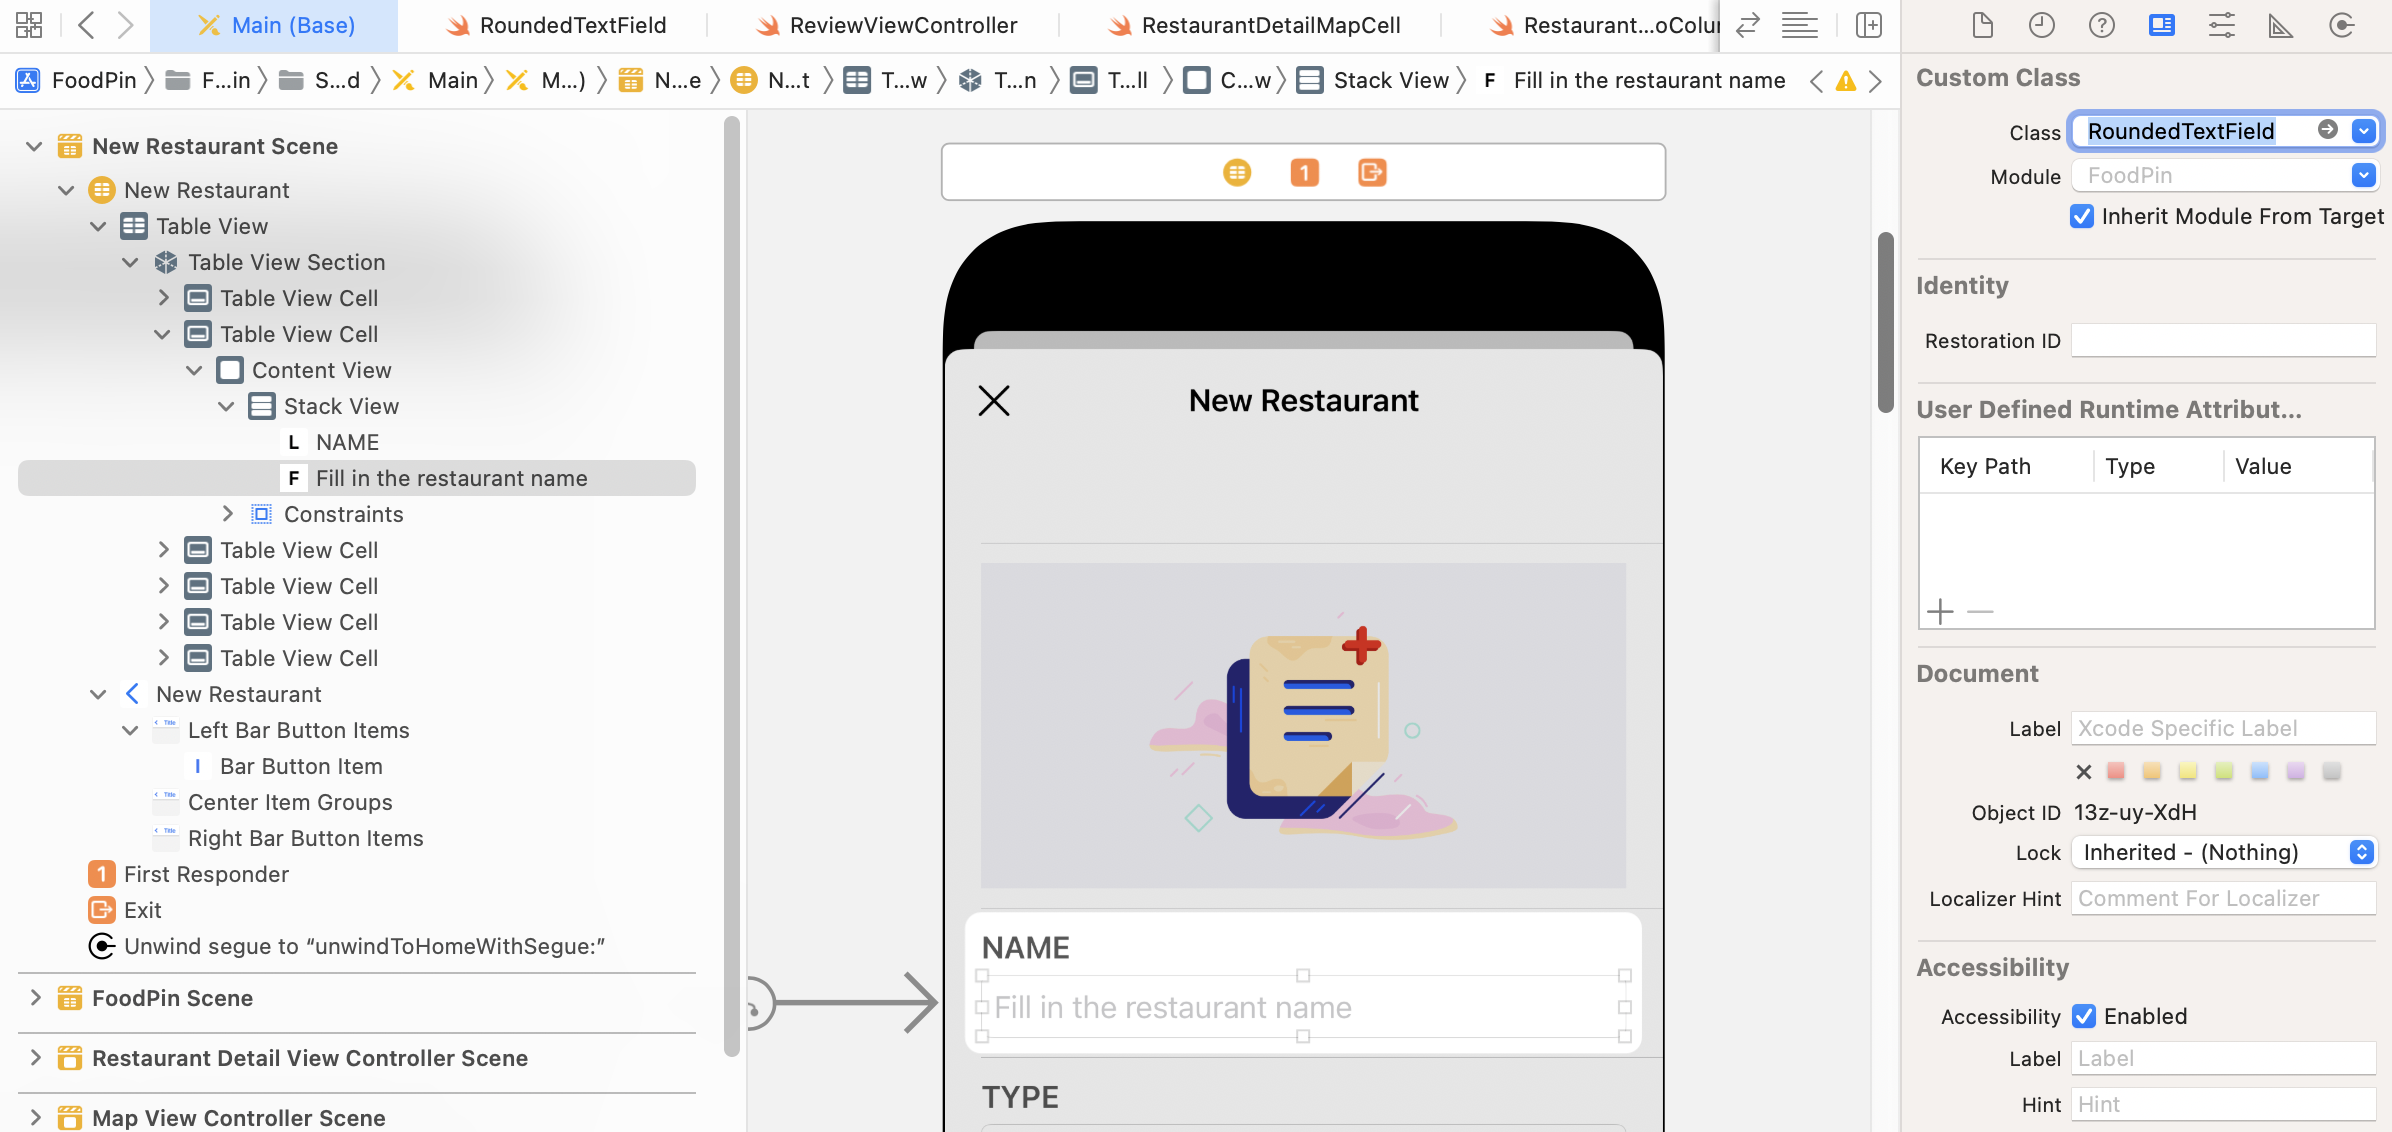
Now that we have created a rounded-corner version of the text field, but we haven't applied it to the text field in the controller. Let's go back to Main. Select the text field for the restaurant name. Go to the Identity inspector and change its custom class to RoundedTextField.
Repeat the procedures for the rest of the text fields (except the text view for the restaurant description). Once you finish, you can run the app to try it out. The text fields should now have text indentation.
There is one more thing that you can tweak to make the form look better. You can select the table view in document outline and change the Separator option to None. This will remove the separators between cells.
Moving onto the Next Text Field
Have you tried to key in something in the text field? If you haven't tried that, please run the app again and give it a shot. By default, the simulator doesn't show the software keyboard. You can press command+k to bring it up.
Do you find something you can improve? For now, when you hit the return key, the cursor doesn't move to the next text field. It just stays where it is.
Let's see how to move the cursor to the next text field when the user taps the return key. The general idea is that we assign each of the text fields a tag. Say, for the Name text field, we set its tag to 1. The Type text field will have a tag value of 2. When a user hits the return key, the text field recognizes the event. Next, it looks up the next text field by increasing the tag value by 1 and then tell the cursor to move to that text field.
In order to implement this solution, we have to first create a custom class for the New Restaurant controller. In the project navigator, right-click the Controller folder and select New file…. Choose Cocoa Touch Class as the template. Set the class name to NewRestaurantController and its subclass to UITableViewController.
Once the NewRestaurantController.swift file is created, remove the following generated methods because we do not need them for the static table view:
override func numberOfSections(in tableView: UITableView) -> Int {
    // #warning Incomplete implementation, return the number of sections
    return 0
}

override func tableView(_ tableView: UITableView, numberOfRowsInSection section: Int) -> Int {
    // #warning Incomplete implementation, return the number of rows
    return 0
}
Next, create an outlet variable for each of the text fields and the text view:
@IBOutlet var nameTextField: RoundedTextField! {
    didSet {
        nameTextField.tag = 1
        nameTextField.becomeFirstResponder()
        nameTextField.delegate = self
    }
}

@IBOutlet var typeTextField: RoundedTextField! {
    didSet {
        typeTextField.tag = 2
        typeTextField.delegate = self
    }
}

@IBOutlet var addressTextField: RoundedTextField! {
    didSet {
        addressTextField.tag = 3
        addressTextField.delegate = self
    }
}

@IBOutlet var phoneTextField: RoundedTextField! {
    didSet {
        phoneTextField.tag = 4
        phoneTextField.delegate = self
    }
}

@IBOutlet var descriptionTextView: UITextView! {
    didSet {
        descriptionTextView.tag = 5
        descriptionTextView.layer.cornerRadius = 10.0
        descriptionTextView.layer.masksToBounds = true
    }
}
Whether it's a button or a text field (or any other view objects), you can make use of the tag property to store a tag value. In the code above, we assign each of the text fields and the text view with a different tag value. The name text field has the smallest tag value and it is the first responder.
The next question is how we can detect the pressing of the return button?
UITextFieldDelegate is the protocol we need to adopt in order to process the event. The protocol provides developers a set of optional methods to manage the editing of a text field. The method that is particularly useful for this scenario is called textFieldShouldReturn(_:). When a user presses the return key in a text field, the method will be invoked. We can implement the method to move the cursor to the next text field.
We will create an extension to adopt the UITextFieldDelegate protocol like this:
extension NewRestaurantController: UITextFieldDelegate {
    func textFieldShouldReturn(_ textField: UITextField) -> Bool {
        if let nextTextField = view.viewWithTag(textField.tag + 1) {
            textField.resignFirstResponder()
            nextTextField.becomeFirstResponder()
        }

        return true
    }
}
In the code above, we increase the current tag value by 1 and call view.viewWithTag to retrieve the next text field. Then we remove the focus of the current text field by calling resignFirstResponder() and let the next text field become the first responder.
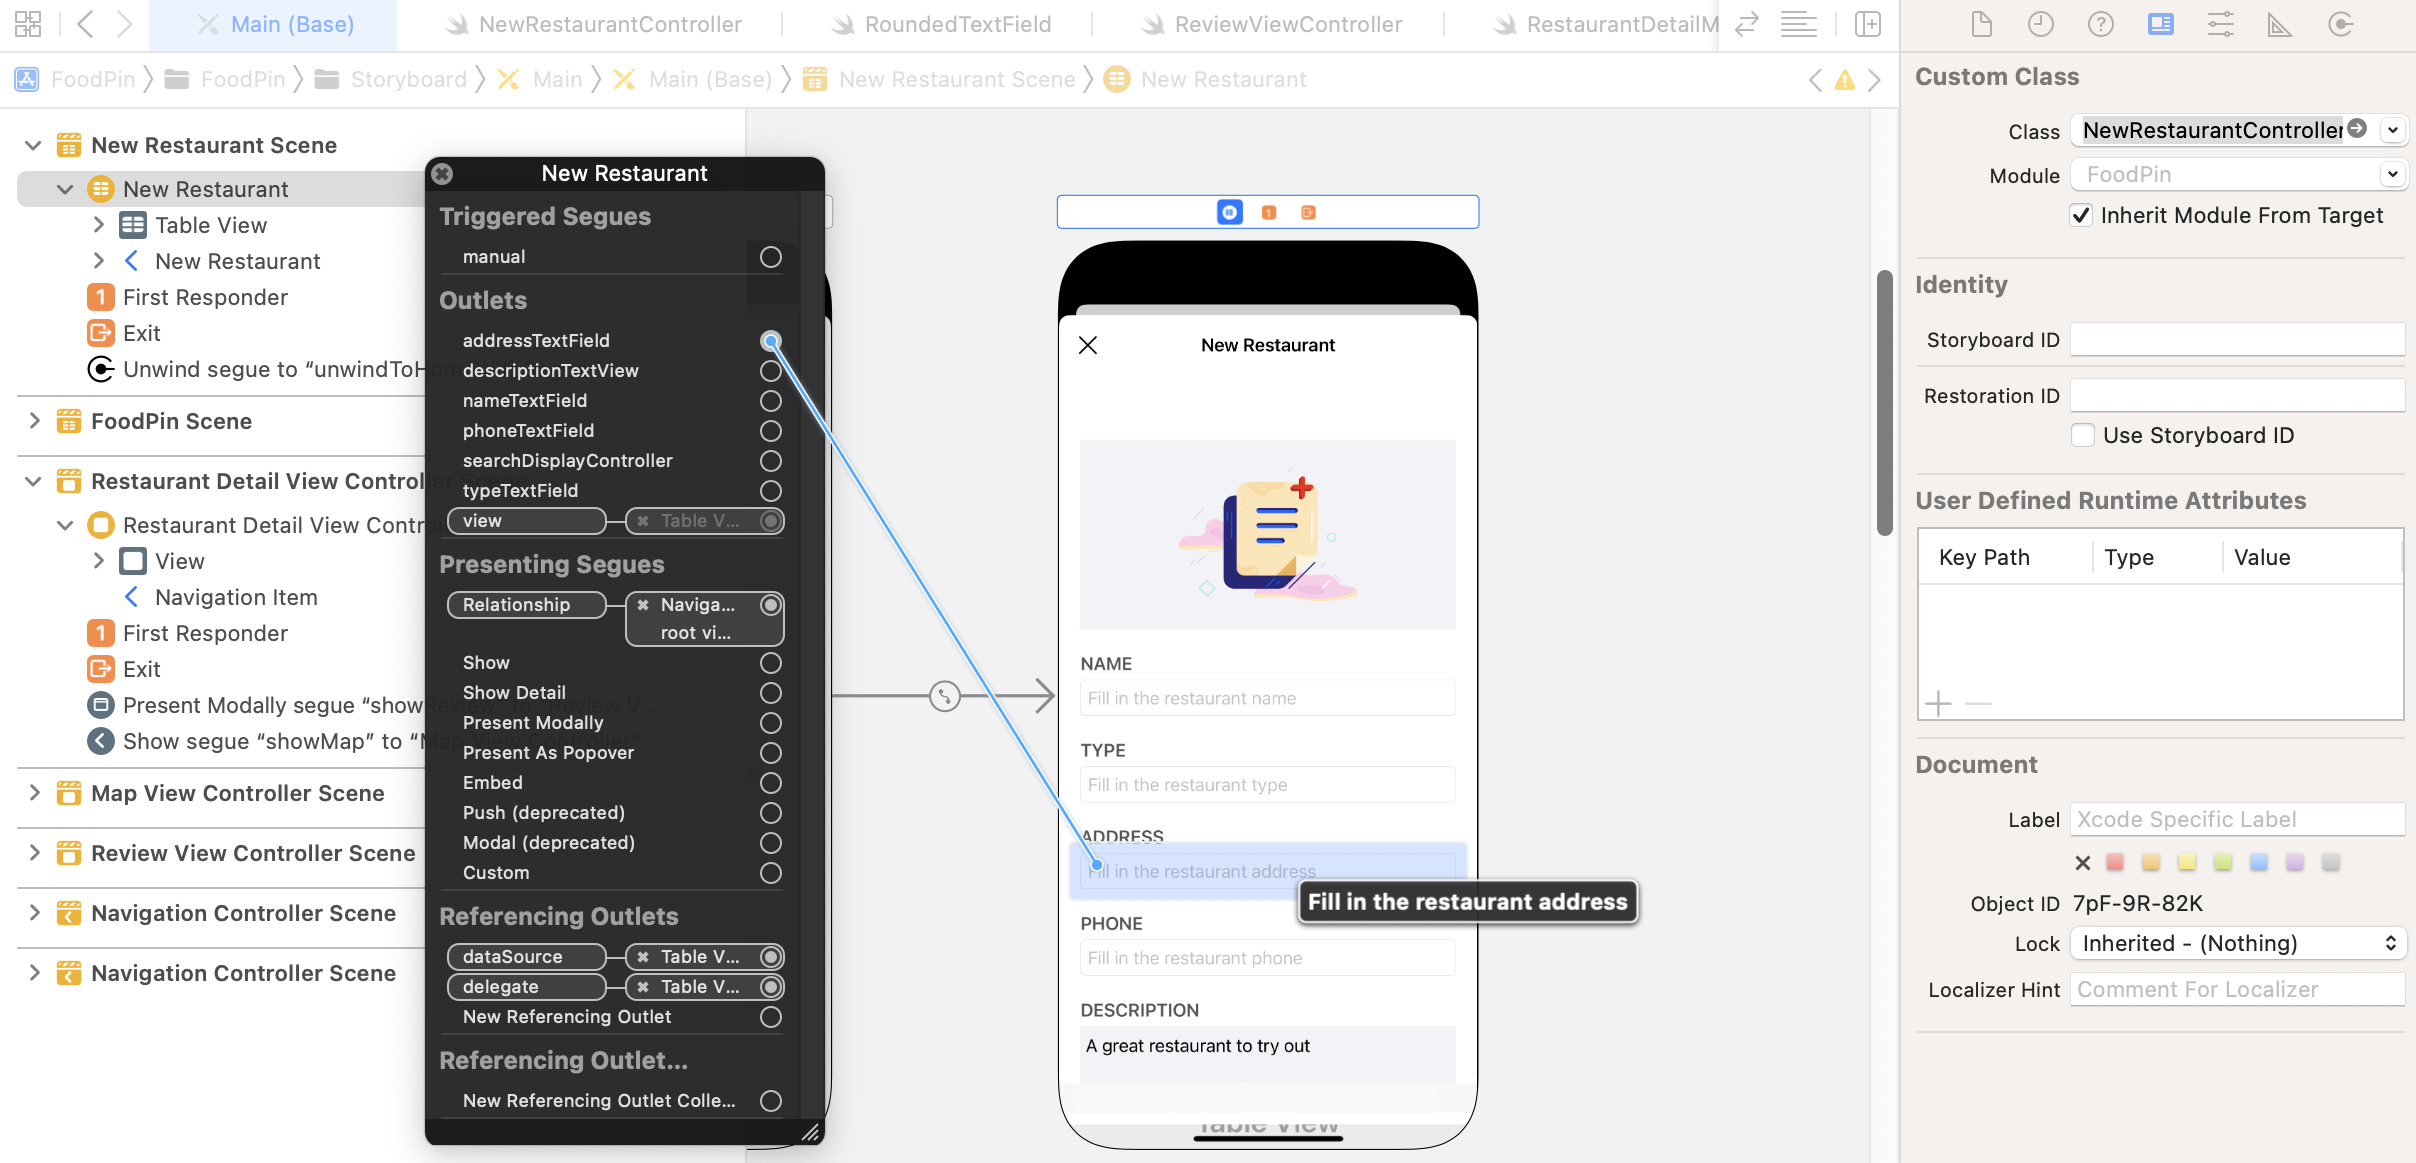
It's not ready to test the app yet. We have to go back to the Main storyboard to connect the outlets.
In Interface Builder, select the New Restaurant controller. Go to the Identity inspector and set its custom class to NewRestaurantController. Then right-click New Restaurant Controller to establish the connections with the outlet variables.
Now test the app again! If you tap the return key while editing a text field, the cursor will automatically move to the next field.
Customizing the Navigation Bar
Before we move onto the usage of UIImagePickerController, let's customize the navigation bar. This is completely optional, but I want to make the UI consistent.
Update the viewDidLoad() method of the NewRestaurantController class like this:
override func viewDidLoad() {
    super.viewDidLoad()

    // Customize the navigation bar appearance
    if let appearance = navigationController?.navigationBar.standardAppearance {

        if let customFont = UIFont(name: "Nunito-Bold", size: 40.0) {

            appearance.titleTextAttributes = [.foregroundColor: UIColor(named: "NavigationBarTitle")!]
            appearance.largeTitleTextAttributes = [.foregroundColor: UIColor(named: "NavigationBarTitle")!, .font: customFont]
        }

        navigationController?.navigationBar.standardAppearance = appearance
        navigationController?.navigationBar.compactAppearance = appearance
        navigationController?.navigationBar.scrollEdgeAppearance = appearance
    }
}
I have discussed the customization of navigation bars in chapter 15, so I believe you understand what the code means. If not, go back to read chapter 15.
Displaying the Photo Library Using UIImagePickerController
When the first table view cell (i.e. the one with the camera icon) is tapped, the app will let users choose the photo source: Camera or Photo library. The UIKit framework provides a convenient API called UIImagePickerController for loading photos from the photo library. What's great is that the same API can be used to bring up a camera interface for taking a picture.
The simulator doesn't support the camera feature. If you want to test an app that utilizes the built-in camera, you'll need a real iOS device.
Note: Starting from Xcode 7, you no longer need to enroll in the Apple Developer Program before you can test your app on a real iOS device. I will show you how to deploy an app to the device for testing in chapter 25.In order to allow users to choose the photo source, we will use
UIAlertController to bring up an action sheet and ask the user to pick an option. Insert the following method in the NewRestaurantController class to detect the touch:
override func tableView(_ tableView: UITableView, didSelectRowAt indexPath: IndexPath) {
    if indexPath.row == 0 {

        let photoSourceRequestController = UIAlertController(title: "", message: "Choose your photo source", preferredStyle: .actionSheet)

        let cameraAction = UIAlertAction(title: "Camera", style: .default, handler: { (action) in
            if UIImagePickerController.isSourceTypeAvailable(.camera) {
                let imagePicker = UIImagePickerController()
                imagePicker.allowsEditing = false
                imagePicker.sourceType = .camera

                self.present(imagePicker, animated: true, completion: nil)
            }
        })

        let photoLibraryAction = UIAlertAction(title: "Photo library", style: .default, handler: { (action) in
            if UIImagePickerController.isSourceTypeAvailable(.photoLibrary) {
                let imagePicker = UIImagePickerController()
                imagePicker.allowsEditing = false
                imagePicker.sourceType = .photoLibrary

                self.present(imagePicker, animated: true, completion: nil)
            }
        })

        let cancelAction = UIAlertAction(title: "Cancel", style: .cancel)

        photoSourceRequestController.addAction(cameraAction)
        photoSourceRequestController.addAction(photoLibraryAction)
        photoSourceRequestController.addAction(cancelAction)

        // For iPad
        if let popoverController = photoSourceRequestController.popoverPresentationController {
            if let cell = tableView.cellForRow(at: indexPath) {
                popoverController.sourceView = cell
                popoverController.sourceRect = cell.bounds
            }
        }

        present(photoSourceRequestController, animated: true, completion: nil)

    }
}
As we've discussed before, the tableView(_:didSelectRowAt:) method is called when a cell is selected. In this case, we only want to bring up an alert controller when the first cell is selected. Therefore, we have a conditional check at the very beginning.
We created two alert actions in the code above: one is for using the camera and the other is for loading the photo library. If you look into the code of both actions, the code snippets are basically the same, except the sourceType is different.
To load the photo library, all you need to do is create an instance of UIImagePickerController and set its sourceType to .photoLibary. If you want to bring the camera for taking photos, you just need to set the sourceType to .camera. You then call up the present(_:animated:completion:) method to bring up the photo library/camera.
That's it. Easy, right? Sometimes, the user may not allow you to access the photo library. As a good practice, you should always use the class method isSourceTypeAvailable to verify if a particular media source is available.
In iOS 10 or later, for privacy reasons, you have to explicitly describe the reason why your app accesses the user's photo library or camera. If you fail to do so, you may end up with an error. You will need to add two keys ( NSPhotoLibraryUsageDescription and NSCameraUsageDescription) in the Info.plist file and provide your reason.
You can treat the Info.plist file as a configuration file of your app project. It contains the meta information of your app such as bundle ID, supported orientation, and its content is structured using XML.
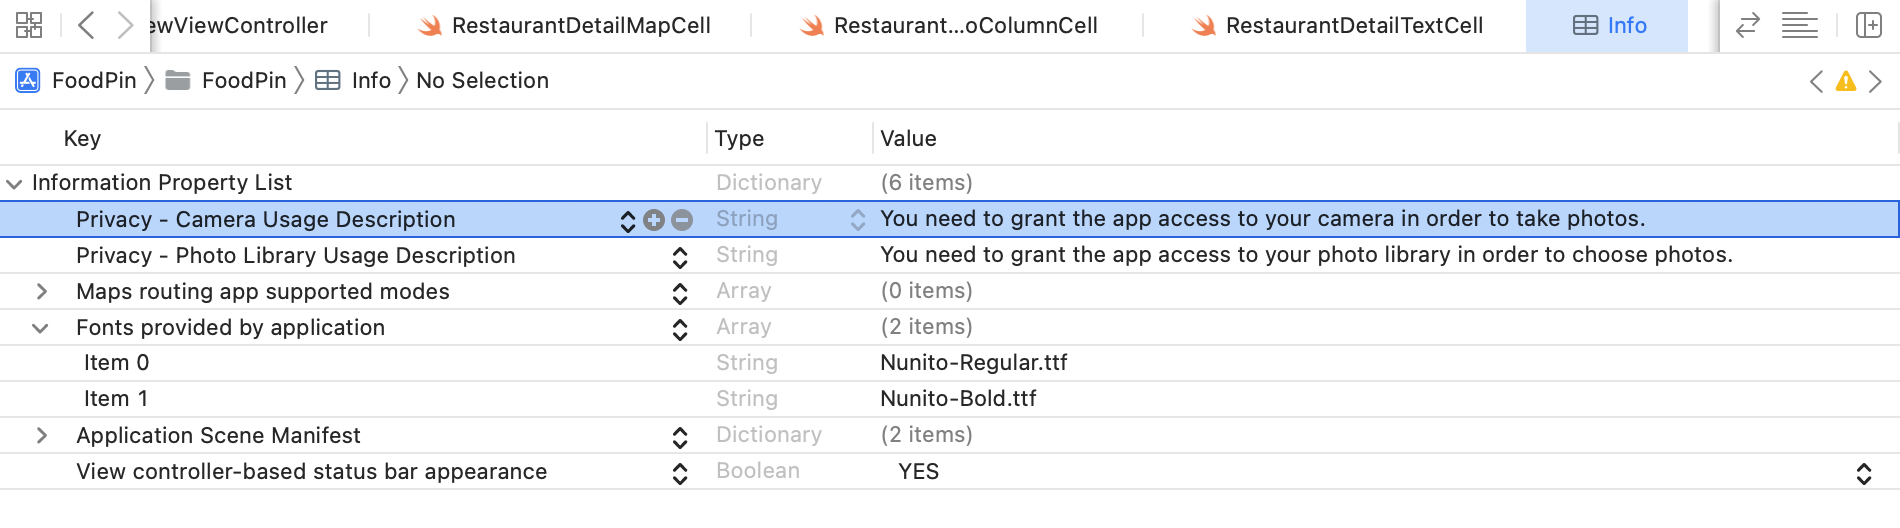
Now select Info.plist in the project navigator. Right-click Information Property List in the editor and select Add Row. Choose "Privacy - Photo Library Usage Description" for the key and set the value to:
You need to grant the app access to your photo library so you can pick your favorite restaurant photo.
Repeat the same procedure and add another row. Set the key to "Privacy - Camera Usage Description" and the value to:
You need to grant the app access to your camera in order to take photos.
Now compile and run the app. Tapping the photo icon should bring up the action sheet. Choose Photo library. Your app should be able to access the photo library. The simulator already comes with several sample photos. If you want to add your own photos, drag them from Finder to the simulator. This will automatically add the photos to the Photos app of the simulator.
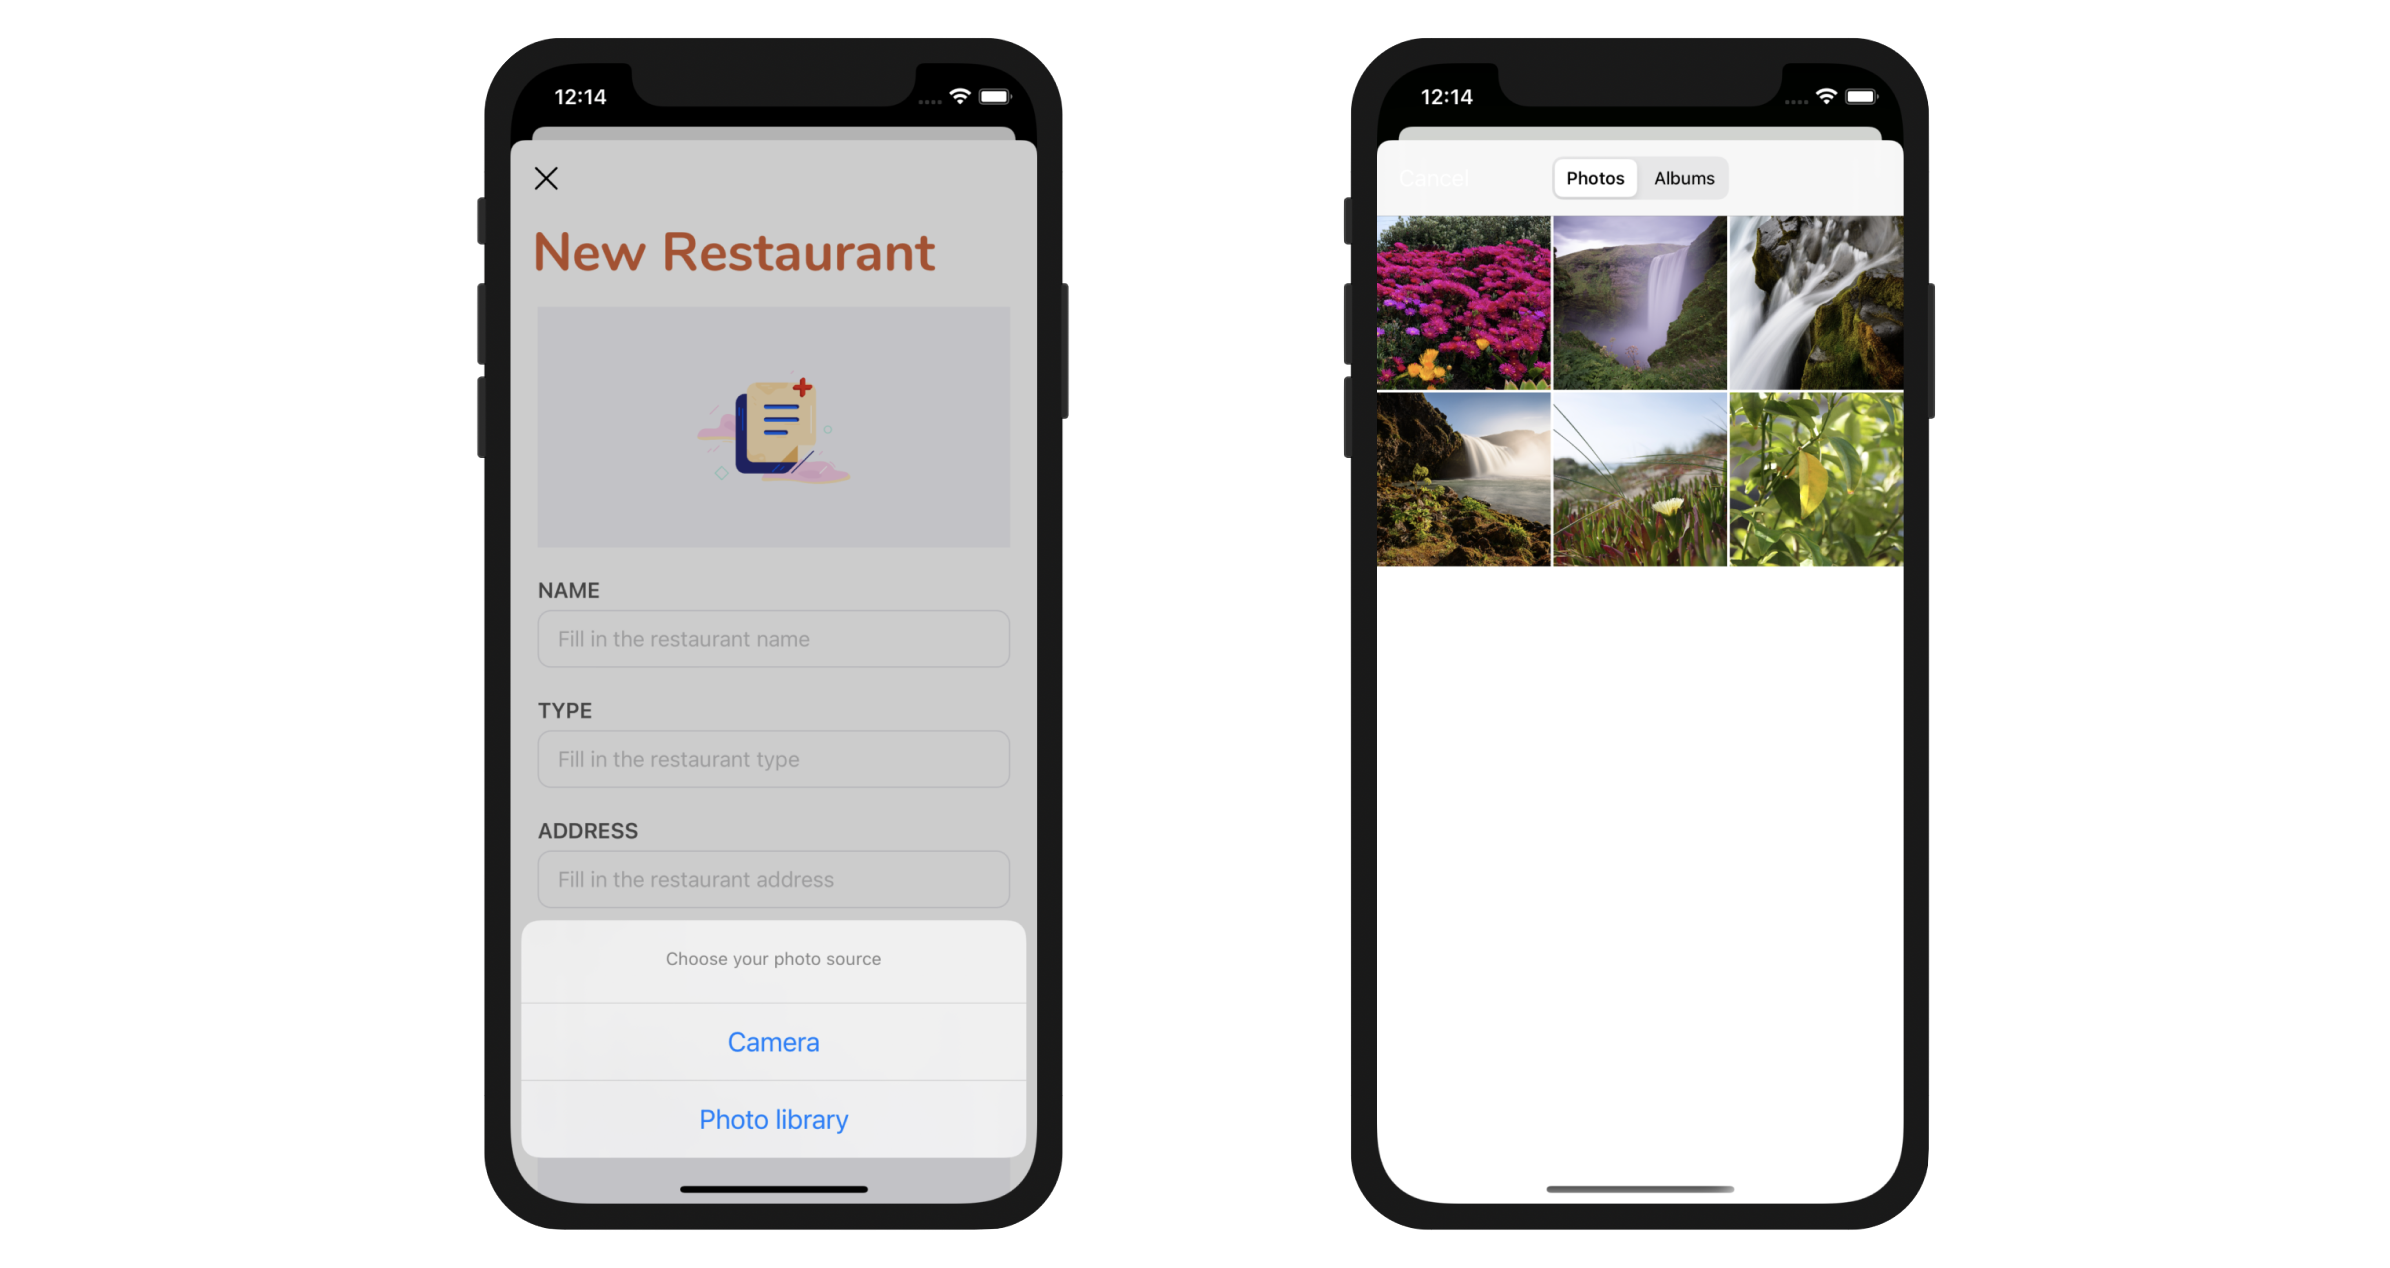
Adopting the UIImagePickerControllerDelegate Protocol
If you select a photo from the photo library, it wouldn't show up in the image view. How do you know which photo the user selects? To interact with the image picker interface, the NewRestaurantController class has to adopt two delegates: UIImagePickerControllerDelegate and UINavigationControllerDelegate.
When a user chooses a photo from the photo library, the imagePickerController(_:didFinishPickingMediaWithInfo:) method of the delegate is called.
func imagePickerController(_ picker: UIImagePickerController, didFinishPickingMediaWithInfo info: [UIImagePickerController.InfoKey : Any]) {

}
By implementing the method, we can get the selected photo from the method's parameter. Before implementing the method, let's declare an outlet variable for the image view in NewRestaurantController. Later we can set the image view with the chosen image.
@IBOutlet var photoImageView: UIImageView! {
    didSet {
        photoImageView.layer.cornerRadius = 10.0
        photoImageView.layer.masksToBounds = true
    }
}
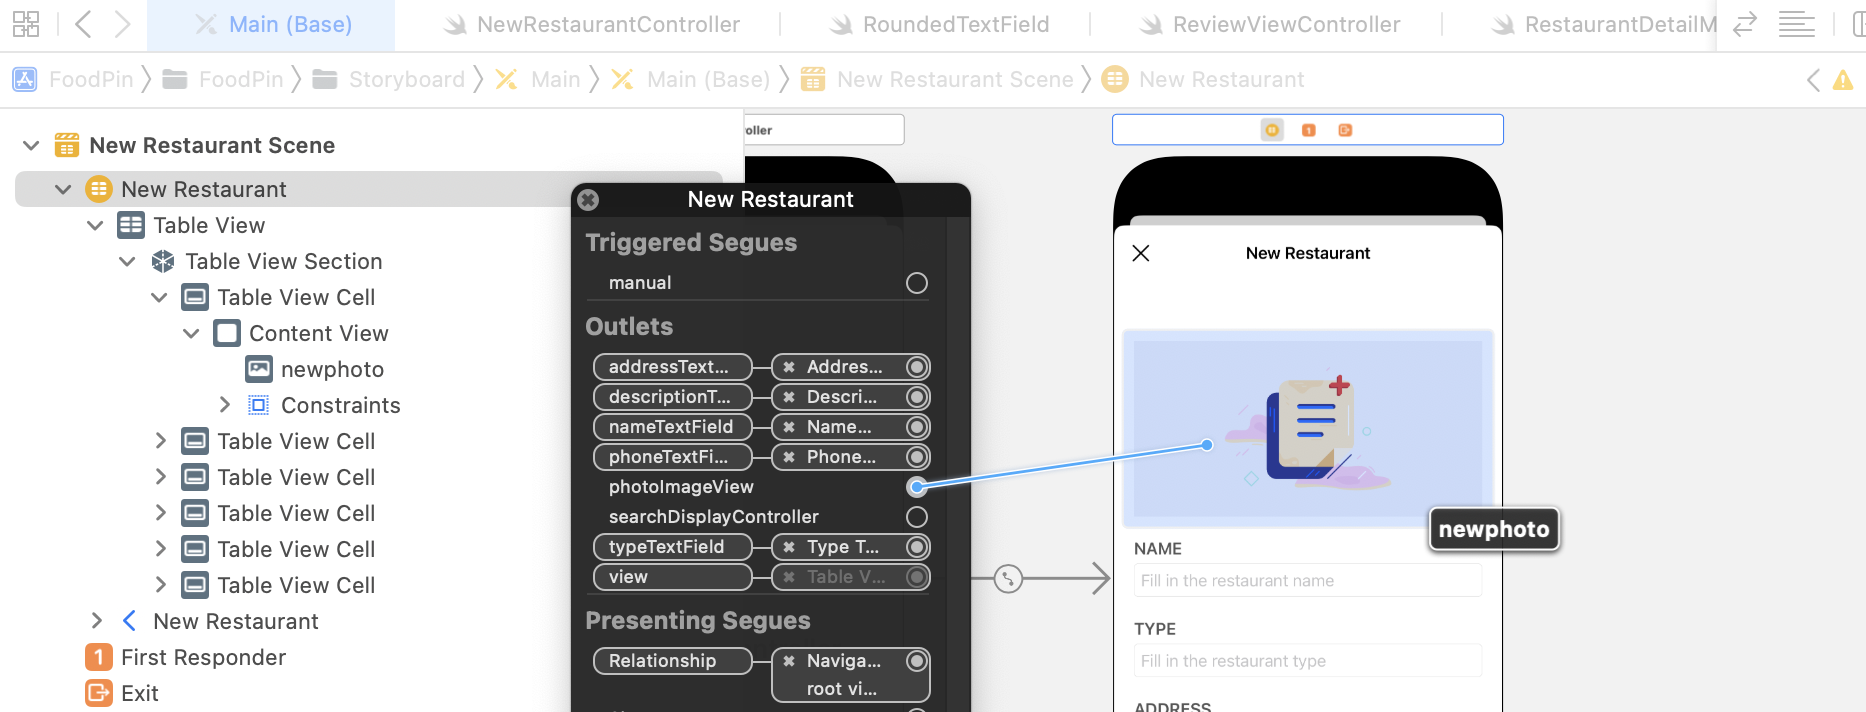
Go to Interface Builder and connect the image view of the cell with the photoImageView outlet variable.
Next, create an extension to adopt the required protocols and implement the delegate method like this:
extension NewRestaurantController: UIImagePickerControllerDelegate, UINavigationControllerDelegate {

    func imagePickerController(_ picker: UIImagePickerController, didFinishPickingMediaWithInfo info: [UIImagePickerController.InfoKey : Any]) {

        if let selectedImage = info[UIImagePickerController.InfoKey.originalImage] as? UIImage {
            photoImageView.image = selectedImage
            photoImageView.contentMode = .scaleAspectFill
            photoImageView.clipsToBounds = true
        }

        dismiss(animated: true, completion: nil)
    }

}
When the method is called, the system passes you an info dictionary object that contains the selected image. UIImagePickerControllerOriginalImage is the key of the image selected by the user.
The above code assigns the image view with the selected image. We also change the content mode so that the image is displayed in aspect fill mode. Lastly, we call the dismiss method to dismiss the image picker.
Don't forget to add this line of code in the tableView(_:didSelectRowAt:) method, immediately after the declaration of imagePicker for both alert actions:
imagePicker.delegate = self
Now you're ready to test the app. Try to select a photo from the album and it should be displayed right in the image view.
Defining Auto Layout Constraints Programmatically
The New Restaurant view works pretty good. Before we close this chapter, I want to show you how to define auto layout constraints using code. You should know how to work with layout constraints in Interface Builder. As you continue to develop your programming skill, you may prefer to define these layout constraints programmatically by using NSLayoutAnchor.
Let's use the photo view of the NewRestaurantController as an example. Earlier, we already define a set of spacing constraints to arrange the layout of the image view. All sides of the image view should be 0 points from the margin.
You should know how to define the spacing constraints in Interface Builder. The question is how can you define these layout constraints programmatically?
When writing code for auto layout, you can define constraints by using an API called NSLayoutAnchor. Take the leading constraint as an example. We specify that there is no space between the leading side of the image view and the leading margin of its superview. Here is the constraint you can find in the document outline:
Photo Image View.leading = leadingMargin
The same constraint can be written using NSLayoutAnchor like this:
let margins = photoImageView.superview!.layoutMarginsGuide
photoImageView.leadingAnchor.constraint(equalTo: margins.leadingAnchor).isActive = true
A layout constraint actually defines a relationship between two user interface objects. If you compare the constraint's properties defined in the Attribute inspector with those defined in the code, you should reveal their relationship. The superView of our photoImageView refers to the content view of the cell. The layoutMarginsGuide represents the view's layout margin. What the code does is to pin the leading anchor of the image view to the leading anchor of the content view's margin.
By default, the constraint is not activated after instantiation. You have to set its isActive property to true in order to activate it.
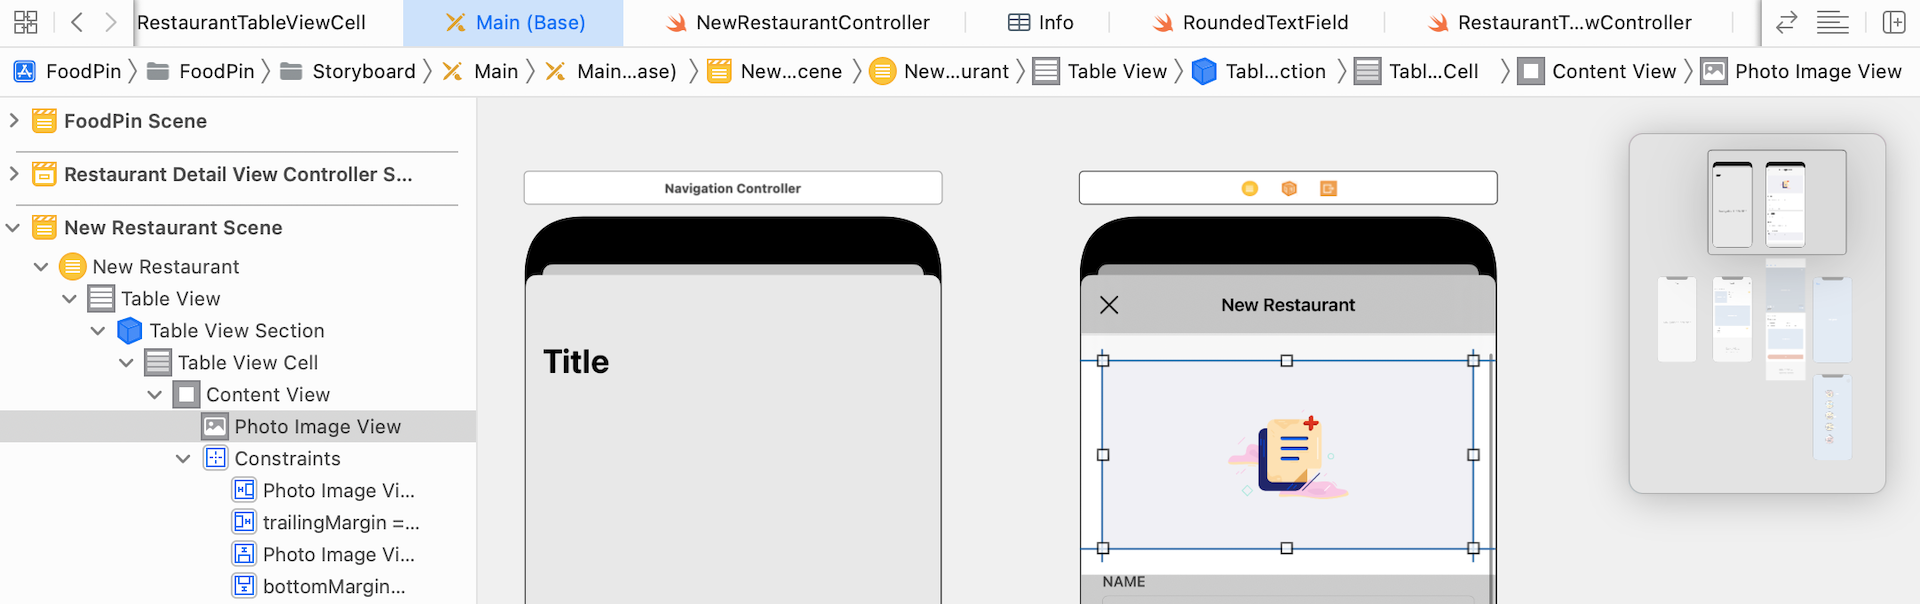
Before you write the code, please switch back to Main.storyboard and delete the constraints of the Photo Image View, as shown in figure 18-19.
Now head back to NewRestaurantController.swift and write the code for the layout constraints. We have to add four layout constraints for the top, bottom, leading (i.e. left), and trailing (i.e. right) sides of the image view. Insert these lines of code in the viewDidLoad() method:
// Get the superview's layout
let margins = photoImageView.superview!.layoutMarginsGuide

// Disable auto resizing mask to use auto layout programmatically
photoImageView.translatesAutoresizingMaskIntoConstraints = false

// Pin the leading edge of the image view to the margin's leading edge
photoImageView.leadingAnchor.constraint(equalTo: margins.leadingAnchor).isActive = true

// Pin the trailing edge of the image view to the margin's trailing edge
photoImageView.trailingAnchor.constraint(equalTo: margins.trailingAnchor).isActive = true

// Pin the top edge of the image view to the margin's top edge
photoImageView.topAnchor.constraint(equalTo: margins.topAnchor).isActive = true

// Pin the bottom edge of the image view to the margin's bottom edge
photoImageView.bottomAnchor.constraint(equalTo: margins.bottomAnchor).isActive = true
Here we define and activate four layout constraints for the image view so that the image is bound within the margins of the cell. To create the layout constraints programmatically, you have to set the translatesAutoresizingMaskIntoConstraints property of the view to false. Now let's run the app again. The layout of the New Restaurant form is the same as before but the constraints of the image view is set programmatically.
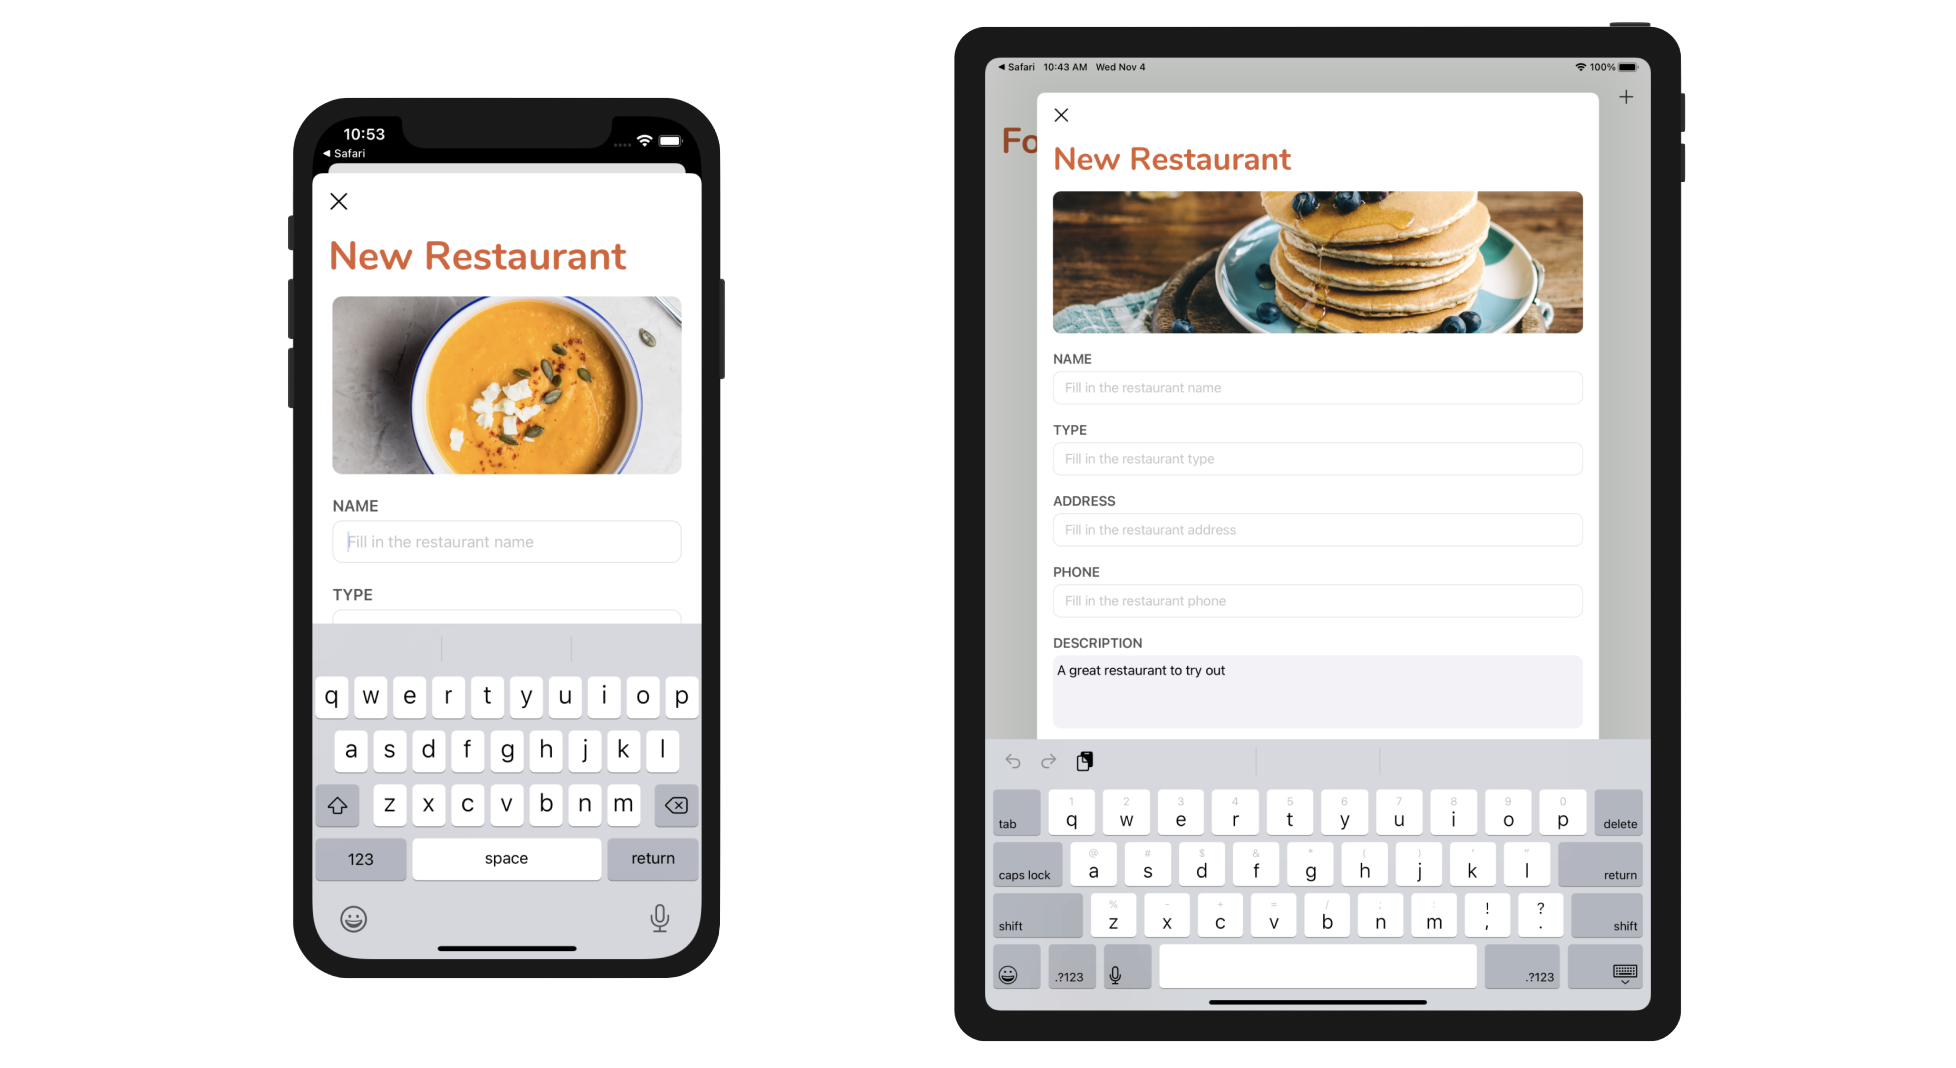
Hiding Keyboard
Right now, you can't dismiss the keyboard on iPhone. We want to let users dismiss the keyboard when tapping any blank area of the form. To do that, you can insert the following code in the viewDidLoad() method:
let tap = UITapGestureRecognizer(target: view, action: #selector(UIView.endEditing))
tap.cancelsTouchesInView = false
view.addGestureRecognizer(tap)
In the code, we create a tap gesture recognizer to the view. Whenever the user taps the form view (excluding those text fields), we call the endEditing method to dismiss the software keyboard.
Exercise #1
Your next task is to add a Save button in the top-right corner of the navigation bar. When the user taps the button, you get the values of the text fields, validate them and print them out to the console.
This exercise is more challenging than the previous one, so I will give you some hints. The first hint is that you will need to refer to the documentation of UITextField (https://developer.apple.com/documentation/uikit/uitextfield). By reading the API document, you will find out which attribute is used for storing the text in the text field.
Secondly, you have to declare a saveButtonTapped action method in the NewRestaurant class. When the Save button is tapped, this action method will be called. You will have to connect the button to the action method in Interface Builder. In the body of the method, you will write code to perform a couple of things:
- Form validation - check if any of the input text is blank. Otherwise, use
UIAlertControllerto present an alert prompt. - Console output - print out the form values to console. Here is a sample output:
Name: Izakaya Sozai
Type: Japanese
Location: 1500 Irving St San Francisco, CA 94122
Phone: (415) 742-5122
Description: A great restaurant to try out
I have included the solution for you. You can find the download link at the end of the chapter. However, I highly recommend you to spend some time on the exercise. It's gonna be fun to figure out your own implementation.
Summary
In this chapter, we demonstrate how to create a static table view using Interface Builder. While you can use a table view to display dynamic data from data source, a static table view provides a great way to display a finite quantity of data that is already known beforehand. You also learned how to access the built-in photo library. UIImagePickerController makes it so simple for developers to access the built-in camera and photo library.
Furthermore, we walked through NSLayoutAnchor together. You should now have some ideas about how to create layout constraints programmatically. You commonly use Interface Builder to define the layout constraints. That's good enough for most layouts. However, when you need to build a dynamic UI that changes within the application, you will need to modify the layout constraints at runtime. I only give you a brief introduction to NSLayoutAnchor. You can refer to the official documentation (https://developer.apple.com/documentation/uikit/nslayoutanchor) for details.
For reference, you can download the complete Xcode project from http://www.appcoda.com/resources/swift57/FoodPinStaticTableView.zip.
Next up, we will talk about Core Data and see how to save the restaurant data in a database.